 User Guide — EPCS Enrollment
With the EPCS enrollment feature, DEA-registered prescribers can send controlled substance prescription orders electronically using the athenahealth GSA-approved credential service provider (athenaCSP).
Your practice must have the EPCS Enrollment feature enabled to access EPCS pages. The following user permissions are required to perform EPCS-related functions:
- Superuser — You must have superuser permissions to designate at least one user (who can be that same superuser) as a "trusted individual" (TI) by assigning the User Admin: Identity Verification role. The superuser must also designate two staff members as EPCS approvers and assign them the Clinicals: EPCS Enrollment Approval role.
- Trusted individual (TI) — You must have the User Admin: Identity Verification role to initiate the identity verification process for any prescriber who wants to use EPCS.
- Approvers — You must have the Clinicals: EPCS Enrollment Approval role to approve prescribers for EPCS.
- Prescribers — You must have a DEA registration number, complete EPCS enrollment, and be approved for EPCS.
If a prescriber is new to your practice, make sure that their medical credentials are up to date before you begin the EPCS enrollment process.
Prescribers must update their medical credentials in a timely manner when they change their business address or name.
- State license — Follow your state's process to update the practice address.
- DEA license — The DEA states that an address change requires an approved state license for the new address first. Update your name or address using the Make Changes to My DEA Registration form, which you can find on the DEA Forms & Applications page.
- NPPES profile (NPI number) — Prescribers can update their name or address by logging in to the NPPES website with their username and password. If you require assistance, go to the NPPES FAQs and review the "Making Changes Online" section. The NPPES site states that for a Practice Location Address: “You must provide a Physical address, this cannot be a PO Box or CMRA (Commercial Mail Receiving Agency). This is the location where the actual services are rendered. Users can enter multiple addresses, but only one primary practice location is required to be specified.” This information is on the Address Page of the NPPES site.
- You are required to update your name or address with CMS within 30 days of a change being made.
Important: If you need help to update your information, contact the credentialing entity directly. athenahealth cannot provide support for these updates.
The EPCS enrollment setup procedure has four steps:
- Your practice superuser designates at least one user (who can also be that same superuser) as a "trusted individual" (TI) by assigning the User Admin: Identity Verification role. Trusted individuals initiate the identity verification process for prescribers who want to use EPCS.
- Your practice superuser designates at least two other users as EPCS approvers by assigning the Clinicals: EPCS Enrollment Approval role. EPCS approvers can grant and revoke EPCS permission for prescribers.
- A DEA-registered prescriber completes the EPCS enrollment, which includes verifying the prescriber's identity and activating a two-factor authentication credential.
- The enrolled prescriber is approved for EPCS access by two EPCS approvers.
Note: You can find a checklist overview of the EPCS setup process in the Success Community article Getting Started With EPCS: Checklist.
The EPCS prescriber identity verification process includes actions taken by the following roles:
- Trusted individual
- Prescriber approver
- Prescriber
The DEA sets strict requirements for the enrollment process that prescribers must complete to electronically prescribe controlled substances. One of these requirements is that prescribers must verify their identity and activate a two-factor authentication credential.
Trusted individual initiates identity verification
For more information, see "Trusted individual (TI) responsibilities."
Important: Users cannot verify or edit the information associated with their own identity. Only another trusted individual can verify or edit this information.
- Display the Identity Verification page: On the Main Menu, click Settings
 >User. In the left menu,under Practice Links — Users, click Identity Verification Admin.
The Pending tab displays a list of prescribers whose identity you must verify. - To complete EPCS identity verification for a prescriber, confirm that you verified a prescriber's current government or state issued ID and check the Verified box.
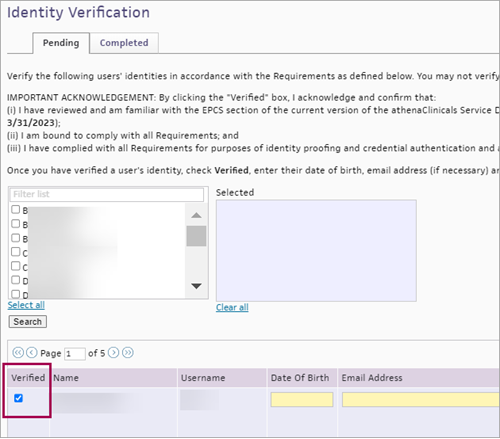
- Enter the following information for each prescriber:
- Date Of Birth
- Email Address (used to receive a confirmation code)
- Home Address (mailing address)
- Click Save.
athenaOne moves the verified prescribers to the Completed tab, where you can make edits as necessary.
Prescriber completes the verification process
- Display the EPCS Setup page: On the Main Menu, click Settings
 > Clinicals. In the left menu,under Practice Links — Order Configuration, click EPCS Setup Admin.
 - Accept the EPCS Terms & Conditions.
- Click User Profiles: Identity Verification to start the identity verification process.
The Update User Profile page appears. - Click the Credentials tab.
- Click Add new if you do not already have a credential.
- Download the Symantec VIP Access app on your smartphone. For information about which operating systems are supported, enter this URL into your smartphone browser: https://m.vip.symantec.com.
Note: You must download the app on a different device than the one you use to prescribe orders. You can have multiple tokens — one on your laptop and one on your phone — each with different credential IDs. However, EPCS regulations state that you cannot use a token installed on the same system on which you are prescribing orders. If you need to re-download the Symantec VIP Access app or change your credential ID, use the Update User Profile page. - Open the app to view your credential ID and security code.
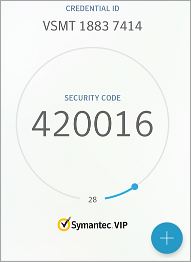
- On the Credentials tab of the Update User Profile page, enter the information from the app in the Credential ID and Security code fields.
Note: Make sure to enter the credential ID without spaces.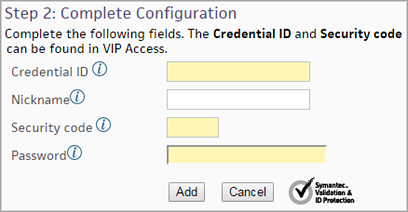
- Enter your athenaOne Password.
- Click Add.
- Click the Identity Verification tab.
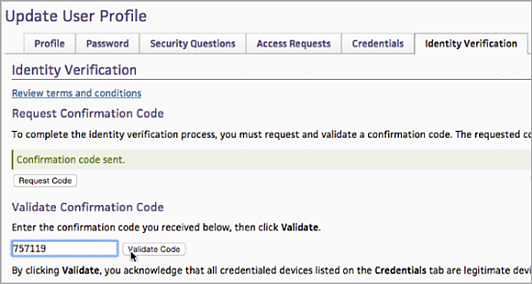
- Under Request Confirmation Code, click Request Code.
athenaOne sends you an email that includes a 6-digit code.
Note: If you do not receive the email with this 6-digit code after two or three attempts, see "If the EPCS confirmation code is not sent in an email." - Enter the code in the Validate Confirmation Code box.
- Click Validate Code to complete the identity verification process.
Note: If your practice is configured for SSO, athenaOne prompts you to create a password during the identity verification process. This password is relevant to identity verification only; continue using your SSO password to log in to athenaOne and sign prescriptions. If you forget the password used with EPCS, you can reset this password on the Update User Profile page.
If the EPCS confirmation code is not sent in an email
The email with the prescriber's EPCS confirmation code is sent from "noreply@login.athenahealth.com" to the email address configured on the Identity Verification page. If the prescriber does not receive this email, the most likely problem is the spam filters at your organization. To work around this problem, edit the Email Address field for the prescriber on the Identity Verification page to use a gmail or personal email address. Because this email contains only the 6‑digit confirmation code, no sensitive data is sent to the email address.
Note: If your organization does not allow the use of a personal email address, contact your IT organization to allow emails from "noreply@login.athenahealth.com."
New York state only — Submit the practitioner EPCS registration form
If you practice in New York state, follow these instructions.
- Display the New York state Department of Health home page for electronic prescribing:
https://www.health.ny.gov/professionals/narcotic/electronic_prescribing/ - Click the appropriate link to complete your registration (for example, Practitioner Registration for EPCS). The athenahealth-specific information to include in your registration is as follows:
- Name of Certified E-prescribing Software Application — athenaClinicals.
- Software Version Certified — Enter the latest version of athenaClinicals.
Note: v15.1 was the first certified version. - Name of Software Application Provider (Company Name) — athenahealth, Inc.
- Email your completed form to narcotic@health.state.ny.gov with "EPCS Practitioner Registration" in the subject line.
The EPCS Enrollment Dashboard helps Practice Administrators and Providers with insights into the status of providers' EPCS enrollment requests.
To display the EPCS Enrollment Dashboard page:
-
On the Main Menu, click the Settings icon
 .
. -
Under ADMIN, click Clinicals.
-
In the Task Bar, under PRACTICE LINKS — Order Configuration, click EPCS Enrollment Dashboard.

The progress of each on-boarding step in the process is identified with Done, Not Done or Denied.
You can sort the data under any column by clicking the collapsible icon in the respective header.
You can search for a specific provider using their provider name or username in the search field.
You can also filter the providers whose approvals are pending with the approvers.
The Days Since Last Action column shows the number of days since the last completed step.
The Total Days Elapsed column shows the number of days elapsed since the start of the process. To see this column, you can scroll horizontally along the dashboard.
Note: For more help on the EPCS Enrollment process, click Help on EPCS Process on the top left corner.
-
After the enrollment request reaches the final status of Done, it will remain on the dashboard for a period of 30 calendar days and then be dropped off the dashboard.
-
If the final status of the enrollment request is Denied, it stays on the dashboard.
-
Blocked and Revoked providers are not displayed in the enrollment dashboard.
-
Deleted providers are not shown in the dashboard only when their identity proofing is also revoked.
EPCS Enrollment Dashboard is available to Providers, Physicians, and Practice Administrators to track the progress of the provider's on-boarding process.
The EPCS prescriber identity verification process includes actions taken by the following roles:
- Trusted individual
- Prescriber approver
- Prescriber
The DEA sets strict requirements for the enrollment process that prescribers must complete to electronically prescribe controlled substances. One of these requirements is that prescribers must verify their identity and activate a two-factor authentication credential.
Trusted individual initiates identity verification
For more information, see "Trusted individual (TI) responsibilities."
Important: Users cannot verify or edit the information associated with their own identity. Only another trusted individual can verify or edit this information.
- Display the Identity Verification page: On the Main Menu, click Settings
 >User. In the left menu,under Practice Links — Users, click Identity Verification Admin.
The Pending tab displays a list of prescribers whose identity you must verify. - To complete EPCS identity verification for a prescriber, confirm that you verified a prescriber's current government or state issued ID and check the Verified box.

- Enter the following information for each prescriber:
- Date Of Birth
- Email Address (used to receive a confirmation code)
- Home Address (mailing address)
- Click Save.
athenaOne moves the verified prescribers to the Completed tab, where you can make edits as necessary.
Prescriber completes the verification process
- Display the EPCS Setup page: On the Main Menu, click Settings
 > Clinicals. In the left menu,under Practice Links — Order Configuration, click EPCS Setup Admin.
 - Accept the EPCS Terms & Conditions.
- Click User Profiles: Identity Verification to start the identity verification process.
The Update User Profile page appears. - Click the Credentials tab.
- Click Add new if you do not already have a credential.
- Download the Symantec VIP Access app on your smartphone. For information about which operating systems are supported, enter this URL into your smartphone browser: https://m.vip.symantec.com.
Note: You must download the app on a different device than the one you use to prescribe orders. You can have multiple tokens — one on your laptop and one on your phone — each with different credential IDs. However, EPCS regulations state that you cannot use a token installed on the same system on which you are prescribing orders. If you need to re-download the Symantec VIP Access app or change your credential ID, use the Update User Profile page. - Open the app to view your credential ID and security code.

- On the Credentials tab of the Update User Profile page, enter the information from the app in the Credential ID and Security code fields.
Note: Make sure to enter the credential ID without spaces.
- Enter your athenaOne Password.
- Click Add.
- Click the Identity Verification tab.

- Under Request Confirmation Code, click Request Code.
athenaOne sends you an email that includes a 6-digit code.
Note: If you do not receive the email with this 6-digit code after two or three attempts, see "If the EPCS confirmation code is not sent in an email." - Enter the code in the Validate Confirmation Code box.
- Click Validate Code to complete the identity verification process.
Note: If your practice is configured for SSO, athenaOne prompts you to create a password during the identity verification process. This password is relevant to identity verification only; continue using your SSO password to log in to athenaOne and sign prescriptions. If you forget the password used with EPCS, you can reset this password on the Update User Profile page.
If the EPCS confirmation code is not sent in an email
The email with the prescriber's EPCS confirmation code is sent from "noreply@login.athenahealth.com" to the email address configured on the Identity Verification page. If the prescriber does not receive this email, the most likely problem is the spam filters at your organization. To work around this problem, edit the Email Address field for the prescriber on the Identity Verification page to use a gmail or personal email address. Because this email contains only the 6‑digit confirmation code, no sensitive data is sent to the email address.
Note: If your organization does not allow the use of a personal email address, contact your IT organization to allow emails from "noreply@login.athenahealth.com."
New York state only — Submit the practitioner EPCS registration form
If you practice in New York state, follow these instructions.
- Display the New York state Department of Health home page for electronic prescribing:
https://www.health.ny.gov/professionals/narcotic/electronic_prescribing/ - Click the appropriate link to complete your registration (for example, Practitioner Registration for EPCS). The athenahealth-specific information to include in your registration is as follows:
- Name of Certified E-prescribing Software Application — athenaClinicals.
- Software Version Certified — Enter the latest version of athenaClinicals.
Note: v15.1 was the first certified version. - Name of Software Application Provider (Company Name) — athenahealth, Inc.
- Email your completed form to narcotic@health.state.ny.gov with "EPCS Practitioner Registration" in the subject line.
A superuser at your practice must designate at least two staff members as EPCS approvers. EPCS approvers grant and revoke permissions for prescribers to electronically prescribe controlled substances. The practice superuser must assign the role Clinicals: EPCS Enrollment Approval to the EPCS approvers.
For each approval (or revocation) of the EPCS permission, two approvers are required.
- Approver 1 can be a non-prescriber or a prescriber (the prescriber need not have completed EPCS identity verification).
- Approver 2 must be a prescriber who has completed EPCS identity verification.
athenahealth recommends that you designate more than two users as backup approvers. If you are the only user at your practice, please contact the CSC for assistance.
EPCS approval has two steps:
Step 1 — The first EPCS approver can be a non-prescriber (such as a practice manager) or a prescriber (as Approver 1, the prescriber need not have completed EPCS identity verification).
Approver 1 marks a prescriber as needing the EPCS permission granted or revoked. When your practice superuser assigns the Clinicals: EPCS Enrollment Approval role to a non-prescriber, athenaOne automatically gives that user access to the Approver 1 view of the EPCS Enrollment Approval page.
Step 2 — The second EPCS approver must be a prescriber who has already completed EPCS identity verification.
Approver 2 authorizes the granting or revocation of the EPCS permission. This authorization requires a security code, which is generated via the approver's two-factor authentication credential. When your practice superuser assigns the Clinicals: EPCS Enrollment Approval role to a prescriber who has already completed EPCS identity verification, athenaOne automatically gives that prescriber access to the Approver 2 view of the EPCS Enrollment Approval page.
Note: If your practice has only a few prescribers, two prescribers who have completed EPCS identity verification can complete EPCS enrollment approval for other prescribers. See To grant or revoke the EPCS permission for a prescriber (Approver 1 is an identity-verified prescriber).
This procedure describes how to grant the EPCS permission to a prescriber when Approver 1 is a non-prescriber (such as a practice manager or other administrator) or a prescriber whose identity has not yet been verified for EPCS. (Approver 2 must always be an EPCS identity-verified prescriber.) If Approver 1 is an EPCS identity-verified prescriber, see To grant or revoke the EPCS permission for a prescriber (Approver 1 is an identity-verified prescriber).
Steps taken by EPCS Approver 1 (approver may be any user in the practice with the proper permissions)
- Display the EPCS Enrollment Approval page: On the Main Menu, click Settings
 > Clinicals. In the left menu,under Practice Links — Order Configuration, click EPCS Enrollment Approval.
The Requests tab appears, displaying prescribers who do not have the EPCS permission.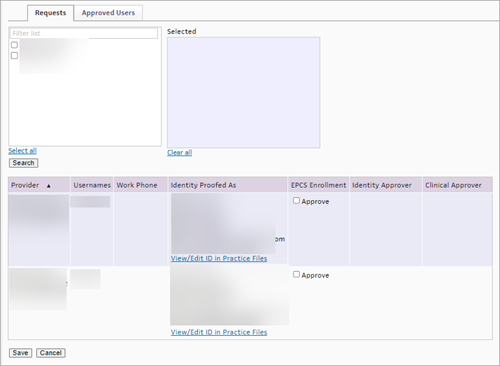
Note: The Approver 2 view is selected by default for an EPCS identity-verified prescriber. If you need to act as Approver 1, see To grant or revoke the EPCS permission for a prescriber (Approver 1 is an identity-verified prescriber). - Verify that the following information is current and in good standing for the prescriber:
- DEA registration to practice
- State authorizations to practice
- State authorizations to dispense controlled substances, if applicable
- If the prescriber passes the verification, check the Approve box.
- Click Save.
athenaOne moves the prescriber to the second EPCS approver's view of the EPCS Enrollment Approval page for authorization.
Steps taken by EPCS Approver 2 (EPCS identity-verified prescriber)
- Display the EPCS Enrollment Approval page: On the Main Menu, click Settings
 > Clinicals. In the left menu,under Practice Links — Order Configuration, click EPCS Enrollment Approval.
The Approval Requests section appears, displaying prescribers who are requesting approval for the EPCS permission.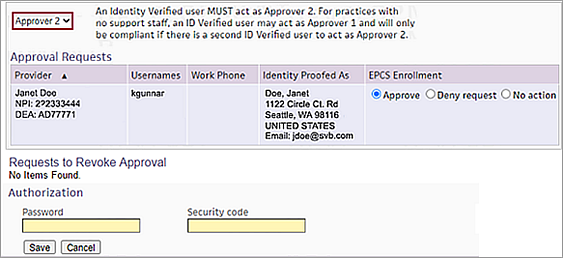
- Select Approve.
- Under Authorization, enter your athenaOne Password and your Security code, generated from your two-factor authentication credential.
- Click Save.
athenaOne grants the EPCS permission to the prescriber.
The DEA requires a prescriber's EPCS capabilities to be revoked when any of the following events occur, on the date that the occurrence is discovered:
- Two-factor authentication credential has been lost, stolen, or compromised.
- Individual practitioner's DEA registration expires, unless the registration has been renewed.
- Individual practitioner's DEA registration is terminated, revoked, or suspended.
- Individual practitioner is no longer authorized to use the electronic prescription application (for example, when the individual practitioner leaves the practice).
This procedure describes how to revoke the EPCS permission from a prescriber when Approver 1 is a non-prescriber (such as a practice manager or other administrator) or a prescriber whose identity has not yet been verified for EPCS. (Approver 2 must always be an identity-verified prescriber.) If Approver 1 is an EPCS identity-verified prescriber, see To grant or revoke the EPCS permission for a prescriber (Approver 1 is an identity-verified prescriber).
Steps taken by EPCS Approver 1 (non-prescriber or prescriber who is not EPCS identity verified
- Display the EPCS Enrollment Approval page: On the Main Menu, click Settings
 > Clinicals. In the left menu,under Practice Links — Order Configuration, click EPCS Enrollment Approval.
 - Click the Approved Users tab, which lists the prescribers who have the EPCS permission.
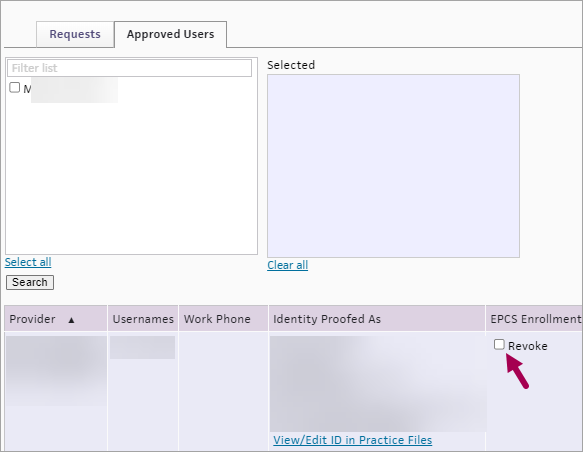
- EPCS Enrollment — Check the Revoke box.
- Click Save.
athenaOne moves the prescriber to the second EPCS approver's view of the EPCS Enrollment Approval page to revoke the permission.
Steps taken by EPCS Approver 2 (EPCS identity-verified prescriber)
- Display the EPCS Enrollment Approval page: On the Main Menu, click Settings
 > Clinicals. In the left menu,under Practice Links — Order Configuration, click EPCS Enrollment Approval.
The Requests to Revoke Approval section appears, displaying prescribers who need the permission revoked.
Note: The prescriber acting as EPCS Approver 2 cannot be the same prescriber whose EPCS permissions are being revoked. athenaOne does not allow prescribers to revoke their own permissions.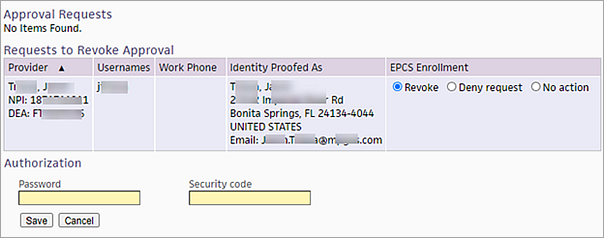
- Under EPCS Enrollment, select the Revoke option.
- Under Authorization, enter your athenaOne Password and your Security code, generated from your two-factor authentication credential.
- Click Save.
athenaOne revokes the EPCS permission from the prescriber.
If you forget or misplace your phone and need to access the VIP Access app, you can:
- Assign the order to a colleague so that the colleague can approve the prescription using their credentials.
- Print and sign the prescription, which you can either hand-deliver to the patient or fax to the pharmacy.
To re-download the Symantec app and add a token, you must do the following:
- Set up two-factor authentication on the Update User Profile page.
- Ask a user administrator or superuser in your practice to start the identity verification process for you again to reestablish your access.
Tip: If you have more than one security token active and only one token is lost, you can use a security code from the other token to prescribe.
Two-factor authentication is the use of two separate factors — something you know and something you have — to authenticate your identity to the application. In athenaClinicals, we use your athenaOne password as something you know and your VIP Access credential, stored on your mobile device, as something you have.
The DEA requires the use of two-factor authentication to reduce the risk of misuse of a prescriber's credentials from both internal and external threats. Even if a prescriber's first factor, the athenaOne password, is compromised, his or her credentials cannot be abused for fraudulent prescriptions in the prescriber's name because the prescriber is in control of the physical token.
Note: This procedure requires the EPCS Enrollment feature.
- Display the Update User Profile page: On the Main Menu, click Settings
 > User Profile.
 - Click the Credentials tab.
- Click Add new.
- Click Download and install VIP Access from Symantec.
- Follow the Symantec instructions to install a token to your desktop or mobile device.
- Email address — Enter your email address.
- Credential ID — Enter the credential ID on your token.
Note: Make sure to enter the credential ID without spaces.
- Nickname — Enter a nickname for your token (optional).
This nickname is useful if you have multiple tokens. - Security code — Enter the security code on your token.
- Click Continue.
Some states mandate that controlled substance prescriptions be sent electronically, so please review your state laws. If you want to bypass EPCS, athenaClinicals supports paper workflows where you can print and sign the prescription. You can then hand-deliver the prescription to the patient or fax it to the pharmacy.
Note: athenaOne identifies all controlled substances at the state-specific and federal levels (you can find the full list of Federal Controlled Substances here). Prescriptions for medications controlled at the state level but not at the federal level can also be sent electronically via Surescripts using the EPCS worklflow.
- Create an order for a controlled substance.
- Send to — Click the plus icon
 and select a pharmacy.
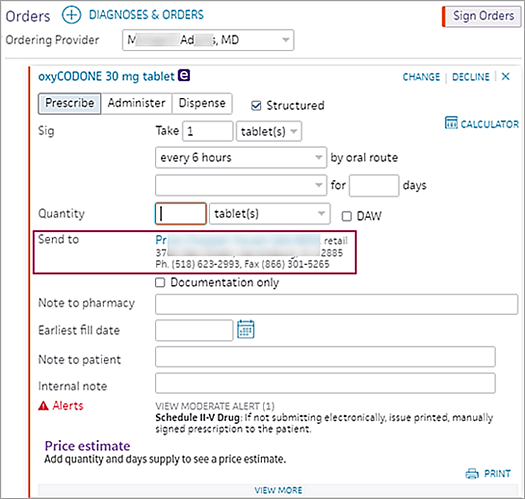
- Note to pharmacy — (Optional) If you want the order to be filled on a future date (specified using he Earliest fill date field), you can also enter a note in this field that instructs the pharmacy to fill the order after the date you specify.
Note: If multiple orders have the same note, athenaOne marks the order as a duplicate and rejects it. Entering a unique note on each order ensures that the pharmacy successfully receives all electronic orders. - Earliest fill date — (Optional) If you want the order to be filled on a future date, enter the earliest date that the patient should receive the prescription (this field applies to both controlled and non-controlled substances and also appears in medication flowsheets). When you sign the order, the prescription is sent immediately to the pharmacy via Surescripts, but the pharmacy does not make the prescription available for the patient until the Earliest fill date (also known as the effective date).
Example: If multiple orders are needed for a patient over a given period of time and the drug name, Sig, and quantity are the same, you can use this field to indicate when the pharmacy should fill each order. - Click Sign orders.
- Click Save.
The EPCS authorization box appears.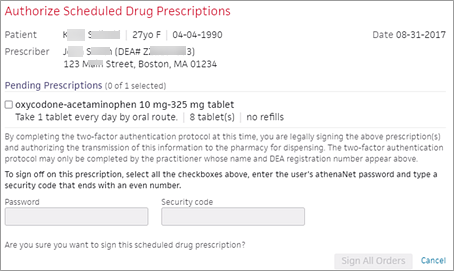
- Review each prescription.
Note: Multiple controlled substance orders for the same patient appear together. - Mark each prescription as reviewed by checking the box to its left.
- After you mark all prescriptions as reviewed, enter your athenaOne Password and the Security code (the PIN from your token) generated from the two-factor authentication credential stored in your VIP Access smartphone application.
Note: If your practice uses SSO, you must use the password you created during the identity verification process instead of the password you use to log in to athenaOne. If you forget the password used with EPCS, you can reset this password on the Update User Profile page. - Click Sign All Orders.
Note: Once you've successfully submitted an EPCS order, you will no longer see an option to print the order. This is a security measure that helps prevent duplicate prescriptions. The option to print is only available prior to order submission or appears if an order fails to transmit electronically.
Electronic Prescribing of Controlled Substances (EPCS) is a technology solution that helps address the problem of prescription drug abuse by removing paper prescriptions from the prescribing process. EPCS regulations permit pharmacies to receive, dispense, and archive these electronic prescriptions.
With the athenaClinicals EPCS enrollment feature, enrolled prescribers can send controlled substance prescription orders electronically. The EPCS feature also creates an electronic accountability trail to ensure that only authorized practitioners are prescribing controlled substances.
To comply with DEA requirements for electronically prescribing controlled substances, prescribers must complete an enrollment process, including verifying their identity and activating a two-factor authentication credential. Your practice designates a "trusted individual" and two "approvers" (one a prescriber, one a non-prescriber). Prescribers are then enrolled in EPCS.
athenahealth is registered as its own credential service provider (athenaCSP), which allows us to perform identity verification and issue two-factor authentication (2FA) tokens. To gain this certification, we were approved by the General Services Administration (GSA) to perform identity verification to Assurance Level 3 (AL3).
To monitor athenaCSP activity, a user with the role User Admin: Identity Verification can view the CSP status of each prescriber on the Identity Verification page.
The "trusted individual" is an athenaOne user at your organization who is responsible for verifying the identity of the prescribers who use EPCS to prescribe controlled substances. A practice superuser designates at least one user as a "trusted individual" (TI) by assigning the User Admin: Identity Verification role to a user (the TI can be that same superuser).
Trusted individuals initiate the identity verification process for prescribers who want to use EPCS and perform the following actions for each prescriber:
- Obtain an original copy of a photo identity document, the prescriber's NPI number, and a valid email address for the prescriber.
Note: Acceptable forms of photo ID include a U.S. driver's license, state ID, or U.S./foreign passport. - Verify that the prescriber providing the photo identity document matches the photo shown in the document.
- Confirm that the NPI number provided by the prescriber exists and matches the prescriber in the National Plan and Provider Enumeration System (NPPES) NPI Registry and that the status of the prescriber is "Active."
- Confirm that the prescriber's full name and practice or mailing address match those that appear in the NPI Registry.
Note: For instructions on how trusted individuals enable EPCS access for prescribers, see To initiate prescriber identification for EPCS enrollment.
The trusted individual must maintain copies of the valid photo IDs used to verify the identity of each prescriber for whom EPCS accounts are created. These documents should not be stored in athenaOne and should be kept for at least 7 years.
For instructions on how trusted individuals enable EPCS access for prescribers, see To complete EPCS identity verification for a prescriber.
EPCS auditing
To retain our status as a credential service provider (CSP), athenahealth is required to conduct Identity Proofing reviews on a representative sample of our client organizations (we conduct these reviews twice a year). Your organization is responsible for maintaining copies of identity verification documents and ensuring that EPCS processes comply with our policies.
For more information, see the FAQ: Electronic Prescribing of Controlled Substances (EPCS).
Prescribers must update their medical credentials in a timely manner when they change their business address or name.
- State license — Follow your state's process to update the practice address.
- DEA license — The DEA states that an address change requires an approved state license for the new address first. Update your name or address using the Make Changes to My DEA Registration form, which you can find on the DEA Forms & Applications page.
- NPPES profile (NPI number) — Prescribers can update their name or address by logging in to the NPPES website with their username and password. If you require assistance, go to the NPPES FAQs and review the "Making Changes Online" section. The NPPES site states that for a Practice Location Address: “You must provide a Physical address, this cannot be a PO Box or CMRA (Commercial Mail Receiving Agency). This is the location where the actual services are rendered. Users can enter multiple addresses, but only one primary practice location is required to be specified.” This information is on the Address Page of the NPPES site.
- You are required to update your name or address with CMS within 30 days of a change being made.
Important: If you need help to update your information, contact the credentialing entity directly. athenahealth cannot provide support for these updates.
The DEA requires you to enter something you know and something you have when electronically prescribing controlled substances.
- Something only you know: your athenaOne password
- Something you have: the two-factor authentication token on your VIP Access App
You can use more than one two-factor authentication token. For example, some prescribers have multiple tokens, one on their laptop and one on their phone, which are each connected to a separate credential ID.
EPCS regulation does not allow prescribers to use tokens installed on the same device that they are using to issue the EPCS order. This restriction is part of the Terms & Conditions you accept in the enrollment process. Therefore, you must use a token from a separate laptop, tablet, or phone to e‑prescribe, not the token from the computer where you are entering the order.
Important: The DEA explicitly disallows sharing your two-factor credentials with any other person, even a colleague. If you lose your phone or the Symantec app, or if you forget your password, see If you lose your phone or the app.
When the EPCS feature is enabled for your practice, athenahealth creates a prescriber profile for each DEA-registered prescriber, with a single login username and password to access athenaOne. Prescribers enrolled in EPCS use their prescriber profile username when they sign in to athenaOne, and when signing and sending controlled substance prescriptions electronically.
Practice administrators can manage the profiles on the Manage Provider Profiles page to ensure a one-to-one mapping of prescribers to profiles. All usernames associated with a prescriber are mapped to the profile, but prescribers use only one username to log in to athenaOne.
Important: As your practice adds new prescribers, practice administrators must configure them to use prescriber profiles on the Manage Provider Profiles page.
Practices that use Single Sign-on with EPCS and use approved password and federation servers can enable enhanced SSO integration. With enhanced SSO integration, prescribers use their SSO password when granting EPCS permissions to other prescribers and when signing and sending controlled substance prescriptions electronically.
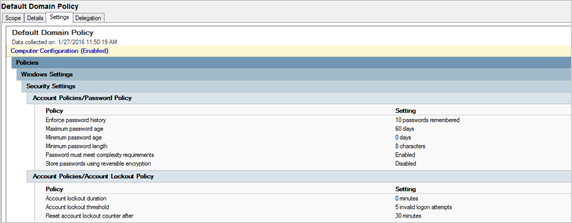
If you choose to use this feature, you must also agree to configure your password complexity to meet the requirements of EPCS:
- Approved password servers: Active Directory 2003, Oracle Directory Service 6
- Approved federation servers: Ping Fed 7.3, Ping Fed 8
- Example password configuration that meets the requirements of EPCS (Active Directory)
You can find your DEA and DEA X number on the NPIs and Other Numbers page. To prevent pharmacy errors when using EPCS, make sure that these numbers are correct and properly formatted — uppercase letters and numbers, with no spaces or dashes.
If an EPCS approved prescriber needs to change her DEA number, the EPCS permissions for that prescriber must first be revoked. (Prescribers can update the expiration date for a DEA number without revoking and reapproving EPCS permissions.)
Note: Only the EPCS permission needs to be revoked, not the identity verification.
After the EPCS permissions for a prescriber are revoked and then reapproved to update the DEA number, prescribers should wait at least 5 days before using EPCS. If you start using EPCS before 5 days have elapsed, your credentials may not be recognized and you may encounter problems.
Revoking permissions follows a two-step process:
- The non-prescriber approver displays the EPCS Enrollment Approval page and clicks the Revoke button.
- The prescriber approver displays the EPCS Enrollment Approval page and selects the Revoke option. The prescriber approver then enters his two-factor authentication security code and athenaOne password to complete the process.
For more information about revoking permissions, see To revoke the EPCS permission from a prescriber.
A Drug Enforcement Administration (DEA) number is assigned to a prescriber by the United States Drug Enforcement Administration. The DEA number allows the prescriber to write prescriptions for controlled substances.
Surescripts, our partner for e-prescribing, ensures that all DEA numbers sent in any electronic prescriptions are in the proper format. This requirement applies to all electronically filed prescriptions, not only to prescriptions for controlled substances. Also, Surescripts validates DEA numbers for both the prescriber and the supervisor.
If a DEA number is not formatted correctly, the prescription drops to electronic fax. You can review stored DEA numbers for prescribers and supervisors on the NPIs and Other Numbers page.
Note: If a prescriber does not have a DEA number, leave the field blank on the NPIs and Other Numbers page. If text such as "None" or "N/A" appears in the DEA number field, delete the DEA number category for that prescriber.
Requirements for a valid DEA number
- The number must consist of 2 uppercase letters followed by 7 numbers (letters are case sensitive). athenahealth recommends that you capitalize the letters.
- If the number has more than 9 characters, the 10th character must be a dash followed by the additional numbers (for example, AA1234567-890).
Note: Surescripts does not validate the remaining characters after the dash.
Examples of valid DEA numbers
- AA1234567
- MB6086089
- AA1234567-890
If you replace your smartphone, display the Update User Profile page, click the Credentials tab, and click Add new to create an additional credential. Then, delete any credentials that are no longer in use.
If you forget or misplace your phone and need to access the VIP Access app, you can:
- Assign the order to a colleague so that the colleague can approve the prescription using their credentials.
- Print and sign the prescription, which you can either hand-deliver to the patient or fax to the pharmacy.
Tip: If you have more than one security token and only one token is lost, you can use a security code from the other token to prescribe.
For detailed instructions, see If you lose your phone or the app.
As required by the Drug Enforcement Agency, we provide two EPCS reports for your practice: a report that shows prescribing activity and another report that shows audit events.
Note: For more information about the EPCS feature, see EPCS Enrollment.
Practice users with the "Clinicals: EPCS Enrollment Approval" user permission or role automatically receive the EPCS Auditable Events report delivered to their Report Inbox. The DEA requires that this report be run for all users who can grant/revoke EPCS access to flag any actions that could indicate a security breach. The report provides information about the following auditable events:
- Failed login attempts — Event in which, for example, a prescriber attempts to log in to the EPCS authorization window with an incorrect password, a clinical staff user with incorrect permissions attempts to sign an EPCS order, or a practice user attempts to log in to athenaOne with an incorrect password.
- Logical access control changes — Event in which a user's access to EPCS is granted or revoked.
Note: You can run this report on demand from the Other tab of the Report Library. If a user receives the EPCS Auditable Events report automatically and wants to stop receipt of the report, you can remove the "Clinicals: EPCS Enrollment Approval" user permission or role.
Auditable events in the EPCS Auditable Events report
Auditable events in the EPCS Auditable Events report include both failed signings of an EPCS order and failed login attempts into athenaOne by any user, even users who are not prescribers and do not have permission to sign EPCS orders. This definition of an auditable event complies with Section 1311.150 of the Electronic Code of Federal Regulations (e-CFR), which states in part (1) that an auditable event can be an "Attempted unauthorized access to the electronic prescription application, or successful unauthorized access where the determination of such is feasible."
The EPCS Provider Issued Substances report shows prescriptions and is available to issuing prescribers.
Note: This report appears in the Report Inbox on the first day of each month for staff members who are listed on the EPCS Enrollment Approval page. You can also run the report whenever you want from the Other tab of the Report Library.
Note: athenaOne identifies all controlled substances at the state-specific and federal levels (you can find the full list of Federal Controlled Substances here). Prescriptions for medications controlled at the state level but not at the federal level can also be sent electronically via Surescripts using the EPCS worklflow.
The Drug Enforcement Agency (DEA) requires a prescribing application to use a General Services Administration (GSA) approved vendor. Symantec is a leading security vendor that athenahealth partners with.
EPCS regulation does not allow prescribers to use a token installed on the same device that they are using to prescribe the EPCS order. You must download the app on a different device than the one you use to prescribe orders. This rule is outlined as part of the Terms & Conditions that users accept in the enrollment process. Therefore, you must use a separate device, most likely a phone, to obtain your two-factor authentication token.
The email with the prescriber's EPCS confirmation code is sent from "noreply@login.athenahealth.com" to the email address configured on the Identity Verification page. If the prescriber does not receive this email, the most likely problem is the spam filters at your organization. To work around this problem, edit the Email Address field for the prescriber on the Identity Verification page to use a gmail or personal email address. Because this email contains only the 6‑digit confirmation code, no sensitive data is sent to the email address.
Note: If your organization does not allow the use of a personal email address, contact your IT organization to allow emails from "noreply@login.athenahealth.com."
Here are items to consider if you receive a large number of pharmacy errors:
- Outdated service level information from Surescripts: athenahealth recommends waiting at least 5 days after your identity verification and approval are completed before you use EPCS. If you start using EPCS before 5 days have elapsed, your credentials may not be recognized and you may encounter problems.
Note: This 5-day wait also applies if your EPCS permissions were revoked and reapproved to update your DEA number. - Medication is obsolete.
- Pharmacy does not accept e-prescribing of controlled substances.
Pharmacies that support EPCS include "ERX" in their names.
If you forget or misplace your phone and need to access the VIP Access app, you can:
- Assign the order to a colleague who can approve the prescription using their credentials.
- Print and sign the prescription, which you can either hand-deliver to the patient or fax to the pharmacy.
If you lose your phone or the app and you need to re-download the Symantec app and add a token, see If you lose your phone or the app.
Verify that the credential ID displayed on the Symantec VIP Access application matches the Credential ID entered on the Security tab of the Update User Profile page.
Note: On your mobile device, open the VIP Access application and look for the credential ID at the top of the page, above the security code.

Credential IDs match
If the credential ID displayed on the Symantec VIP Access application matches the credential ID entered on the Update User Profile page, follow these steps to troubleshoot the problem.
- Verify that the credential ID is enabled in athenaOne.
- Display the Users page.
- Search for the username of the prescriber and click update.
- Click the Security tab.
- At the bottom of the page, under VIP Access Credentials, verify the status of the Credential ID.

Note: To comply with EPCS security regulations, we no longer support generating a temporary Symantec code. If you click Generate code in VIP Access Credentials, athenaOne no longer generates a code and does not send a code to the provider. - If the status is Disabled, click Enable.
- Verify that the time and date on the device used to generate the token are correct. The Symantec VIP Access application generates a new security code every 30 seconds. The security codes are time based; if the time on the device used to generate the code is out of sync, the codes are not generated correctly.
For mobile devices, consult the manufacturer's directions to verify that the time and date are set correctly. In general, you can follow these instructions: - Go to the device settings.
- If your device has a toggle to set the time and date automatically, disable that toggle, wait 10 seconds, and then reenable the toggle to force the device to resynchronize the time and date.
- Verify that the credential ID is functioning correctly.
- In a browser window, enter https://idprotect.vip.symantec.com/.
- Click Test.
- Enter the credential ID from the device and click Continue.
- Enter the current security code from the device.
Symantec verifies that the device token is functioning correctly or, if not, it allows you to reset the token by entering two consecutive codes from the device.
Credential IDs do not match
If the credential ID displayed on the Symantec VIP Access application does not match the credential ID entered on the Update User Profile page, the credential ID must be updated to the correct value.
This issue usually occurs when a prescriber is using a new device or the prescriber deleted the VIP Access application and reinstalled it. Whenever the application is installed, a new credential ID is generated and must be mapped to the user's account.
To resolve this problem, follow these steps.
- Disable the provider’s current credential ID.
- Display the Users page.
- Search for the username of the prescriber and click update.
- Click the Security tab.
Note: To access the Security tab, you must have the User Admin or Practice Superuser role. Also, if you have access to another tablespace, you must have the same username and permissions in both tablespaces to access the Security tab. - At the bottom of the page, under VIP Access Credentials, click Disable.
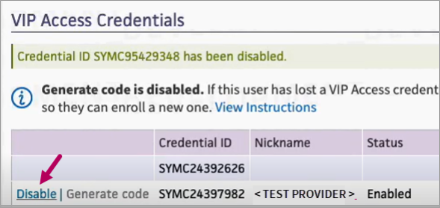
Once disabled, a notification appears. To reinstate the provider’s EPCS access, click View Instructions or complete the steps that follow.
- Revoke the provider’s current EPCS access.
- Display the Users page.
- Click the Identity verification tab.
- Click Revoke.
-
Start the identity verification process for the provider.
Follow the steps in Trusted individual identity verification on this page to verify the provider’s identity.
-
Have the provider complete the verification process.
-
Ask the provider to follow the steps in Prescriber completes the verification process on this page.
-
Remind the provider to add their new credential ID, which is included in Prescriber completes the verification process steps.
-
Remind the provider to delete any old credential IDs.
-
Ask the provider to accept terms and conditions and reset their password.
Direct them to Settings (Gear) > MY CONFIGURATIONS | User Profile > Identity Verification tab. In Terms and Conditions, the provider clicks Accept.
After accepting terms and conditions, the provider clicks the Password tab, enters a new password, reenters the password to confirm, and then clicks Save.
-
Some states mandate that controlled substance prescriptions be sent electronically, so please review your state laws. If you want to bypass EPCS, athenaClinicals supports paper workflows where you can print and sign the prescription. You can either hand-deliver the prescription to the patient or fax it to the pharmacy.
Note: athenaOne identifies all controlled substances at the state-specific and federal levels (you can find the full list of Federal Controlled Substances here). Prescriptions for medications controlled at the state level but not at the federal level can also be sent electronically via Surescripts using the EPCS worklflow.