 User Guide — Resolving Unprocessed Documents in HOLD Status
There are several reasons why a document may be routed to your document HOLD queue in the Faxes/Scans Dashboard. To access a document in HOLD status on the Faxes/Scans Dashboard, click a linked number in the HOLD row to display the list of documents, and then click an individual document in the list.
Note: Please do not send documents in HOLD to athenaError after the issues listed below have been resolved.
To learn when to send documents to athenaError, see Returning Documents to athenahealth for Error Correction.
If a document is received with blacked-out pages, incomplete fax batch, or illegible image, the document requires your review to determine whether the document is acceptable.
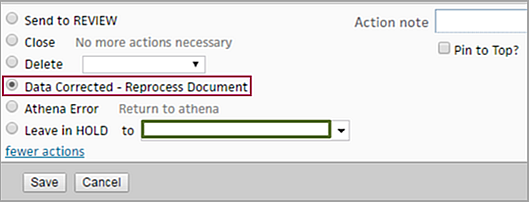
- If all pertinent pages are acceptable, select Data Corrected – Reprocess Document and enter an action note that says "please process" to indicate that you are satisfied with the transmission.
- If all pertinent pages are not acceptable, please follow your organization's internal policy for notifying the sender of the faxing error.
Best practice: Delegate a staff member with appropriate user permissions to delete/close documents. You can use the Task Assignment Overrides page to route the documents to the delegated user automatically.
To enable the successful submission of outbound documents, athenaOne requires a phone and fax number to be recorded in athenaOne for each provider and practice. To resolve this issue, use the Departments page to enter the correct phone number.
- Display the Departments page: On the Main Menu, click Settings
 >Billing. In the left menu, under Practice Links — Departments, click Departments.
 - Locate the department in the Departments list, and click the update link.
- Phone — Enter the phone number to use for contacting this department.
- Fax — Enter the fax number used to use for outgoing fax.
- Click Save.
After the phone and fax numbers are corrected, return to the document and resubmit it.
- Scroll down to the very bottom of the screen, just above the Save and Cancel buttons, and click view actions.
- If the Resubmit button is not visible, click more actions.

- Select the Resubmit option, and click Save.
There may be a number of reasons why the patient can't be identified by the athenaOne system:
- The patient may have had a name change.
- The patient may have a duplicate patient chart.
- The patient may be registered in a different department.
- There may have been edits to the patient chart that resulted in spelling errors or a mismatch on date of birth.
- The patient listed on the document is not registered with your practice because an external facility faxed documents to your practice in error.
To resolve this issue, make the necessary corrections to the patient's record: chart creation, chart correction, register the patient in the new department, or provide athenahealth with the duplicate chart's patient ID (when duplicate charts is the issue).
After the corrections are made, you can return the document to athenahealth for reprocessing.
- Scroll down to the very bottom of the screen, just above the Save and Cancel buttons, and click view actions.
- If the Data Corrected – Reprocess Document button is not visible, click more actions.

- Select the Data Corrected – Reprocess Document option.

- Enter a brief note in the Action note field.
- Click Save.
On occasion, the provider listed on the document cannot be identified because an external facility faxed documents to your practice in error, or because the provider is no longer with your organization.
Unfortunately, athenahealth cannot verify that a faxed document is intended for your facility, or that the provider on the document is currently practicing within your practice.
To resolve this issue, follow your organization's internal policy for notifying the sender of faxing errors. We recommend that you contact the sender, inform them of the error, and request that they update their records. After the sender has been notified, you can delete the document.
If the provider field is left blank but a patient has been identified and selected, you can select the patient's usual provider instead of deleting the document. After you update the provider, scroll down to click view actions and select Send to Review for the selected provider.
Please do not send these misrouted documents to athenaError because athenahealth is not authorized to contact the sender on your behalf or delete the document for you.
Best practice: Delegate a staff member with appropriate user permissions to delete/close documents. The user permission is "Clinicals: Delete Document."
- Display the Users page: On the Main Menu, click Settings
 >User. In the left menu,under Practice Links — Users, click Users.
 - Enter search criteria to find the user.
- Click Search.
A list of usernames that match your search criteria appears below. - Click the update link for the user account to update.
The user profile details appear in the fields at the top of the page. - Click the Roles tab.
- Click the Edit link.
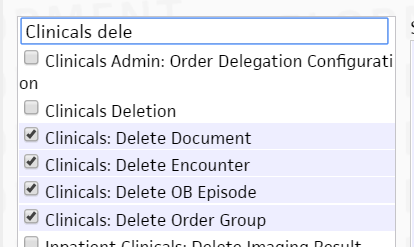
- Enter "Clinicals dele" in the role search box at the top of the list of roles to view the individual deletion permissions. The Clinicals Deletion role includes all deletion permissions. You can either check that role, or uncheck it and then check individual delete permissions for different document types.

- Leave a box unchecked to withhold a permission from the user.
- Click Save.
"Clinical Provider" with an active fax number or a "Fax Number" entered in the field are required to send outbound documents.
To resolve the issue, search for and select the clinical provider by searching for the provider's name or facility. If the provider doesn't appear in the search and the same fax number won't be used in the future, enter the fax number in the Fax Number field. You can also use the Suggest a Clinical Provider page to add a new provider and add a fax number to the entry.
After you enter the fax number, return to the document and resubmit it.
- Scroll down to the very bottom of the screen, just above the Save and Cancel buttons, and click view actions.
- If the Resubmit button is not visible, click more actions.

- Select the Resubmit option, and click Save.
On occasion, the patient listed on the document is not registered with your practice because an external facility faxed documents to your practice in error.
To resolve this issue, follow your organization's internal policy for notifying the sender of faxing errors. Please do not return the document to athenaError, because athenahealth does not have the authority to delete or close faxed documents on behalf of your practice.
Best practice: Delegate a staff member with appropriate user permissions to delete/close documents.
- Display the Users page: On the Main Menu, click Settings
 >User. In the left menu,under Practice Links — Users, click Users.
 - Enter search criteria to find the user.
- Click Search.
A list of usernames that match your search criteria appears below. - Click the update link for the user account to update.
The user profile details appear in the fields at the top of the page. - Click the Roles tab.
- Click the Edit link.
- Enter "Clinicals dele" in the role search box at the top of the list of roles to view the individual deletion permissions. The Clinicals Deletion role includes all deletion permissions. You can either check that role, or uncheck it and then check individual delete permissions for different document types.

- Leave a box unchecked to withhold a permission from the user.
- Click Save.
The Provider field is required for faxed documents. The provider must be selected from the drop-down list.
To resolve this issue, select the provider. If the provider is not found in the list, you can add the provider to the appropriate department's provider drop-down list using the Provider Drop-Downs page.
Note: You must have access to provider data to edit provider drop-downs. See User Access to Provider Data for more information.
If your practice is smaller, the list of departments and providers appears as soon as you display the Provider Drop-Downs page. (The login departments are listed vertically on the left side of the page; the provider names are listed horizontally across the top of the page.) If your practice has a large number of providers, you must first select the providers from the list that appears when you display the Provider Drop-Downs page. The grid of departments and providers appears after you make this selection.
- Display the Provider Drop-Downs page: On the Main Menu, click Settings
 >Billing. In the left menu, under Practice Links — Providers, click Provider
Drop-Downs.
 - If your organization has a very large number of providers, the list of providers appears.
- From the list, select the providers that you want to appear in the drop-down menu for a department.
Tip: To select multiple providers, hold down the CTRL key and click individual provider names. To select a range of providers, hold down the Shift key and select a range of provider names. - Click Filter.
A grid appears, showing rows for departments and columns for provider usernames.
- From the list, select the providers that you want to appear in the drop-down menu for a department.
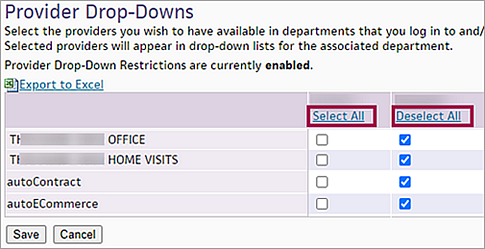
- For each department on the left side of the page, select the providers that you want to appear in the drop-down menu for the department, for login or scheduling purposes. Alternatively, locate the provider name at the top of the page and select all the departments where the provider should be listed.
Tip: To include a provider in all the departments listed on the left side of the page, click Select All. To remove a provider from all the departments listed on the left side of the page, click Deselect All.
- Deselect any providers that should not appear in a given department.
- Click Save.
After you add the provider to the drop-down list, you can return to the document, select the provider from the Provider menu, and select Data Corrected – Reprocess Document under Document actions.
An Rx/Order is not faxed without a corresponding paper form for the order type.
To resolve this issue, use the Order Routes page to attach the paper form to the order route.
- Display the
Order Routes page: On the Main Menu, click Settings
 > Clinicals. In the left menu, under Practice Links — Order Configuration, click Order Routes.
 - Click Edit for the order route you need.
Additional fields appear. - Clinical order form — Select the clinical paper form on which the orders will be printed. (These forms are administered using the Clinical Paper Forms page.)
- Click Save.
After the order route has been updated, return to the document and resubmit it.
- Scroll down to the very bottom of the screen, just above the Save and Cancel buttons, and click view actions.
- If the Resubmit button is not visible, click more actions.

- Select the Resubmit option, and click Save.
Best practice: You can use the Task Assignment Overrides page to route to documents to delegated users automatically.