Medication Administration Record (MAR)
athenaOne for Hospitals & Health Systems
The electronic Medication Administration Record (MAR) enables nurses to track medication orders and their administration using barcode scanners or manual entry. Medications appear in the MAR after they are entered by a nurse or physician and can be marked as administered before being signed by a physician or verified by a pharmacist.
Related user guides:
In the patient chart, click the arrow in the green workflow menu (at the upper right) and select Go to MAR. (The options available in the green workflow menu depend on your user role.)
On the Charge Overview page, click View MAR Information to open the MAR in a new tab.
You must be logged in to a department that uses athenaOne for Hospitals & Health Systems.
You must have the Inpatient Clinicals: eMAR user permission to access this page. This permission is included in the following user roles:
- Inpatient Nurse
- Inpatient Certified Nursing Assistant
- Inpatient Licensed Practical Nurse
- Inpatient Clinicals: eMAR
Note: To see the nurse view of the inpatient patient list and access the Medical Administration Record (MAR), you must have both of these user permissions: Inpatient Clinicals: eMAR and Inpatient Clinicals: Nurse Task Sign-off. Without both permissions, a user sees the non-nurse view of the inpatient patient list and cannot access the MAR.
- Display the patient's MAR: In the patient chart, click the arrow in the green workflow menu (at the upper right) and select Go to MAR. (The options available in the green workflow menu depend on your user role.)
- Verify that the correct patient is selected. The patient ID number is located in the patient banner, below the patient's name.
If you use a barcode scanner, click anywhere on the screen and then scan the patient's wristband ID. If the barcode matches, you can continue.
- Click the medication name to open the task.
- On the left side of the page, click acknowledge.
This action indicates that the nurse has seen the order and closes the inbox task. This acknowledgment appears in the order history, but it is not part of a required workflow.
- In the patient chart, click the arrow in the green workflow menu (at the upper right) and select Go to MAR. (The options available in the green workflow menu depend on your user role.)
- Locate the discontinued order in the list of medication orders.
- Click ACKNOWLEDGE DISCONTINUED.

- Display the MAR: In the patient chart, click the arrow in the green workflow menu (at the upper right) and select Go to MAR. (The options available in the green workflow menu depend on your user role.)
- Verify that the correct patient is selected. The patient ID number is located in the patient banner, below the patient's name.
If you use a barcode scanner, click anywhere on the page and then scan the patient's wristband ID. If the barcode matches, you can continue.
Administer the medication
Note: At the upper right corner of the MAR, you can click Due, PRN, or All to toggle the view. Medication tasks appear on the Due tab one hour before their scheduled time. If the medication is not administered, the task remains on the Due tab for 23 hours after the due time.
- Click the name of the medication to administer. The input form opens with the most current dosage time, and administer selected.

- Pain (appears for pain medications only) — Select the patient's pain scale.
- Products — Select the product to administer and enter the quantity.
You can click the plus icon to add a product, and click the X icon
  to delete a product.
 - For orders in mg or mL, the ordered amount is populated automatically on the first scan.
- For discrete units such as pills and capsules, scan the barcode for each unit ordered. For example, to fill an order for two tablets, scan the barcode twice.
- Administered — The field is populated automatically with the current date and time.
Note: An alert appears if you enter the wrong dose or administer the dose at the wrong time. You can select the override options if needed and enter a reason for the change in the text field. - Post-DST — Only check this box if you are administering the medication between 1:00 a.m.-1:59 a.m. on the Sunday in November that Daylight Savings Time (DST) ends.
- Note — Enter any notes concerning this medication administration.
- Make sure that only the medications you want to sign are selected and that the bars for those medications have turned green. If the High alert medication message appears, select the Requires validation from another nurse option.

- Click Sign.
If you use barcode scanning, scan the patient's wristband to sign the medication administration.
For high alert medications, the medication remains on the Due tab with a *Validation Required warning. A second nurse must then confirm that they checked the preparation and administration to verify that the medication was prepared correctly.
Scanning the medication barcode populates the Products field, including the quantity.
- Display the patient's MAR: In the patient chart, click the arrow in the green workflow menu (at the upper right) and select Go to MAR. (The options available in the green workflow menu depend on your user role.)
- Verify that the correct patient is selected. The patient ID number is located in the patient banner, below the patient's name.
If you use a barcode scanner, click anywhere on the screen and then scan the patient's wristband ID. If the barcode matches, you can continue.
- Click the name of the medication to administer. The input form opens with the most current dosage time, and administer selected.

- Click Not Given.
-
Not Given Reason - Required — Click into this field and, from the PATIENT DECLINED or PROVIDER DEFERRED categories, select the reason why the vaccine was not given.
Note: Reasons have codes associated with them for vaccine-related quality measures.
Tips:-
Begin typing in the field to show matching options in the list.
-
You can expand some options by clicking the down arrow to the right of the reason.
-
-
If you choose a Contraindication, two optional fields appear:
-
Contraindication Effective Date — Enter the effective date, if you know it.
-
Contraindication Expiration Date — Enter the expiration date, if you know it.
-
- Make sure that only the medications you want to sign are selected and that the bars for those medications have turned green.
- Click Sign. If you use barcode scanning, scan the patient's wristband to sign the medication administration.
After saving and approving a vaccine order, you can view the Not Given status and reason on the Vaccines tab and from Chart Export.
- Display the patient's MAR: In the patient chart, click the arrow in the green workflow menu (at the upper right) and select Go to MAR. (The options available in the green workflow menu depend on your user role.)
- Verify that the correct patient is selected. The patient ID number is located in the patient banner, below the patient's name.
If you use a barcode scanner, click anywhere on the screen and then scan the patient's wristband ID. If the barcode matches, you can continue.
- Click the name of the medication and then click the time of the dose to reschedule it.
The administer option is selected by default.
- Click reschedule.

- New time — Enter the new date and time for the medication dose.
- Reason — Select a reason for rescheduling.
- Make sure that only the medications you want to sign are selected, and that the bars for those medications have turned green.
- Click Sign. If you use barcode scanning, scan the patient's wristband to sign the medication administration.
- Display the patient's MAR: In the patient chart, click the arrow in the green workflow menu (at the upper right) and select Go to MAR. (The options available in the green workflow menu depend on your user role.)
- Verify that the correct patient is selected. The patient ID number is located in the patient banner, below the patient's name.
If you use a barcode scanner, click anywhere on the screen and then scan the patient's wristband ID. If the barcode matches, you can continue.
Important: It is your responsibility to review any release of protected health information (PHI) to ensure compliance with HIPAA, federal, and state regulations. Every document should be reviewed for PHI before printing and release.
To print a single day's medications
- Click the date to print (dates are listed horizontally across the top of the page).
- Click All (in the upper right corner) to display all medications for the selected date.

- Scroll down to the bottom of the page, and click the Print icon
 at the lower right.
The preview window appears. (Your browser must allow pop-ups to see the preview window.) - Use the print dialog to print.
To print MAR information for a date range
- In the patient chart, click the Menu icon
 and select Chart export.
 - In the Chart Export window, under Available Attachments, you can select the Medication Administration Record header to print the entire MAR.
You can also click the plus icon to expand the Medication Administration Record and double-click or use the arrows to select individual dates.
 - Click Export Chart Sections.
A review window appears. - Method — Select Paper print-out.
- Scroll down to the Actions section and select the Submit option.
- Click Save. The task appears in Submit status.
- Click
 Print in the upper right corner.
Your exported MAR appears.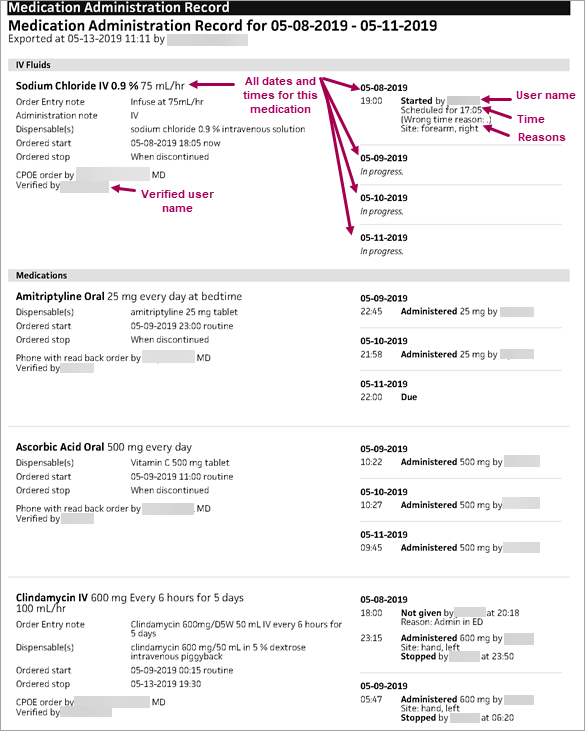
- Display the patient's MAR: In the patient chart, click the arrow in the green workflow menu (at the upper right) and select Go to MAR. (The options available in the green workflow menu depend on your user role.)
- Verify that the correct patient is selected. The patient ID number is located in the patient banner, below the patient's name.
If you use a barcode scanner, click anywhere on the screen and then scan the patient's wristband ID. If the barcode matches, you can continue.
Medications in the MAR can be marked as administered before they are signed by a physician or verified by a pharmacist.
- Display the patient's MAR: In the patient chart, click the arrow in the green workflow menu (at the upper right) and select Go to MAR. (The options available in the green workflow menu depend on your user role.)
- Verify that the correct patient is selected. The patient ID number is located in the patient banner, below the patient's name.
If you use a barcode scanner, click anywhere on the screen and then scan the patient's wristband ID. If the barcode matches, you can continue.
- Click the name of the intermittent IV medication to administer. The input form opens with Administer selected and the most current dosage due time selected.

- Amount administered — The amount administered is populated from the order.
- Site — Select the IV site from the menu and then indicate Left or Right.
- Administered at — This field defaults to the current date and time.
Note: An alert appears if you enter the wrong dose or administer the dose at the wrong time. You can select the override options if needed and enter a reason for the change in the text field. - Note — Enter any notes concerning this medication administration.
- Make sure that only the medications you want to sign are selected and that the bars for those medications have turned green. If the High alert medication message appears, select the Requires validation from another nurse option.

- Click Sign.
If you use barcode scanning, scan the patient's wristband to sign the medication administration.
For high alert medications, the medication remains on the Due tab with a *Validation Required warning. A second nurse must then confirm that they checked the preparation and administration to verify that the medication was prepared correctly.
Medications in the MAR can be marked as administered before they are signed by a physician or verified by a pharmacist.
- Display the patient's MAR: In the patient chart, click the arrow in the green workflow menu (at the upper right) and select Go to MAR. (The options available in the green workflow menu depend on your user role.)
- Verify that the correct patient is selected. The patient ID number is located in the patient banner, below the patient's name.
If you use a barcode scanner, click anywhere on the screen and then scan the patient's wristband ID. If the barcode matches, you can continue.
- Click the name of the push medication to administer. The input form opens with Administer selected, and the most current dosage due time selected.

- Products — Select the product.
If your hospital uses barcode scanning, scanning the medication barcode automatically selects the product in the list. - Amount administered — The amount administered is populated from the order.
- Site — Select the IV site from the menu and then indicate Left or Right.
- Start time — This field defaults to the current date and time.
The bar on the left side turns green.
Note: An alert appears if you enter the wrong dose or administer the dose at the wrong time. You can select the override options if needed and enter a reason for the change in the text field. - Note — Enter any notes concerning this medication administration.
- Click Sign.
If you use barcode scanning, scan the patient's wristband to sign the medication administration.
For high alert medications, the medication remains on the Due tab with a *Validation Required warning. A second nurse must then confirm that they checked the preparation and administration to verify that the medication was prepared correctly.
Medications in the MAR can be marked as administered before they are signed by a physician or verified by a pharmacist.
- Display the patient's MAR: In the patient chart, click the arrow in the green workflow menu (at the upper right) and select Go to MAR. (The options available in the green workflow menu depend on your user role.)
- Verify that the correct patient is selected. The patient ID number is located in the patient banner, below the patient's name.
If you use a barcode scanner, click anywhere on the screen and then scan the patient's wristband ID. If the barcode matches, you can continue.
- Click the name of the PCA medication to administer. The input form opens with Administer selected, and the most current dosage due time selected.
- Click record.
In the medication form
- Pain — Select the patient's level of pain.
- Product — The product is populated automatically. If more than one product could fulfill the order (the same drug from different manufacturers), you can select the product.
- For orders in mg or mL, the ordered amount is populated automatically on the first scan.
- For discrete units such as pills and capsules, scan the barcode for each unit ordered. For example, to fill an order for two tablets, scan the barcode twice.
Scanning the medication barcode populates the Products field, including the quantity.
- Dose received — Enter the dose received.
- Time recorded — This field defaults to the current time.
- Note — Enter any notes concerning this medication administration.
- Make sure that only the medications you want to sign are selected, and that the bars for those medications have turned green.
- Click Sign.
If you use barcode scanning, scan the patient's wristband to sign the medication administration.
- Display the patient's MAR: In the patient chart, click the arrow in the green workflow menu (at the upper right) and select Go to MAR. (The options available in the green workflow menu depend on your user role.)
- Verify that the correct patient is selected. The patient ID number is located in the patient banner, below the patient's name.
If you use a barcode scanner, click anywhere on the screen and then scan the patient's wristband ID. If the barcode matches, you can continue.
Administer the insulin
- Click the insulin medication name to administer. The input form opens with Administer selected, and the most current dosage due time selected.

- Click Administer. The input form opens with additional fields. The fields may vary with the medication.
- To use the most recent glucose reading, select the Use most recent reading option.
You can also record a new reading. Any values you enter in the MAR also appear in the Vitals section of the patient chart and in the patient's flowsheet. - To record a new reading:
- Glucose — Enter the new reading.
- Taken — Enter the time of the new reading.
Note: If an insulin sliding scale was configured and selected, athenaOne calculates the units of insulin to be given to the patient based on the sliding scale selected when the order was created.
- Calculated dose — athenaOne automatically calculates the units of insulin to be given to the patient based on the Glucose field and the sliding scale selected when the order was entered.
- Administered — Enter the actual number of units administered and record the date and time in the fields provided.
Note: An alert appears if you enter the wrong dose or administer the dose at the wrong time. You can select the override options if needed and enter a reason for the change in the text field. - Note — Enter any notes concerning this medication administration.
- Make sure that only the medications you want to sign are selected and that the bars for those medications have turned green. If the High alert medication message appears, select the Requires validation from another nurse option.

- Click Sign.
If you use barcode scanning, scan the patient's wristband to sign the medication administration.
For high alert medications, the medication remains on the Due tab with a *Validation Required warning. A second nurse must then confirm that they checked the preparation and administration to verify that the medication was prepared correctly.
- Display the patient's MAR: In the patient chart, click the arrow in the green workflow menu (at the upper right) and select Go to MAR. (The options available in the green workflow menu depend on your user role.)
- Verify that the correct patient is selected. The patient ID number is located in the patient banner, below the patient's name.
If you use a barcode scanner, click anywhere on the screen and then scan the patient's wristband ID. If the barcode matches, you can continue.
Administer the insulin
- Click the insulin medication name to administer. The input form opens with the most current dosage time, and administer selected.

- Use most recent reading — You can select this option to use the most recent glucose reading.
You can also record a new reading. Any values you enter in the MAR also appear in the Vitals section of the patient chart and in the patient's flowsheet. - To record a new reading:
- Glucose — Enter the new reading.
- Taken — Enter the time of the new reading.
Note: athenaOne calculates the units of insulin to be given to the patient, based on the sliding scale selected when the order was created.
- Calculated dose — athenaOne automatically calculates the units of insulin to be given to the patient based on the Glucose field and the sliding scale selected when the order was entered.
- Administered — Enter the actual number of units administered and record the date and time in the fields provided.
Note: An alert appears if you enter the wrong dose or administer the dose at the wrong time. You can select the override options if needed and enter a reason for the change in the text field. - Note — Enter any notes concerning this medication administration.
- Make sure that only the medications you want to sign are selected and that the bars for those medications have turned green.
- Click Sign.
If you use barcode scanning, scan the patient's wristband to sign the medication administration.
Continuous IVs remain on the Due tab after they are discontinued. Note that their status is Discontinue instead of In Progress.
- In the patient chart, click the arrow in the green workflow menu (at the upper right) and select Go to Orders. (The options available in the green workflow menu depend on your user role.)
- athenaOne automatically discontinues continuous IV orders after the duration has been met. You can see details about discontinued orders on the Patient List, Order Entry, and Chart Export pages.
To manually discontinue an IV order before the duration has been met
- Under Recent Changes, click the X icon next to the continuous IV order to discontinue it.

- Click the order to expand its details and enter a reason for discontinuing it.
- Select the order and click Enter Orders (nurse) or Sign Orders (physician).
To record the discontinued order in the MAR
- Display the patient's MAR: In the patient chart, click the arrow in the green workflow menu (at the upper right) and select Go to MAR. (The options available in the green workflow menu depend on your user role.)
- In the MAR, locate the order on the Due tab or the All tab, click the order to expand its details, and then click RECORD STOP TIME.
- In the Stopped at field, enter the date and time you stopped the IV.

- Click Sign. After you sign the administration, the stop time appears in the summary.

Intermittent IVs remain on the Due tab after they are administered with a note stating that a stop time is required.
- Display the patient's MAR: In the patient chart, click the arrow in the green workflow menu (at the upper right) and select Go to MAR. (The options available in the green workflow menu depend on your user role.)
- In the MAR, locate the order on the Due tab or the All tab, click the order to expand its details, and then click RECORD STOP TIME.
- In the Stopped at field, enter the date and time you stopped the IV.

- Click Sign. After you sign the administration, the stop time appears in the summary.
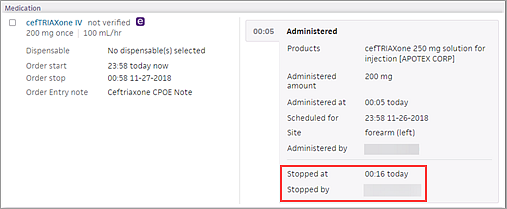
Notes entered during order entry and verification are visible in the collapsed order view in the MAR, below the sig information, as well as in the expanded order view, in the Order Entry note and Administration note fields.
When more than one user views the same patient chart simultaneously, a blue bar appears as an indicator.
If more than one user attempts to edit the same chart section at the same time, a multi-user conflict message appears. For example, two nurses cannot simultaneously update the same patient's MAR.
However, more than one user can update the same chart if the updates are in different chart sections. For example, a nurse can update the MAR for a med administration while another nurse updates a physical therapy note in the same chart.
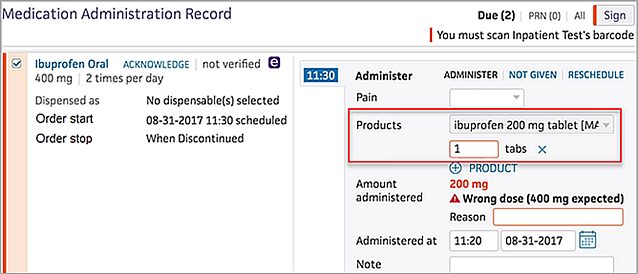
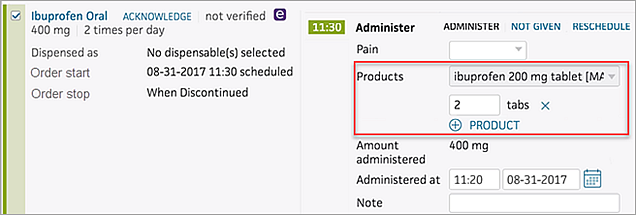
When you scan a medication barcode in the MAR, the Products field is automatically populated with the medication and its quantity. If your scan is successful, the box next to the medication is checked automatically.
You can scan multiple medications in a row (batch scan). You can also scan any medication in your formulary except for compounded medications. athenaOne supports many standardized barcode formats, including product identification data structures supported by the Global Trade Item Number (GTIN) standard and 2-D barcodes.
Scanning additional tablets or other discrete units increases the medication quantity incrementally. For example, to fill an order for two tablets, you must scan the barcode for a single tablet twice. For orders in mg or mL, the ordered amount is populated automatically on the first scan.
First scan
Second scan
You must scan the patient's wristband to sign the medication administration.
Note: You can scan the medication barcode and the patient's barcode in either order.
If a scan results in an error, athenaOne displays a barcode scanning error that explains the issue. You must click Dismiss for each error to close the warning. You can continue scanning other medications when the warning is visible. If additional scanning errors occur, athenaOne adds them to the list of warnings.
| Scenario | Error message | Recommended solution |
|---|---|---|
| Scanned item is not on formulary |
Off-formulary scanned item has exactly 1 drug match: Off-formulary Medication Scanned
Off formulary scanned item has multiple drug matches:
|
Send this message to your pharmacist to add this medication to the formulary. |
| Scanned item doesn't match an active order for this patient | Active Order Not Found [patient] does not have an active order with [medication] as a dispensable. |
Review the patient's orders and consult provider if an order needs to be placed |
| Scanning an order that's scheduled on a different day | Order Not in Current View
There are no [medication] administrations scheduled for the day that you're looking at. The next administration is scheduled for [date] |
|
| On Due Tab scanning a PRN drug | Order Not in Current View
[medication] is ordered as PRN. Go to the PRN tab to administer it. |
Make sure the PRN tab is selected prior to scanning PRN medications |
Note: Multiple errors may appear when you scan a barcode. You must dismiss all errors before acting on the medication.
- Honeywell Eclipse 5145
- Honeywell Hyperion 1300g
- Honeywell Xenon 1902
- Datalogic Gryphon GD4400
Scheduled and completed doses for each medication appear in a single row.

Clicking a medication on these tabs displays:
- Due and PRN tabs — Details of the last administration.
- All tab — All previous administrations for the day.
You can click any previous administration to review the documentation and the username of the person who completed it. This summary also includes the time that the medication was originally scheduled to be administered.

The Medication Administration Record (MAR) labels all times from 1:00 a.m.-1:59 a.m. on the Sunday in November that Daylight Saving Time (DST) ends as either DST or Post-DST. DST and Post-DST labels appear in all places that time is documented in the MAR, including the order details, input form, order details for administered orders, and the printed MAR. These labels also appear on the Pharmacy Verification page for unverified orders that have already been administered.
Note: For continuous IV medication orders, the DST and Post-DST labels appear next to times the IV was started, refilled, held, discontinued, and stopped. If the IV includes administration times both before and after DST ends, both labels will be displayed.
At the upper right corner of the Medication Administration Record (MAR), you can click Due, PRN, or All to toggle the view of the medication tasks.
Medication tasks appear on the Due tab one hour before their scheduled time. If the medication is not administered, the task remains on the Due tab for 23 hours after the due time.
Continuous IVs remain on the Due tab after they are discontinued. Note that their status is Discontinue instead of In Progress.
Intermittent IVs remain on the Due tab after they are administered with a note stating that a stop time is required.
Orders remain on the Due tab of the MAR for 24 hours after administration only. You can add a stop time to the order by locating it on the All tab.
PRN orders are administered as needed.
PRN orders for specific time periods
PRN orders ordered for a specific time period (such as minutes, hours, or days) are removed from the PRN tab of the MAR after the stop time has been reached. The next PRN task is still generated, and the expired order appears on the All tab, where you can still document the administration time after the fact, if needed.
Note: When you document the administration time, you must enter a time that occurred before the ordered stop time. If you enter a later time, you receive a warning and cannot sign the order.
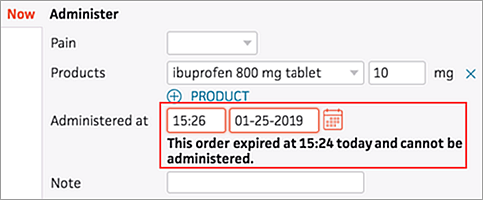
PRN orders for specific number of doses
After all doses of a PRN order that was ordered for a specific number of doses are administered:
- The PRN order is removed from the PRN tab of the MAR.
- The order is automatically completed and its stop time is set to the documented time of the final administration task.
- No additional PRN tasks are generated.
- The order continues to appear on the All tab of the MAR.
PRN orders with a frequency of "once"
PRN orders with a frequency of once can be administered only once. After a one-time PRN order is administered:
- The PRN order is removed from the PRN tab of the MAR.
- The order is automatically completed and its stop time is set to the documented time of the final administration task.
- No additional PRN tasks are generated.
- The order continues to appear on the All tab of the MAR.
PRN order stop times
PRN orders with a frequency of once or with a specific number of doses have a stop time of When X dose(s) administered.

Deleting a PRN task
If you delete a PRN task, the task is automatically regenerated with a blank stop time. This new task is completed automatically after you administer the ordered number of doses. (The task continues to appear on the All tab of the MAR after completion.)
To locate and record overdue medication tasks, use the All tab.
Expired PRN orders appears on the All tab. If needed, you can document the administration time after the fact.
Note: When you document the administration time, you must enter a time that occurred before the ordered stop time. If you enter a later time, you receive a warning and cannot sign the order.

Vaccine orders have a stop time of one hour after their scheduled start time.

After the stop time has been reached, the order remains on the All tab of the MAR but cannot be administered.
Note: Vaccine orders appear on the All tab only for the day on which they are scheduled to be administered.
Nurses must monitor the Due tab for warnings about validation.
For a medication with a high alert warning, you must select the Requires validation from another nurse option during medication administration.
After you sign the administration, the medication remains on the Due tab with a *Validation Required warning.
A second nurse must then confirm that they checked the preparation and administration to verify that the medication was prepared correctly.
To validate the administration of a medication with the *Validation Required alert:
- Click the VALIDATE link to view the validation fields. The Validated at field defaults to the current date and time.
- You can enter an optional note in the Note field.
- Check the checkbox to the left of the medication name.
- Click Sign to validate the administration of this medication.
The administration data entry form includes the Amount administered field, which displays the total amount of the medication administered.

This field appears only if the medication is administered in different units than originally ordered (for example, mg instead of tabs) or if multiple medications are selected.
If you administer a different amount of the medication than was ordered, athenaOne displays a warning, and you must enter a reason for the change in the Reason field.

The MAR has a top-level Sign button, and a checkbox appears for each medication. You can sign medication administrations individually, or check the Select all box and sign all selected administrations by clicking the top-level Sign button.
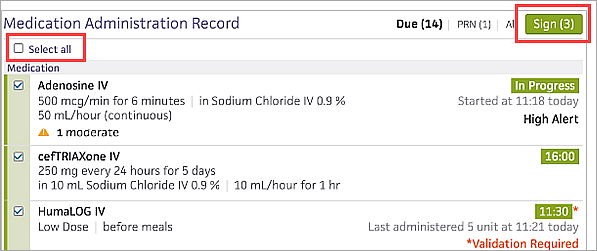
If you use barcode scanning, scan the patient's wristband to sign the medication administration.
athenaOne creates hourly .pdf backups of the MAR for each patient admitted per department. You can use the backups to continue providing care to your patients if the electronic MAR is unavailable or inaccessible. Each .pdf contains three days of medication administration information (yesterday, today, and tomorrow). The backups are stored in .zip files on your organization's SFTP server. There is a separate .zip file for each department.
Note: In rare instances, if athenaOne cannot create a .pdf file, the system will create an .html file you can access for the patient. athenaOne can also create a .txt file.
Can I access a .pdf for every patient?
athenaOne creates .pdf files of the MAR for any patient listed with a bed assignment or a waiting status in the Emergency Department or any patients in the Patient List, of any Inpatient department, who have a status of Admitted. No MAR backup files are created for patients with a status of Discharged.
What if a patient is in the process of transferring to a different department?
athenaOne creates MAR .pdf files for patients who are in the process of transferring to a different department in both departments: the original department and the destination. If you are viewing the backup files by department, the transfer patient will have duplicate files.
There are no patients admitted currently. Why am I seeing .zip files for the MAR?
If there are no active patients with medication administration, the .zip file states "there were no admitted patients in the [Department name] department at the time of this backup" with the date and time.
Note: If you need a previous version of a backup, contact the Client Support Center (CSC).
