 User Guide — Recording IV Administration in the MAR
athenaOne for Hospitals & Health Systems
Table of Contents
To record continuous IV medication administration
To record intermittent IV medication administration
To record a push IV medication administration
To record insulin dose administration
To record continuous IV medication administration
Medications in the MAR can be marked as administered before they are signed by a physician or verified by a pharmacist
- Display the patient's MAR: In the patient chart, click the arrow in the green workflow menu (at the upper right) and select Go to MAR. (The options available in the green workflow menu depend on your user role.)
- Verify that the correct patient is selected. The patient ID number is located in the patient banner, below the patient's name.
If you use a barcode scanner, click anywhere on the screen and then scan the patient's wristband ID. If the barcode matches, you can continue.
The Start option
- Click the continuous IV medication name to administer. The form opens with the start time and the Start option selected at the top right side of the form.
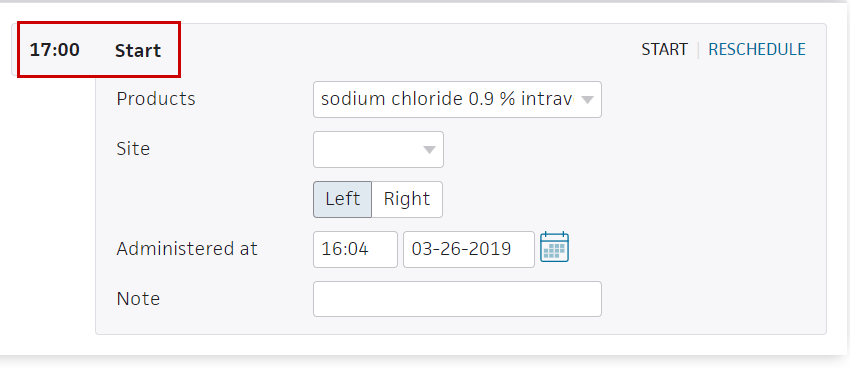
- Products — Select the product if not already selected.
- Site — Select the IV site in the drop-down list, and then indicate Left or Right.
- Administered at — This defaults to the current time and date.
Note: An alert appears if you enter the wrong dose or administer the dose at the wrong time. You can select the override options if needed and enter a reason for the change in the text field. - Note — Enter any notes concerning this medication administration.
- Make sure that only the medications you want to sign are selected and that the bars for those medications have turned green. If the High alert medication message appears, select the Requires validation from another nurse option.

.
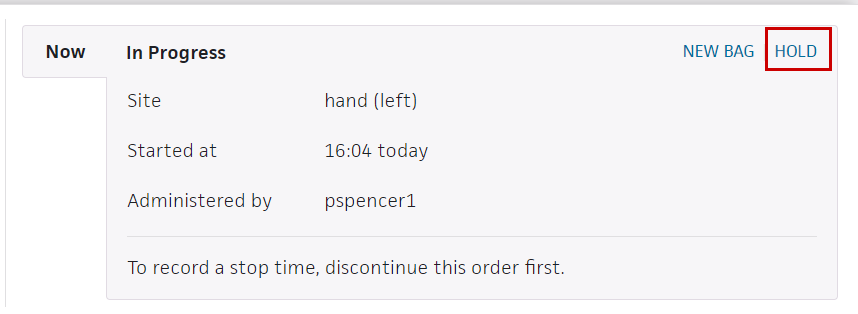
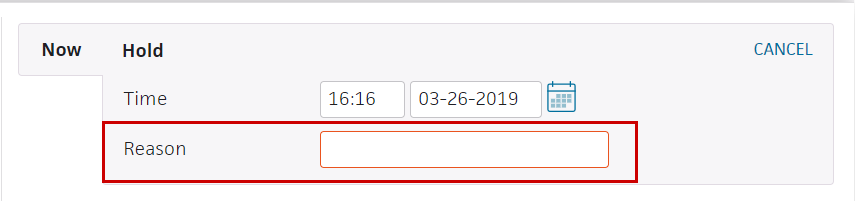
The Hold option
- To place a continuous IV order on hold, click the medication to open the form and and click HOLD at the upper right
- Reason — Enter the reason for the hold.
- Check the medication's checkbox at the left. The Sign button turns green.
- Click Sign.
The Restart option
- To continue treatment with the same bag, click the medication to open the form and then click RESTART at the upper right.
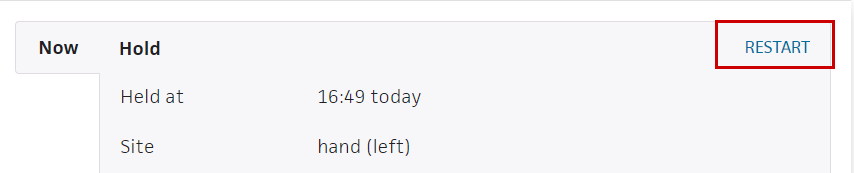
- Review the order details.
- Reason — Enter a reason.
- Check the medication's checkbox at the left. The Sign button turns green.
- Click Sign.
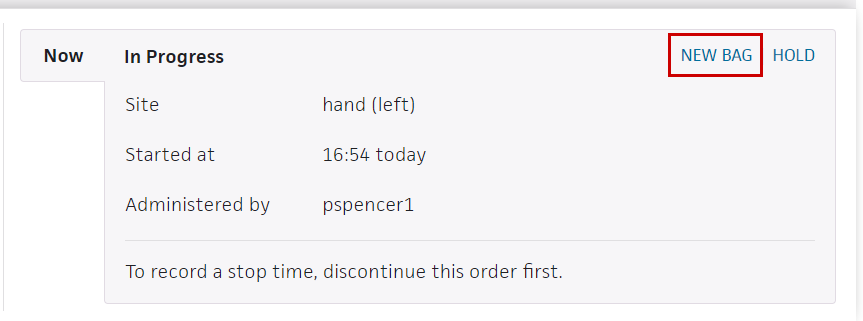
The New Bag option
- To continue the IV treatment with a new bag, click the medication to open the form and click NEW BAG.
- Amount administered — Enter the amount of medication administered in the previous IV bag.
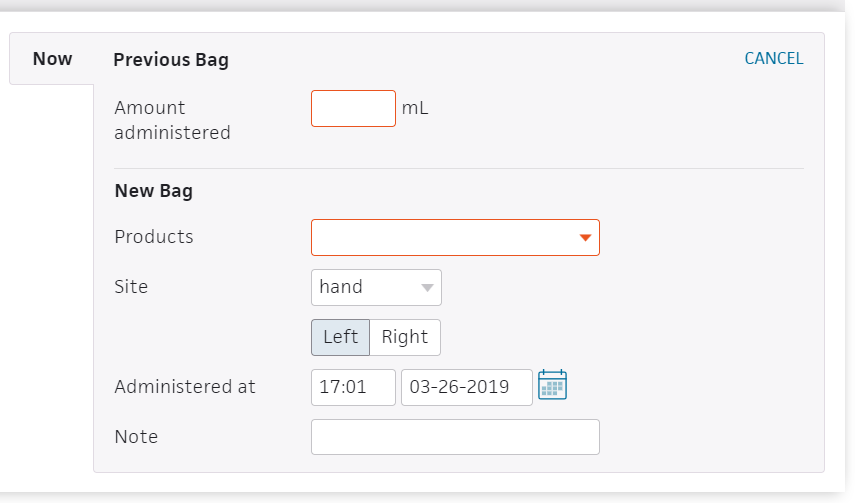
- Product — Select the product for the new bag (if not already selected).
- Note — Enter a note if needed.
- Check the medication's checkbox at the left. The Sign button turns green.
- Click Sign.
The Discontinue option
Every 10 minutes, athenaOne looks for continuous IV orders with an ordered duration. When it finds a continuous IV order that is currently running and has met the ordered duration, athenaOne discontinues the order automatically. The nursing care team receives a notification about the discontinued IV order inthe Patient List, and details about the discontinued order also appearon the Order Entry page and on the Chart Export page.
Note: The start and stop time of the IV administration must be recorded in the MAR by a nurse .
Example 1
When a continuous IV has an ordered duration, such as 24 hours, athenaOne applies the ordered duration to the IV start time, as documented in theMAR, to determine when to automatically discontinue the order.
For example, if the nurse starts the IV at 13:00 on Day 1 and the ordered duration is 24 hours, the nurse can expect athenaOne to automatically discontinue the order between 13:00 and 13:10 on Day 2.
Example 2 (with a hold)
To automatically discontinue an order when it meets the ordered duration, athenaOne takes into account any holds during the IV administration. For example, if the nurse starts the IV at 13:00 on Day 1 and while the IV is running for the ordered duration of 24 hours the nurse holds the IV for 30 minutes by using the Hold workflow in the MAR, the nurse can expect athenaOne to automatically discontinue the order between 13:30 and 13:40 on Day 2.
To record intermittent IV medication administration
Medications in the MAR can be marked as administered before they are signed by a physician or verified by a pharmacist.
- Display the patient's MAR: In the patient chart, click the arrow in the green workflow menu (at the upper right) and select Go to MAR. (The options available in the green workflow menu depend on your user role.)
- Verify that the correct patient is selected. The patient ID number is located in the patient banner, below the patient's name.
If you use a barcode scanner, click anywhere on the screen and then scan the patient's wristband ID. If the barcode matches, you can continue.
- Click the name of the intermittent IV medication to administer. The input form opens with Administer selected and the most current dosage due time selected.

- Amount administered — The amount administered is populated from the order.
- Site — Select the IV site from the menu and then indicate Left or Right.
- Administered at — This field defaults to the current date and time.
Note: An alert appears if you enter the wrong dose or administer the dose at the wrong time. You can select the override options if needed and enter a reason for the change in the text field. - Note — Enter any notes concerning this medication administration.
- Make sure that only the medications you want to sign are selected and that the bars for those medications have turned green. If the High alert medication message appears, select the Requires validation from another nurse option.
- Click Sign.
If you use barcode scanning, scan the patient's wristband to sign the medication administration.
For high alert medications, the medication remains on the Due tab with a *Validation Required warning. A second nurse must then confirm that they checked the preparation and administration to verify that the medication was prepared correctly.
To record a push IV medication administration
Medications in the MAR can be marked as administered before they are signed by a physician or verified by a pharmacist.
- Display the patient's MAR: In the patient chart, click the arrow in the green workflow menu (at the upper right) and select Go to MAR. (The options available in the green workflow menu depend on your user role.)
- Verify that the correct patient is selected. The patient ID number is located in the patient banner, below the patient's name.
If you use a barcode scanner, click anywhere on the screen and then scan the patient's wristband ID. If the barcode matches, you can continue.
- Click the name of the push medication to administer. The input form opens with Administer selected, and the most current dosage due time selected.
- Products — Select the product.
If your hospital uses barcode scanning, scanning the medication barcode automatically selects the product in the list. - Amount administered — The amount administered is populated from the order.
- Site — Select the IV site from the menu and then indicate Left or Right.
- Start time — This field defaults to the current date and time.
The bar on the left side turns green.
Note: An alert appears if you enter the wrong dose or administer the dose at the wrong time. You can select the override options if needed and enter a reason for the change in the text field. - Note — Enter any notes concerning this medication administration.
- Click Sign.
If you use barcode scanning, scan the patient's wristband to sign the medication administration.
For high alert medications, the medication remains on the Due tab with a *Validation Required warning. A second nurse must then confirm that they checked the preparation and administration to verify that the medication was prepared correctly.
To record insulin dose administration
- Display the patient's MAR: In the patient chart, click the arrow in the green workflow menu (at the upper right) and select Go to MAR. (The options available in the green workflow menu depend on your user role.)
- Verify that the correct patient is selected. The patient ID number is located in the patient banner, below the patient's name.
If you use a barcode scanner, click anywhere on the screen and then scan the patient's wristband ID. If the barcode matches, you can continue.
Administer the insulin
- Click the insulin medication name to administer. The input form opens with Administer selected, and the most current dosage due time selected.
- Click Administer. The input form opens with additional fields. The fields may vary with the medication.
- To use the most recent glucose reading, select the Use most recent reading option.
You can also record a new reading. Any values you enter in the MAR also appear in the Vitals section of the patient chart and in the patient's flowsheet. - To record a new reading:
- Glucose — Enter the new reading.
- Taken — Enter the time of the new reading.
Note: If an insulin sliding scale was configured and selected, athenaOne calculates the units of insulin to be given to the patient based on the sliding scale selected when the order was created.
- Calculated dose — athenaOne automatically calculates the units of insulin to be given to the patient based on the Glucose field and the sliding scale selected when the order was entered.
- Administered — Enter the actual number of units administered and record the date and time in the fields provided.
Note: An alert appears if you enter the wrong dose or administer the dose at the wrong time. You can select the override options if needed and enter a reason for the change in the text field. - Note — Enter any notes concerning this medication administration.
- Make sure that only the medications you want to sign are selected and that the bars for those medications have turned green. If the High alert medication message appears, select the Requires validation from another nurse option.
- Click Sign.
If you use barcode scanning, scan the patient's wristband to sign the medication administration.
For high alert medications, the medication remains on the Due tab with a *Validation Required warning. A second nurse must then confirm that they checked the preparation and administration to verify that the medication was prepared correctly.
To record sliding scale insulin dose administration
- Display the patient's MAR: In the patient chart, click the arrow in the green workflow menu (at the upper right) and select Go to MAR. (The options available in the green workflow menu depend on your user role.)
- Verify that the correct patient is selected. The patient ID number is located in the patient banner, below the patient's name.
If you use a barcode scanner, click anywhere on the screen and then scan the patient's wristband ID. If the barcode matches, you can continue.
Administer the insulin
- Click the insulin medication name to administer. The input form opens with the most current dosage time, and administer selected.
- Use most recent reading — You can select this option to use the most recent glucose reading.
You can also record a new reading. Any values you enter in the MAR also appear in the Vitals section of the patient chart and in the patient's flowsheet. - To record a new reading:
- Glucose — Enter the new reading.
- Taken — Enter the time of the new reading.
Note: athenaOne calculates the units of insulin to be given to the patient, based on the sliding scale selected when the order was created.
- Calculated dose — athenaOne automatically calculates the units of insulin to be given to the patient based on the Glucose field and the sliding scale selected when the order was entered.
- Administered — Enter the actual number of units administered and record the date and time in the fields provided.
Note: An alert appears if you enter the wrong dose or administer the dose at the wrong time. You can select the override options if needed and enter a reason for the change in the text field. - Note — Enter any notes concerning this medication administration.
- Make sure that only the medications you want to sign are selected and that the bars for those medications have turned green.
- Click Sign.
If you use barcode scanning, scan the patient's wristband to sign the medication administration.
To record PCA medication administration
Medications in the MAR can be marked as administered before they are signed by a physician or verified by a pharmacist.
- Display the patient's MAR: In the patient chart, click the arrow in the green workflow menu (at the upper right) and select Go to MAR. (The options available in the green workflow menu depend on your user role.)
- Verify that the correct patient is selected. The patient ID number is located in the patient banner, below the patient's name.
If you use a barcode scanner, click anywhere on the screen and then scan the patient's wristband ID. If the barcode matches, you can continue.
- Click the name of the PCA medication to administer. The input form opens with Administer selected, and the most current dosage due time selected.
- Click record.
In the medication form
- Pain — Select the patient's level of pain.
- Product — The product is populated automatically. If more than one product could fulfill the order (the same drug from different manufacturers), you can select the product.
- For orders in mg or mL, the ordered amount is populated automatically on the first scan.
- For discrete units such as pills and capsules, scan the barcode for each unit ordered. For example, to fill an order for two tablets, scan the barcode twice.
Scanning the medication barcode populates the Products field, including the quantity.
- Dose received — Enter the dose received.
- Time recorded — This field defaults to the current time.
- Note — Enter any notes concerning this medication administration.
- Make sure that only the medications you want to sign are selected, and that the bars for those medications have turned green.
- Click Sign.
If you use barcode scanning, scan the patient's wristband to sign the medication administration.