 Person Center — Quality Tab
athenahealth Population Health
Use the Person Center Quality tab to track quality measures for each patient.
On the Main Menu, enter the patient's name, patient ID, or member ID (insurance number) in the Search Bar. Under NETWORK PATIENTS, select the data type and then click the search icon. Matching patients are listed under the Patients tab. Click the patient name to expand the selection, and then click the patient name in large text to display the patient's Person Center. Click the Quality tab on the left side
Your organization must use athenahealth Population Health, and you must have one of these roles to access the Quality tab of a patient's Person Center:
Assign this role to quality managers. This role provides access to the quality-related data for any patient in the Person Center, meaning that you can:
- Search for patients in the Search Bar
- Access the Quality tab
- Access the Utilization tab
- Access the Data tab (including Data Timeline)
Assign this role to quality analysts. This role provides access to the quality-related data in the Person Center, meaning that you can:
- Access the Quality tab
- Access the Utilization tab
- Access the Data tab (including Data Timeline)
The Quality tab of the Person Center is designed to help providers determine the quality measures relevant for each patient, and his or her compliance with those measures. This tab functions as a Quality Manager that pertains to each individual patient.
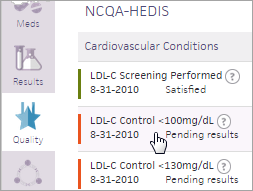
Similar to the Quality Manager dashboard (All Quality Programs on the Quality Manager page), the measures for which the patient is eligible are grouped by program. Within the row for each measure:
- Hover over the question mark next to a measure name to show a brief description of the measure as it relates to this patient.
- A colored bar to the left of the measure name indicates compliance status where:
- Green indicates Satisfied
- Orange indicates Not Satisfied
- Gray indicates that results are Excluded
- Immediately below the measure name, there is a brief summary of the information driving the compliance status, such as No result or the numerical value of a measure.
- Click Add Task to add tasks (Document Exclusion, Add Result, Upload Documentation, Note, Send Patient Letter, Patient Phone Call) to the Population Health Inbox.
Note: If you upload documentation (new files for that particular quality measure), you can access this information in the Activity Timeline.
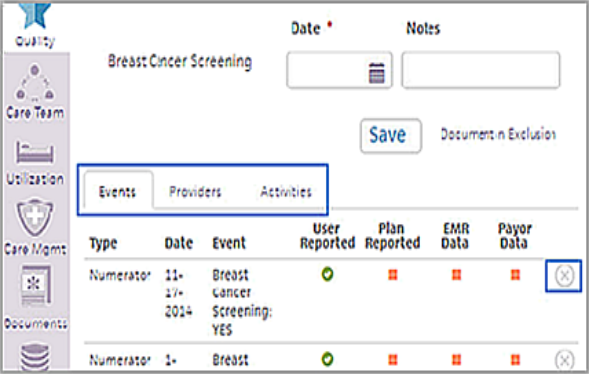
Click a measure to expand the row, and enable data entry for that measure. The required fields for data entry appear for the measure you expanded, as well as a Notes field. Process measures typically require only dates, whereas outcome measures also include a location to enter numerical results.
After you enter the required information, click Save. If the information entered satisfies the measure, a green bar appears next to the measure name. If it does not satisfy the measure, the status is Not Satisfied and an orange bar appears next to the measure name.
Additional information related to the patient and the measure is also located in the expanded view:
- The Events Tab contains all Numerator and Denominator events related to the measure, including the source of the data. Manually entered information can also be deleted in this tab by clicking the Delete icon
 in the last column.
 - The Providers Tab contains a summary of all provider encounters for the measure year being viewed to assist in medical record research.
- The Activities Tab contains all activities that have been conducted for this patient within the application, including user information and the measures to which the activity was related.

All columns in these tabs are sortable, in ascending and descending order.
To document an exclusion, click Document an exclusion in the expanded view. Then, select an exclusion reason from a list and enter a date. Clicking Save saves the information entered. A gray bar appears next to the measure name.
Only users who have the Population Management: Quality Manager permission can see and use the Document an exclusion link.
If your organization has a CMS data feed that indicates a date of death (DOD) for any of your patients, these deceased patients now appear with a Deceased tag, their DOD, and a calculated age in the patient banner. A similar tag appears when you select the patient on the Quality Manager Details page.
In addition to the tag:
- Deceased patients are automatically excluded from quality measures.
- The Deceased tag also appears if you manually enter a Deceased exclusion.
- You can opt to see the Deceased tag and DOD on the Patient Search Results and Add Multiple Results pages.
These features notify your staff of a patient's death and reduce work required to document quality measure exclusions.
Note: How the application handles deceased patients applies to both the Person Center and Quality Manager.
A patient marked as deceased is automatically excluded from quality measures, starting with the year of the patient's death. The patient appears in the Excluded category on the Quality Manager Details page, with date of death listed as part of the exclusion event ("Deceased" appears in the Event column).
Note: This information appears in the Quality Manager Details page, and in the Quality tab of the deceased patient's Person Center.
When you select Deceased as the reason for exclusion from a quality measure, the Deceased tag automatically appears in the patient banner and in the Quality Manager Details page, but with a question mark in place of the date of death. You cannot manually enter a date of death.
If your organization does not have a CMS data feed, you can manually enter a Deceased exclusion. In that case, the Deceased tag appears in the patient banner and in the Quality Manager Details page.
When you customize fields for the Patient Search Results and Add Multiple Results pages, you can specify Deceased and DOD as additional fields. When you add these fields, this information appears in the patient table:
- "Deceased" appears if a patient is deceased. The column is blank for all other patients.
- The patient's DOD appears only if this information is available. Otherwise, the cell remains blank.
You can perform the following tasks for each patient in the Quality tab:
- To view measures that you hid in Quality Manager, click HIDDEN.
- To add and view patient appointments, click Appointments.
- To create a letter to a patient, click Letter.
- To customize and print a quality management summary, click Print.
-
Display the patient's Person Center Quality tab: On the Main Menu, enter the patient's name, patient ID, or member ID (insurance number) in the Search Bar. Under NETWORK PATIENTS, select the data type and then click the search icon. Matching patients are listed under the Patients tab. Click the patient name to expand the selection, and then click the patient name in large text to display the patient's Person Center. Click the Quality tab on the left side.
- Click the measure of interest.

The area expands to show measure details. - In the Events area, click the X icon
 next to the result that you want to delete.
Note You can delete only results that were entered manually; therefore, you may not see an X icon next to each result.
- Display the patient's Person Center Quality tab: On the Main Menu, enter the patient's name, patient ID, or member ID (insurance number) in the Search Bar. Under NETWORK PATIENTS, select the data type and then click the search icon. Matching patients are listed under the Patients tab. Click the patient name to expand the selection, and then click the patient name in large text to display the patient's Person Center. Click the Quality tab on the left side.
- Click a quality measure.
- Click Document an Exclusion.
- Complete the Exclusion fields:
- Date — Enter the exclusion date.
- Choose exclusion reason — Select Deceased from the list.
- Note — If applicable, enter a note about the exclusion in the third field on the right.
- Click Save.
- Display the Quality Manager Details page: On the Main Menu, click Quality, and then click Network Quality Dashboard. In the center pane, under All Quality Programs, click a program status (for example, "Goal not reached") and then click a test or measure.
- Click the name of the desired patient in the patient list. An extended patient view appears.
- Click Document an exclusion next to the Save button. A row labeled "Exclusion" appears in the patient view.
- Date — Enter a date for the exclusion.
Note: Exclusion dates are keyed to the END DATE that appears at the top of the Quality Manager Details page. To change the end date, click END DATE: YYYY at the top of the page, select a new year from the list of years available, then click Apply. - Select Deceased from the Choose exclusion menu.
- Notes — Enter notes (optional).
- Click Save.
The exclusion appears in the panel's Events tab. The application updates patient status figures above the patient list.
Note: To view measure data for the selected patient in the Person Center, click the patient's name at the top of the panel. - Click Close X to close the patient's panel.
- Display the Quality Manager page: On the Main Menu, click Quality. Click Network Quality Dashboard.
- Click a program status (for example, "Goal not reached") to display the measures included in the program.
- Click Add Multiple Results.
- Click CUSTOMIZE FIELDS.
-
Select these options to add them as columns in the list:
- Member Deceased ("Deceased" appears if a patient is deceased. The column is blank for all other patients.)
-
Member DOD (DOD appears only if this data is available; otherwise the cell remains blank.)