 User Guide — Care Plan
athenahealth Population Health
A care manager can create a care plan for a patient to prevent or better manage an illness. A care plan helps you manage care-related events, goals, and assessments for an individual patient.
On the Main Menu, enter the patient's name, patient ID, or member ID (insurance number) in the Search Bar. Under NETWORK PATIENTS, select the data type and then click the search icon. Matching patients are listed under the Patients tab. Click the patient name to expand the selection, and then click the patient name in large text to display the patient's Person Center. Click Care Plan at the top of the page.
Your organization must use athenahealth Population Health, and you must have one of these roles to access a patient's care plan:
-
Population Management: Care Manager
-
Population Management: Care User
If you review and complete events for members of the care team, you need one of the following:
- Population Management: Reviews Others' Care Changes role
- Population Management: Care Manager: Can Review Others' Care Changes permission
Note: Make sure that you do not also have the Population Management: Flag Care Activities for Review role or the Population Management: Care Manager: Requires Review permission.
If you create events that are reviewed and completed by someone else, you need one of the following:
- Population Management: Flag Care Activities for Review role
Important: Users with this role cannot mark events as complete. - Population Management: Care Manager: Requires Review permission
Note: To complete an event, you must assign it to a user who has the Population Management: Reviews Others' Care Changes role.
After you enroll a patient in care management, you can create a care plan for the patient.
If a patient does not already have a care plan, you can add the default care plan, called Comprehensive Health (a documentation event appears in the timeline to indicate that you added the care plan).
After you create the default Comprehensive Health care plan, you can:
- Add templated information to the Comprehensive Health care plan (see "To add templated information to a care plan").
- Create additional care plans and toggle between the care plans as needed (see "To add additional care plans for a patient").
To create the Comprehensive Health care plan for a patient with no care plan:
- Display the patient's Person Center: On the Main Menu, enter the patient's name, patient ID, or member ID (insurance number) in the Search Bar. Under NETWORK PATIENTS, select the data type and then click the search icon.
Matching patients appear under the Patients tab. - Click the patient name to expand the selection, and then click the patient name in large text to display the patient's Person Center.
- Click
 Care Plan at the top of the Person Center.
Note: The plus icon appears only if the patient does not have a care plan.
The Comprehensive Health care plan opens. - Add health concerns, goals, tasks, and assessments to the default care plan, as described in the following sections.
Note: For certain common chronic conditions, you can add templated health concerns, goals, tasks, and assessments (see "To add templated information to a care plan").
For certain common chronic conditions, you can select a template to add the contents of the template to a care plan. Using templates, you can quickly enter a set of goals, tasks, and assessments commonly associated with the condition.
Note: You can remove goals, tasks, and assessments from a care plan after you add the templated information, but you cannot add or edit items in the template. For instructions on creating a care plan without a template, see "To add additional care plans for a patient."
- Display the patient's Person Center: On the Main Menu, enter the patient's name, patient ID, or member ID (insurance number) in the Search Bar. Under NETWORK PATIENTS, select the data type and then click the search icon.
Matching patients appear under the Patients tab. - Click the patient name to expand the selection, and then click the patient name in large text to display the patient's Person Center.
- Click Care Plan at the top of the Person Center.
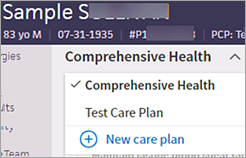
- If the patient has more than one care plan, select the care plan from the menu.
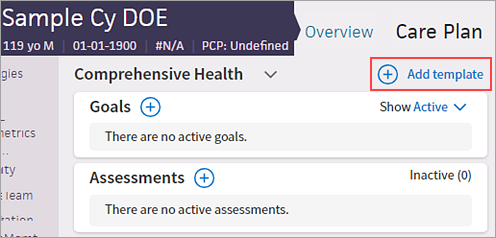
- Click
 Add template.
- Add care plan templates — Select one or more care plan templates.
Tip: You can begin typing the name of a care plan template to search for and select it.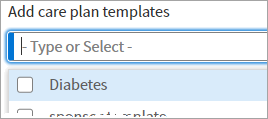
Note: The care plan templates you select appear in the search field. (To remove a care plan, click X.)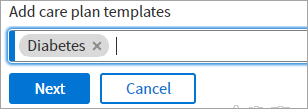
- After you select all the templates, click outside the menu.
- Click Next.
For the first care plan template you selected, the goals, assessments, and tasks associated with that template are displayed in the care plan.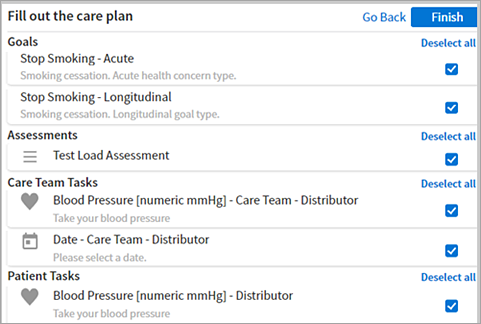
- To remove any of the default goals, assessments, or tasks, clear the box next to the item that you don't want to include for the patient. You can also click Deselect all or Select all to clear or select all options in a group.
Note: You cannot add or edit items in a template. - Click Finish.
After you create the default Comprehensive Health care plan, you can add additional care plans and toggle between the care plans as needed.
Note: To add a care plan based on a template, see "To add a care plan from a template."
- Display the patient's Person Center: On the Main Menu, enter the patient's name, patient ID, or member ID (insurance number) in the Search Bar. Under NETWORK PATIENTS, select the data type and then click the search icon.
Matching patients appear under the Patients tab. - Click the patient name to expand the selection, and then click the patient name in large text to display the patient's Person Center.
- Click Care Plan at the top of the Person Center.
- Click the down arrow to the right of Comprehensive Health, and then click
 New care plan.
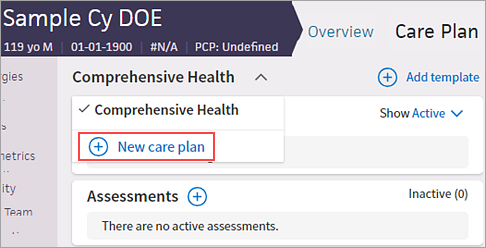
- Enter a name for the care plan, such as Hypertension, and then click Save.
- To add templated information to the new care plan, click
 Add template and then search for and select the templates (for more information, see "To add templated information to a care plan").
 - Add health concerns, goals, tasks, and assessments to this care plan as needed.
For more information, see the following sections.
If the patient has more than one care plan, you can see all their care plan information on one page. You can use the drop-down menus at the top of the patient's care plan page to select which care plans and care plan components you want to see.
- Display the patient's Person Center: On the Main Menu, enter the patient's name, patient ID, or member ID (insurance number) in the Search Bar. Under NETWORK PATIENTS, select the data type and then click the search icon.
Matching patients appear under the Patients tab. - Click the patient name to expand the selection, and then click the patient name in large text to display the patient's Person Center.
- Click Care Plan at the top of the Person Center.
- Click Care Plans Selected.
- All care plans are checked and appear on the patient's care plan page by default. Uncheck the care plans you do not want to see on the patient's care plan.
- Display the patient's Person Center: On the Main Menu, enter the patient's name, patient ID, or member ID (insurance number) in the Search Bar. Under NETWORK PATIENTS, select the data type and then click the search icon.
Matching patients appear under the Patients tab. - Click the patient name to expand the selection, and then click the patient name in large text to display the patient's Person Center.
- Click Care Plan at the top of the Person Center.
- Click Components Selected.
- All care plans components are checked and appear on the patient's care plan page by default. Uncheck the care plan components you do not want to see on the patient's care plan.
You can rename a care plan that you created.
Note: You cannot rename the default Comprehensive Health care plan.
- Display the patient's Person Center: On the Main Menu, enter the patient's name, patient ID, or member ID (insurance number) in the Search Bar. Under NETWORK PATIENTS, select the data type and then click the search icon.
Matching patients appear under the Patients tab. - Click the patient name to expand the selection, and then click the patient name in large text to display the patient's Person Center.
- Click Care Plan at the top of the Person Center.
- Click the Comprehensive Health menu to display all care plans for the patient.
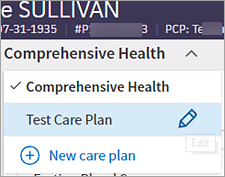
- Hover the cursor over the care plan whose name you want to change and click the edit icon
 .
. - Enter the new name for the care plan and click Save.

Add standard or custom goals based on your patient's care management health concerns.
- Display the patient's Person Center: On the Main Menu, enter the patient's name, patient ID, or member ID (insurance number) in the Search Bar. Under NETWORK PATIENTS, select the data type and then click the search icon.
Matching patients appear under the Patients tab. -
Click the patient name to expand the selection, and then click the patient name in large text to display the patient's Person Center.
- Click Care Plan at the top of the Person Center.
- Select the care plan that you want to add a goal for.
- Click the plus icon to the right of Goals.
- Goal — You can select a goal from the content library or create a goal in your own words.
- Start typing the name of a goal and select it from the list that appears.
- Enter the goal in your own words, for example, "Lose 15 pounds."
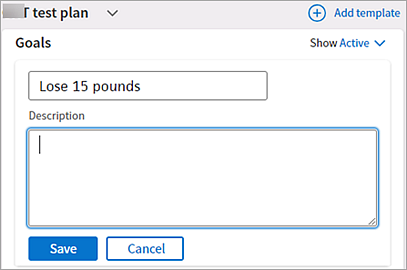
- Description — Enter details about the desired outcome for this goal.
Note: If you selected a goal from the search results, a description for the goal may appear in the Description field. You can edit this description. - Click Save.
After you create a goal in the care plan, you can change the name and description of the goal or change its status at any time. You can also prioritize goals in a care plan.
Note: If two members of a care team attempt to update a patient's goals simultaneously, an alert appears (Another user is currently making edits to goals). Click Refresh Goals to continue. Both care team members see the goal as it currently exists, including any changes made by the other team member.
- Display the patient's Person Center: On the Main Menu, enter the patient's name, patient ID, or member ID (insurance number) in the Search Bar. Under NETWORK PATIENTS, select the data type and then click the search icon.
Matching patients appear under the Patients tab. -
Click the patient name to expand the selection, and then click the patient name in large text to display the patient's Person Center.
- Click Care Plan at the top of the Person Center.
- Select the care plan that you want to update a goal for.
- To change the goal name or description:
- Locate the goal and then click the more options icon
 on the right.
 - From the menu, select Setup.
The goal window opens. - Edit the Title or Description field and then click Save.
- To flag a goal as a priority goal (you can mark more than one goal as a priority goal):
- Locate the goal and then click the more options icon
 on the right.
 - From the menu, select Flag as priority.
The goal is now marked with a priority flag (also visible in the patient timeline).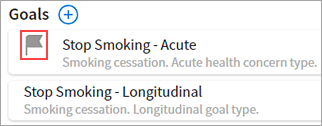
- To remove the flag from a priority goal, click the more options icon
 next to the goal and select Remove flag from the menu.
 - To make a goal inactive:
- Locate the goal and click the more options icon
 on the right.
 - From the menu, select Make inactive.
Note: If the goal was a priority goal, the priority flag is removed. - To reactivate an inactive goal:
- Click the Show menu to the right of Goals and select Inactive from the menu to display inactive goals.
- Locate the inactive goal and click the Move to active button.
- To complete a goal:
- Locate the goal and click the status menu.
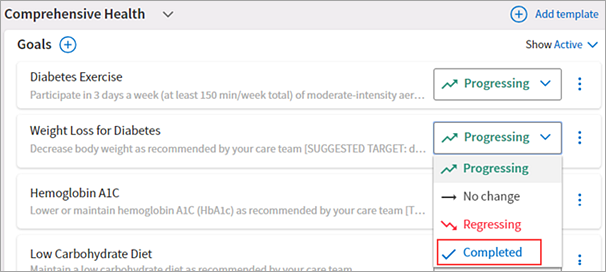
- Click Completed.
Note: If the goal was a priority goal, the priority flag is removed when you mark the goal as Completed. - To see completed goals:
- Click the Show menu to the right of Goals.
- Select Completed.
For each care plan, you can create and update tasks for care team members.
Add standard or custom tasks for care team members based on your patient's care management problems. You can associate a care team task with one of the goals in the care plan and associate the task with a specific care team member, if you choose.
Note: You can create custom tasks that can be marked as complete, but you cannot create a recurring task or a task that requests specific, structured data or free-text entries.
- Display the patient's Person Center: On the Main Menu, enter the patient's name, patient ID, or member ID (insurance number) in the Search Bar. Under NETWORK PATIENTS, select the data type and then click the search icon.
Matching patients appear under the Patients tab. -
Click the patient name to expand the selection, and then click the patient name in large text to display the patient's Person Center.
- Click Care Plan at the top of the Person Center.
- Click the care plan that you want to add a task for.
- Click the plus icon to the right of Care Team Tasks.
Additional fields appear.
Note: If you marked a one-time care manager task as complete, you must wait at least one day to add the same task to the care plan. - Task — You can select a task from the content library or create a care team task in your own words.
- Task instructions — Enter notes to describe the task fully.
Note: For tasks that involve common measurements or support — such as blood pressure, blood glucose, heart rate, and educational content — an additional window appears for you to record the information or access the educational content. - Relate this task to a goal — Select a goal to associate this task with or select No associated goal.
- Assigned to — Assign the task to a member of the care team, or select Any Care Team Member from the menu.
- Click Save.
After you create a care team task in the care plan, you can change the description of the task or change its status at any time.
- Display the patient's Person Center: On the Main Menu, enter the patient's name, patient ID, or member ID (insurance number) in the Search Bar. Under NETWORK PATIENTS, select the data type and then click the search icon.
Matching patients appear under the Patients tab. -
Click the patient name to expand the selection, and then click the patient name in large text to display the patient's Person Center.
- Click Care Plan at the top of the Person Center.
- Click the care plan that you want to update a task for.
- To change the task description, related goal, or care team assignment:
- Click the task and then click the more options icon
 next to the task.
 - Select Setup from the menu.
The task window opens. - Edit the Instructions, Relate to a goal, or Assigned to field, and then click Save.
- To make a task inactive:
- Click the task and then click the more options icon
 next to the task.
 - From the menu, select Make inactive.
The Inactive counter increments by 1. - To reactivate an inactive task:
- Click the Show menu to the right of Care Team Tasks and select Inactive from the menu to display inactive tasks.
- Locate the inactive task and click the Move to active button.
- To complete a task, locate the task and click the Complete button.
- To see completed tasks:
- Click the Show menu to the right of Care Team Tasks.
- Select Completed from the menu.

Note: You can click the refresh icon ![]() (on the top left corner of the care plan) to update the data for all the patient's care plans that include the same task.
(on the top left corner of the care plan) to update the data for all the patient's care plans that include the same task.
If you or another care team member enter an incorrect task value (such as a temperature or blood pressure reading), you can edit the previously recorded task value.
Note: You cannot edit checkmark tasks (such as "Call Dr. James Tuesday") or recurring tasks.
When a care team member changes the value of a task, the patient timeline displays a change to the care plan that is visible to all users. The timeline displays the change in this format: "Updated Care Team Task" with the task name.
- Display the patient's Person Center: On the Main Menu, enter the patient's name, patient ID, or member ID (insurance number) in the Search Bar. Under NETWORK PATIENTS, select the data type and then click the search icon.
Matching patients appear under the Patients tab. -
Click the patient name to expand the selection, and then click the patient name in large text to display the patient's Person Center.
- Click Care Plan at the top of the Person Center.
- Select the care plan that you want to correct a task for.
- To display all completed care team tasks:
- Click the Show menu to the right of Care Team Tasks.
- Select Completed from the menu.

- Click the edit icon
 to the left of the value you need to correct.
The task window opens. - Edit the recorded value. For example, for a numeric pain scale, select the correct value from the list; for a blood pressure reading, enter the correct reading.
- Click Save.
For each care plan, you can create and update tasks for the patient.
Add standard or custom tasks for patients based on your patient's care management problems. You can associate a patient task with one of the goals in the care plan, if you choose.
Note: You can create custom tasks that can be marked as complete and recurring tasks, but you cannot create a custom task that requests specific, structured data or free-text entries.
- Display the patient's Person Center: On the Main Menu, enter the patient's name, patient ID, or member ID (insurance number) in the Search Bar. Under NETWORK PATIENTS, select the data type and then click the search icon.
Matching patients appear under the Patients tab. -
Click the patient name to expand the selection, and then click the patient name in large text to display the patient's Person Center.
- Click Care Plan at the top of the Person Center.
- Click the care plan that you want to add a task for.
- Click the plus icon to the right of Patient Tasks.
Additional fields appear. - Task — You can select a task from the content library or create a patient task in your own words.
- Task instructions — Enter notes to describe the task fully. (Notes for some tasks appear automatically; you can edit those notes.)
Note: For tasks that involve common measurements or support — such as blood pressure, blood glucose, heart rate, and educational content — an additional window appears for you to record the information or access the educational content. - Relate this task to a Goal — Select a goal to associate this task with or select No associated goal.
- Schedule — Select One-time (the default value) or Recurring (for a task that should be repeated regularly).
- If you select One-time, the Due date field appears, where you can enter a due date for the patient task.
- If you select Recurring, you can select the days of the week on which the patient should complete the task (all days are selected by default). Click a day to deselect it or to select it again.
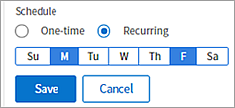
In this example, the patient should complete the task on Mondays and Fridays. - Click Save.
After you create a patient task in the care plan, you can change the description of the task or change its status at any time.
- Display the patient's Person Center: On the Main Menu, enter the patient's name, patient ID, or member ID (insurance number) in the Search Bar. Under NETWORK PATIENTS, select the data type and then click the search icon.
Matching patients appear under the Patients tab. -
Click the patient name to expand the selection, and then click the patient name in large text to display the patient's Person Center.
- Click Care Plan at the top of the Person Center.
- Click the care plan that you want to update a task for.
- To change the task instructions or related goal:
- Click the task and then click the more options icon
 next to the task.
 - Select Setup from the menu.
The task window opens. - Edit the Instructions or Relate to a goal field and then click Save.
- To make a patient task inactive:
- Click the task and then click the more options icon
 next to the task.
 - Select Make inactive from the menu.
The Inactive counter increments by 1. - To reactivate an inactive patient task:
- Click the Show menu to the right of Patient Tasks and select Inactive from the menu to display inactive tasks.
- Locate the inactive task and click the Move to active button.
- To complete a patient task, locate the task and click the Complete button.
Note: Some tasks — for example, Log Weight — have a Record button instead of a Complete button. Click the button, record the value, and then click Save and Complete. - To see completed tasks:
- Click the Show menu to the right of Patient Tasks.
- Select Completed from the menu.

Note: You can click the refresh icon ![]() (on the top left corner of the care plan) to update the data for all the patient's care plans that include the same task.
(on the top left corner of the care plan) to update the data for all the patient's care plans that include the same task.
If you or another care team member enter an incorrect task value (such as a temperature or blood pressure recording), you can edit the previously recorded task value. You can edit values for recurring patient tasks and for completed patient tasks.
Note: You cannot edit checkmark tasks (such as "Drink 5L of water").
Each time a change is made, the patient timeline displays a change to the care plan that is visible to all users. The timeline displays the change in this format: "Updated Patient Task" with the task name.
- Display the patient's Person Center: On the Main Menu, enter the patient's name, patient ID, or member ID (insurance number) in the Search Bar. Under NETWORK PATIENTS, select the data type and then click the search icon.
Matching patients appear under the Patients tab. -
Click the patient name to expand the selection, and then click the patient name in large text to display the patient's Person Center.
- Click Care Plan at the top of the Person Center.
- Click the care plan that you want to correct a patient task for.
Recurring patient tasks
- Click the recurring patient task.
The measurement history appears. - Hover over the measurement to change, for example, if the value for a specific day is marked as Skipped but your patient actually completed the task and has given you the value for that day.
Tip: Click View more records to expand the list of tasks. - Click the edit icon
 to the right of the value to change.
 - Edit the recorded value.
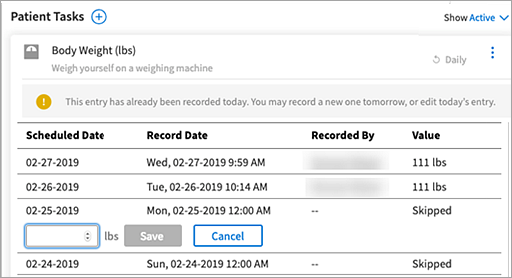
- Click Save.
Completed patient tasks
- To display all completed patient tasks:
- Click the Show Active menu to the right of Patient Tasks.
- Select Completed from the menu.

- Click the edit icon
 to the left of the value you need to correct.
The task window opens. - Edit the recorded value. For example, for a numeric pain scale, select the correct value from the list; for a blood pressure reading, enter the correct reading.

- Click Save.
Assessments are groups of questions to help evaluate and track the progress of a patient's care. Assessments can be scored. Status messages let you know when an assessment is due, whether it's in process, or whether it's complete.
Assessments from published works are acknowledged with a citation at the bottom of the assessment.

- Display the patient's Person Center: On the Main Menu, enter the patient's name, patient ID, or member ID (insurance number) in the Search Bar. Under NETWORK PATIENTS, select the data type and then click the search icon.
Matching patients appear under the Patients tab. -
Click the patient name to expand the selection, and then click the patient name in large text to display the patient's Person Center.
- Click Care Plan at the top of the Person Center.
- Click the care plan that you want to add an assessment for.
- Click the plus icon to the right of Assessments.
Additional fields appear. - Assessment — Start typing the name of the assessment and select it from the list that appears.
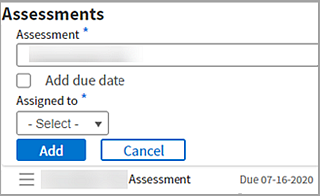
- Assigned to — Select a member of the care team (or yourself) to perform this assessment.
Note: You can assign assessments only to members of the patient's care team. See To add members to a patient's care team if you need to add more care team members. - Add due date — To add a date by which the assessment should be administered, select this option. The Due date field appears.
Note: This field is automatically selected when you assign an assessment to a member of your care team. - Due date — Specify the due date for the assessment.
Note: The due date is required when you assign an assessment to a member of your care team. - Click Save.
- Display the patient's Person Center: On the Main Menu, enter the patient's name, patient ID, or member ID (insurance number) in the Search Bar. Under NETWORK PATIENTS, select the data type and then click the search icon.
Matching patients appear under the Patients tab. -
Click the patient name to expand the selection, and then click the patient name in large text to display the patient's Person Center.
- Click Care Plan at the top of the Person Center.
- Click the care plan that you want to administer an assessment for.
- Scroll down to the Assessments section and locate the assessment.
- Click Assess to the right of the assessment that you want to administer to the patient.

- Ask your patient the questions and record the patient's responses.
Note: Required questions are indicated by a blue bar to the left of the question.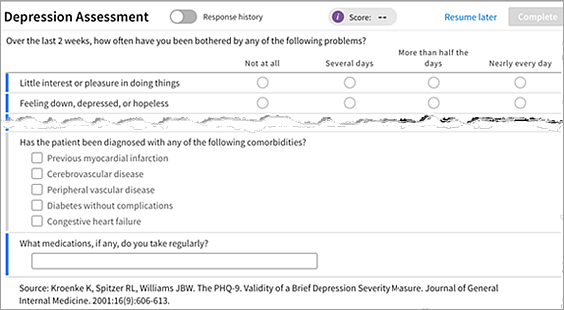
- To display the patient's previous answers to each question while you administer the assessment, select the Response History option at the top of the Assessments section.
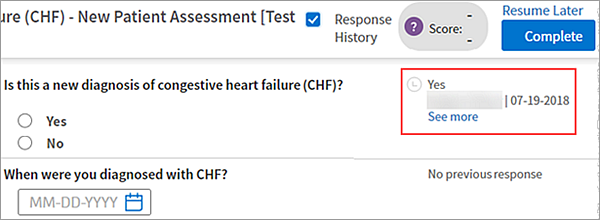
The previous answers appear to the right of the questions. Click See more to display all previous answers to the questions.
Note: The Response History option is available only if the patient previously took this assessment. - To save the assessment for completion at a later time, click Resume Later.
Note: Click Assess again to resume where you left off. - After making sure that all required questions are answered, click Complete. The final score appears at the top of the Assessments section.
Note: The Complete button is enabled when all required questions are answered. - To print a completed assessment, click the Print icon at the top right of the assessment.

The printed assessment includes patient identifying information, date and time that the assessment was completed, name of the person who administered the assessment, all completed assessment questions, and the patient's answers.
- Display the patient's Person Center: On the Main Menu, enter the patient's name, patient ID, or member ID (insurance number) in the Search Bar. Under NETWORK PATIENTS, select the data type and then click the search icon.
Matching patients appear under the Patients tab. - Click Care Plan at the top of the Person Center and select the care plan you want to update the status of an assessment for.
To make an assessment inactive
- Click the more options icon
 next to the assessment.
 - Select Make inactive in the list.
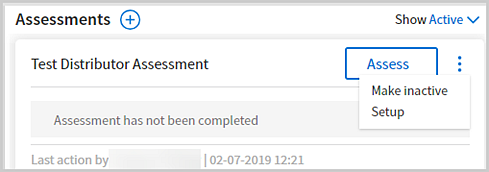
The inactive counter increments by 1.
To reactivate an inactive assessment
- Click the Show menu to the right of Assessments and select Inactive in the menu to display inactive assessments.
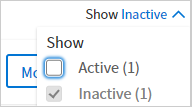
- Hover over the assessment and click Move to active.

A patient's previous answers to an assessment can supply context for their current answers, giving care managers more clinical information. You can view assessment history at any time, including while administering an assessment.
From the care plan
- Display the patient's Person Center: On the Main Menu, enter the patient's name, patient ID, or member ID (insurance number) in the Search Bar. Under NETWORK PATIENTS, select the data type and then click the search icon.
Matching patients appear under the Patients tab. -
Click the patient name to expand the selection, and then click the patient name in large text to display the patient's Person Center.
- Click Care Plan at the top of the Person Center.
- Click the care plan that includes the assessment that you want to see and scroll down to the Assessments section.
- In the list of assessments, click the body of an assessment to view the history of this assessment for this patient.
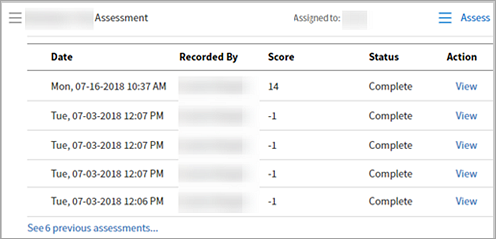
The history includes the date and time of the assessment, which care team member recorded it, and the score for assessments that were administered more than once. - Click View at the far right to see the most recent previous responses for each question.
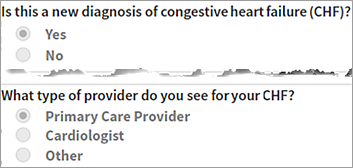
Note: You cannot edit previous answers.
During an assessment
- Display the patient's Person Center: On the Main Menu, enter the patient's name, patient ID, or member ID (insurance number) in the Search Bar. Under NETWORK PATIENTS, select the data type and then click the search icon.
Matching patients appear under the Patients tab. -
Click the patient name to expand the selection, and then click the patient name in large text to display the patient's Person Center.
- Click Care Plan at the top of the Person Center.
- Click the care plan that includes the assessment that you want to see and scroll down to the Assessments section.
- Click Assess.
- Check Response History at the top of the assessment to see the assessment history.
After you create a care plan, you can add reasons for the care plan. You can also mark a the reason for care plan as inactive and revisit it later by making it active again.
Health concerns (referred to previously as "reasons for care") documented in the care plan are problems, barriers to care, or social determinants of health that patients should focus on with guidance and assistance from the patient's care team. You use the care plan to document goals and tasks for patients enrolled in care management (see athenaClinicals Care Plan or, for Population Health, User Guide: Care Plan).
Health concerns on the Care tab are associated with the patient. Not all problems documented on the Problems tab need to be addressed in the care plan as health concerns.
- Display the patient's Person Center: On the Main Menu, enter the patient's name, patient ID, or member ID (insurance number) in the Search Bar. Under NETWORK PATIENTS, select the data type and then click the search icon.
Matching patients appear under the Patients tab. - Click the patient name to expand the selection, and then click the patient name in large text to display the patient's Person Center.
- Click Care Plan at the top of the Person Center.
- Select the care plan that you want to edit.
- Scroll down to the bottom of the care plan and click the plus icon to the right of Reasons for Care Plan.
- Begin typing the name or SNOMED code of a care management problem and then select the reason for care from the list that appears.

- Click Save.
- To mark a reason for care plan as inactive:
- Click the more options icon
 next to the reason for care plan.
- From the menu, select Make inactive.
- To reactivate an inactive reason for care plan:
- Click the Show menu to the right of Reasons for Care Plan and select Inactive from the menu to display inactive health concerns.
- Click the Move to active button next to the reason for care plan.
If you mistakenly add a goal, task, or reason for care to the care plan — or if the goal, task, or reason for care is no longer relevant — you can permanently remove the it from the care plan.
- Display the Person Center and click Care Plan at the top of the page.
- Select the care plan that includes the goal, task, or reason for care that you want to delete.
- Click the more options icon
 to the right of the reason for care, goal, or task to display the menu and select Delete.
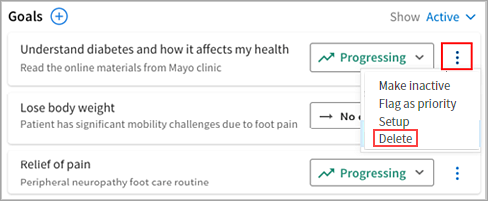
- Click Delete.
You can use the timeline to create, edit, and reschedule events in a care plan.
Although you can access a patient's care plan at any time by clicking Care Plan on the Overview page of the Person Center, you can also create an event in the timeline.
- Display the patient's Person Center: On the Main Menu, enter the patient's name, patient ID, or member ID (insurance number) in the Search Bar. Under NETWORK PATIENTS, select the data type and then click the search icon.
Matching patients appear under the Patients tab. - Click the patient name to expand the selection, and then click the patient name in large text to display the patient's Person Center.
- Click New Event, and then select Care Event.
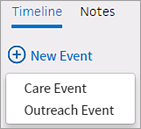
The New Event window appears. - Complete the fields.
Tip: Click Show Schedule to check schedule availability. - Click Schedule to schedule the event or Resume Later to start entering your note about the event.
An event in the timeline can be edited only by the person it is assigned to.
- Display the patient's Person Center: On the Main Menu, enter the patient's name, patient ID, or member ID (insurance number) in the Search Bar. Under NETWORK PATIENTS, select the data type and then click the search icon.
Matching patients appear under the Patients tab. - Click the patient name to expand the selection, and then click the patient name in large text to display the patient's Person Center.
- In the timeline, click the event to display the event details.
- Click the edit icon
 next to the event name.
 - Edit the event.
- Click Track Changes to make changes to the care plan, or click Schedule to schedule a new event.
Note: Choose Track Changes when you want to associate care plan changes with an event. - Close the event.
- Click Resume Later if you want to make additional changes to the care plan or documentation at a later time.
- Click Complete to permanently close the event.
Note: Marking an event as Complete locks the event permanently and prevents further edits. You cannot undo or unlock completed events. If additional notes are needed after an event has been marked as complete, you can create another event and add a note there.
Only the user assigned to the event can edit the event. You can assign events to other members of your care team for review and access to editing, or you can reassign an event to yourself to give you edit access.
Example: If an event is assigned to another care manager, you cannot edit the event. However, if you have the Care Manager Admin permission, you can reassign the event to yourself and then edit the event.
- Display the patient's Person Center: On the Main Menu, enter the patient's name, patient ID, or member ID (insurance number) in the Search Bar. Under NETWORK PATIENTS, select the data type and then click the search icon.
Matching patients appear under the Patients tab. - Click the patient name to expand the selection, and then click the patient name in large text to display the patient's Person Center.
- In the event timeline, click the event to see additional information.
- Click the edit icon
 .
. - Assign To — Click into the field to select a new user to assign the event to. If you want to assign the event to yourself, select Myself.
- If you assigned the event to yourself, edit, document, or schedule the event as needed.
- Click Complete or Resume Later.
Note: Marking an event as Complete locks the event permanently and prevents further edits. You cannot undo or unlock completed events. If additional notes are needed after an event has been marked as complete, you can create another event and add a note there.
- Display the patient's Person Center: On the Main Menu, enter the patient's name, patient ID, or member ID (insurance number) in the Search Bar. Under NETWORK PATIENTS, select the data type and then click the search icon.
Matching patients appear under the Patients tab. - Click the patient name to expand the selection, and then click the patient name in large text to display the patient's Person Center.
- In the event timeline, click the scheduled event to display the event details.
- Click the edit icon
 .
. - Edit the schedule information.
Tip: Click Show Schedule to check schedule availability.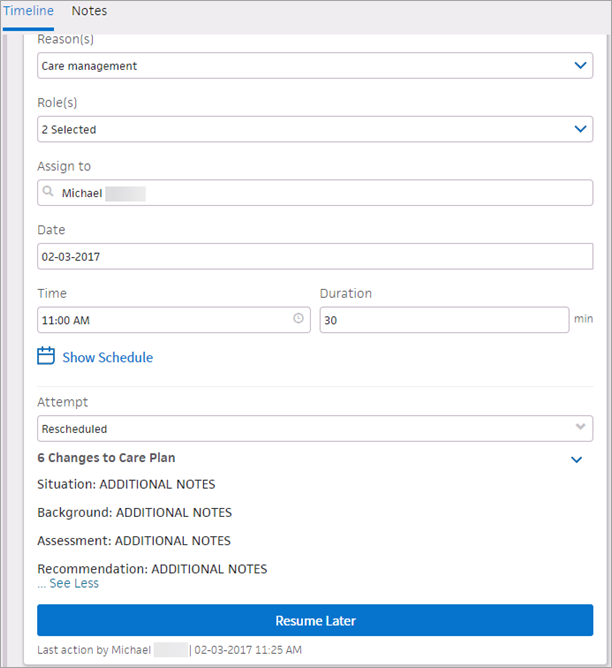
- Reason — Select Rescheduled.
- Click Resume Later.
A yellow Requires Review icon  indicates that the event requires review before it can be marked as complete. Only users who have either of the following roles or permissions can review and complete these types of events:
- Population Management: Reviews Others' Care Changes role
- Population Management: Care Manager: Can Review Others' Care Changes permission
If you do not have permission to review and complete events, the event remains In Progress until a user with review permission reviews and completes the event.
- Display the patient's Person Center: On the Main Menu, enter the patient's name, patient ID, or member ID (insurance number) in the Search Bar. Under NETWORK PATIENTS, select the data type and then click the search icon.
Matching patients appear under the Patients tab. - Click the patient name to expand the selection, and then click the patient name in large text to display the patient's Person Center.
- In the timeline, click the event to display the event details.
- Click the edit icon
 next to the event name.
 - Review the event.
- Click the down arrow to the right of Resume Later, and select Review and Complete.
Note: Marking an event as Complete locks the event permanently and prevents further edits. You cannot undo or unlock completed events. If additional notes are needed after an event has been marked as complete, you can create another event and add a note there.
If an event is scheduled for a future date and time you can select Cancel Event from the Resume Later menu.
- Display the patient's Person Center: On the Main Menu, enter the patient's name, patient ID, or member ID (insurance number) in the Search Bar. Under NETWORK PATIENTS, select the data type and then click the search icon.
Matching patients appear under the Patients tab. - Click the patient name to expand the selection, and then click the patient name in large text to display the patient's Person Center.
- In the timeline, click the event to display the event details.
- Click the edit icon
 next to the event name.
 - Click the down arrow to the right of Resume Later, and select Cancel Event.
Note: Marking an event as Canceled locks the event permanently and prevents further edits. You cannot undo or unlock canceled events. If additional notes are needed after an event has been marked as complete, you can create another event and add a note there.
You cannot cancel the following types of events:
- Documentation events
- Events that have "Track Changes" enabled
- Events that do not include care plan changes
- Events assigned to another user
Barriers to a patient's health care access are documented at the patient level. Barriers appear on the Overview page of a patient's Person Center, as well as on the Care Management tab.
- Display the patient's Person Center: On the Main Menu, enter the patient's name, patient ID, or member ID (insurance number) in the Search Bar. Under NETWORK PATIENTS, select the data type and then click the search icon.
Matching patients appear under the Patients tab. -
Click the patient name to expand the selection, and then click the patient name in large text to display the patient's Person Center.
- Click the Care Management tab.
- On the Care Management tab, click the plus sign next to Barriers to Health.
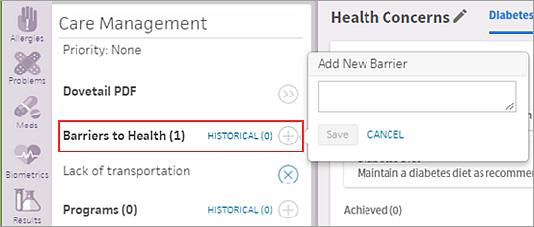
- Enter a free-text barrier to health care access for the patient (for example, the patient is hard of hearing or unable to drive).
- Click Save.
Note: You can remove a barrier by clicking the X icon next to the barrier.
When you share or print a care plan from the Person Center, you can select the recipient and customize the content of the care plan.
- Display the patient's Person Center: On the Main Menu, enter the patient's name, patient ID, or member ID (insurance number) in the Search Bar. Under NETWORK PATIENTS, select the data type and then click the search icon.
Matching patients appear under the Patients tab. - Click the patient name to expand the selection, and then click the patient name in large text to display the patient's Person Center.
- From the SHARE WITH menu at the top right, select the person you intend to share the printed care plan with (Clinician, Patient, or Quality Manager).
Alternatively, you can click the print icon on most events to open the Share Care Plan window.
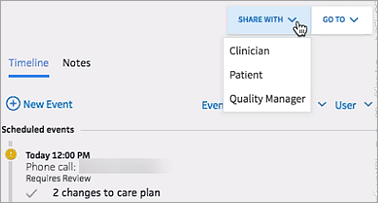
Note: The Share Care Plan with feature does not send the care plan to the selected person, but simply changes the type of information included in the printed document based on what that recipient would want to know. The default content of the printed care plan is configured for each type of recipient, but you can select or deselect information in the document preview window before printing. - Customize the printed care plan by selecting and deselecting options on the left to add or remove information. For example, you can select the Allergies option to include allergy information in the printed care plan.
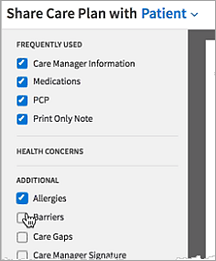
- If the recipient of the printed care plan is the patient, click Record Provision to indicate when the care plan was sent to the patient, and then click Save.
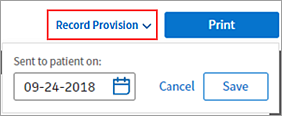
- Click Print.
The event appears on the patient's event timeline as "Care plan letter," and the Care Plan section of the Care Management tab lists the date, the sender, and the recipient of the care summary.
- Display the patient's Person Center: On the Main Menu, enter the patient's name, patient ID, or member ID (insurance number) in the Search Bar. Under NETWORK PATIENTS, select the data type and then click the search icon.
Matching patients appear under the Patients tab. - Click the patient name to expand the selection, and then click the patient name in large text to display the patient's Person Center.
- Click an event in the patient timeline.
- Click the print icon
 in the expanded event.
 - When you print a care plan from the patient timeline, the default information in the care plan indicates the patient as the recipient. To change the type information that displays in the care plan, select Clinician or Quality Manager from the menu.
Note: The Share Care Plan with feature does not send the care plan to the selected person, but simply changes the type of information included in the printed document based on what that recipient would want to know.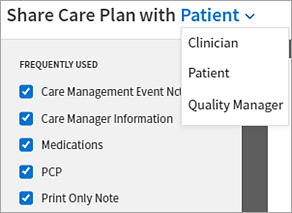
- Customize the printed care plan by selecting and deselecting options on the left to add or remove information, including care event notes.

Note: The note associated with the event that you clicked in the timeline to print the care plan is automatically included in the care plan options. - If the recipient of the printed care plan is the patient, click Record Provision to indicate when the care plan was sent to the patient, and then click Save.

- Click Print.
The event appears on the patient's event timeline as "Care plan letter," and the Care Plan section of the Care Management tab lists the date, the sender, and the recipient of the care summary.
A care manager can create a care plan for a patient to prevent or better manage an illness. The care plan provides a road map for the patient's care team, helping you to manage care-related events, goals, and assessments for an individual patient. The athenahealth Population Health care plan allows you to:
- Access and edit a patient's care plan at any time.
- Search a clinician-curated content library for goals, tasks, assessments, and health concerns.
- Display historical notes and create new notes.
Library content is curated by clinicians and sourced from governmental and societal evidenced-based practice guidelines.
A care plan addresses an area of the patient's health, such as general wellness, hypertension, or anxiety. Care plans are a collection of associated health concerns, goals, tasks, and assessments.
A patient can have one, two, or more care plans, depending on how you want to organize the information. If you create more than one care plan for a patient, you can select a care plan from the menu to display the goals, tasks, and assessments for that specific care plan.

You may decide that your patient needs a single care plan (for example, Comprehensive Health), consisting of several health concerns with related tasks and goals. Another patient may have several interrelated comorbidities that you choose to track as separate care plans or as a single care plan.
After you create a care plan, you can add templated information for a number of common chronic conditions. Using a template, you can quickly enter a set of goals, tasks, and assessments commonly associated with a condition into the default Comprehensive Health care plan or a care plan you created.
Note: athenahealth plans to add more templates in upcoming releases.
Templated care plan information is available for the following chronic conditions and programs supported by athenahealth Population Health.
- Acute Pain
- Alcohol Abuse
- Alzheimer's
- Asthma
- Atrial Fibrillation
- Autism
- Cancer
- Chronic Kidney Disease
- Chronic Migraines
- Chronic Obstructive Pulmonary Disease (COPD)
- Chronic Pain
- Cognitive Impairment
- Congestive Heart Failure (CHF)
- COVID-19 Comprehensive
- Dementia
- Depression
- Diabetes Mellitus (DM)
- Drug/Substance Abuse
- End Stage Renal Disease (ESRD)
- Gestational Diabetes
- Hepatitus/Chronic Viral B&C
- Hyperlipidemia
- Hypertension (HTN)
- Obesity
- Osteoarthritis
- Osteoporosis
- PACE - In-Home Services
- PACE - Nursing
- PACE - Social Services
- Palliative
- Parkinson's
- Prediabetes
- Recurrent Pneumonia
-
Rheumatoid Arthritis
-
Stroke
- Transitions of Care
- Type 1 Diabetes
- Type 2 Diabetes
The care plan templates are based on evidence-based, nationally recognized guidelines and reflect current clinical practice standards. The goals, tasks, and assessments included for the chronic care diagnosis in each template come from a clinician-curated content library.
You can remove goals, tasks, and assessments from a care plan template that you add to a patient's care plan, but you cannot add or edit items in the template itself. If you add multiple care plan templates that share some of the same content (for example, "Weigh yourself weekly" may be a task for several conditions), the shared content is added only once in the care plan.
After you create a care plan, enter your patient's goals for this care plan.
Goals are targets for patients in care management. Specific to a patient's situation, goals focus on a desired outcome. Care managers can document a desired result or possible outcome that a patient commits to with the care manager. For patients with multiple conditions or for goals that should be met in sequential order, care managers can indicate which goals are currently a priority for the patient.
You can search for and select goals in the clinician-curated content library, and you can create custom goals for the patient. Goal statuses are:
- Active — Goal is currently being worked on.
- Inactive — Goal is paused or no longer relevant.
Note: Inactive goals are saved and can be reactivated. - Achieved — Goal is completed.
You can also enter goal progress statuses for each goal in a care plan. Goal progress statuses are:
- Progressing
- No change
- Regressing
- Completed
Note: Marking goal progress as Completed sets the goal status to Achieved.
You can indicate that a goal is a priority by clicking the More icon and selecting Flag as priority from the options. Priority goals have a flag icon next to them in the care plan and patient timeline.
Care team tasks are assignments in a care plan for a care team member, such as "Share diabetes education content with patient." You can search for and select care team tasks in the clinician-curated content library, and you can create custom tasks for the care team.
Care team task statuses are:
- Active — Task is currently being worked on.
- Inactive — Task is paused or no longer relevant.
- Completed — Task is completed.
Patient tasks are assignments in a care plan for the patient, such as, "Take your blood pressure." You can search for and select patient tasks in the clinician-curated content library, and you can create custom tasks for the patient.
Patient task statuses are:
- Active — Task is currently being worked on.
- Inactive — Task is paused or no longer relevant.
- Completed — Task is completed.
Reasons for care plan are the problems, barriers to care, or social determinants of health that the patient and provider should focus on. You can add a health concern to the patient care plan at any time.
Reasons for care documented in the care plan are problems, social determinants, or barriers to health that patients should focus on with guidance and assistance from the patient's care team. You use the care plan to document goals and tasks for patients enrolled in care management.
- Problem — Any diagnosis or problem that necessitates follow-up and monitoring in the care plan.
Examples: pregnancy, diabetes - Barrier to care — Any factor that may prevent a patient having access to the health care services.
Examples: homeless, financially poor, difference in location - Social determinant of health — Any condition of the patient's life or environment that may affect their access to health care services.
Examples: In debt, victim of abuse, low-level literacy
Reasons for care on the Care tab are associated with the patient. Not all problems documented on the Problems tab need to be addressed in the care plan as reasons for care.
Assessments are groups of questions to help evaluate and track the progress of a patient's care. Assessments can be scored. Status messages let you know when an assessment is due and whether the assessment is in process or completed. You can search for and select assessments in the clinician-curated content library. Answers to previously completed assessments are available.
Assessment statuses are:
- Completed
- Active
- Inactive
The following global assessments are available only to customers with athenahealth Population Health:
- 20-Item Short Form Survey (SF-20)
- 36-Item Short Form Survey (SF-36)
- Activities of Daily Living (ADLs)
- Acute Pain - Follow-Up Patient Assessment
- Acute Pain - New Patient Assessment
- Adolescent Wellness - Follow-up Patient Assessment
- Adolescent Wellness - New Patient Assessment
- Advance Directive Status
- Adverse Childhood Experiences (ACEs)
- Alcohol Use Disorders Identification Test (AUDIT)
- Alcohol Use Disorders Identification Test (AUDIT-C)
- Arthritis - Basic Assessment
- Asthma - Follow-Up Patient Assessment
- Asthma - New Patient Assessment
- CAD - Basic Assessment
- CAGE Assessment for Alcohol Abuse
- Cancer - Basic Assessment
- Cancer: Quality of Life - Follow-Up Patient Assessment
- Cancer: Quality of Life - New Patient Assessment
- Caregiver Assessment
- Caregiver Reaction Scale (CRS)
- Chronic Kidney Disease (CKD) - Follow-up Patient Assessment
- Chronic Kidney Disease (CKD) - New Patient Assessment
- Chronic Obstructive Pulmonary Disease (COPD) - Follow-up Patient Assessment
- Chronic Obstructive Pulmonary Disease (COPD) - New Patient Assessment
- Chronic Pain - Follow-Up Patient Assessment
- Chronic Pain - New Patient Assessment
- CKD - Basic Assessment
- Columbia Suicide Severity Rating Scale (C-SSRS)
- Comprehensive Patient Assessment
- Congestive Heart Failure (CHF) - Follow-Up Patient Assessment
- Congestive Heart Failure (CHF) - New Patient Assessment
- COPD - Basic Assessment
- Coronary Artery Disease (CAD) - Follow-Up Patient Assessment
- Coronary Artery Disease (CAD) - New Patient Assessment
- Dementia - Follow-Up Patient Assessment
- Dementia - New Patient Assessment
- Depression - Follow-up Patient Assessment
- Depression - New Patient Assessment
- Diabetes - Basic Assessment
- Diabetes Knowledge Assessment
- Diabetes Mellitus (DM) - Follow-up Patient Assessment
- Diabetes Mellitus (DM) - New Patient Assessment
- Drug Abuse Screening Test (DAST-10)
- Edinburgh Postnatal Depression Scale (EPDS)
- Edmonton Symptom Assessment System (ESAS-R)
- Exercise Assessment
- Generalized Anxiety Disorder 7-item (GAD-7) Scale
- Geriatric Depression Scale - Short Form (GDS-SF)
- HARK Questions
- Health Assessment Questionnaire II (HAQ‐II)
- Healthy Diet Assessment
- Height, Weight, BMI
- Herth Hope Index
- Hospital - Admission
- Hospital - Discharge
- Hospital - Review
- Household Food Security Survey: Six-Item Short Form
- Hyperlipidemia - Follow-Up Patient Assessment
- Hyperlipidemia - New Patient Assessment
- Hypertension (HTN) - Follow-Up Patient Assessment
- Hypertension (HTN) - New Patient Assessment
- Hypertension - Basic Assessment
- Initial Patient Assessment
- Kidney Disease and Quality of Life (KDQOL-SF v1.3)
- Kutcher Adolescent Depression Scale (KADS-6)
- LACE Index Scoring Tool
- Medication Review
- Missouri Alliance for Home Care's (MAHC-10) Fall Risk Assessment Tool
- Newborn Intake
- Numeric Pain Rating Scale
- Obesity - Basic Assessment
- Obesity - Follow-Up Patient Assessment
- Obesity - New Patient Assessment
- Opioid Risk Tool (ORT) - Female Assessment Version
- Opioid Risk Tool (ORT) - Male Assessment Version
- Osteoarthritis (OA) - Follow-up Patient Assessment
- Osteoarthritis (OA) - New Patient Assessment
- Osteoporosis - Follow-up Patient Assessment
- Osteoporosis - New Patient Assessment
- Oswestry Low Back Disability (ODI) Assessment
- Oswestry Neck Disability (NDI) Assessment
- PACE - In-Home Services Assessment
- PACE - Nursing Assessment
- PACE - Nutrition Assessment
- PACE - Occupational Therapy (OT) Assessment
- PACE - Physical Therapy (PT) Assessment
- PACE - Primary Care Provider (PCP) Assessment
- PACE - Recreation Assessment
- PACE - Social Worker Assessment
- Palliative Care Outcome Scale - Patient Questionnaire
- Palliative Care Outcome Scale - Staff Questionnaire
- Patient Health Questionnaire - 2/9 (PHQ-2/9)
- Patient Health Questionnaire-2 (PHQ-2)
- Patient Health Questionnaire-9 (PHQ-9)
- Pediatric Wellness - Follow-up Patient Assessment
- Pediatric Wellness - New Patient Assessment
- Peripheral Vascular Disease - Basic Assessment
- Pharmacy Referral Form
- Prenatal - Follow-up Assessment
- Prenatal - Initial Assessment
- Protocol for Responding to and Assessing Patient Assets, Risks, and Experiences (PRAPARE)
- Psychosocial Assessment
- RAND Depression Screener
- RAND Negative Impact of Asthma on QoL (RAND-IAQL-12)
- Readiness to Change
- Resuscitation Status
- Rheumatoid Arthritis (RA) - Follow-Up Patient Assessment
- Rheumatoid Arthritis (RA) - New Patient Assessment
- Screen for Child Anxiety Related Disorders (SCARED) - CHILD Version
- Screening for Obsessive-Compulsive Disorder (OCD)
- Screening for Posttraumatic Stress Disorder (PTSD)
- Screening for Social Anxiety Disorder
- Seizure Disorder - Basic Assessment
- Seizures - Follow-up Patient Assessment
- Seizures - New Patient Assessment
- Self-Efficacy For Appropriate Medication Use Scale
- Self-Efficacy for Managing Chronic Disease 6-Item Scale
- Six-Item Screener To Identify Cognitive Impairment
- Skilled Nursing Facility (SNF) - Admission
- Skilled Nursing Facility (SNF) - Discharge
- Skilled Nursing Facility (SNF) - Review
- Social Demographics
- Social Determinants of Health
- Social History
- Social Work Assessment Tool (SWAT) - Patient Version
- Social Work Assessment Tool (SWAT) - Primary Caregiver Version
- St. Louis University Mental Status (SLUMS) Evaluation
- Stopping Elderly Accidents, Deaths & Injuries (STEADI): Fall Risk Checklist
- Stroke - Follow-Up Patient Assessment
- Stroke - New Patient Assessment
- Substance Abuse Assessment
- Survey of Well-being for Young Children: 24 Months
- Survey of Well-being of Young Children: 12 Months
- Survey of Well-being of Young Children: 15 Months
- Survey of Well-being of Young Children: 18 Months
- Survey of Well-being of Young Children: 2 Months
- Survey of Well-being of Young Children: 30 Months
- Survey of Well-being of Young Children: 36 Months
- Survey of Well-being of Young Children: 4 Months
- Survey of Well-being of Young Children: 48 Months
- Survey of Well-being of Young Children: 6 Months
- Survey of Well-being of Young Children: 60 Months
- Survey of Well-being of Young Children: 9 Months
- The Functional Assessment of Cancer Therapy - General (FACT-G)
- The General Practice Physical Activity Questionnaire (GPPAQ)
- Tobacco Assessment
- Transitions Assessment
- UCLA Loneliness Scale
- Vulnerable Elders Survey (VES-13)
- WILDA Pain Assessment
Health concerns appear as tabs located at the top of the care plan. You can add health concerns to a care plan at any time.
Important: The health concerns that you enter here relate only to the concerns being addressed by the care plan. Health concerns tracked in a care plan are not related to the problems found on the Problems tab of the Person Center.
Click Care Plan in your patient's Person Center to access a care plan. As you work, athenaOne automatically creates an event in the timeline to record changes that you make in the care plan.
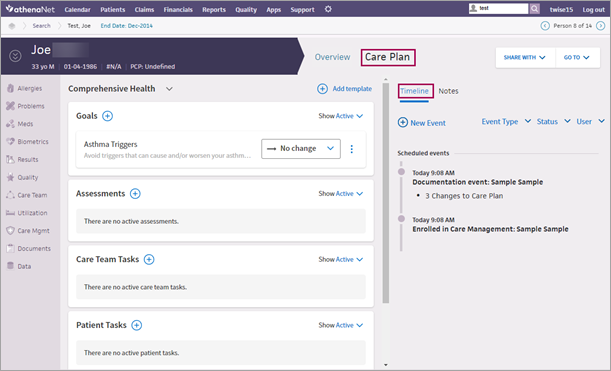
Note: You can also access the care plan by creating an event in the timeline, and you can log an event without accessing the care plan.
All notes are available in the timeline. Care managers write notes in the event timeline when creating a new care event or by adding a note to an existing event (including documentation events). athenaOne saves these notes automatically.
Note: Only the care team member that the event is assigned to can edit the event.
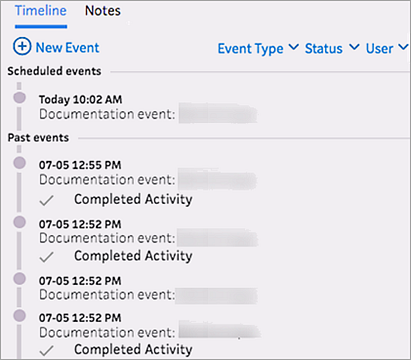
The Notes tab displays all notes written for all events.
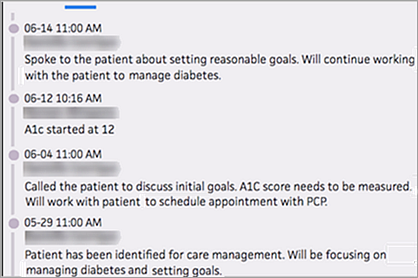
You can toggle between the Timeline and Notes tabs. Notes are visible without expanding the event in the timeline.