Person Center
athenahealth Population Health
A patient's Person Center provides access to all data related to the patient in the athenahealth Population Health database. The data follows a patient's care both in and outside your organization, providing you with insights that help you understand the patient's complete health picture.
On the Main Menu, enter the patient's name, patient ID, or member ID (insurance number) in the Search Bar. Under NETWORK PATIENTS, select the data type and then click the search icon. Matching patients are listed under the Patients tab. Click the patient name to expand the selection, and then click the patient name in large text to display the patient's Person Center.
Your organization must use athenahealth Population Health.
To edit the patient banner, your practice must have the "Population Management: Edit Banner" feature enabled.
You must have a role that includes one of these permissions to access a patient's Person Center:
- Population Management: Person Center — View the patient banner, patient briefing, Problems tab, Meds tab, and Results tab in the Person Center
- Population Management: Person Center: Audit Log — Access to the Audit Log
- Population Management: Person Center: Documents — Access to the Documents tab
- Population Management: Person Center: Event Timeline — View and schedule events in the event timeline
- Population Management: Person Center: Meds (Edit) — Edit the contents of Meds tab
- Population Management: Person Center: Problems (Edit) — Edit the contents of Problems tab
- Population Management: Person Center: Quality Care Tab — Access to the Care Team tab
- Population Management: Person Center: Results (Edit) — Edit the contents of the Results tab
- Population Management: Person Center: Utilization — Access to the Utilization tab
- Population Management: Person Center: Banner (Edit) — Edit the patient banner in the Person Center
- Population Management: Person Search — Ability to search for network patients
- Population Management: Person Center: Data Timeline — Access to the data timeline in Data tab
- Population Management: Person Center: Quality P4P Tab — Access to the Quality tab
- Population Management: Person Center: Raw Data — Access to the Data tab
- Population Management: Person Center: Care Management Tab (Read-Only) — Read-only access to the Care Management tab
- Population Management: Care Manager — Access to the event timeline and care-related tabs in the Person Center
- Population Management: Care Manager: Admin — Access the Care Admin tab of the Care Manager page
- Population Management: Care Manager: Summary — View and edit the Clinical Summary in the Person Center
- Population Management: Patient Referral — Add a new program in the Care Management Tab to identify a patient for a care management program
Note: To add a new patient registration, your organization must use athenahealth Population Health, and you must have a role that includes the "Population Management: Admin: Add New Patient" permission.
- Display the New Network Patient Registration page: On the Main Menu, click Patients. Under PATIENT REGISTRATION, click New Network Patient Registration.
- First Name — Enter the patient's first name.
- Last Name — Enter the patient's last name.
- Date of Birth — Enter the patient's date of birth.
- Gender — Select the patient's gender from the menu.
- Complete at least one of the following fields:
- Primary Phone — Enter the patient's primary phone number.
- Driver's License Number — Select the state where the patient's vehicle is registered and enter the patient's driver's license number.
- Member ID — Select the payer from the menu and enter the patient's health insurance member ID number for that payer.
Note: All payers available for your organization are listed. - Preferred Name — Enter the patient's preferred name or nickname. The preferred name appears in quotation marks in the banner of the Person Center after the patient's full name (First Last "Preferred").
- Email Address — Enter the patient's email address.
- Street Address — Enter the patient's mailing address.
- Primary Care Provider — Enter the patient's primary care provider.
Note: All payers available for your organization are listed. - Click Next.
The Check Patient Information page appears. - Review the patient's information.
If you find incorrect information, click Back to Edit to correct it. - On the Check Patient Information page, click Add Patient.
The New Patient Added window appears. - To create another patient, click Add Another Patient.
- To display the Person Center of the patient you just added, click the patient's name.
To edit the patient banner, your practice must have the "Population Management: Edit Banner" feature enabled, and you must have either the Population Management: Person Center: Edit Banner role or the Population Management: Full Demographics Edit role.
Note: You cannot edit demographic information that was received via a feed, such as a Claims feed.
- Display the patient's Person Center: On the Main Menu, enter the patient's name, patient ID, or member ID (insurance number) in the Search Bar. Under NETWORK PATIENTS, select the data type and then click the search icon. Matching patients are listed under the Patients tab. Click the patient name to expand the selection, and then click the patient name in large text to display the patient's Person Center.
- Click the view more icon
 to the left of the patient's name in the banner.
 - Hover your cursor over the Patient section and click EDIT.
The Patient window appears. - Edit the following patient information as needed:
- Name (first, middle, and last)
- Preferred name
- Date of birth
- Gender
- Language (primary)
- Phone (including the preferred contact and other contact phone numbers)
- Address
Note: To edit the patient's Name (first, middle, and last), Date of birth, and Gender, you must have both the Population Management: Person Center: Edit Banner role and the Population Management: Full Demographics Edit role.
- Click Save.
-
Display the patient's Person Center: On the Main Menu, enter the patient's name, patient ID, or member ID (insurance number) in the Search Bar. Under NETWORK PATIENTS, select the data type and then click the search icon. Matching patients are listed under the Patients tab. Click the patient name to expand the selection, and then click the patient name in large text to display the patient's Person Center.
- Click GO TO in the top right corner, then select Provider Care Summary.
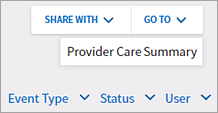
The Provider Care Summary appears.
- Check the box next to each care event to include in the care summary.
All care summaries contain the patient's contact information, PCP name, medications, problems, labs, and plan of care.
Note: If no care events are selected, the care summary contains only the patient's contact information, PCP name, medications, problems, labs, and plan of care. - Click Download C-CDA.

The C-CDA file downloads in .xml format. The file is labeled with the patient's patient ID and is stored in your computer's Downloads folder.
-
Display the patient's Person Center: On the Main Menu, enter the patient's name, patient ID, or member ID (insurance number) in the Search Bar. Under NETWORK PATIENTS, select the data type and then click the search icon. Matching patients are listed under the Patients tab. Click the patient name to expand the selection, and then click the patient name in large text to display the patient's Person Center.
- Click the down arrows
 in the patient banner to view more demographic information.
 - Hover your cursor over the Patient section and click EDIT.
- Click the plus icon
 next to Language to add another language.
Note: You can continue to click the plus icon next to Language to add more languages.
 - Select a language in the drop-down list.
- Click Primary next to the patient's primary language to indicate the patient's primary language.
Primary appears in purple next to the primary language, just as it does for the patient's primary phone number. - Click Save.
- Display the patient's Person Center: On the Main Menu, enter the patient's name, patient ID, or member ID (insurance number) in the Search Bar. Under NETWORK PATIENTS, select the data type and then click the search icon. Matching patients are listed under the Patients tab. Click the patient name to expand the selection, and then click the patient name in large text to display the patient's Person Center.
- Click the Data tab.
- Click Timeline.
- Click Customize Graph.
- In the drop-down list, uncheck boxes to include only the data you want to view in the graph.
Note: By default, all boxes in the drop-down list are checked. - Click Apply Selections.
- Display a patient's Person Center: On the Main Menu, enter the patient's name, patient ID, or member ID (insurance number) in the Search Bar. Under NETWORK PATIENTS, select the data type and then click the search icon. Matching patients are listed under the Patients tab. Click the patient name to expand the selection, and then click the patient name in large text to display the patient's Person Center.
- In the Timeline tab of the event timeline, click Event Type, Status, or User, and then select options from the list.
Only events that match your criteria appear on the event timeline.
Note: Event types shown on the timeline appear in blue font; event types excluded from the timeline appear in gray font. - To show the next 20 events, click the down arrow icon
 at the bottom of the event timeline.
- Display a patient's Person Center: On the Main Menu, enter the patient's name, patient ID, or member ID (insurance number) in the Search Bar. Under NETWORK PATIENTS, select the data type and then click the search icon. Matching patients are listed under the Patients tab. Click the patient name to expand the selection, and then click the patient name in large text to display the patient's Person Center.
- Click Event Type (found in the filter options above the Timeline).
- Check Referrals.
Only these activities related to care management referrals appear on the event timeline.
- Display a patient's Person Center: On the Main Menu, enter the patient's name, patient ID, or member ID (insurance number) in the Search Bar. Under NETWORK PATIENTS, select the data type and then click the search icon. Matching patients are listed under the Patients tab. Click the patient name to expand the selection, and then click the patient name in large text to display the patient's Person Center.
- Click New Event at the top of the event timeline.
The Add Event window opens. - Event Type — Select the type of event.
- Reason(s) — Select one or more reason for the event.
- Roles — Check the roles the event applies to.
- Assign to — Assign the event to a member of the care team or to yourself.
- Date — Enter a date for the event.
- Time — Enter a time for the event to begin.
- Duration — Enter the duration of the event.
Tip: Click Show Schedule to open your schedule in the Person Center. Click Hide Schedule to close the schedule. - Attempt — If you try to contact the patient but are unsuccessful in reaching them, you can select a description of the attempt from the menu.
- Optional: Add a note in the free text field.
- Click Schedule or click Track Changes.
- Display a patient's Person Center: On the Main Menu, enter the patient's name, patient ID, or member ID (insurance number) in the Search Bar. Under NETWORK PATIENTS, select the data type and then click the search icon. Matching patients are listed under the Patients tab. Click the patient name to expand the selection, and then click the patient name in large text to display the patient's Person Center.
- Click the event in the event timeline to expand the event details.
- Click the edit icon
 .
.
The Edit Event window appears. - Edit the fields as needed.
- Click Complete Event to complete this event, or click Resume Later to edit the event later.
Note: Your organization's preferences determine whether you should complete an event for each attempt or edit an existing event and resume it later. Marking an event as Complete locks the event permanently and prevents further edits. You cannot undo or unlock completed events. If additional notes are needed after an event has been marked as complete, you can create another event and add a note there.
- Display a patient's Person Center: On the Main Menu, enter the patient's name, patient ID, or member ID (insurance number) in the Search Bar. Under NETWORK PATIENTS, select the data type and then click the search icon. Matching patients are listed under the Patients tab. Click the patient name to expand the selection, and then click the patient name in large text to display the patient's Person Center.
- Click the scheduled event in the event timeline to expand the event details.
- Display a patient's Person Center: On the Main Menu, enter the patient's name, patient ID, or member ID (insurance number) in the Search Bar. Under NETWORK PATIENTS, select the data type and then click the search icon. Matching patients are listed under the Patients tab. Click the patient name to expand the selection, and then click the patient name in large text to display the patient's Person Center.
- Click the event in the event timeline.
The event opens in the event timeline. - Review the event.
Tip: Some types of events can be reviewed by the same person that created the event, but others must be reviewed by another staff member with appropriate permissions. Users who would like to complete their own events and complete events that others assign to them should not have the Population Management: Flag Care Activities for Review OR the Population Management: Care Manager: Requires Review role since these roles do not allow events to be completed. - Click Review and Complete or Complete Event.
If an event is scheduled for a future date and time you can select Cancel Event from the Resume Later menu.
- Display the patient's Person Center: On the Main Menu, enter the patient's name, patient ID, or member ID (insurance number) in the Search Bar. Under NETWORK PATIENTS, select the data type and then click the search icon.
Matching patients appear under the Patients tab. - Click the patient name to expand the selection, and then click the patient name in large text to display the patient's Person Center.
- In the timeline, click the event to display the event details.
- Click the edit icon
 next to the event name.
 - Click the down arrow to the right of Resume Later, and select Cancel Event.
Note: Marking an event as Canceled locks the event permanently and prevents further edits. You cannot undo or unlock canceled events. If additional notes are needed after an event has been marked as complete, you can create another event and add a note there.
You cannot cancel the following types of events:
- Documentation events
- Events that have "Track Changes" enabled
- Events that do not include care plan changes
- Events assigned to another user
- Display the patient's Person Center: On the Main Menu, enter the patient's name, patient ID, or member ID (insurance number) in the Search Bar. Under NETWORK PATIENTS, select the data type and then click the search icon. Matching patients are listed under the Patients tab. Click the patient name to expand the selection, and then click the patient name in large text to display the patient's Person Center.
- Click the Quality tab.
- Click a quality test.
- Date — Select the date of the test.
- Result — Enter the result.
Note: The Result field only appears for tests that you need to enter a value. - Note — Enter any notes about the result.
- Click Save.
- Display the Documents tab in the Person Center.
- Click the plus icon
 .
.
The Upload document window appears. - Type — Select the type of document to upload.
- Assigned to — Leave the uploading the document assigned to yourself or select another user.
Note: If you select another user, completing the File field is not required. - Summary — If desired, summarize the content of the file.
- File — Select a file to upload.
- Click Add.
The file appears in the Documents tab, and an event is automatically added to the event timeline.
Note: You must have a role that includes the Population Management: Person Center: View Linked Charts permission to access this functionality.
-
Display a patient's Person Center: On the Main Menu, enter the patient's name, patient ID, or member ID (insurance number) in the Search Bar. Under NETWORK PATIENTS, select the data type and then click the search icon. Matching patients are listed under the Patients tab. Click the patient name to expand the selection, and then click the patient name in large text to display the patient's Person Center.
-
Click GO TO in the top right corner, then select Clinical Charts.
Only the charts you have permission to access in athenaClinicals for the patient appear. -
Confirm that each athenaClinicals patient chart found is for the correct patient.
-
Click Pending (#) and then click a chart in the list.
-
Click Confirm if the chart is for the correct patient.
Any charts in the Pending list that are associated with the same patient record are automatically confirmed. -
If a chart is for a different patient, click Deny, enter a Denial Reason, and click Submit.
-
-
In the Confirmed (#) list, click the patient chart you want to display.
The athenaClinicals patient chart appears to the right of the patient's Person Center.
Tip: To adjust the width of the athenaClinicals patient chart, click its left edge and drag it to the desired width. To close the athenaClinicals patient chart, click Close.
- Display a patient's Person Center: On the Main Menu, enter the patient's name, patient ID, or member ID (insurance number) in the Search Bar. Under NETWORK PATIENTS, select the data type and then click the search icon. Matching patients are listed under the Patients tab. Click the patient name to expand the selection, and then click the patient name in large text to display the patient's Person Center.
- Click the Data tab.
- Click Claims.
A patient's previous answers to an assessment can supply context for their current answers, giving care managers more clinical information. You can view assessment history at any time, including while administering an assessment.
- Display the patient's Person Center: On the Main Menu, enter the patient's name, patient ID, or member ID (insurance number) in the Search Bar. Under NETWORK PATIENTS, select the data type and then click the search icon.
Matching patients appear under the Patients tab. -
Click the patient name to expand the selection, and then click the patient name in large text to display the patient's Person Center.
- Click Care Plan at the top of the Person Center.
- Click the care plan that includes the assessment that you want to see and scroll down to the Assessments section.
- In the list of assessments, click the body of an assessment to view the history of this assessment for this patient.
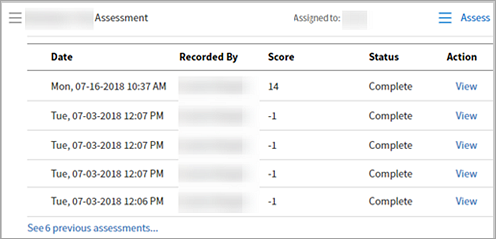
The history includes the date and time of the assessment, which care team member recorded it, and the score for assessments that were administered more than once. - Click View at the far right to see the most recent previous responses for each question.
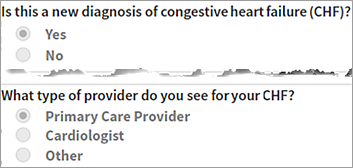
Note: You cannot edit previous answers.
Your organization must use Milliman Advanced Risk Adjuster (MARA) logic to view a patient's severity data. Milliman risk scores predict total claim cost in terms of inpatient services, outpatient services, physician and other services, and prescription drug services.
- Display the patient's Person Center: On the Main Menu, enter the patient's name, patient ID, or member ID (insurance number) in the Search Bar. Under NETWORK PATIENTS, select the data type and then click the search icon. Matching patients are listed under the Patients tab. Click the patient name to expand the selection, and then click the patient name in large text to display the patient's Person Center.
- Click the Utilization tab.
The Severity area of this tab shows your facility or network's retrospective Milliman risk scores. The score is based on a rolling 12 month time frame.
This option is available only for patients who are part of an automated phone campaign.
-
Display the patient's Person Center: On the Main Menu, enter the patient's name, patient ID, or member ID (insurance number) in the Search Bar. Under NETWORK PATIENTS, select the data type and then click the search icon. Matching patients are listed under the Patients tab. Click the patient name to expand the selection, and then click the patient name in large text to display the patient's Person Center.
- On the event timeline, click the
 New Event.
 - Event type — Select Outreach Campaign.
- Reason(s) — Select Outreach Campaign from the list of reasons, and select any other related reasons for the event.
- Role(s) — Select Outreach Manager and/or any other roles related to the event.
- Assign to — Assign the event to a member of the care team or to yourself.
- Date — Enter a date for the event.
- Time — Enter a time for the event to begin.
- Duration — Enter the duration of the event.
Tip: Click Show Schedule to open your schedule in the Person Center. Click Hide Schedule to close the schedule. - Attempt — If an attempt is made to contact the patient but is the attempt is unsuccessful, you can select a description from the Attempt menu.
- Optional: Add a note in the free text field.
- Click Schedule or click Track Changes.
-
Display the patient's Person Center: On the Main Menu, enter the patient's name, patient ID, or member ID (insurance number) in the Search Bar. Under NETWORK PATIENTS, select the data type and then click the search icon. Matching patients are listed under the Patients tab. Click the patient name to expand the selection, and then click the patient name in large text to display the patient's Person Center.
-
Click Event Type (near the upper right of the event timeline), and select Outreach.
If your organization accidentally associated a single patient with two separate patient records (for example, if a patient was entered under two names, such as Robert Brown and Bob Brown) or associated two patients with one single patient record (for example, if a parent and child patient have the same name), you need to create a case on the Success Community to merge or unmerge the patient records.
Merge patient records
After two patient records are successfully merged, the merged patient record will include patient demographic data from the master record (specified by you in the support case). All other data will be combined from the two records.
Unmerge patient records
After a single patient record is successfully unmerged by athenahealth, your organization must carefully review the resulting records to ensure accuracy.
- The following data is unmerged by the process:
- Claims
- EMR
- ADT
- Labs
- Medications and all other patient record information, such as care plan and timeline data, need to be manually reviewed by you for each unmerged patient record.
Important: Make sure that you submit and verify any changes required to move patient data to the other (correct) patient record, if necessary. For example, if a patient's messages to their provider appear in the wrong record, you must move this data to the correct record.
When you share or print a care plan from the Person Center, you can select the recipient and customize the content of the care plan.
- Display the patient's Person Center: On the Main Menu, enter the patient's name, patient ID, or member ID (insurance number) in the Search Bar. Under NETWORK PATIENTS, select the data type and then click the search icon.
Matching patients appear under the Patients tab. - Click the patient name to expand the selection, and then click the patient name in large text to display the patient's Person Center.
- From the SHARE WITH menu at the top right, select the person you intend to share the printed care plan with (Clinician, Patient, or Quality Manager).
Alternatively, you can click the print icon on most events to open the Share Care Plan window.
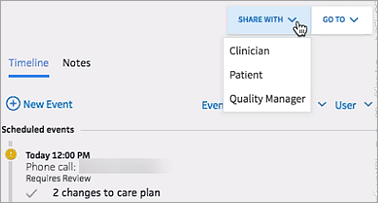
Note: The Share Care Plan with feature does not send the care plan to the selected person, but simply changes the type of information included in the printed document based on what that recipient would want to know. The default content of the printed care plan is configured for each type of recipient, but you can select or deselect information in the document preview window before printing. - Customize the printed care plan by selecting and deselecting options on the left to add or remove information. For example, you can select the Allergies option to include allergy information in the printed care plan.
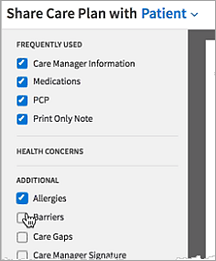
- If the recipient of the printed care plan is the patient, click Record Provision to indicate when the care plan was sent to the patient, and then click Save.
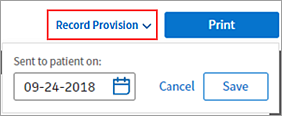
- Click Print.
The event appears on the patient's event timeline as "Care plan letter," and the Care Plan section of the Care Management tab lists the date, the sender, and the recipient of the care summary.
- Display the patient's Person Center: On the Main Menu, enter the patient's name, patient ID, or member ID (insurance number) in the Search Bar. Under NETWORK PATIENTS, select the data type and then click the search icon.
Matching patients appear under the Patients tab. - Click the patient name to expand the selection, and then click the patient name in large text to display the patient's Person Center.
- Click an event in the patient timeline.
- Click the print icon
 in the expanded event.
 - When you print a care plan from the patient timeline, the default information in the care plan indicates the patient as the recipient. To change the type information that displays in the care plan, select Clinician or Quality Manager from the menu.
Note: The Share Care Plan with feature does not send the care plan to the selected person, but simply changes the type of information included in the printed document based on what that recipient would want to know.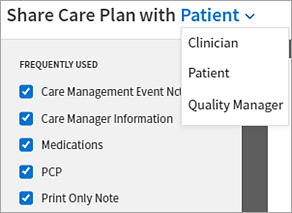
- Customize the printed care plan by selecting and deselecting options on the left to add or remove information, including care event notes.

Note: The note associated with the event that you clicked in the timeline to print the care plan is automatically included in the care plan options. - If the recipient of the printed care plan is the patient, click Record Provision to indicate when the care plan was sent to the patient, and then click Save.

- Click Print.
The event appears on the patient's event timeline as "Care plan letter," and the Care Plan section of the Care Management tab lists the date, the sender, and the recipient of the care summary.
A patient's previous answers to an assessment can supply context for their current answers, giving care managers more clinical information. You can view assessment history at any time, including while administering an assessment.
From the care plan
- Display the patient's Person Center: On the Main Menu, enter the patient's name, patient ID, or member ID (insurance number) in the Search Bar. Under NETWORK PATIENTS, select the data type and then click the search icon.
Matching patients appear under the Patients tab. -
Click the patient name to expand the selection, and then click the patient name in large text to display the patient's Person Center.
- Click Care Plan at the top of the Person Center.
- Click the care plan that includes the assessment that you want to see and scroll down to the Assessments section.
- In the list of assessments, click the body of an assessment to view the history of this assessment for this patient.

The history includes the date and time of the assessment, which care team member recorded it, and the score for assessments that were administered more than once. - Click View at the far right to see the most recent previous responses for each question.

Note: You cannot edit previous answers.
During an assessment
- Display the patient's Person Center: On the Main Menu, enter the patient's name, patient ID, or member ID (insurance number) in the Search Bar. Under NETWORK PATIENTS, select the data type and then click the search icon.
Matching patients appear under the Patients tab. -
Click the patient name to expand the selection, and then click the patient name in large text to display the patient's Person Center.
- Click Care Plan at the top of the Person Center.
- Click the care plan that includes the assessment that you want to see and scroll down to the Assessments section.
- Click Assess.
- Check Response History at the top of the assessment to see the assessment history.
A patient's Person Center is set up much like the Patient Chart in athenaClinicals, but it is a population health management tool, rather than an EMR. It contains data found in EMRs as well as data related to quality measures and utilization because its main purpose is to provide you with the data needed to improve clinical outcomes while lowering costs.
The page shows aggregated data from disparate sources, including payer and EMR data feeds, in a format that is easily digestible and flexible, allowing you to see an overview and dig deeper for in-depth analysis.
Analysts and quality managers can use this information to propose data-driven improvement initiatives. Care teams can use this information to identify and track patients in care management programs using the care management workflow and to create care plans and monitor a patient and care team's progress in achieving goals and overcoming barriers.
A patient's Person Center includes these elements:
- Patient banner — Located near the top of the page, this element shows a patient's demographic information.
- Patient briefing — Located on the left of the page, this element shows a patient's utilization and key attributes.
- Event timeline — Located on the right of the page, this element shows activities related to a patient's care.
- Person Center tabs — Located down the left side of the page, the tabs allow you to access a patient's current and historical data organized by a specific topic.
The patient banner includes:
- Patient name with last name in uppercase.
- Select patient demographic information:
- Age
- Date of birth (DOB)
- Date of death (DOD)
Note: A DOD only appears if your organization has a CMS data feed that indicates the patient is deceased. - Patient ID
- PCP
- Quickview
Note: You can view the associated patient IDs in this drop-down. You can choose the desired clinical patient ID from the Quickview drop-down menu. You can mark only one patient ID as your favorite by clicking the star icon next to the patient ID. Clinical patient IDs are grouped by Practice Name and sorted in ascending order by Practice ID and then Patient ID.
Click the view more icon ![]() to view additional demographic information:
to view additional demographic information:
- Language
- Insurance
- Preferred Contact
- Other Contact
- Note
You can click the Patient, Preferred Contact, or Other Contact area to view additional phone numbers for the person.
Note: If no data is available, "None specified" appears; however, when no language or insurance is specified, this information is simply omitted.
The patient briefing provides you with an overview of a patient's PCP, insurance, utilization, problems, and medications.
The PCP area of the patient briefing displays:
- PCP name
- Group name
- PCP phone number
You can click the PCP name to access the provider's PCP Center
Note: This area of the patient briefing is hidden for manually added patients who have no eligibility data for their PCP or insurance.
If you change the END DATE filter (at the top of the Person Center) and eligibility data for the selected month is not found, Unavailable appears in the PCP section.
Note: The PCP information shown in the patient banner is the most current information, regardless of the month selected in the END DATE filter.
The insurance area of the patient briefing displays:
- Payer name and details
-
Current/Not Current indicator — Current appears only for patients with at least one Member Month in the previous two months. Otherwise, Not Current appears.
- At Risk/Not at risk indicator — At Risk appears only for patients you are responsible for (at risk for) per your custom configurations. These configurations should align with the details of each of your payer contracts. If the patient is not at risk, Not at risk appears.
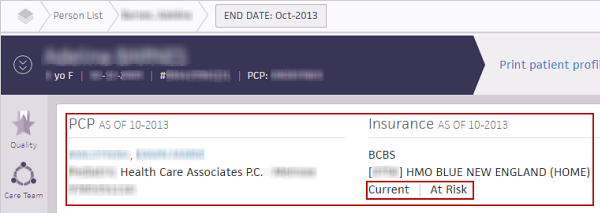
Note: This area of the patient briefing is hidden for manually added patients who have no eligibility data for their PCP or insurance.
If you change the END DATE filter (at the top of the Person Center) and eligibility data for the selected month is found, the insurance information updates to show the information based on that month ("as of MM-YYYY"). If eligibility data for the selected month is not found, Not Current appears in the insurance area.
Note: The insurance information shown in the patient banner drop-down list is the most current information, regardless of the month selected in the END DATE filter.
The athenaWell area of the patient briefing displays the patient's athenaWell account status.
- Not Invited — The patient has not been invited to athenaWell.
- Invited — The patient has been invited to athenaWell and needs to activate an account.
- Active — The patient activated the athenaWell account.
- Deactivated — The patient's athenaWell account has been deactivated.
For more information, see athenaWell.
The Utilization area displays the patient's utilization, allowing a quick overview of the patient's:
- Severity (retrospective risk score)
- Total per member per month (PMPM) cost
- Severity adjusted PMPM cost
- YTD number of events for each of the following:
- Emergency department visits
- Admits
- Visits
All values in the Utilization tab are year-to-date (YTD) except Severity (Retrospective), which is based on a rolling 12 month time frame.
Note: The severity scores in the Utilization tab may differ from those in the patient banner because the scores are based on data from two different sources.
The Problems area of the patient briefing displays a list of the patient's current focus problems.
The Medications area of the patient briefing displays a list of the patient's current medications.
The event timeline appears in the right pane of a patient's Person Center.
Events track activities related to a patient's care. You can track activities that occur both in and outside your organization.
These activities related to a patient's care are tracked in the event timeline:
- Communications (with patient, PCP, health professionals, other)
- Appointments
- Hospital stays
- Skilled nursing facility stays
- Patient consent
- Reviews
- General notes
- Documentation
- Creation of or modifications to the patient's care plan
On the left side of the Person Center, you can click one of these tabs to access the patient's current and historical data related to the topic:
A care manager can create a care plan for a patient to prevent or better manage an illness.
After you create or update a patient's care plan, you can create a clinical summary to provide some general notes about the patient encounter.
To access the clinical summary, click GO TO at the upper right of the care plan, then click Provider Care Summary.
You can print provider care summaries to communicate information with other healthcare professionals.
You can print a provider care summary to share clinically relevant information about the patient, including a clinical summary note, with other healthcare professionals who need updated information about the patient.
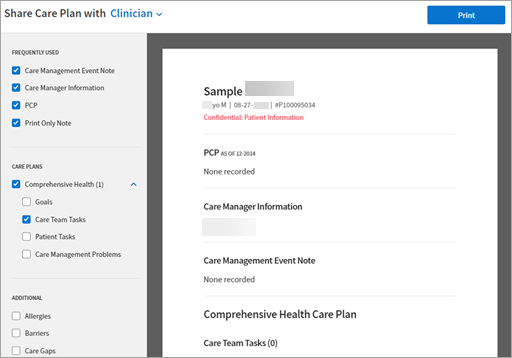
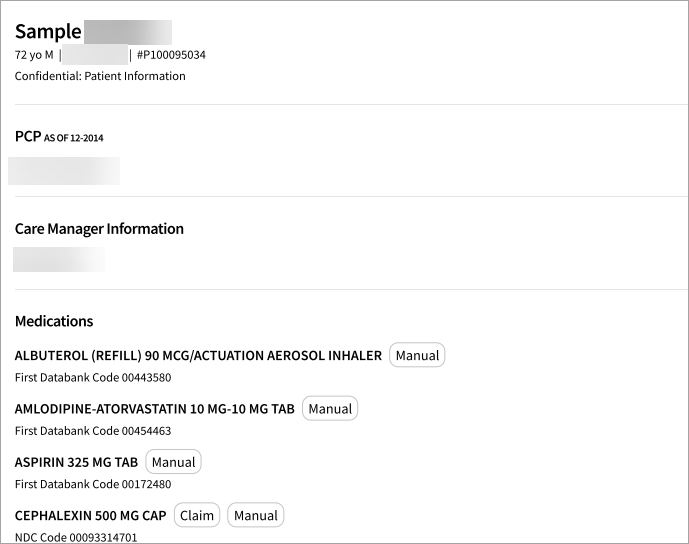
The print version of the provider care summary can include items listed below. Use default content, or select the items you want to print.
- Patient information
Frequently Used
- PCP
- Care Manager Information
- Care Management Event Note
- Print-only note
Care Plans
- Care Plan title
- Goals
- Care Team Tasks
- Patient Tasks
- Care Management Problems
Additional
- Allergies
- Barriers
- Care Gaps
- Care Manager Signature
- Care Team
- Insurance
- Labs
- Medications
- Patient Agreement
- Patient Banner Note
- HCC - Potential Diagnoses
- Problems
- Physician Recommendations / Response
- Utilization
You can print a care plan to provide your patient with a summary of his or her care plan, which can help them reach care plan goals.
Outreach Manager messages, as well as resultant patient interactions and outcomes, are visible in the patient's timeline. You can:
- See campaign messages sent to patients in the patient's timeline.
- View relevant interactions, such as phone calls with patients, in the patient's timeline.
- Enter the outcome of patient calls related to an Outreach Manager campaign.
The history of your Outreach Manager campaign — the messages and the related interactions and outcomes — are visible in the patient's Person Center.
The history is useful, for example, if a patient calls in response to an automated phone message regarding a preventive care exam that needs to be scheduled. You can document the details of this phone call during the conversation, thus adding the event (the phone call) to the patient's event timeline.