 User Guide — athenaWell
athenahealth Population Health
athenaWell is a patient-facing application that is closely integrated with the athenahealth Population Health Care Manager. With athenaWell, your patients can stay on top of their personalized care plans while they're on the go.
Note: Patients can access the athenaWell self-service portal to search for answers to their questions and read support documentation.
Your organization must use athenahealth Population Health, and you must have a role that includes the Population Management: Self-Managed Care permission to access this functionality.
In order for your patients to use the athenaWell app, you must invite them through the Person Center. Once invited, patients receive an email encouraging them to activate their account and download the mobile app (Apple iOS) or the Web application.
Note: Patients do not need to have a smartphone to use athenaWell. Patients can access athenaWell using a Web browser on any laptop or desktop computer.
- Display the patient's Person Center: On the Main Menu, enter the patient's name, patient ID, or member ID (insurance number) in the Search Bar. Under NETWORK PATIENTS, select the data type and then click the search icon.
Matching patients appear under the Patients tab. - Click the patient name to expand the selection, and then click the patient name in large text to display the patient's Person Center.
- Click the Care Management tab.
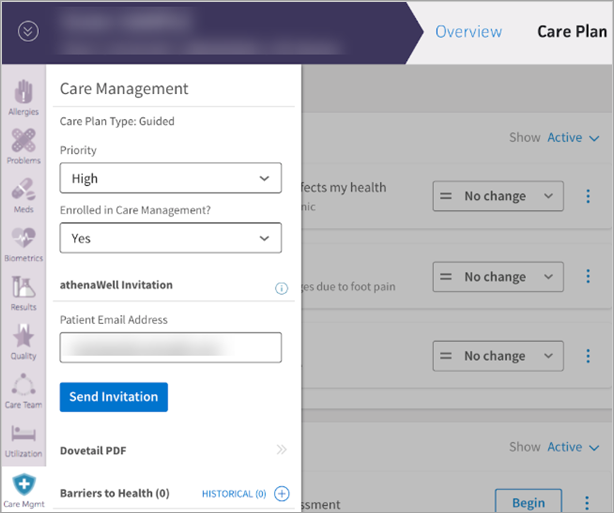
- Care Plan Type — This field shows the type of Care Plan the patient has (Automated or Guided).
- Priority — Select a care plan priority from the menu.
- Enrolled in Care Management? — Select Yes or No.
- Yes — The patient has access to athenaWell, and enrolled patients have editable care plans. If a patient is enrolled in care management and has accepted their athenaWell invitation, their athenaWell status automatically becomes Active, and they can see any care plans in the athenaWell app.
Note: This field is set to Yes by default for patients who are invited to athenaWell via the rising-risk workflow and patients with a Guided Care Plan. - No — The patient does not have access to athenaWell, and all active health concerns and care plans are archived. Patients with an unenrolled care management status have care plans that are not editable. Unenrolling a patient from care management automatically changes their athenaWell status to Inactive, which removes them from athenaWell, and the patient can no longer see their care plan in the app.
Note: If the athenaWell status of the patient is set to Invited, you can set this field to No to cancel the invitation.
athenaWell Invitation section
- athenaWell Status — The patient's athenaWell status is automatically set to Active after they accept their athenaWell invitation.
Inactive or Deactivated patients cannot access athenaWell functionality. - Patient email address — Enter the email address where the patient will receive the athenaWell invitation.
- Phone Number — Enter the patient's phone number.
Note: This field appears only if your practice enabled two-factor authentication (2FA). Two-factor authentication is a security process that requires the patient to provide two authentication factors to verify that they are who they say they are — in this case, access to the email address and the phone number they provided. - Click Send invitation.
Your patient receives an email invitation to activate her account. After completing a simple account setup form, the patient can download the app for iOS or log in via the Web (if the patient does not have a smartphone).
You can update a patient's email address or phone number and resend the patient an invitation to athenaWell.
Note: The Patient Phone Number field appears only if two-factor authentication (2FA) is enabled for athenaWell. The phone number is used to verify the patient's identity by sending a text message.
- Display the patient's Person Center: On the Main Menu, enter the patient's name, patient ID, or member ID (insurance number) in the Search Bar. Under NETWORK PATIENTS, select the data type and then click the search icon.
Matching patients appear under the Patients tab. - Click the patient name to expand the selection, and then click the patient name in large text to display the patient's Person Center.
- Click the Care Management tab.
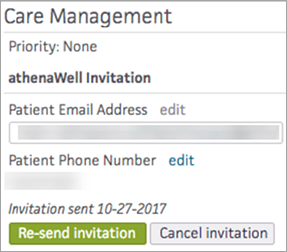
- Under athenaWell invitation, edit the patient's email address, phone number (if the field is available), or both.
- Patient Email Address — Click edit and then enter the patient's new email address.
- Patient Phone Number — Click edit and then edit the patient's phone number.
- Click Re-send invitation.
- If two-factor authentication is not enabled, athenaOne sends a new athenaWell invitation to the updated email address.
- If two-factor authentication is enabled, athenaOne sends a new athenaWell invitation using the updated phone number.
As soon as a patient receives an invitation to use athenaWell, you can start customizing the patient's care plan on the Care Plan page.
Note: After a patient accepts the invitation to use athenaWell, the athenaWell account status changes to Active and an account activation for athenaWell event appears in the timeline.
The patient task statuses are the same as those that appear on the Care Plan page. You can change the status of a task at any time.
All patient tasks, goals, and assessments that you select when you invite your patient to athenaWell default to Active status and are immediately visible to the patient when he activates his athenaWell account.
- Display the patient's Person Center: On the Main Menu, enter the patient's name, patient ID, or member ID (insurance number) in the Search Bar. Under NETWORK PATIENTS, select the data type and then click the search icon.
Matching patients appear under the Patients tab. - Click the patient name to expand the selection, and then click the patient name in large text to display the patient's Person Center.
- Open an existing care management event, or create a new care management event from the timeline.
- Click Care Plan to the right of the purple banner (above the timeline).
You can see all your patient tasks on the Care Plan page. All patient tasks default to Active status. - Click the patient task status that you want to change, such as Active.
- Select the new status for the patient task from the list.
- Completed — The task is complete.
- Removed — The task is removed from the patient's care plan.
- Active — The patient needs to complete the task.
- Paused — The task is paused.
All patient tasks are patient-facing and visible to the patient in the athenaWell app. athenaWell patient tasks can be added and scheduled in the Patient Tasks section of the Care Plan.
The Care Plan page displays all the patient tasks, goals, and assessments that you select when you invite the patient to athenaWell. All these tasks default to Active status.
- Display the patient's Person Center: On the Main Menu, enter the patient's name, patient ID, or member ID (insurance number) in the Search Bar. Under NETWORK PATIENTS, select the data type and then click the search icon.
Matching patients appear under the Patients tab. - Click the patient name to expand the selection, and then click the patient name in large text to display the patient's Person Center.
- Open an existing care management event, or create a new care management event from the timeline.
- Click Care Plan to the right of the purple banner (above the timeline).
- Click a patient task to display the task details.
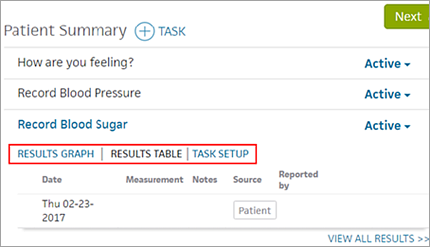
- RESULTS GRAPH — Displays entered data in graph form.
Hover over a data point on the graph to display details, including the value, the date that the value was reported, and by whom it was reported. - RESULTS TABLE — Displays entered data and all instances when the patient was supposed to enter data based on the task's recurrence (see To update a patient task). Care managers can edit or enter data in the Results Table (see To document or edit data for an athenaWell task).
- Date — Date that the result was (or should have been) reported, based on task recurrence.
- Result/Measurement — Result value.
- Notes — Additional notes written by the patient or care manager.
- Source — Source of the data (for example, Patient, Manual).
- Reported by — Name of the person who reported the result.
- TASK SETUP — Displays task settings, such as instructions and recurrence (see To update a patient task).
The patient task expands to display the following information, depending on the task:
Each result row shows:
In the Results Table of an athenaWell task, you can see any patient self-reported data or manually entered data for a task. You can also document or edit any data for a task — for example, if a patient forgets to report a result or enters an incorrect result but gives you the result data over the phone or in person.
- Display the patient's Person Center: On the Main Menu, enter the patient's name, patient ID, or member ID (insurance number) in the Search Bar. Under NETWORK PATIENTS, select the data type and then click the search icon.
Matching patients appear under the Patients tab. - Click the patient name to expand the selection, and then click the patient name in large text to display the patient's Person Center.
- Open an existing care management event, or create a new care management event from the timeline.
- Click Care Plan to the right of the purple banner (above the timeline).
- Click a patient task to expand the task details.
The Results Table appears and displays the last five instances when the patient should have reported data (based on the task recurrence). If the patient reported data, this self-reported data appears. - Click VIEW ALL RESULTS (bottom right) to see all the data.
- Hover over any result row, with or without entered data, to display the EDIT link on the right side.
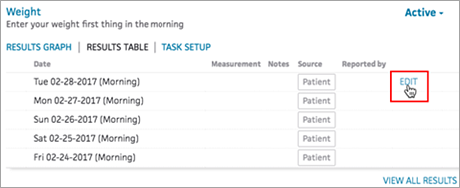
- Click the EDIT link to document or edit data.
- Enter the result value and any notes.
- Click SAVE.
After you document or edit an entry, your name appears in the Reported by column.
After you create a patient task in the care plan, you can change the description of the task or change its status at any time.
- Display the patient's Person Center: On the Main Menu, enter the patient's name, patient ID, or member ID (insurance number) in the Search Bar. Under NETWORK PATIENTS, select the data type and then click the search icon.
Matching patients appear under the Patients tab. -
Click the patient name to expand the selection, and then click the patient name in large text to display the patient's Person Center.
- Click Care Plan at the top of the Person Center.
- Click the care plan that you want to update a task for.
- To change the task instructions or related goal:
- Click the task and then click the more options icon
 next to the task.
 - Select Setup from the menu.
The task window opens. - Edit the Instructions or Relate to a goal field and then click Save.
- To make a patient task inactive:
- Click the task and then click the more options icon
 next to the task.
 - Select Make inactive from the menu.
The Inactive counter increments by 1. - To reactivate an inactive patient task:
- Click the Show menu to the right of Patient Tasks and select Inactive from the menu to display inactive tasks.
- Locate the inactive task and click the Move to active button.
- To complete a patient task, locate the task and click the Complete button.
Note: Some tasks — for example, Log Weight — have a Record button instead of a Complete button. Click the button, record the value, and then click Save and Complete. - To see completed tasks:
- Click the Show menu to the right of Patient Tasks.
- Select Completed from the menu.

Note: You can click the refresh icon ![]() (on the top left corner of the care plan) to update the data for all the patient's care plans that include the same task.
(on the top left corner of the care plan) to update the data for all the patient's care plans that include the same task.
Add standard or custom tasks for patients based on your patient's care management problems. You can associate a patient task with one of the goals in the care plan, if you choose.
Note: You can create custom tasks that can be marked as complete and recurring tasks, but you cannot create a custom task that requests specific, structured data or free-text entries.
- Display the patient's Person Center: On the Main Menu, enter the patient's name, patient ID, or member ID (insurance number) in the Search Bar. Under NETWORK PATIENTS, select the data type and then click the search icon.
Matching patients appear under the Patients tab. -
Click the patient name to expand the selection, and then click the patient name in large text to display the patient's Person Center.
- Click Care Plan at the top of the Person Center.
- Click the care plan that you want to add a task for.
- Click the plus icon to the right of Patient Tasks.
Additional fields appear. - Task — You can select a task from the content library or create a patient task in your own words.
- Task instructions — Enter notes to describe the task fully. (Notes for some tasks appear automatically; you can edit those notes.)
Note: For tasks that involve common measurements or support — such as blood pressure, blood glucose, heart rate, and educational content — an additional window appears for you to record the information or access the educational content. - Relate this task to a Goal — Select a goal to associate this task with or select No associated goal.
- Schedule — Select One-time (the default value) or Recurring (for a task that should be repeated regularly).
- If you select One-time, the Due date field appears, where you can enter a due date for the patient task.
- If you select Recurring, you can select the days of the week on which the patient should complete the task (all days are selected by default). Click a day to deselect it or to select it again.
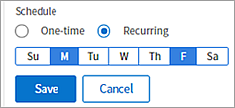
In this example, the patient should complete the task on Mondays and Fridays. - Click Save.
As a member of the care team, you can see educational material targeted to your athenaWell patients in the Patient Resources section of the Care Manager. Patients see these materials in the Care Center section of the athenaWell app.
The educational materials in the list are based on the patient tasks or disease condition (such as diabetes) that you select when you invited the patient to athenaWell. You can assign educational material as a task for your patients to help ensure that they read it.
Note: For patients invited via the athenaWell rising-risk workflow, educational materials are selected based on the patient's disease condition (see athenaWell for rising-risk patients).
- Display the patient's Person Center: On the Main Menu, enter the patient's name, patient ID, or member ID (insurance number) in the Search Bar. Under NETWORK PATIENTS, select the data type and then click the search icon.
Matching patients appear under the Patients tab. - Click the patient name to expand the selection, and then click the patient name in large text to display the patient's Person Center.
- Create a new care management event from the timeline.
- Click Care Plan to the right of the purple banner (above the timeline).
- To see the list of educational materials available to the patient, click Patient Resources to the right of Patient Tasks.
- To display the educational handout, click View Resource under the title.
The educational material opens in a new tab of your browser window. - To add the handout to the list of tasks that you can assign to the patient, click Assign Task to the right of the title.
- To add the handout to the list of tasks for the patient, follow the instructions in To add a new athenaWell patient task.
You can communicate directly with your patients by sending and receiving messages in the Messages panel of the Person Center. Messages are sent to patients immediately. Patients can read the messages on their mobile phones or using a Web application and can respond in the same manner.
To exchange athenaWell messages with a patient, you must be a member of the patient's care team. (To add yourself to a patient's care team, see the instructions in Person Center — Care Team Tab.)
- Display the patient's Person Center: On the Main Menu, enter the patient's name, patient ID, or member ID (insurance number) in the Search Bar. Under NETWORK PATIENTS, select the data type and then click the search icon.
Matching patients appear under the Patients tab. - Click the patient name to expand the selection, and then click the patient name in large text to display the patient's Person Center.
- Click MESSAGES to the right of the timeline.
- Type your message in the text box at the bottom of the Messages panel.
- Click Send.
Messages you send appear in purple text bubbles on the right side of the panel, and messages from the patient appear in gray text bubbles.
If you have unread messages from the patient, the Messages link in the Person Center turns orange, with a count of the number of unread messages in parentheses. When you click MESSAGES to open the Messages panel, the panel automatically scrolls to the first unread message.
You can send message attachments to your athenaWell patients and view attachments that they send you. These attachments — with or without associated messages — appear in the Messages panel of the patient's Person Center.
To exchange athenaWell messages with a patient, you must be a member of the patient's care team. (To add yourself to a patient's care team, see the instructions in Person Center — Care Team Tab.)
- Display the patient's Person Center: On the Main Menu, enter the patient's name, patient ID, or member ID (insurance number) in the Search Bar. Under NETWORK PATIENTS, select the data type and then click the search icon.
Matching patients appear under the Patients tab. - Click the patient name to expand the selection, and then click the patient name in large text to display the patient's Person Center.
- Click MESSAGES to the right of the timeline.
Any attachments sent by you or your athenaWell patient appear here.
Note: PDF files appear as a Download link in the message instead of as a thumbnail of the file. - To display an attachment, click it.
The attachment opens outside the Messages panel. - To send attachments to your athenaWell patients:
- At the bottom of the Messages panel, click the plus icon
 in the text box.
 - Select the file (.jpg, .gif, .png, or .pdf) and click Open. The attached file appears below the message text box.
Note: The file size cannot exceed 10 MB. -
Type a message in the text box to accompany your attachment.
- Click Send.
When any member of a care team opens and reads a patient's message, the message is marked as "Read" for all care team members. You can flag patient messages for follow-up by the appropriate care team member.
- Flag a patient message for yourself as a reminder to follow up on this message later.
- Flag the patient message for another member of the care team to read and address.
To flag an athenaWell message for follow-up, you must be a member of the patient's care team. (To add yourself to a patient's care team, see the instructions in Person Center — Care Team Tab.)
- Display the patient's Person Center: On the Main Menu, enter the patient's name, patient ID, or member ID (insurance number) in the Search Bar. Under NETWORK PATIENTS, select the data type and then click the search icon.
Matching patients appear under the Patients tab. - Click the patient name to expand the selection, and then click the patient name in large text to display the patient's Person Center.
- Click MESSAGES to the right of the timeline.
- Click the flag icon
 at the top of the Messages panel.
 - Click the names of the care team members for whom you want to flag this patient message.
- Flag one or more care team members.
- Select All to flag the patient message for all members of the care team.
- Unflag a care team member by clicking the name again.
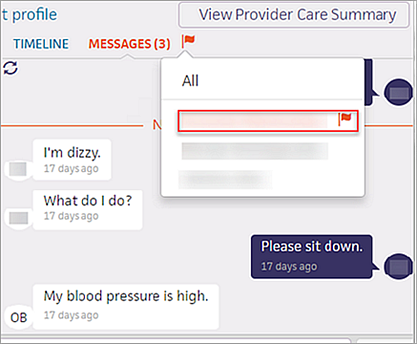
Important: Only the person who created the flag or the flagged person can complete follow-up and remove the flag.
Read and address flagged messages as soon as possible.
- Display the patient's Person Center: On the Main Menu, enter the patient's name, patient ID, or member ID (insurance number) in the Search Bar. Under NETWORK PATIENTS, select the data type and then click the search icon.
Matching patients appear under the Patients tab. - Click the patient name to expand the selection, and then click the patient name in large text to display the patient's Person Center.
- Click MESSAGES to the right of the timeline.
A message at the top of the Messages panel indicates that the message is flagged for your follow-up.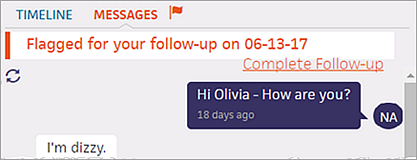
- Click Complete Follow-up to indicate that you followed up.
The flag is removed from the message thread.
The Patient Conversations section of your Inbox provides another way to see unread patient messages.
- Display the Care Manager page: On the Main Menu, click Patients and select Care Management.
- In the Inbox, click Patient Conversations. The number of unread patient conversations appears in parentheses.
The Patient Conversations window opens.
- Click the conversation to display the Messages panel in that patient's Person Center.
You can flag a patient conversation for follow-up for yourself in the Inbox on the Care Manager page.
- Display the Care Manager page: On the Main Menu, click Patients and select Care Management.
- In the Inbox, click Patient Conversations.

Note: If the last message sent was an attachment, Attachment appears in the conversation thread. - Click the gray flag next to the date to flag the conversation for follow-up.
The flag turns orange. - You can reset the flag to gray (no follow-up) by clicking it again.
You can follow up on a flagged patient conversation from your Inbox on the Care Manager page.
- Display the Care Manager page: On the Main Menu, click Patients and select Care Management.
If any patient conversations are flagged for you to follow up, an orange flag appears next to Patient Conversations.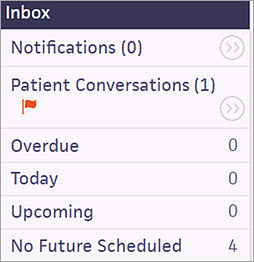
- In the Inbox, click Patient Conversations.
- Click the patient conversation to display the Messages panel in the patient's Person Center.
- Read the message and respond as needed.
- On the Care Manager page, click Patient Conversations and click the orange flag to reset the flag to gray (no follow-up).
You can see a patient's Active patient tasks without opening a care management event. (Active tasks are tasks that the patient is responsible for completing in the athenaWell application.)
- Display the patient's Person Center: On the Main Menu, enter the patient's name, patient ID, or member ID (insurance number) in the Search Bar. Under NETWORK PATIENTS, select the data type and then click the search icon.
Matching patients appear under the Patients tab. - Click the patient name to expand the selection, and then click the patient name in large text to display the patient's Person Center.
- Click the Care Management tab.
Under the Care Plan section of the Inbox, the patient's Active tasks appear. - Click the view more icon
 to the right of Care Plan to display a read-only version of the Care Plan page.
You can access information about athenaWell patients on the Patients tab in the Care Manager. The Patients tab displays information about multiple patients at once, such as which patients have been invited to athenaWell and which patients have sent you messages that you need to read.
You can change a patient's athenaWell account status (Active, Deactivated, Paused) as needed. For example, if a patient decides not to use athenaWell, you can place the patient account in Paused status. With this account status, the patient no longer sees athenaWell tasks but can still log in to the application to send you a message.
If a patient is no longer eligible for care management services due to a change in insurance, you can deactivate the patient's athenaWell account. The patient can no longer log in to the athenaWell application. At a later time, you can reactivate the patient's account.
- Active status — The patient can log in to athenaWell. Any previously paused tasks are set to Active status and are visible to the patient.
- Deactivated status — The patient can no longer access or log in to his athenaWell account. All tasks are set to Paused status.
- Paused status — The patient can continue to log in to her athenaWell account but cannot see any tasks. All tasks are set to Paused status.
- Display the patient's Person Center: On the Main Menu, enter the patient's name, patient ID, or member ID (insurance number) in the Search Bar. Under NETWORK PATIENTS, select the data type and then click the search icon.
Matching patients appear under the Patients tab. - Click the patient name to expand the selection, and then click the patient name in large text to display the patient's Person Center.
- Open an existing care management event, or create a new care management event from the timeline.
- Click Care Plan to the right of the purple banner (above the timeline).
- Click the Care Management tab.
- athenaWell Status — Select the status for the patient (Invited, Active, Inactive, Deactivated).
athenaWell is a patient-facing application that is closely integrated with the athenahealth Population Health Care Manager. With athenaWell, your patients can stay on top of their personalized care plans while they're on the go. Patients can use athenaWell to:
- Self-report data (biometrics data, for example).
- Complete care plan tasks (record their weight, for example).
- Communicate with their care manager directly via a mobile or Web application.
Note: Patients can access the athenaWell self-service portal to search for answers to their questions and read support documentation.
athenaWell allows care managers to monitor their patient population in real time and with minimal effort. In addition, athenaWell allows care managers to collect more data about their patients than they can obtain during office visits alone.
If you are interested in using athenaWell, please contact your Customer Success Manager. athenahealth must complete an implementation process with your practice before you can use athenaWell.
Patients with one or more health conditions who do not need active care management — rising-risk patients — can use athenaWell to manage their care. The athenaWell experience for rising-risk patients is automated, from email invitation to care plan generation.
To enable athenaWell for rising-risk patients, contact a member of your Client Services team to target the population of rising-risk patients that you want to invite to athenaWell. athenahealth sends the invitations to your patients on a continual basis.
Note: To receive an invitation for athenaWell, patients must have an email address on file in athenaOne.
After a patient accepts the invitation to use athenaWell, the athenaWell account status changes to Active and an account activation for athenaWell event appears in the timeline.

An automated care plan appears in the patient's Person Center and in the athenaWell application for the patient to see.
The automated care plan for a rising-risk patient is selected based on the patient population and program that your organization requested from athenahealth. For example, if your organization selected a diabetic patient population, these patients receive a diabetic care plan.
These automated care plans are developed by clinicians and include tasks to help patients manage their chronic conditions independently.
- Each task has its own schedule — for example, daily, weekly, or on Mondays, Wednesdays, and Fridays only.
- Some tasks may not be scheduled until a week or two after the patient activates the athenaWell account, when it's clinically relevant for the patient to complete the task.
- Tasks that start later also help the patient from feeling overwhelmed with too many tasks.
The triage care manager is the person assigned to all rising-risk patients invited to athenaWell. The triage care manager can assign each patient to a different care manager at any time while the patient's care plan is still automated. If the patient's condition worsens, you can convert a patient from an automated care plan to a guided care plan, so that you can customize the care plan.
If a clinical decision is made that a patient needs additional monitoring, you can move the patient from an automated care plan to a guided care plan, which you can customize.
- Display the patient's Person Center: On the Main Menu, enter the patient's name, patient ID, or member ID (insurance number) in the Search Bar. Under NETWORK PATIENTS, select the data type and then click the search icon.
Matching patients appear under the Patients tab. - Click the patient name to expand the selection, and then click the patient name in large text to display the patient's Person Center.
- Open an existing care management event, or create a new care management event from the timeline.
- Click Care Plan to the right of the purple banner (above the timeline).
- Click Convert to Guided. A confirmation message appears.
Important: After you move a patient from an automated care plan to a guided care plan, you cannot move the patient back to an automated care plan. - To move the patient to a guided, customizable care plan, click Add to Guided Care.
The patient's care team is now responsible for any care plan updates.
- John Smith, a care manager administrator, wants to engage diabetic patients in his organization who are not currently assigned to a care manager and who are not actively receiving guided care. He wants to encourage these diabetic patients to manage their care independently by using the athenaWell application to track a series of tasks designed for diabetic patients.
- Working with athenahealth, John determines the patient population to target based on disease condition (diabetes), age (≥18 years old), sex (male and female), and at-risk state (at risk).
- John identifies a care manager at his practice, Ben Brown, to serve as the triage care manager. Ben will be assigned automatically to every patient that this outreach campaign invites to athenaWell.
- athenahealth creates the outreach campaign and runs it.
- Patients in this patient population who have an email address stored in athenaOne receive an email invitation to join athenaWell.
- Sue Quinn, a diabetic patient in the organization, receives the athenaWell invitation email and activates her athenaWell account.
- She immediately receives an automated care plan with a few tasks to complete right away, including recording her blood glucose result today.
- Sue enters a blood glucose result of 300 mg/dL, which is well above the normal range. A notification is sent to Ben's Inbox, letting him know that Sue entered a high blood glucose value.
- Ben clicks the notification to display Sue's Person Center. He makes the clinical decision to move Sue from the automated care plan to a guided care plan so that he can work closely with her to address her high blood glucose levels.