Care Manager
athenahealth Population Health
The Care Manager page provides access to a care manager's schedule as well as care management referral and workflow tools. You can use this page to:
- View and filter all patients associated with care management programs
- Analyze statistics related to these patients
- Manage activities, such as scheduling care management events and changing a patient's status in a care management program
On the Main Menu, click Patients and select Care Management.
Your organization must use athenahealth Population Health, and you must have the Population Management: Care Manager role or the Population Management: Care User role to access this page.
To view and edit the Problems, Meds, and Results tabs, you must have the Care Manager role or these individual user permissions:
- Population Management: Person Center: Problems (Edit)
- Population Management: Person Center: Meds (Edit)
- Population Management: Person Center: Results (Edit)
To view and edit the Patients tab, you must also have the Population Management: Manage Referrals role.
To view program referral activities in the audit log (from the Data tab in the Person Center), you must have the Population Management: Person Center: Data Tab: Audit Log role or permission. This role is also embedded in the Quality Management roles.
The center pane of the Care Manager page is the hub of the care management workflow, providing care managers with the following tools to manage the workflow and gain insight about the overall population as well as each individual patient associated with care management programs.
Events are activities related to a patient's care, both in and outside your organization. You can create and manage these events from the Care Manager and from the Person Center:
- Communications (with patient, PCP, health professionals, other)
- Appointments
- Hospital stays
- Skilled nursing facility stays
- Patient consent
- Reviews
- General notes
- Documentation
- Creation of or modifications to the patient's care plan
- Sending a care plan to the patient
In the Care Manager, the Schedule shows scheduled events, such as appointments and calls, for care managers. You can choose to view scheduled events for the day, week, or month for either your entire team or a specific care manager.
You can add an event to:
- Document a past event
- Schedule a future event
- Upload a file, patient history, or patient consent
- Schedule non-patient time (such as meetings or vacation time)
The Patients tab provides a comprehensive view of all program referrals assigned to you and all the patients for whom you are a member of the care team.
Note: You can export the entire list of patients to an Excel spreadsheet by clicking EXPORT ALL. To export a selected list of patients, click the checkbox to the left of each patient.
The following columns appear by default:
- Patient — Patient name followed by DOB, age, and member ID
- PCP — Name of the patient's PCP
- Group — The pod (team) or group that the patient's PCP belongs to
- Practice — Practice that the PCP belongs to (determined by provider hierarchy)
- Program — Name of the care management program that the patient is enrolled in
- Status — Patient's status in this program, such as Enrolled or Identified
- Assigned To — Care team member that the patient was assigned to when added to the specified program
- Date Assigned — Date that the patient was assigned to the care team member
Depending on your permissions, you can use MANAGE COLUMNS to add columns to the tab from the following categories:
- Patient Information
- Program
- Care Management Event
- Clinical Utilization (this column is available only if your organization enables ADT feeds)
- Risk (this column is available only if your organization uses the HCC risk adjustment feature)
- Self Management (this column is available only if your organization uses the athenaWell app)
The Patients tab shows specific information about patient referrals and events.
- Click the Patients tab to see a list of all patients assigned to you (default view).
- Click your name at the top of the tab and select other team members to see patients assigned to those members of your team.
You can filter columns to refine your patient list. In most cases, the columns default to All. Use the None option to see patients for whom no entry exists in the selected column.
To further refine the patient list, click MANAGE COLUMNS.
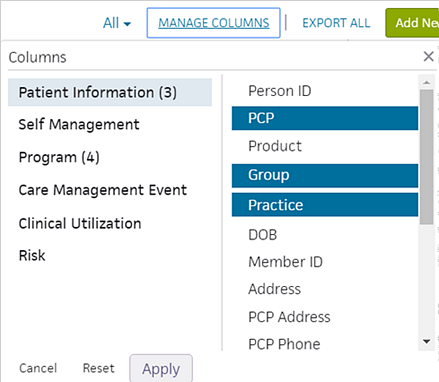
On the left, choose the type of column to add, such as Patient Information. Then, choose a column heading on the right, such as Member ID, and then click Apply.
Note: Selected columns are highlighted in blue.
After you set your view the way you want it, you can save your column and filter settings using the History icon ![]() and the star icon
and the star icon ![]() .
.
When updating the status of a program referral on the Patients tab in the Care Manager, you can select another status only within the same group or a subsequent group.
Status options are organized into three status groups:
- Active
- Rejected or unenrolled
- Error
The active statuses are:
- Identified
- Scheduled
- Pending
- Enrolled
You can change an active status to a different active status, a rejected or unenrolled status, or to an error status.
The rejected or unenrolled statuses are:
- Declined
- Unable to contact
- Clinically not appropriate
- Minimum requirements not met
- Ineligible
- Do not contact
- Unenrolled
- Unenrolled: Clinically stable
- Unenrolled: Declines further care management
- Unenrolled: Death
- Unenrolled: Changed provider to non-network
- Unenrolled: Ineligible
You can change a rejected or unenrolled statuses to a different rejected or unenrolled status or to an error status.
The error statuses are:
- Added in error
- Duplicate
You can select an error status to indicate errors, such as an incorrect status or a duplicate program. You can change an error status only to a different error status.
You must have the Population Management: Care Manager: Admin permission to access the Care Admin tab.
The Care Admin tab shows metrics for patients associated with care management programs. You can also see metrics for events to do by the care management team.
In the "Patients waiting in each Onboarding Stage" area, you can see how many patients are:
- Waiting to enroll
- Waiting for a first encounter
- Waiting for a follow-up appointment
You can also see how long patients have been waiting in these stages.
Click any blue tally to see a list of patients with these details:
- Person (patient name)
- Last updated date
- Referral assigned to
- Days in waiting
From this list, you can:
- Access a patient's Person Center by clicking the patient name
- Sort the list by clicking a column title
Note: When you access a patient's Person Center from the Care Admin page, you can use the Next and Previous arrows at the top right of the page to navigate through the entire list of patients in that group. You can also see how many patients are in this list and where the patient you are viewing is in this list.
Events are activities related to a patient's care, both in and outside your organization. You can create and manage these events from the Care Manager and from the Person Center:
- Communications (with patient, PCP, health professionals, other)
- Appointments
- Hospital stays
- Skilled nursing facility stays
- Patient consent
- Reviews
- General notes
- Documentation
- Creation of or modifications to the patient's care plan
- Sending a care plan to the patient
In the "Events To Do" area, you can see metrics for events to do by the care management team, including:
- Past Due — Overdue care management tasks.
- No Future Scheduled — Patients enrolled in a care management program who do not have a care event scheduled.
- Incomplete — Care management tasks that were started but not completed.
- Scheduled — Care management tasks scheduled in the last four weeks.
- Completed — Care management tasks completed in the last four weeks.
You can also see how long events to do have had these statuses.
Click any blue tally to see a list of patients and relevant details, including who the referral is assigned to. From this list, you can:
- Access a patient's Person Center by clicking the patient name
- Sort the list by clicking a column title
Note: When you access a patient's Person Center from the Care Admin page, you can use the Next and Previous arrows at the top right of the page to navigate through the entire list of patients in that group. You can also see how many patients are in this list and where the patient you are viewing is in this list.
Click any Past Due blue tally to see a list of patients with these details:
- Person (patient name)
- Scheduled date
- Event description
- Assigned to
- Days waiting
- Notes
Click any No Future Scheduled blue tally to see a list of patients with these details:
- Person (patient name)
- Last activity date
- Days waiting
Click any Incomplete blue tally to see a list of patients with these details:
- Person (patient name)
- Scheduled date
- Event description
- Assigned to
- Days waiting
- Notes
Each month, CMS allows you to bill for 20 minutes or more of CCM services rendered to patients enrolled in the CMS Chronic Care Management program (see Chronic Care Management).
Note: You can submit only one CCM bill or claim per patient per month.
The Billing tab displays the CCM billing dashboard, which provides an aggregate view of all patients enrolled in the CMS Chronic Care Management program, as well as the total number of minutes of care management activities completed each month. On the billing dashboard, you can attest to sending billing requests for multiple patients at the same time.
To document and review CCM services for a patient, the patient must be enrolled in the CMS Chronic Care Management program. For instructions, see "To enroll a patient in a care management program" on the Care Management Workflow page.
Care managers with the Population Management: Care Manager: Billing Dashboard permission can use the CCM billing dashboard to view the billing status of multiple patients at once (see "To view the CCM billing status of multiple patients"). On the billing dashboard, you can filter the list of patients by their CCM status.
- Not enough time spent — This status indicates that fewer than 20 minutes of CCM services have been rendered for the patient in the selected month.
- Ready to bill — This status indicates that at least 20 minutes of CCM services have been rendered for the patient in the selected month.
- Marked as billed — This status indicates that a care manager has already attested to sending the billing summary to the patient's provider for CCM services rendered to the patient in the selected month.
Care managers can use the CCM billing dashboard to view the billing status of multiple patients at once.
Note: To display the CCM billing dashboard, you must have the Population Management: Care Manager: Billing Dashboard and Population Management: Care Manager: Bulk Send Bill to Provider permissions.
- Display the Care Manager page: On the Main Menu, click Patients and select Care Management.
- Click the Billing tab.

The CCM billing dashboard appears, listing all patients enrolled in the CMS Chronic Care Management program for the month.
Note: You can click a column header to sort the dashboard by that column. - You can filter the billing dashboard by these criteria:
- Month/Year — Select a month and year to display patients enrolled in CCM for that month.
- Status — Select a CCM status from the menu to display patients for that CCM status (see "CCM billing statuses").
- Care manager — Select a care manager from the list to display patients assigned to that care manager.
- Select the patients in the filtered list.
- Click Create Billing Request to generate a billing request for CCM services for athenaOne.
Care managers document care management services by adding and completing events in the event timeline of the patient's Person Center. All event types in the menu on the Add Event page are considered CCM services. However, only events that have been closed and marked as complete count toward the 20 minutes of CCM services.
- Display the patient's Person Center: On the Main Menu, enter the patient's name, patient ID, or member ID (insurance number) in the Search Bar. Under NETWORK PATIENTS, select the data type and then click the search icon.
Matching patients appear under the Patients tab. - Click the patient name to expand the selection, and then click the patient name in large text to display the patient's Person Center.
- In the event timeline, click the event that you want to bill to see the expanded event.
- Time Spent — Enter the number of minutes of services rendered.
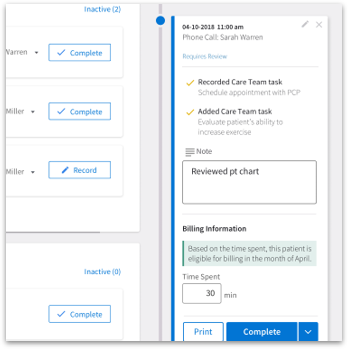
- Click Complete or Resume Later.
- Click Resume Later if you want to make additional changes to the care plan or documentation at a later time.
- Click Complete to permanently close the event.
Note: Marking an event as Complete locks the event permanently and prevents further edits. You cannot undo or unlock completed events. If additional notes are needed after an event has been marked as complete, you can create another event and add a note there.
You can edit CCM billing time in events if, for example, you initially forgot to add the billing time.
Events can be edited and tracked up until the time the event is marked complete. Completed events are locked to ensure that they aren't accidentally edited.
If the event is still in progress, all users can edit the billing time. If the event is complete, only users without the Requires Review permission can edit the Time Spent field. Users with the Requires Review permission are not able to edit the Time Spent field after an event is completed.
- Display the patient's Person Center: On the Main Menu, enter the patient's name, patient ID, or member ID (insurance number) in the Search Bar. Under NETWORK PATIENTS, select the data type and then click the search icon.
Matching patients appear under the Patients tab. - In the Event Timeline on the right, click the event that you want to edit.
- To edit the CMS billing time spent for an event in progress:
- Click Track Changes.
- Time Spent — Edit the number of minutes of services rendered.
- To edit the CMS billing time spent for a completed event:
- Click the edit icon
 to the right of the Time Spent value.
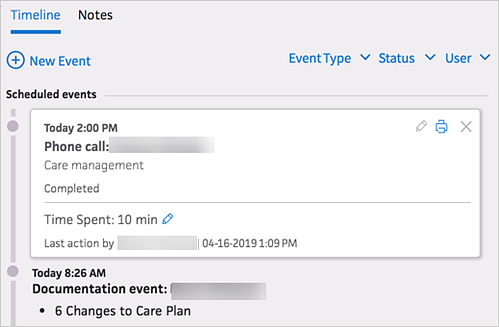
- Time Spent — Edit the number of minutes.
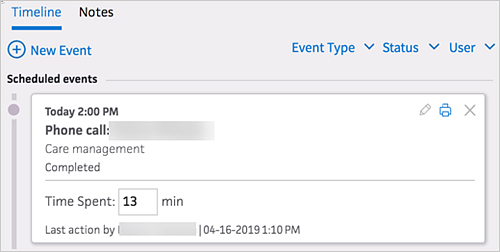
- Click the edit icon
When the total number of minutes of CCM services rendered reaches 20 minutes in a month, the Billing Summary option appears in the GO TO top right corner of the patient's Person Center.
- Display the patient's Person Center: On the Main Menu, enter the patient's name, patient ID, or member ID (insurance number) in the Search Bar. Under NETWORK PATIENTS, select the data type and then click the search icon.
Matching patients appear under the Patients tab. - Click the patient name to expand the selection, and then click the patient name in large text to display the patient's Person Center.
- Click the GO TO menu, then select Billing Summary.
- Click Show to display the clinical summary note associated with the care event.

- Click Export to Excel under any billing summary title to create a .csv file of the billing summary.
- Click Mark as billed to the right of the month to bill.
The Billing Summary is highlighted and the rest of the page is grayed out.
Important: When you click the Mark as billed button, you are attesting that these care management activities have been billed for this month in a third-party billing system outside athenahealth Population Health. - Click Mark as billed again.
The bill is marked as sent by you on today's date.
Note: To use the Activity tab, you must have a role that includes the Population Management: Care Manager: Admin permission.
The Activity tab displays metrics for the care management activities in your organization, including home and office visits, phone calls and text messages, and assessments. These metrics enable your organization to identify and share best practices from high-performing care managers and make changes to workflows that can maximize quality and financial performance.
Note: The Activity tab displays completed care activities only.
To display the care management activity data, click the Activity tab on the Care Manager page.
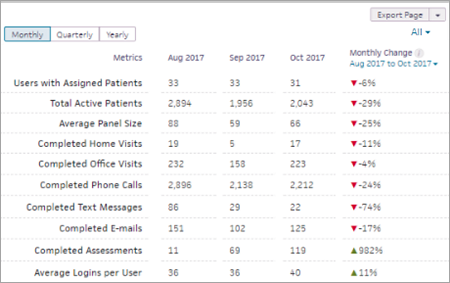
Care management activity data is displayed in a table that shows metric data for all care management users for the last three months. You can apply filters to select specific users and display metrics for the last three quarters or three years.
- The first column lists the metrics.
- The second, third, and fourth columns show the last three years, three quarters, or three months, depending on your selection.
- The last column compares two time periods, based on your selection, showing the percentage change from one period to the next. For example, if you select a three-month time frame, you can compare June to July, July to August, or June to August.
Note: If no metric data is available for the earlier time period in the comparison, the last column shows the raw change instead of the percentage change.
The Activity tab provides the following metrics.
Note: The term "users" in the metric descriptions includes care managers and other members of the care team.
This metric shows the number of users assigned at least one patient.
- Individual patients assigned to two different users are counted twice (once for each user).
- All users are included in this metric, regardless of permissions or roles.
- All patients are included in this metric, regardless of status, such as enrolled or active.
This metric shows the number of active patients assigned to a user.
- Active patients are patients with at least one occurrence of a care management activity, including new enrollments and events created.
- User is a care team member assigned a patient, regardless of care manager role or permissions.
This metric shows the total patient count per user, averaged across all users to calculate the patient ratio.
- Users are counted if they have at least one patient assigned to them.
- Patients are counted if they have a care activity that occurred in the given time frame.
- Calculation is total active patients/total care management users.
This metric shows the total number of completed home visits.
- All home visits are included, regardless of type or role selected.
- Metric excludes sample patients and visits with no completion date.
This metric shows the total number of completed office visits.
- All office visits are included, regardless of type or role selected.
- Metric excludes sample patients and office visits with no completion date.
This metric shows the total number of completed phone calls.
- Metric excludes sample patients and phone calls with no completion date.
- Phone calls must be completed within the application.
This metric shows the total number of completed text messages.
- Metric excludes sample patients.
- Metric excludes text messages with no completion date.
This metric shows the total number of completed email messages.
- Metric excludes sample patients.
- Email messages must be completed within the application.
This metric shows the total number of completed assessments.
- Metric includes static and dynamic assessments.
- Assessments must be completed within the application.
This metric shows the average number of logins for all athenahealth Population Health users who had at least one login in the time frame selected.
Note: The Activity tab displays completed care activities only.
- Display the Care Manager page: On the Main Menu, click Patients and select Care Management.
- Click the Activity tab.

- Click Monthly, Quarterly, or Yearly to see care management metrics for the last three months, three quarters, or three years.

The three-month display is selected by default. - By default, metrics for all care managers appear. To display metrics for specific care managers:
- Click the arrow next to All and select the care management users for whom you want to see metrics.
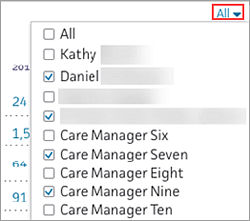
- To apply the filter, click the arrow next to All again.
- To remove care management users from the filter list, click the arrow next to All and deselect users.
- Depending on the time frame you selected, you can display a comparison of two months, two quarters, or two years in the last column of the Activity tab. By default, the last column shows a comparison between the first month, quarter, or year and the last month, quarter, or year.
Click the arrow at the top of the last column and select the two months, quarters, or years that you want to compare. - If you displayed metrics for the last three months, select the two months that you want to compare.
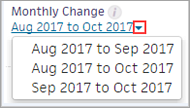
- If you displayed metrics for the last three quarters, select the two quarters that you want to compare.
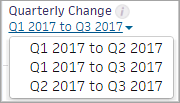
- If you displayed metrics for the last three years, select the two years that you want to compare.
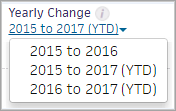
Note: The current year metrics are for the year to date. - You can reset the filters for time frame, care users, and metrics as needed.
- To export the activity data as it is shown on the Activity tab, click Export Page in the upper right corner of the page.

The data is exported to an Excel spreadsheet (.xlsx format). - To export historical data, click the arrow next to the Export Page button and select Export Historical.
This option includes care management activity data for up to three years and is organized by month.
These pages offer some additional tools:
- Care Management tab of the Person Center — View a patient's history in care management programs, update program status and patient priority, and create a program referral. You can also access the patient's detailed patient information in the Person Center and monitor progress in meeting care plan goals.
- Patient Population page — Analyze the broader patient population and identify candidates for a care management program.
Care managers can identify patients for care management programs on these pages:
- Patients tab of the Care Manager page — View patients already associated with a program for another care management program.
- Care Management tab of the Person Center — Identify a patient for a care management program.
- Patient Population page — Identify a group of patients for a care management program.
Note: Non-care managers can identify patients for care management programs only on the Care Management tab of the Person Center and on the Patient Population page.
The Care Manager page shows your Population Health Inbox in the left pane and your messages in the right pane, so you can see items on your to-do list and your most recent message.
The Population Health Inbox shows your care and quality tasks:
- Notifications — Notifications for ADT events, athenaWell patient responses, and vital/measurement out-of-range values.
- Patient Conversations — Unread patient messages.
- Overdue — Overdue care and quality events and tasks.
- Today — Today's care and quality events and tasks.
- Upcoming — Care and quality events and tasks for the next 30 days.
- No Future Scheduled — Your assigned patients enrolled in a care management program who do not have a care event scheduled.
- Sign off — Quality tasks sent back to you from the person you assigned them to.
- Requires Review — Care events that require your review.
Note: To view the Requires Review list, you must have the Care Manager: Can Review Others' Changes permission.
You can complete tasks and open events directly from the Population Health Inbox.
The Messages pane displays your most recent messages from athenahealth and other users in your organization. Click a message to view that message in full, or click VIEW ALL MESSAGES to view all of your messages in full.
You can view your team's to-do list in the Events To Do area of the Care Admin tab.
You can view a colleague's schedule by clicking your username at the upper right of the Schedule in the center pane and selecting your colleague's name.
If a patient enrolled in a care management program has no future event scheduled, you can schedule an event for them directly from your Population Health Inbox.
- Display your Population Health Inbox.
- Click No Future Scheduled.
- Click + Event.
- Click the plus icon
 next to a time in the Schedule.
The Add Event window appears with all fields pre-populated. - Click Add or Add and Open.
The Notifications row appears at the top of the Inbox when you receive a notification about a patient for whom you are on the care team. These notifications help you determine when to intervene to provide additional support to these patients.
Note: The Notifications row appears after you receive your first notification about a patient.
The following notification types are available in the Inbox:
- ADT-related events — Notifications about events related to admissions, discharges, and transfers (ADT).
Note: Your organization must have an ADT data feed and notification rules set up in athenaOne to receive ADT notifications. Contact a member of your Client Services team to set up ADT notifications. - Vital or measurement out-of-range notifications — Notifications triggered by the entry of a vital or measurement outside a defined threshold.
Note: Your organization must request this type of notification. Contact a member of your Client Services team to set up these notifications. - athenaWell notifications — Notifications triggered by patient task responses from the athenaWell app.
Note: Your organization must use athenaWell to receive these notifications.
By default, all notifications appear in the list. You can control the notifications you receive using the Notification Settings page.
- Display the Care Manager page: On the Main Menu, click Patients and select Care Management.
The Notifications row appears at the top of the Inbox when you receive a notification about a patient.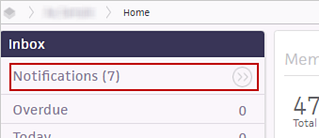
- Click the view more icon
 in the Notifications row to display the Notifications page.
- Click SETTINGS.
The Notification Settings page opens.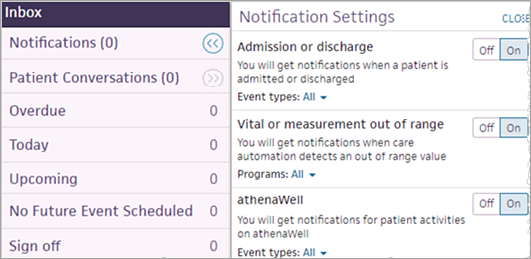
- To disable notifications for an event type or program (for example, the athenaWell Patient task inactivity event), click the All arrow and deselect the event type or program.
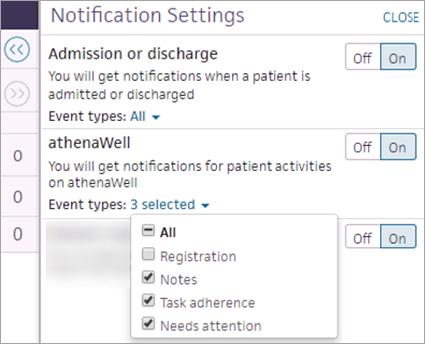
- To disable notifications for an entire category (such as athenaWell), click Off.
- After you make your changes, click CLOSE.
Note: Your organization must have an ADT data feed and notification rules set up in athenaOne to receive ADT notifications. Contact a member of your Client Services team to set up ADT notifications.
- Display the Care Manager page: On the Main Menu, click Patients and select Care Management.
The Notifications row appears at the top of the Inbox when you receive a notification about a patient.
- Click the view more icon
 in the Notifications row to display the Notifications page.
The notifications are organized by type — Inpatient Re-Admission, Inpatient Discharge, Inpatient Admission, and ED Visit — with the most recent at the top. - Acknowledge a notification in one of the following ways:
- Click the patient's name in the notification to display the patient's Person Center. This action removes the notification from your Inbox.
- Click the
 icon to the right of the notification to remove that notification.
 - Click DISMISS to the right of the date to remove all notifications for that date.
- Display the Care Manager page: On the Main Menu, click Patients and select Care Management.
- Click Schedule.
Tip: To check a colleague's availability, click the name in the upper right of the Schedule view and select the name of your colleague. Only users with the Population Management: Care Manager permission appear in this list. - Near the top left of the Schedule view (center pane), click one of these options:
- Day
- Week
- Month
The schedule displays appointments based on the timeframe you select.
- Display the Care Manager page: On the Main Menu, click Patients and select Care Management.
- Click the Schedule tab.
- Click the plus icon
 next to a time in the Schedule.
 - Select Care Management or Non Patient Time.
The Add Event window appears. - Patient — Search for the patient's name, and select the matching name in the drop-down list.
- Event Type — Select the type of event.
- Reason(s) — Select one or more reason for the event.
- Roles — Check the roles the event applies to.
- Assign to — Assign the event to a member of the care team or to yourself.
- Date — Enter a date for the event.
- Time — Enter a time for the event to begin.
- Duration — Enter the duration of the event.
- Attempt — If you try to contact the patient but are unsuccessful in reaching them, you can select a description of the attempt from the menu.
- Add a note in the free text field (if applicable).
- Click Complete Event or Schedule.
Notes:
- Complete Event appears for events that are marked as a past date. Schedule appears for events that are marked as a future date.
- Marking an event as Complete locks the event permanently and prevents further edits. You cannot undo or unlock completed events. If additional notes are needed after an event has been marked as complete, you can create another event and add a note there.
- Display the Care Manager page: On the Main Menu, click Patients and select Care Management.
- Click Schedule.
- Click the event in the Schedule.
The patient's Person Center appears, with the event opened in the event timeline (right pane). - Click the edit icon
 to open the Edit Event window.
 - Edit the fields as needed.
- Click Complete Event to complete this event, or click Resume Later to edit the event later.
Note: Your organization's preferences determine whether you should complete an event for each attempt or edit an existing event and resume it later. Marking an event as Complete locks the event permanently and prevents further edits. You cannot undo or unlock completed events. If additional notes are needed after an event has been marked as complete, you can create another event and add a note there.
- Display the Care Manager page: On the Main Menu, click Patients and select Care Management.
- Click Schedule.
- Click the scheduled event in the Schedule.
The patient's Person Center appears, with the event displayed in the event timeline (right pane). - Click on the event to see more information.
- Display the Care Manager page: On the Main Menu, click Patients and select Care Management.
- Click Schedule.
- Click the plus icon
 next to a time in the Schedule.
The Add Event window appears. - Select Non Patient Time.
- Event type — Enter a brief description of your meeting or personal time scheduled.
- Assign To — Select a person to assign the event to.
- Date — Select a starting date from the calendar.
- Until — Select an ending date from the calendar.
- From — Select a starting time for the event.
- To — Select an ending time for the event.
- Optional: Add a note to the event in the text field.
- Click Schedule.
Non-patient time appears in your Schedule view as well as in the Schedule when other people view your calendar.
- Display the Care Manager page: On the Main Menu, click Patients and select Care Management.
- Click Schedule.
- Click the event in the Schedule.
The Edit Event window appears. - Click Delete.
- Display the Care Manager page: On the Main Menu, click Patients and select Care Management.
- Click Schedule.
- Click the event in the Schedule.
The patient's Person Center appears, with the event details expanded in the timeline (right pane). - Click the edit icon
 .
.
The Edit Event window appears. - Assign To — Select the name of the staff member from the list.
Tip: If the person's name does not appear in the Care Team or Other Users portions of this list, type the person's name in the Assign To field to search for the staff member. You can assign an event to any staff member in your organization. - Click Resume Later.
- Display the Care Manager page: On the Main Menu, click Patients and select Care Management.
- Click Schedule.
- Click the event in the Schedule.
The Edit Event window appears. - Edit the fields as needed.
- Click Delete or Save.
- Display the Care Manager page: On the Main Menu, click Patients and select Care Management.
- Click the Patients tab.

A list of all patients with an active care management program status appears. - To filter the list, you can:
- Click any column with an arrow and select an option to show only patients who meet your selected criteria.
- Click any column without an arrow to reverse the sort order of the list.
- Click MANAGE COLUMNS, choose the type of column to add, choose a column heading on the right, and then click Apply.
- Display the Care Manager page: On the Main Menu, click Patients and select Care Management.
- Click the Patients tab.
- In the table, click the Assigned To menu.
- Select the name of a care manager.
- Display the Care Manager page: On the Main Menu, click Patients and select Care Management.
- Click the Patients tab.
- To sort the list, click any column heading.
- To filter the list, click the column menu icon
 next to any column heading and select an option.
Note: You can also add columns by clicking MANAGE COLUMNS. Choose the type of column to add, choose a column heading on the right, and then click Apply.
- Display the Care Manager page: On the Main Menu, click Patients, and then select Care Management.
- Click the Patients tab.
- Check the box to the left of the patient's name.
- Select Add Care Management Event to Selected from the drop-down list to add an event.
The Add Event window opens. - Complete the Add Event form.
- Click Add to add the care management event.
- Display the Care Manager page: On the Main Menu, click Patients and select Care Management.
- Click Patients.

- Check the box next to the patient's name.
Note: You can select more than one patient to refer. - Click Add New Program Referral.
If you want to refer all patients in the list to a care management program, click the down arrow to the right of Add New Program Referral and click Add Program Referral to All.
The Add New Program Referral window appears. - Complete the required and optional fields, noting the following:
- Program — You cannot select a program that already has an active status (i.e., Identified, Pending, Scheduled, or Enrolled) for the patient.
- Assigned To — The selected user is added to the patient's Care Team.
- Focus problem(s) — Recommend focus problems for the patient.
Note: You must display the Focus problem(s) list each time you add another focus problem. As you add focus problems, a tally of the selected focus problems appears in this field (e.g., "3 selected"), and the selected focus problems appear highlighted in blue in the list. You can click on a focus problem highlighted in blue to deselect it.
- Status — Select Identified.
Note: You can select any status option, but if you do so, you may be skipping steps in the Care Management Workflow. - Click Save.
- Display the Care Manager page: On the Main Menu, click Patients and select Care Management.
- Click the Patients tab.
- In the Actions column, click EDIT.
The Edit Program Referral window appears. - Status — Select Enrolled.
- Date updated — Enter the date of enrollment.
- Status note — Type any notes related to the status update.
- Click Save.
- Display the Care Manager page: On the Main Menu, click Patients and select Care Management.
- Click the Patients tab.
- In the Actions column, click EDIT.
The Edit Program Referral window appears. - Status — Select one of the Unenrolled statuses.
- Date updated — Enter the date of unenrollment.
- Status note — Type any notes related to the status update.
- Click Save.
- Display the Care Manager page: On the Main Menu, click Patients and select Care Management.
-
Click Patients.
- Under the Program column, click the name of the patient's program you want to edit.
- Edit the program information as needed.
- Click Save.
- Display the Care Manager page: On the Main Menu, click Patients and select Care Management.
- Click Patients.
- Under the Program column, click the name of the patient's program you want to edit.
The Edit Program window appears. - Status — Select a status from the list to change the patient's status in this program.
- Date updated — Enter the date associated with this status change.
- Status note — Type any notes related to the status update.
- Click Save.
- Display the Care Manager page: On the Main Menu, click Patients and select Care Management.
- Click the Patients tab. If the Next CM Event column is missing, click MANAGE COLUMNS to add the column.
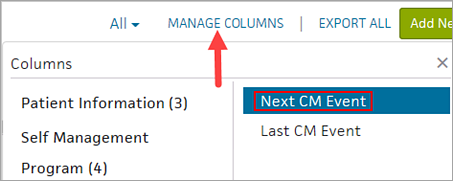
- In the Next CM Event column, click No future event scheduled to schedule the next event.
-
To add the event, enter information in the Add Event window.
- Click Add to schedule the next care management event.
- Display the Care Manager page: On the Main Menu, click Patients and select Care Management.
- Click the Patients tab. If the Last CM Event column is missing, click MANAGE COLUMNS to add the column.
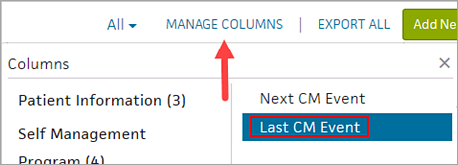
- Click the event in the Last CM Event column.
- Find the event in the timeline in the patient's Person Center, click EDIT, and make changes to the event.
- Click Save to save your edits.
- Display the Care Manager page: On the Main Menu, click Patients and select Care Management.
- Click the Patients tab. If the Next CM Event column is missing, click MANAGE COLUMNS to add the column.

- In the Next CM Event column, click the event you want to edit.
-
Find the event in the timeline in the patient's Person Center, click EDIT, and make the changes to the event.
- Click Save to save your edits to the next event.
- Display the Care Manager page: On the Main Menu, click Patients and select Care Management.
- Click the Care Admin tab.
Metrics related to care management programs appear. - You can view these metric in the "Patients waiting in each Onboarding Stage" area:
- Enroll
- First Encounter
- Follow-up
- You can also view these metrics in the "Events To Do" area:
- Past Due
- No Future Scheduled
- Incomplete
- Scheduled
- Completed
- Click any blue tally to see a list of patients and some details.
Tip: You can click a patient's name to access additional information on the patient's Person Center.
- Display the Care Manager page: On the Main Menu, click Patients and select Care Management.
- Click the Care Admin tab.
Metrics related to care management programs appear. - In the "Patients waiting in each Onboarding Stage" area, click a blue tally in the Enroll row to view a list of patients waiting to be enrolled in a care management program.
- To sort the list, click a column title.
- To view additional information on the patient's Person Center, click the patient's name.
- Display the Care Manager page: On the Main Menu, click Patients and select Care Management.
- Click the Care Admin tab.
Metrics related to care management programs appear. - In the "Patients waiting in each Onboarding Stage" area, click a blue tally in the First Encounter row to view a list of patients waiting for a first encounter.
- To sort the list, click a column title.
- To view additional information on the patient's Person Center, click the patient's name.
- Display the Care Manager page: On the Main Menu, click Patients and select Care Management.
- Click the Care Admin tab.
Metrics related to care management programs appear. - In the "Patients waiting in each Onboarding Stage" area, click a blue tally in the Follow-up row to view a list of patients waiting for a follow-up appointment.
- To sort the list, click a column title.
- To view additional information on the patient's Person Center, click the patient's name.
- Display the Care Manager page: On the Main Menu, click Patients and select Care Management.
- Click the Care Admin tab.
Metrics related to care management programs appear. - In the "Events To Do" area, click a blue tally in the Past Due row to view a list of your team's past due care management events.
- To sort the list, click a column title.
- To view additional information on the patient's Person Center, click the patient's name.
- Display the Care Manager page: On the Main Menu, click Patients and select Care Management.
- Click the Care Admin tab.
Metrics related to care management programs appear. - In the "Events To Do" area, click a blue tally in the No Future Scheduled row to view a list of patients enrolled in care management programs who do not have a care event scheduled.
Notes:- To view additional information on the patient's Person Center, click the patient's name.
- Sort the list by clicking a column title.
- Display the Care Manager page: On the Main Menu, click Patients and select Care Management.
- Click the Care Admin tab.
Metrics related to care management programs appear. - In the "Events To Do" area, click a blue tally in the Incomplete row to view a list of care management events that were started but not completed by your team.
- To sort the list, click a column title.
- To view additional information on the patient's Person Center, click the patient's name.
When you share or print a care plan from the Person Center, you can select the recipient and customize the content of the care plan.
- Display the patient's Person Center: On the Main Menu, enter the patient's name, patient ID, or member ID (insurance number) in the Search Bar. Under NETWORK PATIENTS, select the data type and then click the search icon.
Matching patients appear under the Patients tab. - Click the patient name to expand the selection, and then click the patient name in large text to display the patient's Person Center.
- From the SHARE WITH menu at the top right, select the person you intend to share the printed care plan with (Clinician, Patient, or Quality Manager).
Alternatively, you can click the print icon on most events to open the Share Care Plan window.
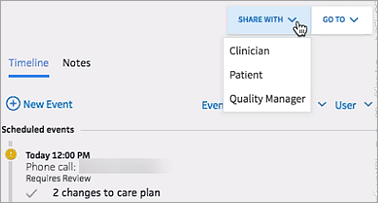
Note: The Share Care Plan with feature does not send the care plan to the selected person, but simply changes the type of information included in the printed document based on what that recipient would want to know. The default content of the printed care plan is configured for each type of recipient, but you can select or deselect information in the document preview window before printing. - Customize the printed care plan by selecting and deselecting options on the left to add or remove information. For example, you can select the Allergies option to include allergy information in the printed care plan.
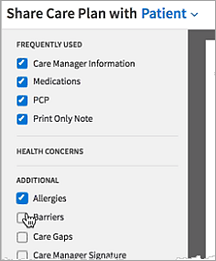
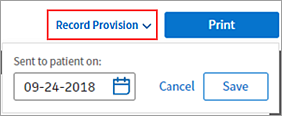
- If the recipient of the printed care plan is the patient, click Record Provision to indicate when the care plan was sent to the patient, and then click Save.
- Click Print.
The event appears on the patient's event timeline as "Care plan letter," and the Care Plan section of the Care Management tab lists the date, the sender, and the recipient of the care summary.
When you share or print a care plan from the Person Center, you can select the recipient and customize the content of the care plan.
- Display the patient's Person Center: On the Main Menu, enter the patient's name, patient ID, or member ID (insurance number) in the Search Bar. Under NETWORK PATIENTS, select the data type and then click the search icon.
Matching patients appear under the Patients tab. - Click the patient name to expand the selection, and then click the patient name in large text to display the patient's Person Center.
- From the SHARE WITH menu at the top right, select the person you intend to share the printed care plan with (Clinician, Patient, or Quality Manager).
Alternatively, you can click the print icon on most events to open the Share Care Plan window.
Note: The Share Care Plan with feature does not send the care plan to the selected person, but simply changes the type of information included in the printed document based on what that recipient would want to know. The default content of the printed care plan is configured for each type of recipient, but you can select or deselect information in the document preview window before printing. - Customize the printed care plan by selecting and deselecting options on the left to add or remove information. For example, you can select the Allergies option to include allergy information in the printed care plan.

- If the recipient of the printed care plan is the patient, click Record Provision to indicate when the care plan was sent to the patient, and then click Save.

- Click Print.
The event appears on the patient's event timeline as "Care plan letter," and the Care Plan section of the Care Management tab lists the date, the sender, and the recipient of the care summary.
- Display the patient's Person Center: On the Main Menu, enter the patient's name, patient ID, or member ID (insurance number) in the Search Bar. Under NETWORK PATIENTS, select the data type and then click the search icon.
Matching patients appear under the Patients tab. - Click the patient name to expand the selection, and then click the patient name in large text to display the patient's Person Center.
- Click an event in the patient timeline.
- Click the print icon
 in the expanded event.
 - When you print a care plan from the patient timeline, the default information in the care plan indicates the patient as the recipient. To change the type information that displays in the care plan, select Clinician or Quality Manager from the menu.
Note: The Share Care Plan with feature does not send the care plan to the selected person, but simply changes the type of information included in the printed document based on what that recipient would want to know.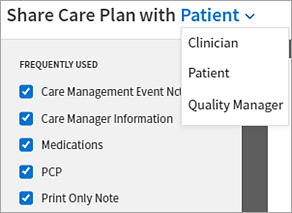
- Customize the printed care plan by selecting and deselecting options on the left to add or remove information, including care event notes.

Note: The note associated with the event that you clicked in the timeline to print the care plan is automatically included in the care plan options. - If the recipient of the printed care plan is the patient, click Record Provision to indicate when the care plan was sent to the patient, and then click Save.

- Click Print.
The event appears on the patient's event timeline as "Care plan letter," and the Care Plan section of the Care Management tab lists the date, the sender, and the recipient of the care summary.
A patient's previous answers to an assessment can supply context for their current answers, giving care managers more clinical information. You can view assessment history at any time, including while administering an assessment.
From the care plan
- Display the patient's Person Center: On the Main Menu, enter the patient's name, patient ID, or member ID (insurance number) in the Search Bar. Under NETWORK PATIENTS, select the data type and then click the search icon.
Matching patients appear under the Patients tab. -
Click the patient name to expand the selection, and then click the patient name in large text to display the patient's Person Center.
- Click Care Plan at the top of the Person Center.
- Click the care plan that includes the assessment that you want to see and scroll down to the Assessments section.
- In the list of assessments, click the body of an assessment to view the history of this assessment for this patient.
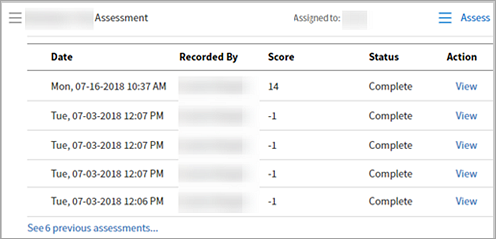
The history includes the date and time of the assessment, which care team member recorded it, and the score for assessments that were administered more than once. - Click View at the far right to see the most recent previous responses for each question.
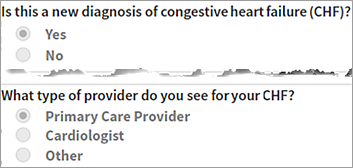
Note: You cannot edit previous answers.
During an assessment
- Display the patient's Person Center: On the Main Menu, enter the patient's name, patient ID, or member ID (insurance number) in the Search Bar. Under NETWORK PATIENTS, select the data type and then click the search icon.
Matching patients appear under the Patients tab. -
Click the patient name to expand the selection, and then click the patient name in large text to display the patient's Person Center.
- Click Care Plan at the top of the Person Center.
- Click the care plan that includes the assessment that you want to see and scroll down to the Assessments section.
- Click Assess.
- Check Response History at the top of the assessment to see the assessment history.