athenaOne Home Page
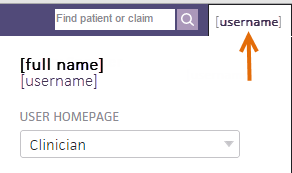
Your athenaOne home page appears when you first log in to athenaOne. To return to your home page from anywhere in athenaOne, click the athenaOne logo at the upper left of your screen. You can click your username in the upper right corner of the screen to select your default home page. Your options depend on your user role and your practice configuration: clinician or non-clinician.
Tip: To return to your home page, click the athenaOne logo in the upper left corner of your screen.
- Click your username in the upper right corner of the screen.
- Under USER HOMEPAGE, select an option.
You can change the default home page in the username menu at any time.
This home page displays appointments and tasks that are central to the clinician's daily workflow.
Note: This option requires athenaClinicals.
When a patient has a Record Access Restriction privacy protection note applied, only users with the Privacy: Access Blocked Patients or the Emergency Access: Privacy: Access Blocked Patients permission can access charts that have this privacy protection, or the user must be a rendering, scheduling, or supervising provider for the patient. A rendering, scheduling, or supervising provider for an appointment can access a restricted patient’s record for 15 days before and after the appointment without specific permissions. Xs replace the patient's information such as their photo, name, age, date of birth, and phone number for unauthorized users.
The Clinical Inbox (left panel) displays all clinical documents assigned to the users in your practice.
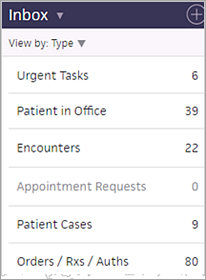
You can use the View by: menu at the top of the Inbox to sort the list by Type or Assigned to.
- Click a row in the Inbox to review the outstanding items in a worklist.
- Click the left arrow icon
 to return to the original view of your Inbox.
The Urgent Tasks row appears at the top of the Inbox if any urgent tasks are assigned to you. A task is flagged as urgent under these circumstances:
- In a clinical document, result, or correspondence, the This task is urgent option was selected.
- An order was marked as STAT during the order workflow.
- An encounter contains an order that was marked as STAT, causing the encounter itself to be marked as Urgent.
Note: The encounter remains "Urgent" until it is closed, even if the order marked as STAT has been submitted.
If you click the Total row in the Inbox, a worklist appears with all tasks requiring your attention. Any urgent tasks are filtered to the top of the list and highlighted with an orange bar.
Tip: To return to your home page, click the athenaOne logo in the upper left corner of your screen.
You can configure the list view of your Clinical Inbox without affecting the grid view. This allows you to focus only on tasks assigned to you, or to monitor the tasks of other selected users.
To add tasks or users, click the plus icon ![]() at the top of the Inbox. You can click Users (n), Provider/Department Staff (n), or Practice Roles (n) and scroll through the list, or you can use the Search tool. This list includes users in all the departments configured in the grid view of your Clinical Inbox, as well as any selected departments. Uppercase indicates roles configured in your current and selected departments.
at the top of the Inbox. You can click Users (n), Provider/Department Staff (n), or Practice Roles (n) and scroll through the list, or you can use the Search tool. This list includes users in all the departments configured in the grid view of your Clinical Inbox, as well as any selected departments. Uppercase indicates roles configured in your current and selected departments.
Select or deselect users to follow or unfollow these users.
Note: When you use the search bar and select from the list of search results, the selected item moves to the top of the list.
By default, if you work in multiple departments, you can view tasks across departments for the users you configured to view in your Inbox, regardless of the department you selected when you logged in to athenaOne. If you have not previously configured any users, your Inbox shows only your tasks, across departments.
Note: When you access the Clinical Inbox, athenaOne verifies your current department access and displays only those departments that you're authorized to view since your last login.
Note: You must have the Department Login Permissions feature to follow these steps.
- Display the athenaOne home page: On the Main Menu, click the athenaOne logo.
- Click the Inbox drop-down menu, and select List View.
- Click the plus icon
 at the top right of the Inbox.
A list of all departments appears on the left, and a list of users and roles appears on the right. - Select at least one department on the left to refine the list of users and roles that appears on the right.
Note: Refining the list by department is not equivalent to displaying tasks assigned to all users and roles in the Inbox. After you select a department, you still need to select an item under Users and roles before tasks appear in your Clinical Inbox. - Select the users or roles of interest on the right, under Users and roles.
Tip: You can search for a specific user by entering the user's full name or username in the search field and then selecting the full name in the list of search results. Or, you can browse for users by expanding the Users or Practice Roles category, scrolling through the list, and selecting a user or role.
- The number of outstanding tasks for an Inbox item appears on the right side of each row in the Inbox.
- You can click an Inbox row to display a scrollable worklist in the (same) left panel. Click a worklist item to display the item details in the center panel.
- Click the left arrow icon
 to return to the original view of your Inbox.
 - You can click a badge in the status bar (at the bottom right of your screen) to display a worklist of those tasks.

Note: Task badges are updated every two minutes; newly assigned tasks are not displayed immediately.
The task sorting for all worklists in the Inbox is as follows:
- Urgent status (any urgent tasks are filtered to the top of the list and highlighted with an orange bar)
- Date (most recent at the top)
- Type (all rows appear)
- Assigned to (all rows, grouped by user)
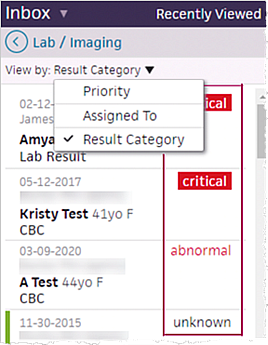
When you click a row, you can further sort the items in the worklist by Priority, Assigned To, or Result Category (for worklists where result tasks appear).
For the following rows where result tasks appear, the Result Category sort option is available: Lab / Imaging, Urgent Tasks, Patient in Office, and Total. The Result Category option sorts tasks by result criticality (critical then abnormal then unknown then other then normal), then by urgency, and finally by created date.
Click the left arrow icon ![]() to return to the original view of your Inbox.
to return to the original view of your Inbox.
If there are outstanding items in your practice's Unconfigured User Inbox, a message appears at the bottom of the Inbox.
If you click the Encounters row, the list of encounters assigned to you (and to any users you added to your Clinical Inbox) appears. A green bar appears next to the names of patients who are checked in. Light green means "checked in and ready for the provider"; the darker green means "checked in and with the provider."
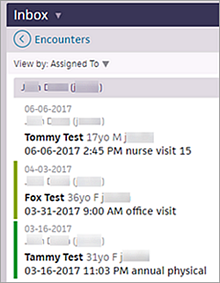
To open an encounter, click a patient name in the list.
If you click the Orders/Rxs/Auths row, the worklist appears. It contains any orders, prescriptions, and authorizations that require your attention.
The colors indicate the appointment status and are sorted in order of priority by default.
A boxed number in red indicates the number of lab/imaging results that came back as abnormal and are considered higher priority for review.

If you click the Lab/Imaging row, the worklist appears. It contains any lab or imaging results that you must reconcile.
High priority items are marked as abnormal. If a lab order is associated with several received lab results, the number of associated results is indicated under the patient's name in the worklist.
The Schedule appears in the center pane. This calendar defaults to the current department of login. If a provider works in two departments, both schedules appear.
You can filter the calendar by:
- Provider
- Department
- Time

Note: As you scroll through the appointment list, the header and the date remain visible.
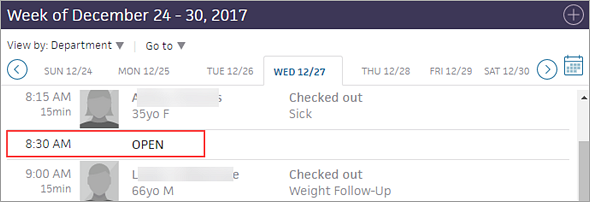
Open slots in the schedule appear with the time of the slot and with the label "OPEN." Multiple open appointment slots are collapsed into a single row.
The highlighted vertical bar shows the patient status:
- No highlight — The patient has not yet arrived. The reason for the visit should be listed on the right of the patient's name.
- Purple — The patient has arrived (Arrived), and the check-in process has begun.
Note: The front desk staff has clicked "start check-in," but check-in is not yet complete. - Orange — The patient is checked in and ready for staff (Ready for staff).
Note: The appointment should appear in the Encounters bucket of the clinician home page, and the color should match the schedule color. - Blue — The patient is with staff (With Staff), and the Intake process has begun.
- Green — The patient has completed Intake and is ready for the provider (Ready for provider).
- Teal — The patient is with the provider (With Provider), and the Exam process has begun.
- Gray — The patient is ready for checkout (Checkout)/encounter is open.
- No highlight — The patient has checked out.
- Gray text — The encounter is closed.
When the appointment is scheduled, or on any page where you can edit the appointment notes, enter the notes in the Notes/Reason field, and then select the Add appointment note to homepage schedule option to the right of the note. The appointment note appears on the schedule until you select the reason for the visit during the encounter workflow.
Note: The appointment note and reason for visit cannot both appear in the schedule. If you do not select the Add appointment note to homepage schedule option for any appointment notes, the appointment type appears on the schedule.
To configure the departments and providers that appear in your Schedule, click the plus icon ![]() at the top of the center panel. You can click Departments (n) or Providers (n) and scroll through those lists, or use the search bar. Schedules for all selected providers appear in a single view. Select and deselect providers to configure your schedule.
at the top of the center panel. You can click Departments (n) or Providers (n) and scroll through those lists, or use the search bar. Schedules for all selected providers appear in a single view. Select and deselect providers to configure your schedule.
Note: When you use the search bar and select from the list of search results, the selected item moves to the top of the list.
You can use the Go to menu to help you access your appointments and reduce scrolling. You can use this menu for the Department, Provider, and Time views of the schedule.
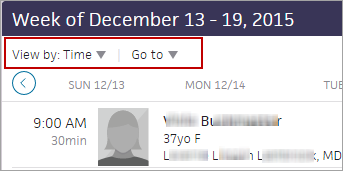
Note: You cannot use this menu in the Status view.
The contents of the Go to menu depend on the setting of the schedule View by: menu.
- View by: menu set to Department or Provider — Go to menu displays the providers you configured using the schedule selector
 .
.
- View by: menu set to Time — Go to menu displays hour blocks. The most recent hour appears at the top of the menu. Scroll up to view information for appointments earlier in the day.
Depending on the option you select, the right panel displays today's schedule or athenaNetwork announcements. When you first log in to athenaOne each day, athenaNetwork content appears automatically. To display today's schedule in the right panel, click SCHEDULE. You cannot hide or remove the right panel.
If you click athenaNetwork, the right panel displays announcements with links to training and resources, including:
- System alerts
- Release Center
- Learning Portal
- athenahealth blog
This panel includes links to the five most recently added posts to athenaOne announcements. To expand the list of announcements, click VIEW MORE at the bottom of the list. To view the complete text of an announcement in a pop-up window, click the title of the post in the Announcements list.
Note: If you use screen resolution or zoom features in your Internet browser to shrink the overall size of the athenaOne window, the Announcements panel may become a "pull tab" that you can expand and contract. We do not recommend using these features because reducing your screen resolution below 100% may skew the display of panels and features on other pages.
This home page provides non-clinicians with an overview of waiting tasks so that you can get a quick start on the day's work.
When a patient has a Record Access Restriction privacy protection note applied, only users with the Privacy: Access Blocked Patients or the Emergency Access: Privacy: Access Blocked Patients permission can access charts that have this privacy protection, or the user must be a rendering, scheduling, or supervising provider for the patient. A rendering, scheduling, or supervising provider for an appointment can access a restricted patient’s record for 15 days before and after the appointment without specific permissions. Xs replace the patient's information such as their photo, name, age, date of birth, and phone number for unauthorized users.
In your left pane Inbox, the Workflow Dashboard tasks associated with your current department are listed first, followed by any tasks assigned to your username.
A thin line separates the Workflow Dashboard tasks (above) from the assigned tasks (below).
You can click a row in the Inbox to display a worklist of outstanding items in the left pane. Then click an item in the worklist to display the task details in the center pane.
Tip: To return to your home page, click the athenaOne logo in the upper left corner of your screen.
By default, all Workflow Dashboard tasks associated with your current department appear, followed by any tasks assigned to your username. A thin dividing line separates Workflow Dashboard tasks from assigned tasks.
Note: If your practice uses athenaCollector without athenaClinicals, no assigned tasks appear.
To add tasks or users, click the plus icon ![]() at the top of the left panel Inbox. You can click Users (n) and scroll through the list, or you can use the Search tool. You can select and deselect users to follow or unfollow, so that you can focus on relevant tasks. Users and departments that you follow are selected (checked).
at the top of the left panel Inbox. You can click Users (n) and scroll through the list, or you can use the Search tool. You can select and deselect users to follow or unfollow, so that you can focus on relevant tasks. Users and departments that you follow are selected (checked).
Note: When you search for a user and select one from the list of search results, the selected user moves to the top of the list.
- The number of outstanding tasks for an Inbox item appears on the right side of each row in the Inbox.
- You can click an Inbox row to display a scrollable worklist in the (same) left panel. Click a worklist item to display the item details in the center panel.
- Click the left arrow icon
 to return to the original view of your Inbox.
 - You can click a badge in the status bar (at the bottom right of your screen) to display a worklist of those tasks.

Note: Task badges are updated every two minutes; newly assigned tasks are not displayed immediately.
You can add or filter the Inbox tasks by department or provider. athenaOne retains your settings so that the next time you display the home page, your tasks appear as they should.
If you follow multiple users in your Inbox, worklist items display the username assigned to the task in the worklist.
The Schedule appears in the center pane. This calendar defaults to the current department of login and shows all providers for that department.
You can filter the calendar by:
- Department (only departments with appointments appear)
- Provider (only providers with appointments scheduled in the selected department appear)
- Time

Note: As you scroll through the appointment list, the header and the date remain visible.
Open slots in the schedule appear with the time of the slot and with the label "OPEN." Multiple open appointment slots are collapsed into a single row.

The highlighted vertical bar shows the patient status in the non-clinician schedule:
- No highlight —
- Purple — The patient has arrived (Arrived), and the check-in process has begun.
Note: The front desk staff has clicked "start check-in," but check-in is not yet complete. - Pink — The provider has signed off on the orders and the patient is ready for checkout.
- Yellow — The patient has been checked out. The status shows "Enter charges."
- Gray text — Charges have been entered.
When the appointment is scheduled, or on any page where you can edit the appointment notes, enter the notes in the Notes/Reason field, and then select the Add appointment note to homepage schedule option to the right of the note.
Note: The appointment note and reason for visit cannot both appear in the schedule. If you do not select the Add appointment note to homepage schedule option for any appointment notes, the appointment type appears on the schedule.
To configure the departments and providers that appear in your Schedule, click the plus icon ![]() at the top of the center panel. You can click Departments (n) or Providers (n) and scroll through those lists, or use the search bar. Schedules for all selected providers appear in a single view. Select and deselect providers to configure your schedule.
at the top of the center panel. You can click Departments (n) or Providers (n) and scroll through those lists, or use the search bar. Schedules for all selected providers appear in a single view. Select and deselect providers to configure your schedule.
Note: When you use the search bar and select from the list of search results, the selected item moves to the top of the list.
You can use the Go to menu to help you access your appointments and reduce scrolling. You can use this menu for the Department, Provider, and Time views of the schedule.

Note: You cannot use this menu in the Status view.
The contents of the Go to menu depend on the setting of the schedule View by: menu.
- View by: menu set to Department or Provider — Go to menu displays the providers you configured using the schedule selector
 .
.
- View by: menu set to Time — Go to menu displays hour blocks. The most recent hour appears at the top of the menu. Scroll up to view information for appointments earlier in the day.
Depending on the option you select, the right panel displays today's schedule or athenaNetwork announcements. When you first log in to athenaOne each day, athenaNetwork content appears automatically. To display today's schedule in the right panel, click SCHEDULE. You cannot hide or remove the right panel.
If you click athenaNetwork, the right panel displays announcements with links to training and resources, including:
- System alerts
- Release Center
- Learning Portal
- athenahealth blog
This panel includes links to the five most recently added posts to athenaOne announcements. To expand the list of announcements, click VIEW MORE at the bottom of the list. To view the complete text of an announcement in a pop-up window, click the title of the post in the Announcements list.
Note: If you use screen resolution or zoom features in your Internet browser to shrink the overall size of the athenaOne window, the Announcements panel may become a "pull tab" that you can expand and contract. We do not recommend using these features because reducing your screen resolution below 100% may skew the display of panels and features on other pages.