 User Guide — Behavioral Health Treatment Plans
athenahealth automatically enables the following features for organizations that offer behavioral health services. For access inquiries or additional support, log into athenaOne and click Support > Success Community > Contact Client Support.
At its most basic, a behavioral health treatment plan is a set of written instructions relating to the treatment of a mental health concern. In the plan, define the patient's concerns, assess their characteristics, and enter goals to measure outcomes as treatment progresses.
Once you've finalized your plan, attest to its accuracy and, if instructed by your organization to do so, send copies of the plan to your patient and any supervising providers for review and attestation.
If your organization offers behavioral health services, both care plans and behavioral health treatment plans are available to add to patient charts.
-
Add a treatment plan to track therapeutic goals for a patient's behavioral health concerns.
-
Add a care plan to record guidance for patients caring for an illness or injury at home. Care plans can also include steps for illness or injury prevention.
Note
Patients can only have one treatment plan and one care plan active at a time. To start a new plan for a patient, archive or delete the current plan. See Remove a plan for details.
- In a patient encounter, click the Care tab.
-
If the patient has an active treatment plan, it appears under Active Plans. Click the double arrow
 to the right of the plan.
-
In the active plan workspace that opens, Care Plan and Treatment Plan tabs appear at the top. Click the Treatment Plan tab to access the active plan.
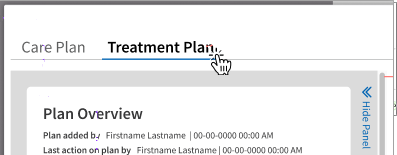
Alternatively, click the Care Plan tab to access or start a care plan.
Access treatment plan details from a closed encounter: You can always access treatment plan information for closed encounters by clicking the Visits tab in your patient's chart. Select the closed encounter and access the streamlined encounter summary for plan details.
- In a patient encounter, click the Care tab.
-
If the patient doesn't have an active treatment plan, No Plan Data appears under Active Plans. Click the double arrow
 to start a plan.
-
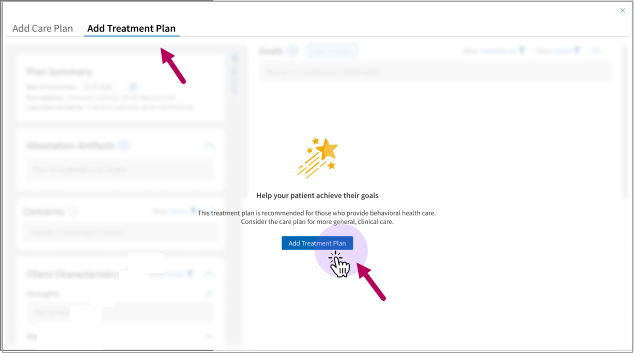
In the active plan workspace that opens, Care Plan and Treatment Plan tabs appear at the top.
-
Start a treatment plan: Click the Add Treatment Plan tab and button.
-
Start a care plan: Click the Add Care Plan tab.
-
When you access either behavioral health treatment plans or care plans, a Plan Overview section that appears in the upper left.
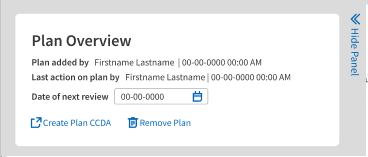
In the overview, enter a Date of Next Review for your plan, generate a CCDA file for transition of care, or Remove a Plan.
Enter a date of next review
After adding or updating a treatment plan, determine a time to check the progress of your plan.
In the Plan Overview, click Date of Next Review. Enter the next review date in MM-DD-YYYY format or use the calendar feature to select the desired review date.
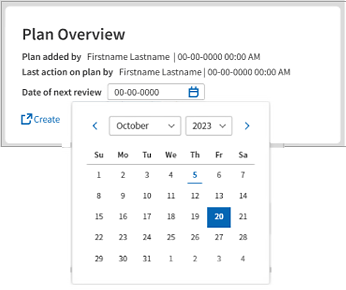
Note: Most therapists enter the date of the patient’s next appointment or set the date for 90 days from the start of a plan. This is when most organizations require staff to renew or update a plan.
Create a CCDA for a plan
In Plan Overview, click Create Plan CCDA to generate a copy of a treatment plan or care plan for transition of care events.
Remove a plan
In the active treatment plan, locate the Plan Overview. Click Remove Plan  to make a plan inactive and archive it.
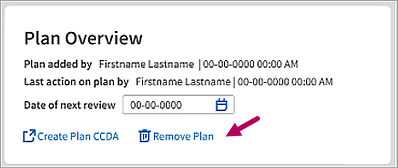
Enter a reason for removal and then click Remove Plan.
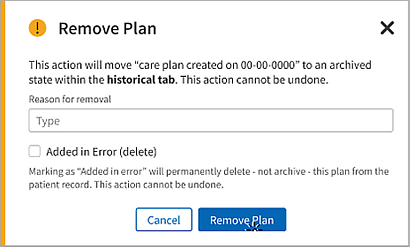
Note: To permanently delete a care plan or treatment plan created in error, select Added in Error (delete) and then click Remove Plan.
The archived plan appears in the Historical tab under its type - Care Plan or Treatment Plan - and it's creation date.
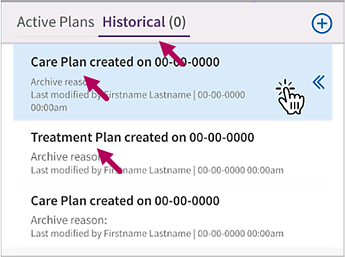
Access archived plans
When you click the option to remove a plan, you have the option to archive a plan or permanently delete it.
If you archive a plan, you can can access a read only copy of it by clicking the Historical tab in the plans menu. Click the double arrows to the right of an archived plan to access it.
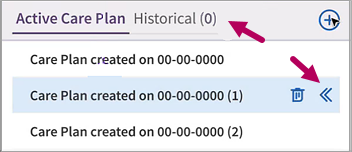
Delete or archive additional active care plans
In rare cases, you may see a patient that has had multiple care plans created in error. In these cases, you won't have access to both types of plans (care plans and treatment plans) until the multiple plan issue has been resolved.
If this occurs, a yellow Action Needed warning appears in the Active Care Plan tab with instructions on resolution.
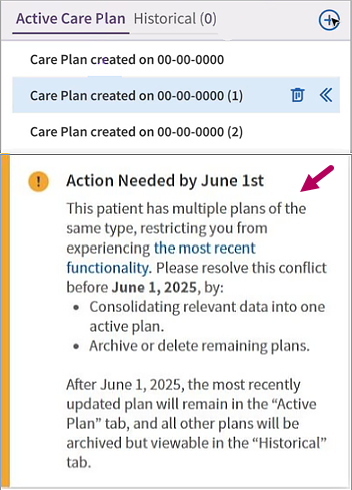
View all active plans to see if the information is relevant. If no data is relevant, then archive or delete all plans. If there is relevant data, please consolidate all information into the most relevant plan, then archive the other plans. Click Archive or Delete to  the right of the unwanted active plans. In the panel that opens, select Archive or Delete and then click Submit.
Access the Concerns section of a behavioral health treatment plan to record issues currently impacting a patient's mood, thinking, or behavior. The remaining sections of the plan are designed to help you and your patient formulate realistic strategies to address these concerns.
Anxiety, financial insecurity, sickness in the family, substance dependence, or difficulty sleeping.
- The Concerns section appears in the upper left of the plan. If the section is collapsed, click Expand
 .
. -
Click Add
 to the right of the section title.
-
In Concern/Presenting problem, begin typing a word or phrase that best describes the concern to address. A menu with matching results from athenahealth's Intelligent Medical Object library appears.
Select an option to indicate a symptom, diagnosis, or primary issue impacting a patient.
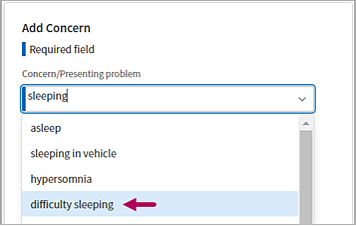
Alternatively, click the down arrow in the field to select an existing problem as the concern.
-
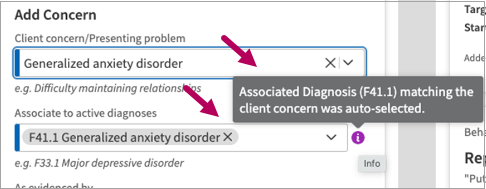
In Associate to active diagnoses, begin typing the diagnosis to associate with a concern and then select it from the menu.

-
Automatically added diagnoses: If you enter a concern that is also a diagnosis previously added in an encounter, this diagnosis automatically appears in the Associate to active diagnoses field. These entries include tooltips indicating that the diagnosis was auto-selected for you. If preferred, click the X in these entries to remove them.
-
Select additional diagnoses: You can associate multiple diagnoses with a concern. Click the down arrow in the Associate to active diagnoses field to select additional diagnoses.
Important
All concerns must be associated with at least one diagnosis. The concern can have the same name as the associated diagnosis, such as depression or insomnia.Note
The active diagnoses menu not only lists diagnoses added during a patient encounter, but lists diagnoses from all patient encounters. Diagnoses added directly to the patient’s Problems list will not appear in the menu. -
-
Optionally, enter evidence your patient shares for the concern or associate with plan goals, if available. For information about these optional fields, see Quick Reference: Treatment Plan Concerns.
-
Click Add
 . Repeat steps three through seven to document additional concerns.
Edit or delete a concern
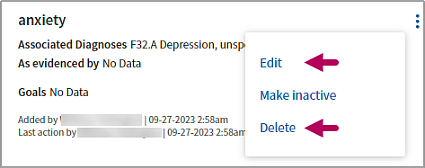
Click the menu  to the right of a concern. Click Edit or Delete to update or permanently delete it.
Update the status of a concern
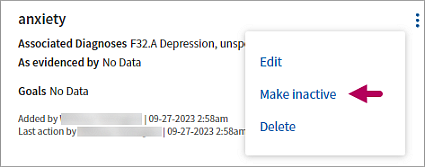
Click the menu  to the right a concern. Select Make inactive to update the status. You can change the status back to Active at any time.
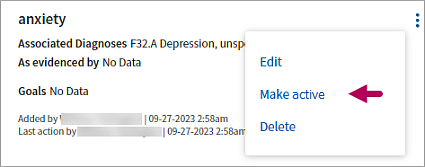
To reactivate, click the menu  to the right of the concern and select Make active.
Access inactive concerns
Click the Show filter to the right of the Concerns section title. In the filter menu, select Inactive. Remove the selection from Active to only view inactive concepts or select both options to view all.

In Characteristics, identify the strengths, needs, abilities, preferences, and supports (SNAPS) your patient can use to promote success during treatment.
Although optional, identifying characteristics can assist you and your patient in developing realistic goals to address their concerns.
-
Has support from family, friends, or their workplace.
-
Needs more control over their sleeping environment.
-
Prefers individual therapeutic sessions.
- The Characteristics section appears in the left column of the plan beneath Concerns. If the section is collapsed, click Expand
 .
. -
Click Add
 to the right of the section title.
-
Entry fields are divided into Strengths, Needs, Abilities, Preferences, and Supports categories. Work with the patient to identify the characteristics that could impact their therapeutic journey.
For more information about these categories, see Quick Reference: Treatment Plan Characteristics.
Note
Characteristic entries are optional. You can create as many entries as needed or leave categories blank. Select from available options or enter as free text (up to 200 characters). -
Click Add Characteristics
 to save your entries.
Note
The next time you click Add to enter additional characteristics, any previous entries are temporarily hidden and blank entry fields appear. When this occurs, you are not overwriting previous entries. When you save your new entries, they will appear with the previous entries in the plan.
Edit or delete a characteristic
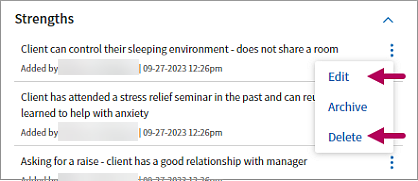
Click the menu  to the right of an entry. Click Edit or Delete to update or permanently delete it.
Archive characteristics
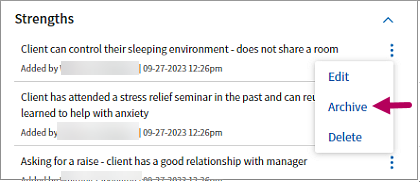
Click the menu  to the right of an entry and select Archive.
-
Access archived characteristics: Click the Show filter
 to the right of the section title. In the filter menu, select Archived.
-
Reactivate an archived characteristic: Click the menu
 to the right of the archived entry and select Make active.
Goals are the broadest category of achievement that patients can work toward to address a concern. Access the Goals section of a behavioral health treatment plan to record this information.
If a patient has insomnia as a concern, “Improve sleep hygiene by establishing routine and schedule” is a good example of a broad-based but achievable goal to improve mental health.
In behavioral health treatment plans, templates consist of predetermined goals, objectives, and interventions you can select to accelerate plan development.
- Locate the Goals section to the right of Concerns. If the section is collapsed, click Expand
 to the right of the section heading.
 -
To the right of the section heading, click Apply Templates
 .
. -
In Apply templates, begin typing the name of a template to locate it. Alternatively, click the down arrow in the search field to browse all templates. Select one or more templates to apply.

-
An outline of the goals in the predefined template appears.
-
Select goal checkboxes to automatically select all predefined objectives and interventions.

-
Remove selections from template goals, objectives, or interventions to omit them.
-
-
Click Apply Templates to add template sections to a plan. Click Show more
 in the lower right corner of a goal to view added sections in detail.
When adding behavioral health goals, you can either apply templates with predefined goals or manually enter goals as needed. Review the following to manually add goals to a treatment plan.
- Access or start a treatment plan.
- Locate the Goals section to the right of Concerns. If the section is collapsed, click Expand
 .
. -
Click Add
 to the right of the section heading.
-
In Goal title, enter a statement summarizing the goal (up to 300 characters) or select a suggested title from the menu. Manually enter a statement or select from a dropdown library of athena-curated content to create a title.

- The remaining fields are optional, but can be useful when tracking goals. Define a goal statement, enter start and target dates, and a priority if helpful. For a complete listing of field definitions, see Quick Reference: Treatment Plan Goals.
-
Click Add
 to enter the goal.
When you save a goal, the goal’s progress status appears in the upper left and its priority level appears in the upper right.
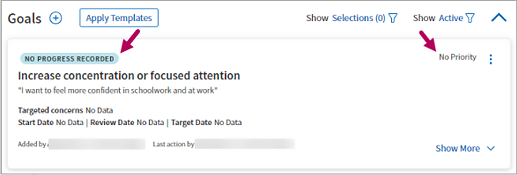
-
Status: After adding a goal, the status appears asNo progress recorded by default. As you enter the progress for a goal, the status updates to reflect your changes.
-
Priority: By default, the goal priority appears as No Priority until you update it in goal details.
Perform actions for goals
Click the menu  to the right of a goal to select an action to take.
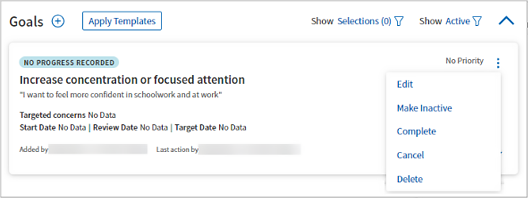
- Edit: Opens the goal for editing.
- Make Inactive: Updates the state of a goal to Inactive, so you can filter it out of active goals if desired. This option is useful for goals not currently being worked on by your patient.
- Complete: Updates the state of a goal to Complete, so you can filter it out of active goals if desired.
- Cancel: Updates the state of a goal to Canceled, but does not permanently delete it. This is useful when reviewing goals you and your patient consider no longer relevant to treatment.
- Delete: Permanently removes goals entered in error.
Update the status of goals
-
In the lower right corner of a goal card, click Show More. Initially, the goal progress status appears as NO PROGRESS RECORDED by default.

-
In Goal Progress Status, click Edit
 .
. -
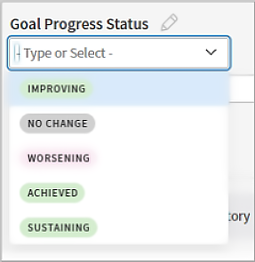
Work with your patient to determine the status of their goal. Select an option closest to the status of the goal as they would describe it.
Note: The status you select is color coded, so you can more easily identify specific goals that require your attention. Green indicates that a goal is improving, sustaining, or achieved. Pink indicates a goal that is worsening. Gray indicates no change.
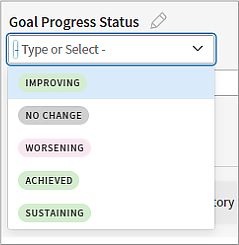
-
Enter a note with information the patient shares about their progress. Click Update
 .
. -
The most recent update appears beneath the status entry field. To view all entries, click Show Progress History.
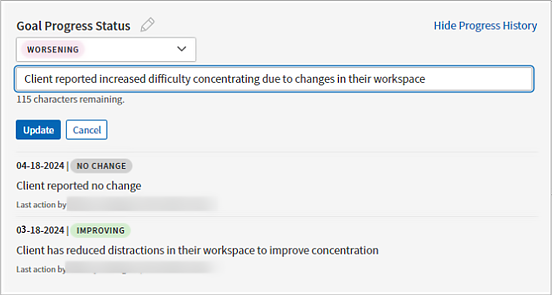
Note: Once entered, you cannot edit or delete an entry. Create a new update to revise the status of a goal.
Access inactive, completed, or canceled goals
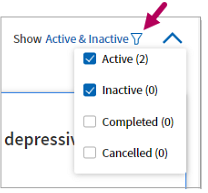
Click the Show filter  to the right of the Goals section title. In the filter menu, select the states to view, which includes options to view Inactive or Completed goals. Select all states to access all goals.
-
In the lower right corner of a goal card, click Show More. Initially, the goal progress status appears as NO PROGRESS RECORDED by default.

-
In Goal Progress Status, click Edit
 .
.
-
Work with your patient to determine the status of their goal. Select an option closest to the status of the goal as they would describe it.
-
Enter a note with information the patient shares about their progress. Click Update
 .
. -
The most recent update appears beneath the status entry field. To view all entries, click Show Progress History.
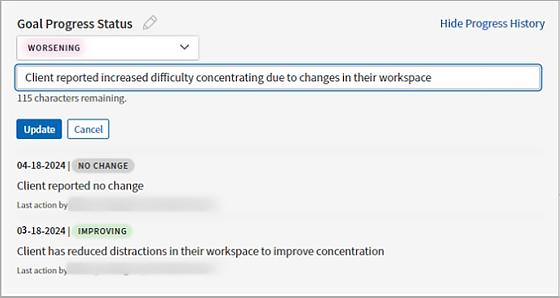
Note: Once entered, you cannot edit or delete an entry. Create a new update to revise the status of a goal.
Objectives are the achievable steps a patient can take to meet an overarching goal. Access the Objectives section of a behavioral health treatment plan to record these steps.
If a patient has “Improve sleep hygiene by establishing routine and schedule” as a goal, “Set reminder to go to bed by 11:00 PM” could be an achievable objective.
In the Goals card, click Show more to expand it. Click Add
 to the right of the Objectives section heading.

In Add Objective, enter keywords and select the objective from results or opt to use the objective as entered.
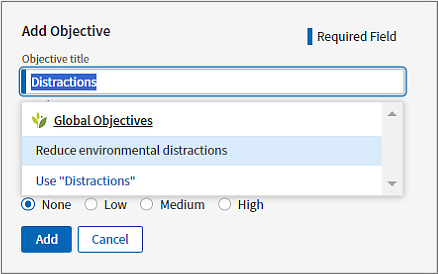
If desired, select a priority level for the objective, a Start Date, and a Target Date. Click Date Range to toggle the date range off and leave the start and target dates undefined.
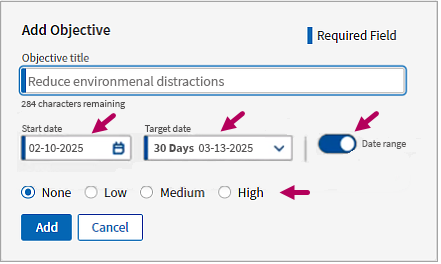
For a complete listing of fields and definitions, see Quick Reference: Objectives.
Edit or delete an objective
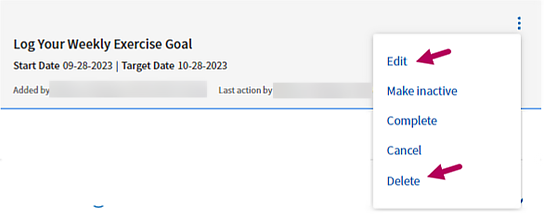
Click the menu  to the right of the objective. Select Edit or Delete. If you delete an objective, it is permanently deleted and no longer appears in any filtered view.
Update the state of an objective
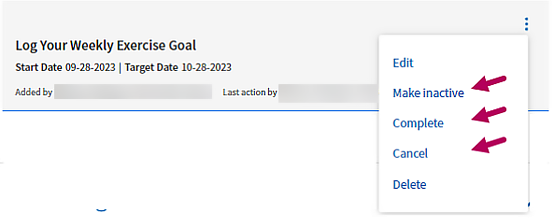
Click the menu  to the right of the objective. Select Make inactive, Complete, or Cancel to update the state. You can change the state of an objective to any other state, including Active, at any time.
Access inactive, completed, or canceled objectives
Click the Show filter  to the right of the Goals section title. In the filter menu, select the states to view, which includes options to view Inactive or Completed goals. Select all states to access all goals.

Access Interventions to enter the specific strategies, resources, or services that you, as your patient's behavioral health provider, should act upon to support your patient's goals.
An intervention for the objective “Set reminder to go to bed by 11:00 PM” could be “Provide patient with link to healthy sleep habits video.”
In the Goals card, click Show more to expand it. Click Add
 to the right of the Interventions section heading.

In Add Intervention, enter keywords and select the strategies, resources, or services you plan to provide. Alternatively, enter an intervention as free text and use the text as entered.
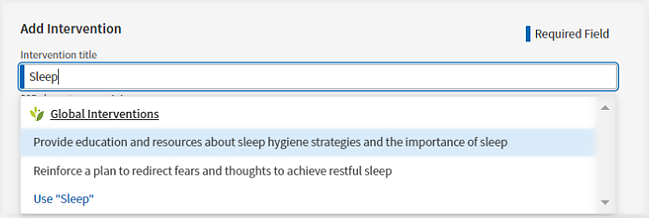
If desired, select a Start Date, and a Target Date. Click Date Range to toggle the date range off and leave the start and target dates undefined.
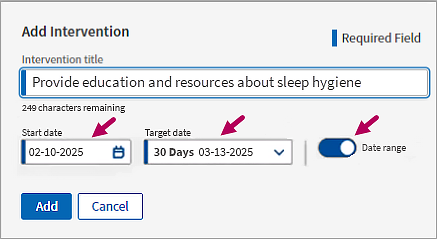
Click Add  to save the intervention.
Edit or delete an intervention
Click the menu  to the right of the intervention. Select Edit or Delete to update or permanently remove it.
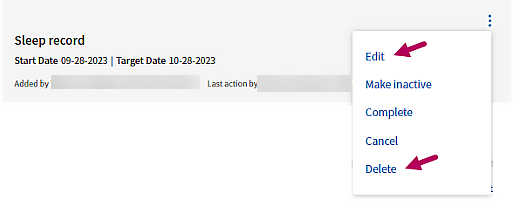
Update the state of an intervention
Click the menu  to the right an intervention. Select Make inactive, Complete, or Cancel to update the state. You can change the state of an intervention to any other state, including Active, at any time.
Access inactive, completed, and canceled interventions
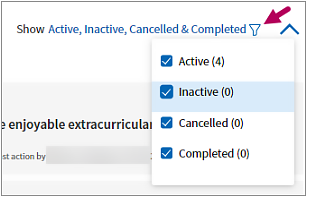
Click the Show filter  to the right of the Interventions section title. In the filter menu, select the states to view. Select all states to access all interventions.
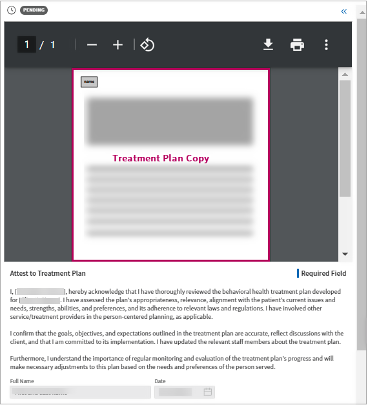
The Attestation workflow allows you to sign-off on a treatment plan by attesting that the information in the document accurately reflects what was discussed during a therapeutic session. If directed by your organization to do so, you can also send an Attestation to the patient, or a person authorized to sign on behalf of the patient, and any supervising provider(s) in your practice for attestation.
After you’ve finalized a treatment plan or have made significant updates to it, you’re ready to start the attestation process.
As a behavioral health provider, complete the following to attest to a finalized treatment plan.
Important
Depending on your organization's policies, you may be required to send a copy of the treatment plan to your patient, a person authorized to sign on behalf of the patient, and supervising providers for additional attestation. If needed, you can select the contact information for these additional attestants from within the attestation workflow. When you attest, the contacts you include will receive a copy of the plan for attestation. Check with your organization to determine whether patient and/or supervisory attestation is required.
- Locate Attestation Artifacts in a treatment plan. Click Add
 to the right of the section title. athenaOne generates an attestation artifact, which opens to the right.
 -
In the artifact, review the PDF copy of the treatment plan and the attestation statement.
-
If you need to send a copy of the treatment plan to your patient for attestation, verify that you have a contact method available. The following also applies to contact information for persons authorized to attest on behalf of a patient, such as a guardian.
-
Contact method and consent available: If the patient — or person authorized to sign on behalf of the patient — has a mobile number or email address in Quickview and has given your organization consent to contact them, their contact information appears in Send Treatment Plan Attestation Requests| To client or guardian beneath the PDF viewer. Select the mobile number or email address.
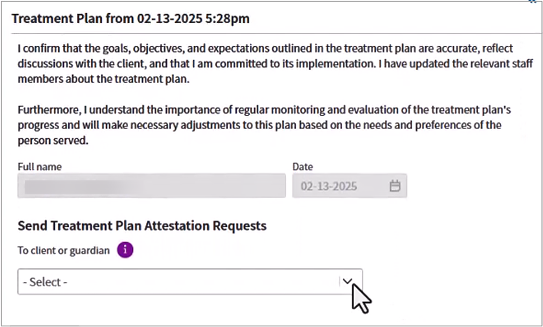
Important: If "There are no consented contact methods" appears in Send Treatment Plan Attestation Requests, either the patient / guardian hasn't supplied a mobile number or email address or they haven't given your organization consent to contact them.

You will be unable to send a copy of the artifact to the patient or their guardian until you correct this issue. See Patient contact method issues beneath this procedure for next steps.
-
-
You also have the option to send the treatment plan to supervisor providers for attestation. Click To providers and select one or multiple providers to include in the attestation process.
Note: If you need to update the treatment plan, click Cancel at the bottom of the screen to stop the attestation process. Update the treatment plan and then create a new attestation artifact.
-
Click Attest. If you included the patient, the patient's guardian, and/or a supervising provider in the attestation, their names appear in a tracking table beneath a PDF preview pane. As the provider, your name will also appear with the status of Attested.
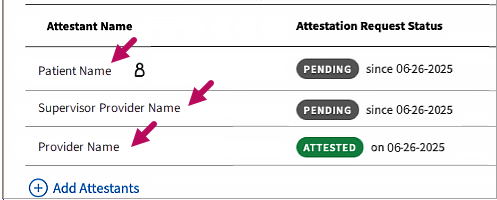
Note: If your patient has a name different from their legal first name documented in Quickview, their preferred name appears in the treatment plan, in the attestation artifact, and in the attestation copy they receive for sign off.
Note: If you added a person attesting on behalf of the patient, such as a guardian, the patient icon appears to the right of their name as well as their relationship to the patient.

Once the designated attestant responds, the following text appears in the Note field: "Attestation request sent to <designated attestant's name (relationship to patient)> via <Email / SMS> at <contact address / number>. Request satisfied by the named attestant."

Troubleshoot patient contact method issues
If your patient or their guardian has no mobile number or email address in Quickview, or if they have not given your organization consent to call or send health notifications, an error message appears in Send Treatment Plan Attestation Requests.

If this appears, you won’t be able to send a copy of the treatment plan until these issues are resolved.
To resolve:
-
Before your patient leaves the session, discuss the best method for you to send them a copy of the treatment plan to review.
If the patient or their guardian provides you with a mobile number or email address and also gives consent to contact them:
-
Click the Menu
 button and select Quickview.
 -
In Quickview, scroll down to Contact List & People with Portal Access and check for a mobile number or email address. Click Edit
 .
.
-
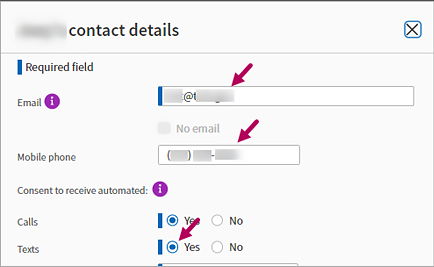
In contact details, enter the patient’s Email and/or Mobile phone number — or the email and mobile number of the patient's guardian, if applicable.
If they provide a mobile number and consent to be contacted, scroll down to Texts and select Yes.
-
Scroll down and click Save.
-
Also update the patient’s privacy settings. In Quickview, locate the Privacy section and click Manage Privacy.

-
In Privacy Information, scroll down to Communicator Automated Messaging Preferences.
-
In Health Notifications, select Email and Text Message check boxes. Scroll down and click Save.

You can now send an electronic copy of the patient's treatment plan to them when you attest.
-
-
Check with your organization for the preferred method to obtain patient attestation in these cases. If there is no method, ask if you can print a copy of the treatment plan for the patient to sign. To print:
-
Create an attestation artifact. Click the double arrows
 to the right of the artifact to open it.
 -
In the PDF viewer, click Print
 or Download
  and print a copy of the plan. Click Cancel.
 -
Ask the patient to review and sign the printed copy to attest. If your organization allows it, you can also mail a copy to obtain the patient’s signature.
-
Patient attestation
After you attest, your patient receives an SMS text or email message with a link to a copy of the finalized plan. Your patient selects Agree to attest that the plan accurately reflects what was discussed in session, or they can Deny to reject the plan.
For more information about the patient attestation workflow, see Patient attestation.
Provider attestation
If you included a supervising provider in your attestation request, the assigned provider can accesses and attest to the request from the List View or Grid View in the Clinical Inbox. Or, they can attest directly from the attestation artifact in a patient's chart.
For supervisory attestation workflow information, see Supervisor Provider Attestation.
Run the treatment plan report
-
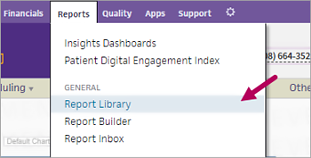
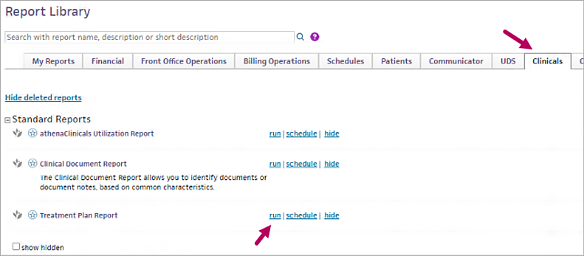
On the main menu, click Reports > Report Library.
-
In the Report Library, select the Clinicals tab. In Treatment Plan Report, click Run.
-
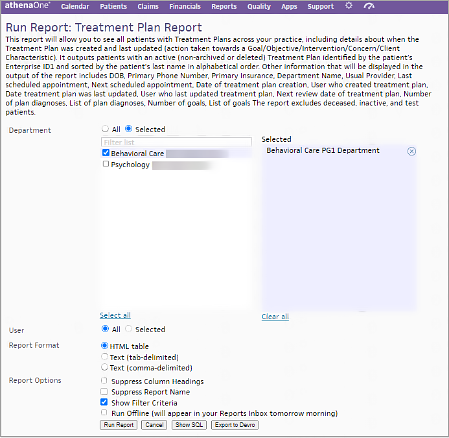
In Run Treatment Plan Report, locate Department. Select All to include all departments or click Select and select specific departments to include.
-
If you’d like to filter treatment plans by the user who created them, in User, select All to include all users or click Select and choose specific user names (or your own user name).
-
In Report Format, select the output format for the report. We recommend selecting Text (tab-delimited) to download the report as a CSV file that can be saved to your local device and can be used for tracking. To view the report within athenaOne, leave the report format as HTML table.
-
In Report Options, you can opt to hide column headings and the report name from your output if desired. We recommend keeping the default setting of Show Filter Criteria selected. If it’s a large report, you can also select Run Offline, which will publish the report when finished to your Inbox the following morning.
-
Click Run Report.