 User Guide — The Encounter Workflow for Providers
The encounter workflow for providers and medical assistants begins with the Intake stage, where MAs and clinical staff can use the Intake checklist to record vitals, verify the reason for the patient's visit, and review the patient's history.
Next, in the Exam stage, the provider reviews the intake information and proceeds with the history of present illness (HPI), review of systems (ROS), physical exam (PE), assessment / plan (A&P), and sign-off steps.
Finally in the Sign-off stage, providers can access and update billing information for the visit.
The provider can begin the encounter workflow from the Clinician home page.
When you log in to athenaOne, the Clinician home page appears, with the Clinical Inbox on the left, the schedule in the center, and news and announcements on the right.
Tip: You can click the plus icon ![]() to add tasks assigned to other users to your Clinical Inbox.
to add tasks assigned to other users to your Clinical Inbox.
For providers — how to access an encounter
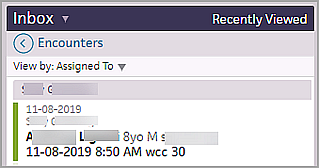
- In the Clinical Inbox, click the Encounters row to display the list of encounters assigned to you (and to any users you added to your Clinical Inbox). Next, click a patient name in the list of encounters.
Note: A green bar appears next to the names of patients who are checked in.
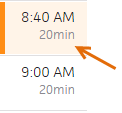
- In the Clinician home page schedule, click a patient name with the Intake stage completed (indicated by a green bar and shading).

- In the Clinician home page schedule, click a patient name that has been checked in for the appointment (indicated by an orange bar and shading).

- If you complete both the Intake and Exam stages of an encounter, click the arrow next to Done with Intake and select one of these options (the patient status changes to "with provider"):
- Done with Intake, go to Exam

- Ignore alerts, go to Exam

In the schedule at the center of the screen, click the patient name to display the patient's chart.

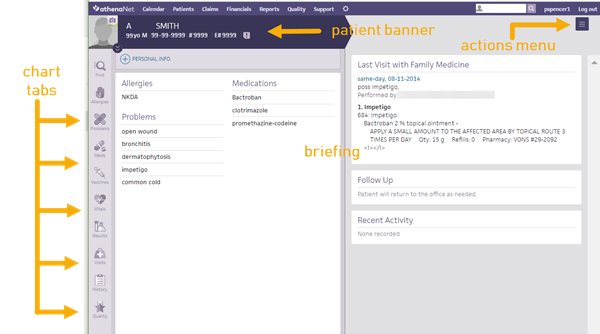
The briefing shows the story of the patient at a glance, highlighting the most critical information at the point of care. It provides lists of chart alerts, allergies, problems, and medications (sorted alphabetically) on the left, and a summary of the patient's last visit and recent activity on the right. The right side of the page displays a summary of today's visit, recent activity, and what happened the last time the patient visited the practice.
Chart tabs at the far left provide quick access to the patient's chart.
- In the schedule on the clinician home page, click a future appointment.
- Click Go to Intake Prep or Go to Exam Prep.
- Document as you would in an encounter.
Note: You cannot sign orders, enter vitals and measurements, or close the encounter. See Actions unavailable in encounter prep mode for more information. - In the Prep Note section (found in the Reason for Visit section), enter any notes or reminders to yourself and other clinical staff.
- Click Done with Intake Prep or Done with Prep.
- Modify the documentation as needed during the encounter.
When the encounter begins, the data converts to active encounter documentation and can be modified as needed during the encounter. - After an encounter has been prepared, you will see the appointment marked PREPPED in the schedule.

Hover your cursor over PREPPED to see who last prepared documentation and when.
Important: If the appointment is moved or cancelled without being rescheduled, the prepped documentation is deleted. If the appointment is rescheduled, the prepped documentation moves to the rescheduled appointment.
In the Intake stage, the Intake checklist appears on the left side of the screen, making it easy for MAs to enter data during intake. The top-to-bottom workflow guides you through completion, with flexibility throughout.
For details, see Intake Stage for athenaClinicals
The Exam stage is designed to accelerate the standard exam, with quick access to the chart sections and a Diagnoses & Orders (D&O) cart. The exam uses a left-to-right layout in three parts:
- Chart tabs (left) — Easy access to the patient's full health information.
- Work area (center) — Your area to document the current step in the exam, supported by documentation accelerators.
- D&O cart (tab at the right) — Your area to queue up diagnoses and orders as they come up during any step in the exam. This is a convenient way to build the Assessment & Plan organically, including transparency into what your staff has queued.
The Exam navigation bar provides easy navigation though the steps of the exam:

For details, see Exam Stage for athenaClinicals.
The billing workflow begins in the Sign-off stage of the encounter. In Sign-off, providers can access the Billing tab and enter charges for the visit.
The Billing tab is available both before and after the encounter is closed. athenahealth recommends that providers complete the billing information during the Sign-off stage of the encounter, after the clinical documentation is complete.
For details, see Sign-off Stage for athenaClinicals.
You can perform these actions in most areas of the encounter:
- At any time, you can return to your home page by clicking the athenaOne logo
 in the upper left corner of the screen.
 -
At the top of the appointment schedule pane, click the left arrow
 or right arrow
  to display appointments for the previous week or for the week ahead. You can also click the calendar icon
  to select another date.
 - Click the Find tab
 in the patient chart to search for documents associated with a patient.
 - Click the plus icon
 to add an item.
 - Click the X icon
 to remove an item.
 - You can enter a period (".") followed by the shortcut name to search for previously saved content.
- Drag and drop items, such as vitals, into a flowsheet.
- Click a row in the Clinical Inbox to display details in the center pane.
- If data is available, you can hover over a row in the Clinical Inbox and click the view flowsheet icon
 to view flowsheets in table or graph format.
 - Click the action icon
 to select an action.
 - If another user made changes to the patient chart or encounter information since you started making changes, a message at the bottom of the page displays the username of the person who made the changes and the time that the changes were saved. Click REFRESH Chart to obtain the latest updates.
