 User Guide — How to Resolve Global Rule 2804: Report Missing Attachments
This guide provides step-by-step instructions for resolving the Global Rule 2804 attachment claim hold.
Note: To display a list of claims where claim rule 2804 was triggered, run the Claims Missing Required Attachments report.
Global Rule 2804, which is based on specific payer guidelines, is triggered on a claim if a required attachment is not uploaded with the claim. This rule creates a placeholder for the attachment prior to submitting the claim to the health insurance payer.
When rule 2804 creates a placeholder, the type of document required for claim submission is described. You need to replace all attachment placeholders with documentation or mark the placeholders as not requiring an attachment.
If you use the athenaClinicals service, you can select an attachment located in the patient chart. This option is available when you upload an attachment and the Source is set to athenaClinicals document.

If you determine that an attachment is not required for a claim, you can remove the rule 2804 attachment placeholder.
Caution: An attachment placeholder is created based on a payer documented requirement or guideline. Marking the placeholder as not required may lead to a denial of the claim from that payer.
- Display the Claim Action page: Select a claim from the Workflow Dashboard, Claim Worklist, or click the Claim Action Page link on the Claim Edit page.
- Locate the Attachment required row under Existing Attachments.

The type of document required is shown in the Type column. - Click the Edit link.
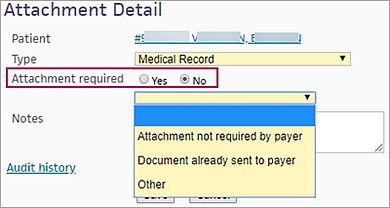
The Attachment Detail page appears. - Attachment required — Select No.
A field appears for you to select a reason that the attachment is not required.
- Select one of these reasons from the menu: Attachment not required by payer, Document already sent to payer, or Other.
- Notes — Enter any additional information about why you are marking the attachment as not required.
- Click Save.
The attachment placeholder in the Attachments table is now marked as "Attachment not required" with the reason you selected.
- Click Cancel.
The Manage Attachments page appears. - Click the Back to Claim Action Page button.
- Display the Claim Edit page: Click the Go to Advanced View link on the Claim Action page.
- Scroll down to the Attachments section (under Illness/Injury).
- Locate the Attachment required row under Attachments.

The type of document required is shown in the Type column. - Click the edit link.
The Attachment Detail page appears. - Attachment required — Select No.
A field appears for you to select a reason that the attachment is not required.
- Select one of these reasons from the menu: Attachment not required by payer, Document already sent to payer, or Other.
- Notes — Enter any additional information about why you are marking the attachment as not required.
- Click Save.
The attachment placeholder in the Attachments table is now marked as "Attachment not required" with the reason you selected.
- Click Cancel.
The Manage Attachments page appears. - Click the Back to Claim Edit button.
If you determine that an attachment indicated by rule 2804 is required for a claim, add the attachment as described in this section.
- Display the Claim Action page: Select a claim from the Workflow Dashboard, Claim Worklist, or click the Claim Action Page link on the Claim Edit page.
- Locate the Attachment required row under Existing Attachments.

The type of document required is shown in the Type column. - Click the Edit link.
The Attachment Detail page appears. - Type — Make sure that the attachment type specified in this field is correct (for example, Medical Record).
- Attachment required — Do not change the default value (Yes).
- Source — Select the source of the document that you are attaching to the claim.
- athenaClinicals document — This option is selected by default.
- Upload file — Select this option to upload a document from your computer.
Attachment source is an athenaClinicals document
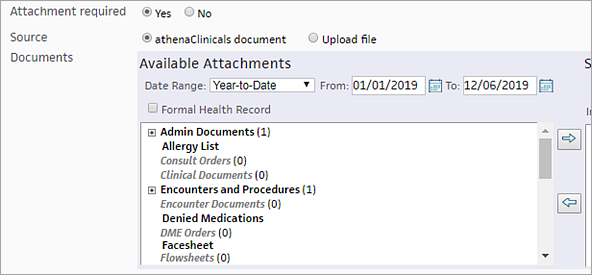
- Documents — If you selected athenaClinicals document as the source, select the documents that you want to attach to the claim from the Available Attachments list.

- Date Range — Select a date range from the menu or specify dates in the boxes to display only documents from that time period.
- Formal Health Record — You can select this option to move the documents and parameters used when generating a patient's official medical record to the Selected Attachments section.
- Include Confidential Patient Information — Select this option to attach information from the Confidential section of the Patient Demographic Information.
- Click the plus sign (+) to display all the documents within a section.
Items displayed in bold with a number in parentheses contain information. Items shown in gray italics with a zero in parentheses (0) do not contain any information for the patient.
Note: To view a document, hover over it to display a view document link. When you click the link, a Clinical Document view of the document appears. - Select the documents from the Available Attachments section to attach to the claim and click the right arrow icon
 .
.
Attachment source is a file you are uploading
- File — If you selected Upload file as the source, click Choose File to locate the document on your system. When you find the file, select it and click Open.
- On the Attachment Detail page, verify that the correct file name appears next to the Choose File button.
Add notes and save the attachment
- Notes — You can enter or update a claim note to describe why you are attaching the documents to the claim.
- Click Save.
The placeholder row in the Attachments table is updated with the actual document information. The [Attachment required] note disappears, and the edit and view links appear.
- Click Cancel.
The Manage Attachments page appears. - Click the Back to Claim Action Page button.
- Display the Claim Edit page: Click the Go to Advanced View link on the Claim Action page.
- Scroll down to the Attachments section (under Illness/Injury).
- Locate the Attachment required row under Attachments.

The type of document required is shown in the Type column. - Click the edit link.
The Attachment Detail page appears. - Type — Make sure that the attachment type specified in this field is correct (for example, Medical Record).
- Attachment required — Do not change the default value (Yes).
- Source — Select the source of the document that you are attaching to the claim.
- athenaClinicals document — This option is selected by default.
- Upload file — Select this option to upload a document from your computer.
Attachment source is an athenaClinicals document
- Documents — If you selected athenaClinicals document as the source, select the documents that you want to attach to the claim from the Available Attachments list.

- Date Range — Select a date range from the menu or specify dates in the boxes to display only documents from that time period.
- Formal Health Record — You can select this option to move the documents and parameters used when generating a patient's official medical record to the Selected Attachments section.
- Include Confidential Patient Information — Select this option to attach information from the Confidential section of the Patient Demographic Information.
- Click the plus sign (+) to display all the documents within a section.
Items displayed in bold with a number in parentheses contain information. Items shown in gray italics with a zero in parentheses (0) do not contain any information for the patient.
Note: To view a document, hover over it to display a view document link. When you click the link, a Clinical Document view of the document appears. - Select the documents from the Available Attachments section to attach to the claim and click the right arrow icon
 .
.
Attachment source is a file you are uploading
- File — If you selected Upload file as the source, click Choose File to locate the document on your system. When you find the file, select it and click Open.
- On the Attachment Detail page, verify that the correct file name appears next to the Choose File button.
Add notes and save the attachment
- Notes — You can enter or update a claim note to describe why you are attaching the documents to the claim.
- Click Save.
The placeholder row in the Attachments table is updated with the actual document information. The [Attachment required] note disappears, and the edit and view links appear.
- Click Cancel.
The Manage Attachments page appears. - Click the Back to Claim Edit button.
If you determine that an attachment is required for a claim but no placeholder was created, you can add the attachment as described in this section.
- Display the Claim Action page: Select a claim from the Workflow Dashboard, Claim Worklist, or click the Claim Action Page link on the Claim Edit page.
- Actions — Select Add Attachment from the menu.
The Add Attachment view appears. - Applies to — Make sure that the correct insurance type (Primary Insurance or Secondary Insurance) is displayed.
- Attachment type — Select the type of attachment to add to the claim.
- Source — Select the source of the document that you are attaching to the claim.
- athenaClinicals document — This option is selected by default.
- Upload file — Select this option to upload a document from your computer.
Note: You can upload PDF files only.
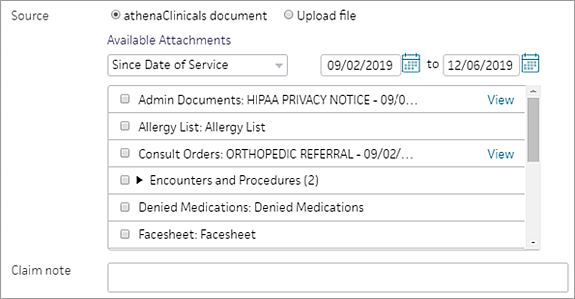
- If you select athenaClinicals document as the source, specify the documents that you want to attach to the claim.

- Select a date range from the menu or specify dates in the boxes to display only documents from that time period.
- Select the documents from the list to attach to the claim. Some documents have a View link, which you can click to display the document in another window.
- If you select Upload file as the source:
- Click the Browse button.
- Locate and select the PDF file on your computer and click Open.
The file name appears under the Browse button.
- Claim note — Enter a claim note to describe why you are attaching the documents to the claim.
- Depending on whether you are submitting the claim, attach the documents as follows:
- Click Attach and Submit.
athenaOne saves the attachments to the claim, applies the DRPBILLING kick code, and submits the claim. - Click Attach.
athenaOne saves the attachments to the claim without submitting the claim.
- Click Attach and Submit.
- Display the Claim Edit page: Click the Go to Advanced View link on the Claim Action page.
- Scroll down to the Attachments section (under Illness/Injury) and click Manage attachments.

The Manage Attachments page opens. - On the Manage
Attachments page, click Add New Attachment.
Additional fields appear. - Type — Select the type of attachment to add to the claim.
- Source — Select the source of the document that you are attaching to the claim.
- athenaClinicals document — This option is selected by default.
- Upload file — Select this option to upload a document from your computer.
Attachment source is an athenaClinicals document
- Documents — If you selected athenaClinicals document as the source, select the documents that you want to attach to the claim from the Available Attachments list.

- Date Range — Select a date range from the menu or specify dates in the boxes to display only documents from that time period.
- Formal Health Record — You can select this option to move the documents and parameters used when generating a patient's official medical record to the Selected Attachments section.
- Include Confidential Patient Information — Select this option to attach information from the Confidential section of the Patient Demographic Information.
- Click the plus sign (+) to display all the documents within a section.
Items displayed in bold with a number in parentheses contain information. Items shown in gray italics with a zero in parentheses (0) do not contain any information for the patient.
Note: To view a document, hover over it to display a view document link. When you click the link, a Clinical Document view of the document appears. - Select the documents from the Available Attachments section to attach to the claim and click the right arrow icon
 .
.
Attachment source is a file you are uploading
- File — If you selected Upload file as the source, click Choose File to locate the document on your system. When you find the file, select it and click Open.
Add notes and save the attachment
- Notes — You can enter or update a claim note to describe why you are attaching the documents to the claim.
- Click Add Attachment.
athenaOne saves the attachments to the claim. - Click the Back to Claim Edit button.