Claim Action
This page allows you to review claims in HOLD status and resolve them on the same page. From the Claim Action page, you can appeal denials; adjust and transfer balances; update diagnosis codes, procedure codes, and modifiers; and add kick reasons.
All other actions on claims in HOLD status can be completed on the Claim Edit page (click Go to Advanced View on the Claim Action page).
Note: The Claim Action page replaces the Add Claim Note page.
To display the Claim Action page, open any claim in HOLD status from:
- Workflow Dashboard
- View Claims Worklists
- Claim Inbox
- Non-clinician home page
- A/R Aging Wizard
- Activity Wizard
- Zero-Pay Review
- Fully Worked Receivables
You can also display the Claim Action page from the Claim Edit page (next to Add Note, click Claim Action Page).
To resolve issues on this page, you must have permission to edit claims.
You can adjust the balance on a claim after it has been submitted to the payer (the Hold Summary status is "Post-Bill").
- Display the Claim Action page.
- Review the claim information.
- Actions — Select Adjust Balance from the menu.
The Adjust Balance view appears.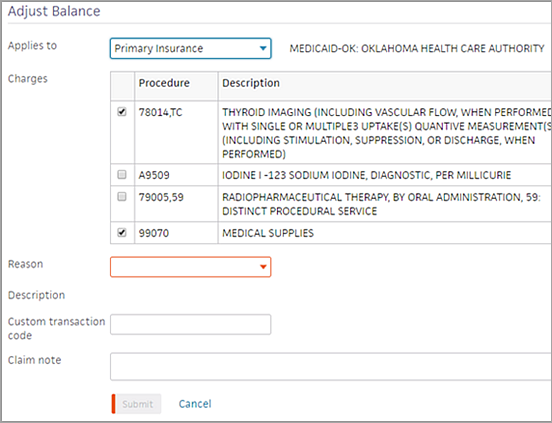
- Applies to — Select the payer to which the adjustment applies: Primary Insurance, Secondary Insurance, or Patient.
- Charges — Select the charges to adjust.
- Reason — Select the reason for the adjustment.
Note: Each adjustment reason maps to a kick reason so that reports are unaffected. See "Adjustment reasons and kick reasons." - Custom transaction code (optional) — Enter a custom transaction code or type a period (.) to use the lookup tool.
- Claim note (optional) — Enter a claim note to describe why you adjusted the charges off the claim.
- Click Submit.
This action closes the claim.
You can adjust the balance on a claim before or after it has been submitted to the payer (the Hold Summary status is "Pre-Bill" or "Post-Bill").
- Display the Claim Action page.
- Review the claim information.
- Actions — If the payer correctly denied the claim, and you want to transfer the balance to the patient or the next payer, select Transfer Balance from the menu. The Transfer Balance view appears.
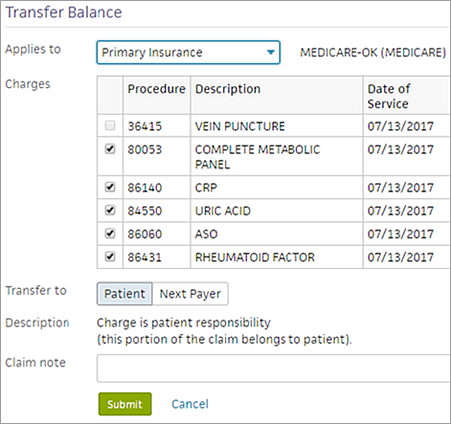
- Applies to — Select the payer from whom you are transferring the charges: Primary Insurance or Secondary Insurance.
- Charges — Select the charges to transfer.
- Transfer to — Select the payer to whom you are transferring the charges: Patient or Next Payer.
- Claim note (optional) — Enter a claim note to describe why you are transferring the balance.
- Click Submit.
If the claim balance was transferred to the patient, the PTRESP kick code is applied. If the claim balance was transferred to the next payer, the NEXTPAYOR kick code is applied.
You can add attachments to a claim before or after it has been submitted to the payer (the Hold Summary status is "Pre-Bill" or "Post-Bill").
Note: If you want to attach documents as part of an appeal for a denied claim, see "To appeal a claim denial."
- Display the Claim Action page.
- Review the claim information and existing documentation.
- Actions — Select Add Attachment from the menu.
The Add Attachment view appears. - Applies to — Select the payer from the menu: Primary Insurance or Secondary Insurance.
- Attachment type — Select the type of attachment to add.
- Source — Select the source of the document that you are attaching to the claim.
- athenaClinicals document — This option is selected by default.
- Upload file — Select this option to upload a document from your computer.
- If you select athenaClinicals document as the source, specify the documents that you want to attach to the claim.
- Select a date range from the menu or specify dates in the boxes to display only documents from that time period.
- Select the documents from the list to attach to the claim. Some documents have a View link, which you can click to display the document in another window.
- Claim note — Enter a claim note to describe why you are attaching the documents to the claim.
- Depending on whether you are submitting the claim, attach the documents as follows:
- Click Attach and Submit.
athenaOne applies the DRPBILLING kick code to the claim. - Click Attach.
athenaOne saves the attachments to the claim without submitting the claim.
If a placeholder for documentation exists in the claim, the placeholder prevents the claim from being dropped after being kicked with PLSAPPEAL, and the claim remains in HOLD status. If you believe that the requested documentation has already been sent to the payer or is not required, you can remove the attachment placeholder.
- Display the Claim Action page: Select a claim from the Workflow Dashboard, Claim Worklist, or click the Claim Action Page link on the Claim Edit page.
- Review the claim information and the existing documentation.
- In the Existing Attachments section at the bottom of the page, click Edit next to the attachment placeholder.
The Attachment Detail page appears. - Attachment required — Select No and then select the reason why the document is not needed from the menu.
- Click Save.
You can appeal a claim denial after the claim has been submitted to the payer (the Hold Summary status is "Post-Bill").
- Display the Claim Action page: Select a claim from the Workflow Dashboard, Claim Worklist, or click the Claim Action Page link on the Claim Edit page.
- Review the claim information and existing documentation.
- Actions — Select Resubmit to Payer from the menu.
The Resubmission request page appears.
Note: You can only submit one resubmission request at a time. If you have an on-going request, you cannot access the resubmission workflow until the pending one is resolved. - Applies to — Select the payer whose denial you are appealing: Primary Insurance or Secondary Insurance.
- Resubmission type — Select a resubmission type from the menu.
- Under Optional information, enter the following information if applicable for your resubmission request:
- Documents — Select medical documents or upload a new attachment to expand the section. Select the type of documentation to add. This documentation should support your appeal.
Notes:- Documents that are already attached to the claim appear in the Existing Attachments section. These documents are available for athenahealth teams to use when constructing a resubmission, and do not need to be reattached via this workflow.
- You can upload only one document via the resubmission workflow. To upload multiple documents, please complete that workflow on the claim itself before coming to this page. Uploading the documents prior to completing the new resubmission workflow allows those documents to be part of the documentation that athenahealth teams select from.
- The Attachment type field sets the type of document you are attaching; it does not filter the medical documentation check boxes located in the Documents section.
- Mail-to address — Click Choose a mail-to address to expand the section. If you don’t see the appropriate address, click add a new mail-to address and enter a new address.
Best practice: To look for additional addresses, search for the address in the Find address field. - Reason for resubmission — Enter the reason for resubmitting the claim.
Note: This field has a 2000-character limit. - Claim note — Click Include claim note (internal) to expand the section. Enter any internal notes for your athenaOne practice users. Describe the reasons why the claim should be appealed, list facts to support the appeal, and indicate whether you attached any supporting documentation or faxed any documentation to athenahealth (you may want to do so).
- Documents — Select medical documents or upload a new attachment to expand the section. Select the type of documentation to add. This documentation should support your appeal.
- Click Submit request. This action applies the PLSPPEAL kick code and moves the claim to athenahealth to review for payer-specific requirements.
A message appears indicating that the resubmission was successfully submitted to athenahealth.
Important: We've built automation for highly predictable resubmission scenarios: When the claim is kicked with PLSAPPEAL, athenaOne automatically executes a resubmission based on the appropriate scenario. (We’re actively building tools that limit the effects of this automation by resubmission type. If you disagree with athenaOne’s automation for the resubmission, submit a case via the Success Community: Main Menu > Support > Contact Client Support Center > Billing & Claims > Correct/Resubmit Claim > Create Online Case.) - An address validation window may appear if the address you entered could not be verified. Choose the address you want to use by selecting either Correct Address or You Entered, and then Confirm address.
You can update diagnosis codes, procedure codes, and modifiers on a claim before or after it has been submitted to the payer (the Hold Summary status is "Pre-Bill" or "Post-Bill").
- Display the Claim Action page.
- Review the claim information.
- Actions — If you need to correct diagnosis codes, procedure codes, or modifiers, select Update Codes from the menu.
The Update Codes view appears. - Diagnosis Codes (ICD-10) — Add, update, and delete diagnosis codes as needed. You can apply these codes to the charge lines below. Type a period (.) to use the lookup tool.
- Add, update, and delete procedure codes and modifiers on the charge lines as needed.
Note: You can edit the Units field, if needed. - Select diagnosis codes on the charge lines as needed.
- Claim note (optional) — Enter a claim note to describe the changes you made and why.
- Click Submit Claim.
athenaOne applies the DRPBILLING kick code to the claim and moves the claim to athenahealth to review for payer-specific requirements.
You can add a kick reason to a claim before or after it has been submitted to the payer (the Hold Summary status is "Pre-Bill" or "Post-Bill").
- Display the Claim Action page.
- Review the claim information.
- Actions — To add a kick reason to the claim, select Add Kick Reason from the menu.
The Add Kick Reason view appears. - Applies to — Select the payer: Primary Insurance, Secondary Insurance, or Patient.
- Charges — If you are adding a kick reason that affects the balance, select the relevant charges.
- Kick reason — Enter the kick reason, or type a period (.) to use the lookup tool.
- Claim note (optional) — Enter a claim note to describe the changes you made and why.
- Click Submit.
If the claim has an open balance, it will not print the CMS-1500 lines. To print an open claim on a CMS-1500 form, you can purchase blank CMS-1500 forms from an office supply company. If the claim is closed, it will print with the red CMS-1500 form lines. You can adjust your printer settings to print in black and white.
Note: The PDF Claim Printing feature must be enabled for your practice.
- Display the Claim Action page for a claim in HOLD status.
- Actions — Select Add Kick Reason from the menu.
- Kick reason — Enter "printonly" (or "PRINTONLY") and click outside the box.
The message "Print claim informational only; no status change" appears next to the Kick reason field. - Click Submit.
The claim appears below the View Attachments/EOBs button. - Format — You can select a different format from the menu and click Go.
- You can use the menu next to the Realign Claim button to select a different printer setting and then click Realign Claim.
- Click the Print icon
 .
.
A print version of the claim appears in a new window.
Note: To save the claim as a PDF document, click the Save icon. - Select the printer and then click Print.
You can use the Claim Inbox menu on the Claim Action page to perform some of the tasks available on the Claim Inbox page.

To display the Claim Inbox page, click the Claim Inbox menu and select Go to Claim Inbox.
Note: This feature is not available to your organization if it is part of a network of athenaOne tablespaces.
If a claim is assigned to a user, the user's name appears under the Hold Summary heading. (The Claim Inbox text does not appear if the claim is unassigned.)
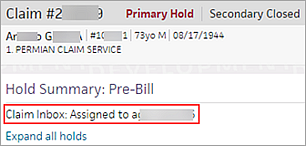
You can assign an unassigned claim to yourself. If you have the Claim Worklists: Manager Access permission, you can assign an unassigned claim to yourself or to another user.
- Display the Claim Action page.
- On the right side of the page, click the Claim Inbox menu.

Note: If the claim is unassigned, the Claim Inbox menu displays only the Assign Claim and Go to Claim Inbox options. - Click Assign Claim.
The Assign Claim window appears. - User - Required — Select the user to whom you want to assign the claim.
- Claim note — Enter a claim note.
- Click Save.
When a claim is assigned to you, your username appears under the Hold Summary heading. (The Claim Inbox text does not appear if the claim is unassigned.)

You can release a claim assigned to you, making the claim unassigned so that another user can find and assign the claim in the Claim Inbox.
Note: If you have the Claim Worklists: Manager Access permission, you can also reassign the claim to yourself or to another user.
- Display the Claim Action page.
- On the right side of the page, click the Claim Inbox menu.
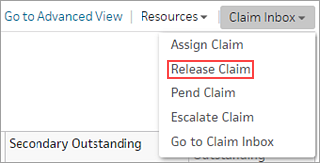
- Click Release Claim.
The Claim Inbox page appears. - Select the claim that you want to release (check the box to the left of the claim on the Claim Inbox page).
- Act on — Select Release from the menu and click Submit.
Note: Releasing claims returns them to Unassigned status, which allows other users to find, assign, and work these claims in the Claim Inbox.
When a claim is assigned to you, your username appears under the Hold Summary heading. (The Claim Inbox text does not appear if the claim is unassigned.)

You can set the claim to a pending status if the claim is assigned to you.
- Display the Claim Action page.
- On the right side of the page, click the Claim Inbox menu.
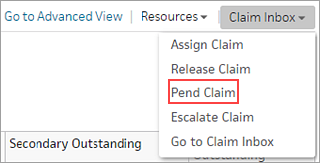
- Click Pend Claim.
The Pend Claim window appears. - To - Required — Enter the date until which you want to pend the claim.
- Return to me after pend — Select this option to return the claim to your My Claims tab on the Claim Inbox page when the pending date expires, instead of returning it to Unassigned status.
- Claim note - Required — Enter a claim note that describes your reason for pending the claim.
- Click Save.
When a claim is assigned to you, your username appears under the Hold Summary heading. (The Claim Inbox text does not appear if the claim is unassigned.)

You can escalate a claim assigned to you.
Note: If you have the Claim Worklists: Manager Access permission, you can also escalate a claim assigned to another user.
- Display the Claim Action page.
- On the right side of the page, click the Claim Inbox menu.
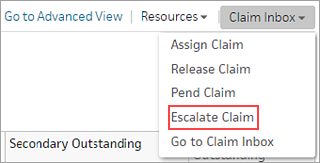
- Click Escalate Claim.
The Escalate Claim window appears. - Escalation contact - Required — Select the user to whom you want to escalate the claim.
- Escalation reason- Required — Select the escalation reason.
- Claim note - Required — Enter a claim note that describes your reason for escalating the claim.
- Click Save.
The Claim Action page provides a clear view of claim, patient, and insurance information for claims in HOLD status. This page summarizes claim issues and provides quick resolution paths for writing off or transferring balances, appealing payer decisions, overriding rules, and editing billing codes.

For each claim, the Claim Action page provides the following information in the banner:
- Claim status for the primary insurance, secondary insurance, and patient
- Patient name, ID, age, gender, and date of birth
- Primary insurance, member ID, and cancelled date, if applicable
- Secondary insurance, member ID, and cancelled date, if applicable
- Date of service, outstanding balance, and total charges
- Supervising provider, rendering provider, and department
Claims in HOLD or MGRHOLD status are labeled as "Pre-Bill" or "Post-Bill."

- Pre-bill claims have not been sent to the payer.
- Post-bill claims have been sent to the payer for payment.
For information about which actions you can take on pre-bill and post-bill claims, see the Actions menu section.
Review the Hold Summary for any rule holds or denials at the claim level or at the charge line-specific level. All the charge lines on the claim are visible in the table. You can hover your cursor over the procedure and diagnosis codes to see their descriptions.
- Expand the rule hold or denial by selecting the row, or click Expand all holds to review all errors on the page.
- Expand rules that can be overridden to override them.
Check whether the claim has any attachments (scroll down to see the Existing Attachments section).
- To add an attachment, click the Actions menu and select Add Attachment (see "To add an attachment to a claim").
- To replace a document placeholder with a document or to delete a document placeholder, click Edit next to the placeholder in the Existing Attachments table (see Attachment Detail).
To display a list of claims that require supporting documentation, you can run the Claims Missing Required Attachments report.
Note: If a denial results from a lack of supporting documentation, claim rule 2804 fires, and athenaOne inserts a document placeholder. The Claims Missing Required Attachments report displays a list of claims where claim rule 2804 was triggered.
The Claim Notes section of the Claim Action page displays the claim notes and charge audit histories.
- All rules that fired on the claim on the same day appear in the same claim note.
- All errors from the same EOB or ERA appear in a single claim note.
To display the most recent claim notes at the top of the table, click the arrow next to the Date column heading. Click the arrow again to order the notes from oldest to most recent.
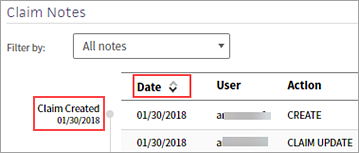
Claim milestones — Claim Created, Claim Billed, Remittance Received, and Claim Closed — appear to the left of the Date column. You can scan the milestones to locate important claim events and understand the history and current status of the claim.
You can display the claim's full audit history in the claim notes.

Click Show n changes to display each edit to the claim or charge in chronological order.
You can filter claim notes to display only the claim notes for the primary insurance, the secondary insurance, or the patient. If a claim has been appealed, you can also use the Filter by field to display the claim notes for appeals to the primary insurance or the secondary insurance only.
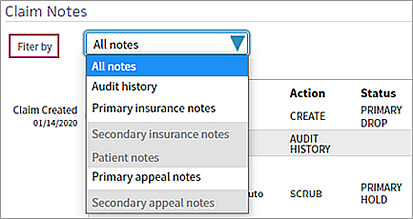
The User column indicates the source of the claim note.
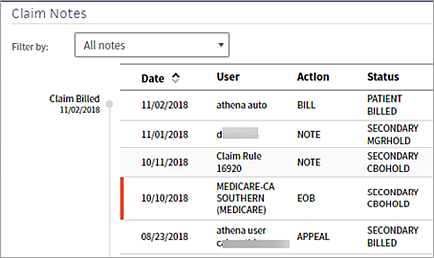
Note: Active claim notes are indicated by a vertical red bar to the left of the claim note date.
- athena auto — athenaOne automatically took action on the claim.
- athena user — An athenahealth user added a note to the claim.
- Claim Rule — Claim rule that fired on the claim.
- Insurance provider name — Appears in the claim note for the provider's remittance to your practice.
- Practice user — A user in your practice took action on the claim.
To open a full-page view of claim notes in a new tab, click View claim notes in new tab.

The full-page view can be helpful when you review a claim with extensive notes or when you need to complete work on a different athenaOne page while referring to the claim notes.

When you open claim notes in a new tab, athenaOne disables any links that take you outside the claim note or allow you to make changes to the claim. For example, you can't click a billing batch link because it would take you to a different page in athenaOne, but you can click Show 7 changes because the changes appear in the claim note.
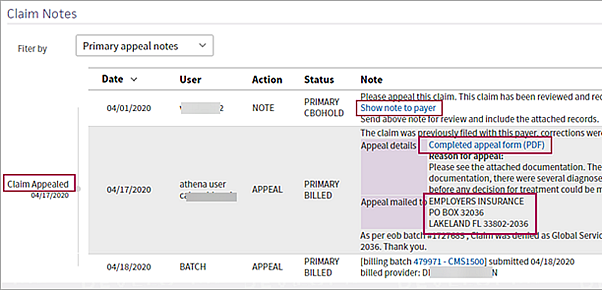
The claim note for an appeal submission shows the most relevant information at the top of the note, including a link to the completed appeal package and the address it was mailed to. Click Completed appeal form (PDF) to review the full document sent to the payer in a new tab.
| Column headings for Claim Notes | |
|---|---|
| Date | The date that the action occurred. Click the arrow to display the oldest claim notes first or the most recent claim notes first. |
| User |
The username of the person who took the action. Note: athena auto indicates an automated system function. athena user indicates an athenahealth employee; this text is followed by the employee's username. |
| Action |
The action taken on the claim.
|
| Status | The status of the claim following this action. |
| Note |
A brief note describing the action, generally including a kick reason. Notes that appear on the Claim Action page also appear in the Claim Notes section of the Claim Preview, Claim Edit, View Claims for Charge Entry Batch, View Claim History, and Claim Review pages.
For older claim notes, click Show more to see the text as it appeared when the rule fired on the claim.
Claim rules are created by athenahealth based on payer rules, client input, format rules for claim submission, and previous denials. Claim rules have a unique number identifier listed in brackets in the description.
The following types of claim notes are the result of claim rules. Note: To override a review claim note, you must have the Claim Note Override: Review role or permission. To override an advice claim note, you must have the Claim Note Override: Advice role or permission.
Note: An override link may also appear when a "predictive rule" fires. A predictive rule is a type of claim advice that uses historical data in athenaOne to predict likely denials, so that you can adjust them off to zero before they appear in your denial work queues. Predictive rules cover Medical Necessity Denials and Benefits Coverage (charges expected to be denied for a benefit limitation or exclusion).
Kick codes:
Each payer has its own denial codes. athenaOne associates different payer denial codes to the athenahealth standard set of kick codes, which determines the appropriate next steps.
Note: When you add a claim note that sets a claim alarm, athenaOne displays the date of the alarm beneath the text of the claim note. The date appears as long as the claim alarm remains active. Claim alarms are reset every time a claim note puts a claim in — or LEAVES a claim in — BILLED status. When claim acknowledgment applies an EMCRCVD or PAYORRCVD claim note, the original alarm is cleared and a new one is set.
Claim Status Inquiry transactions:
Note: CSI transactions are supported for athenaCollector clients only. For more information about CSI, please refer to Claim Status Inquiry. |
To select the next action to resolve the claim hold, click the Actions menu. The options in the Actions menu depend on whether the hold is "Pre-Bill" or "Post-Bill," as shown in the Hold Summary.

Pre-bill claims have not been sent to the payer. The actions available for these claims are:
- Transfer Balance
- Add Attachment
- Update Codes
- Add Kick Reason
Post-bill claims have been sent to the payer for payment. The actions available for these claims are:
- Adjust Balance
- Transfer Balance
- Add Attachment
- Appeal Claim
- Update Codes
- Add Kick Reason
If you cannot take the appropriate action on the Claim Action page, click Go to Advanced View to display the Claim Edit page.
Click Resources to access the following:
- Active EOBs (available if an active EOB is associated with the claim)
- Phone Payer Information page
- Clinical encounter (available if an active clinical encounter is associated with the claim)
- Billing Summary
- Patient Quickview
Note: The information on the Phone Payer Information page is read-only. athenahealth recommends that you send your questions for insurance companies to us, so that we can resolve them on your behalf. Add the ADNREVIEW kick reason to the claim and enter your reason for requesting follow-up in the Claim note field.
When you adjust a claim, the adjustment reasons in the menu map to kick reasons, which appear in reports, as follows.
| Adjustment Reason | Kick Reason |
| Abandoned by payer | ABANDONED |
| Administrative adjustment | ADMIN |
| Bad debt | BADDEBT |
| Free care | FREECARE |
| Global services | GLOBAL |
| Small balance | SMALLBAL |
| Provider in capitation agreement | CAP |
| Provider under contract | CONTRACT |
| Other | OTHER |
| Vendor Adjustments kickcode | VENDORADJUSTMENTS |
athenaOne uses the information on the Payer Enrollment page to confirm that enrollment has been completed and to locate the billing information to write on the claim form. athenaOne uses the insurance package, service department, and provider on the claim to look up the corresponding record on the Payer Enrollment page. If athenaOne does not find a matching record on the Payer Enrollment page, these rules fire:
- Claim Rule 7759 Provider Credentialing Status Required
- Claim Rule 7760 Medical Group Credentialing Status Required
Note: Claim Rules 7759 and 7760 do not fire for payers that do not require payer enrollment (usually smaller commercial payers).
When global rule 7759 or 7760 holds a claim, athenaOne automatically creates a payer enrollment row in the Billing Group and Provider sections of the Payer Enrollment page (a note icon appears on the Payer Enrollment page to indicate that athenaOne created the payer enrollment row).
Rows are created nightly. After athenaOne creates the row, rule 6487 or 12178 fires, and a claim note alerts you to update the credentialing information for the new row. The following conditions prevent athenaOne from creating a payer enrollment row:
- No row currently exists for the payer in either the Billing Group or the Provider section.
- A row for the payer exists in the Provider section but does not include the claim's correct billing information (for example, if the existing row does not include the date of service or department information).
When no record on the Payer Enrollment page matches the payer of the claim, Rule 7759 or 7760 fires.
- Display the claim that is in MGRHOLD for rule 7759 or 7760.
- On the Claim Edit page, under the Claim Notes heading, click participating if your practice is credentialed with that payer, or click non-participating if your practice is not credentialed with that payer.
When you click one of those links, athenaOne automatically adds a record to the Payer Enrollment page. This action kicks off the enrollment process for that payer.
Note: If you do not have the required permissions to make updates to the Payer Enrollment page, Rule 7759 or 7760 fires.
When records on the Payer Enrollment page match the payer but none of the records matches the specific department or provider on the claim, Rule 7759 or 7760 fires.
- Display the claim that is in MGRHOLD for rule 7759 or 7760.
- On the Claim Edit page, under the Claim Notes heading, click the here link in the rule description to display the Payer Enrollment page.
- You can click Learn more on the Payer Enrollment page to learn more about why the claim is in MGRHOLD and what steps you can take to remedy the situation.