 User Guide — Order Management from In-house Clinics to Hospital Departments: Laboratory and Radiology
athenaOne for Hospitals & Health Systems
You can view and manage orders sent from a hospital's (ambulatory) clinic to a hospital's radiology or laboratory department. Front desk staff can associate orders with visits, see the authorization status of orders, and automatically create inpatient orders in hospital radiology and laboratory departments.
Your organization must use athenaOne for Hospitals & Health Systems, and your organization must have Hospital Collector Order Management feature enabled.
See also: User Roles and Permissions.
You can view and manage orders sent from a hospital's (ambulatory) clinic to a hospital's radiology or laboratory department. Front desk staff can associate orders with visits, see the authorization status of orders, and automatically create inpatient orders in hospital radiology and laboratory departments.
Attaching orders to a visit
Why attach an order to a visit? Attached orders support clinical and billing processes. After a patient is checked in, radiology and laboratory clinicians can see the order in order entry. Authorization information is available throughout the claim creation process.
On the Visit - Patient Access page, you can attach and detach orders and view and print the complete order details. You can also see progress on associated authorizations, and add an authorization manually, if your organization has athenaOne® Authorization Management enabled.
You can also attach orders to new visits from the patient Quickview and from the Orders to Schedule worklist, where you can see all unattached orders. You can create a new visit, schedule a visit, or attach orders to an existing visit when you display a patient's orders using the Orders to Schedule worklist.
Returning, resubmitting, or cancelling orders
You can return an order from an in-house clinic to the ordering provider, with a note describing why the order can't be performed. For example, you can return an order if the provider ordered the wrong procedure, if the patient refused the ordered procedure, or if the patient can't be contacted.
You can also resubmit or cancel an order sent from a hospital department to a clinic. If you resubmit an order, you can attach a note to the order's action history explaining why the order was resubmitted.
If athenahealth adds an authorization, the authorization details appear on the Visit - Patient Access page in the Authorization Details and History sections on the Orders/Authorizations tab.
The Authorization Details section includes:
- The payer authorizing the care
- The CPT codes being authorized
- The latest status of the authorization
- A note that the authorization was Added by athenahealth
The History section displays a summary of athenahealth's actions on the authorization so you can follow its progress.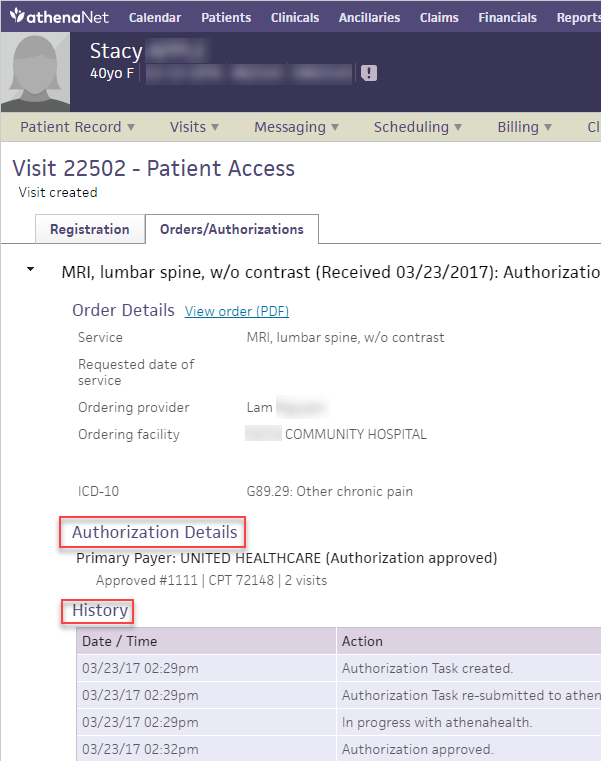
The following order statuses appear on the Order History page for in-house clinic-to-hospital department orders:
- Requested – A clinic placed an order to be performed in the hospital.
- Entered – An order is attached to a visit and submitted in order entry.
- Resulted – An order was completed in the laboratory or radiology department, and athenahealth has received and processed the results.
- Cancelled – An order was cancelled.
- Returned to Provider – An order was not performed and was returned to the provider for additional action.
Note: If you see an order in Resulted status that is not attached to a visit, follow the workflow to attach an order in Resulted status.
- Display the patient's Quickview: In the patient chart, click the Menu icon
 in the upper right corner and select Quickview.
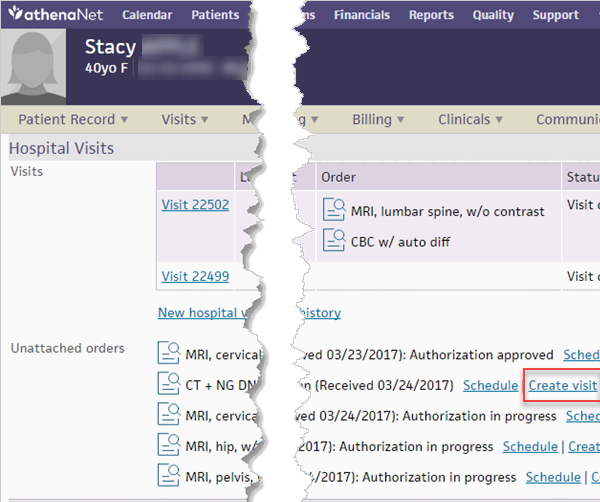
 - Under the Hospital Visits heading, click Create visit for an unattached order.
- Complete the registration information.
- Click Save.
athenaOne creates a new visit.
Note: Clicking Cancel cancels the new hospital visit. The order remains an unattached order.
- Display the Visit - Patient Access page: On the patient Quickview, under the Hospital Visits heading, click view for the visit you need.
- Click the Orders/Authorizations tab.
The list of available unattached orders appears.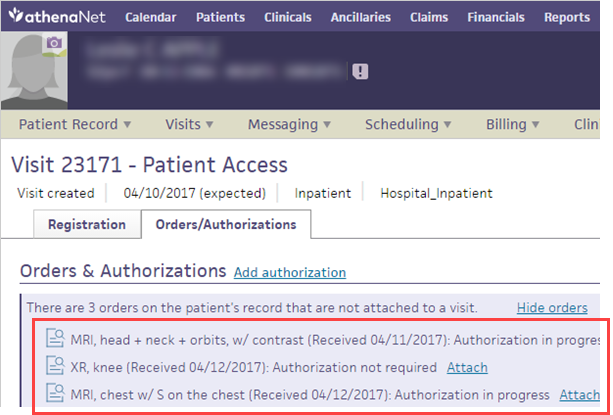
- Click Attach for the order to associate with the visit.
You can attach an order at any time. - You can click View order (PDF) to see the complete order details, including the ordering provider's signature.
Note: You can save the .pdf file to your computer or print it.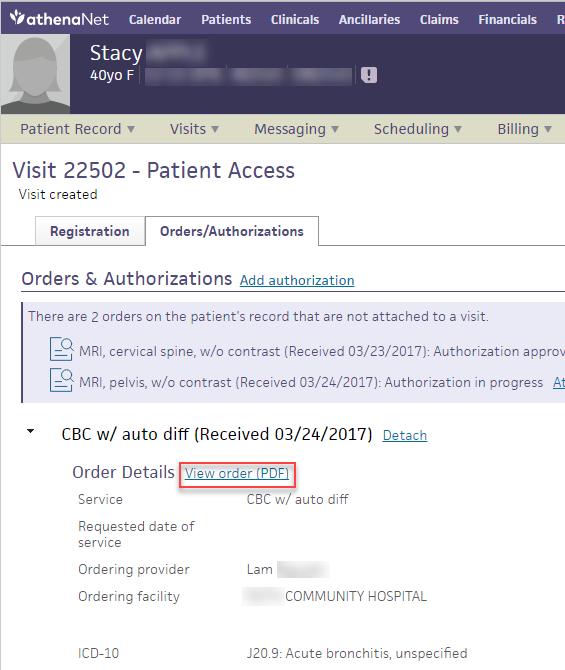
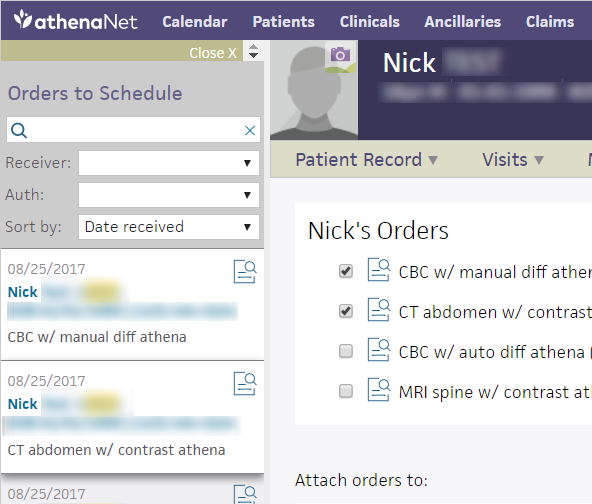
- Display the Orders to Schedule worklist: On the Main Menu, click Calendar. Under Orders, Orders to Schedule. This worklist appears in the Task Bar at the left and displays all orders received by the hospital.
- Enter the patient's name, ID, or the order type that you want to work (e.g., Smith, 1432, or MRI).
- Select filter criteria:
- Receiver — Select the hospital receiving the order.
- Auth — Select the status of the authorization: Approved, In Progress, Denied, or Expired.
- Sort by — Select Date received or Requested date.
- Click the order preview icon to view the order.
You can view and print the .pdf file from this window. - Click the order in the Orders to Schedule worklist to display the patient's list of orders in the Workspace.
- If there are multiple unattached orders, check the box next to each order you want to attach to a visit.
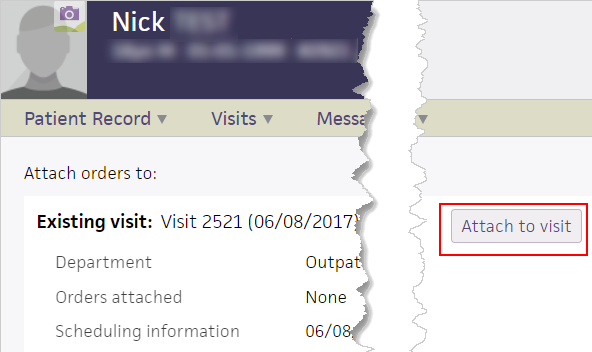
- Click Attach to visit in an existing visit.
The Visit Timeline tab on the Visit - Patient Access page appears, with a message and View link for the newly attached orders.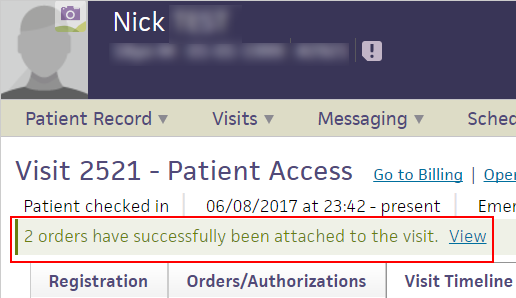
If an order is in Resulted status, you can attach the order to the appropriate visit on the Visit History page. In this way, you create an accurate record of when the order was performed.
- Display the Orders to Schedule worklist: On the Main Menu, click Calendar. Under Orders, Orders to Schedule. This worklist appears in the Task Bar at the left and displays all orders received by the hospital.
- Click an order in Resulted status to display the order in the Workspace.
- Click Patient Record.
- Select Quickview.
- Under Hospital Visits, click View full visit history.
Note: You cannot return an order in Resulted status to the provider. You can click Visit History to view the full visit history. - Click view next to the visit to which the order belongs.
The Visit - Patient Access page appears. - Click the Orders/Authorizations tab.
- Click Attach on the order in Resulted status.
The message, "This order was attached after discharge" appears under the order.
- Display the Visit - Patient Access page: On the patient Quickview, under the Hospital Visits heading, click view for the visit you need.
- Click the Orders/Authorizations tab.
The list of available unattached orders appears.
Tip You can click Hide orders to hide unattached orders.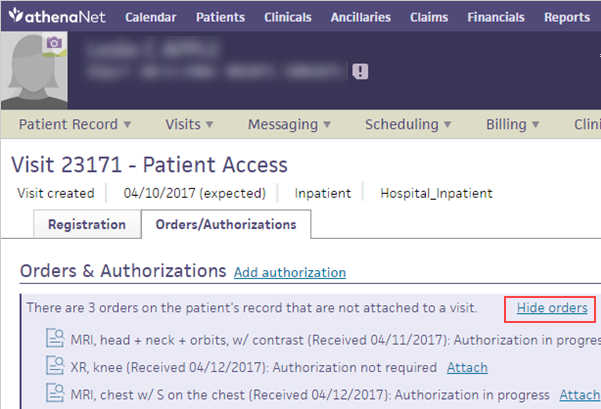
- Click Detach to remove an order from a visit.
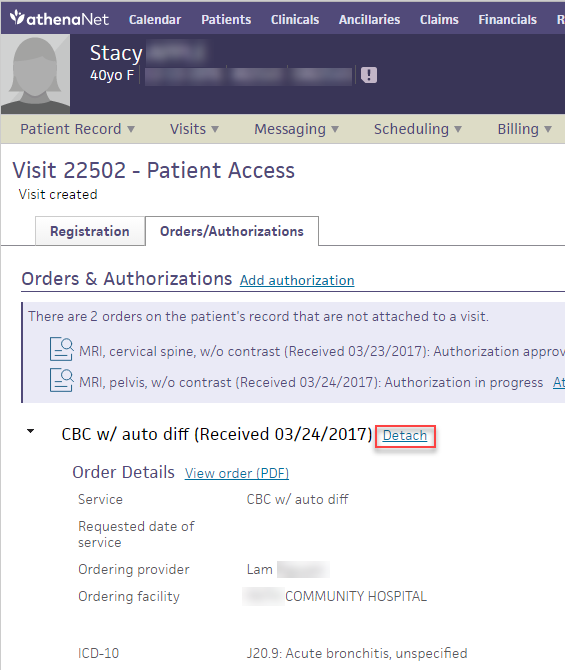
The order is now available to attach to other visits.
- Display the Visit - Patient Access page: On the patient Quickview, under the Hospital Visits heading, click view for the visit you need.
- On the Orders/Authorizations tab, click Add authorization.
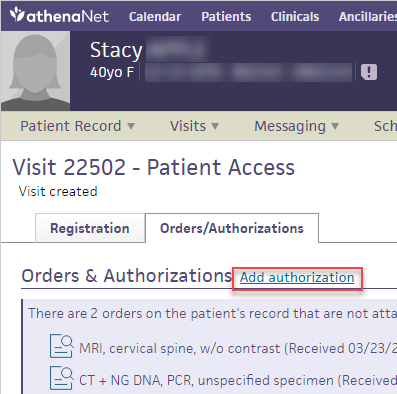
The Add Authorization window appears.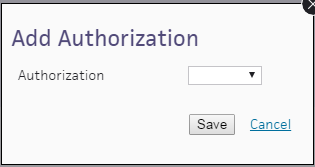
- If an authorization was added previously, select the existing authorization in the drop-down menu. You can either detach or update the existing authorization.
- If no authorization was added previously, click Add new to enter authorization information manually.
Note: The new authorization is associated with the primary insurance on the visit automatically. - Click Save.
The authorization appears on the Orders/Authorizations tab of the Visit - Patient Access page.
- Display the Orders to Schedule worklist: On the Main Menu, click Calendar. Under Orders, Orders to Schedule. This worklist appears in the Task Bar at the left and displays all orders received by the hospital.
- Enter the patient's name, ID, or the order type that you want to work (e.g., Smith, 1432, or MRI).
- Select any additional filter criteria:
- Receiver — Select the hospital receiving the order.
- Auth — Select the status of the authorization: Approved, In Progress, Denied, or Expired.
- Sort by — Select Date received or Requested date.
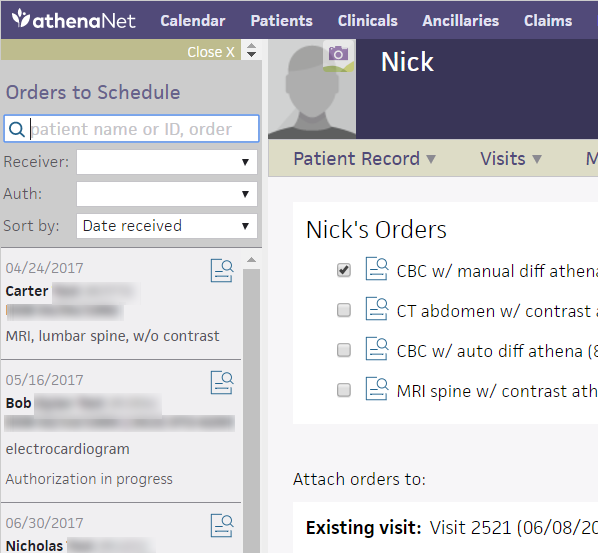
- Click the order preview icon
 to view the order.
Tip: You can click View order (PDF) to view and print the .pdf file from this window. - Click the order in the Orders to Schedule worklist to display the patient's list of orders in the Workspace.
- If there are multiple unattached orders, check the box next to each order you want to create a new visit for.
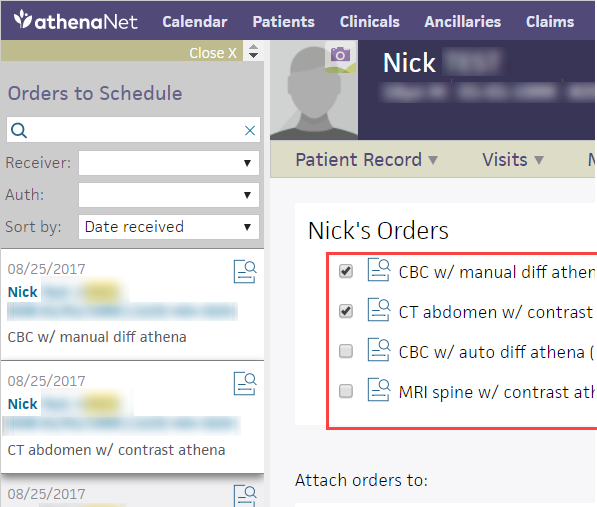
- Scroll down to the New visit heading, and click Create visit.

The new Visit — Patient Access page appears, with the unattached order on the Orders/Authorizations tab.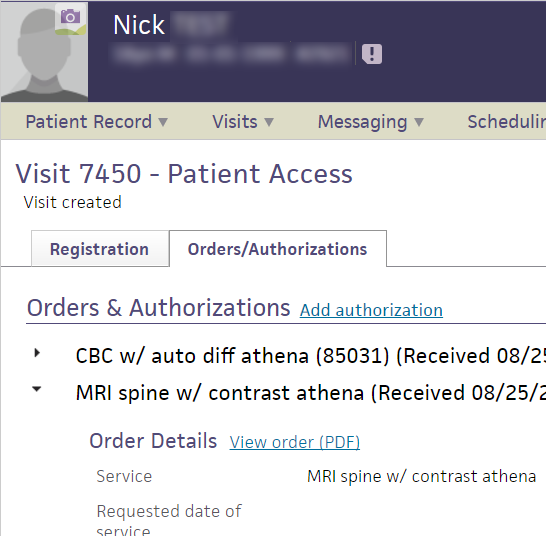
- Complete the patient's registration as you normally would.
athenaOne attaches the order to the new visit automatically. - Click Save.
- Display the Orders to Schedule worklist: On the Main Menu, click Calendar. Under Orders, Orders to Schedule. This worklist appears in the Task Bar at the left and displays all orders received by the hospital.
- Enter the patient's name, ID, or the order type that you want to work (e.g., Smith, 1432, or MRI).
- Select filter criteria:
- Receiver — Select the hospital receiving the order.
- Auth — Select the status of the authorization: Approved, In Progress, Denied, or Expired.
- Sort by — Select Date received or Requested date.
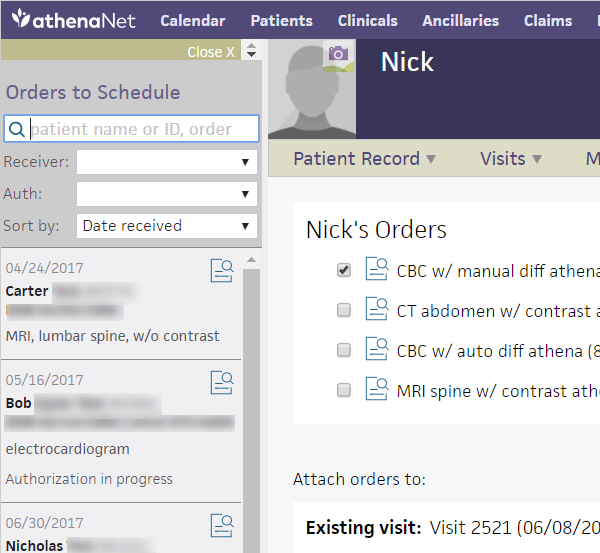
- Click the order preview icon to view the order.
You can view and print the .pdf file from this window.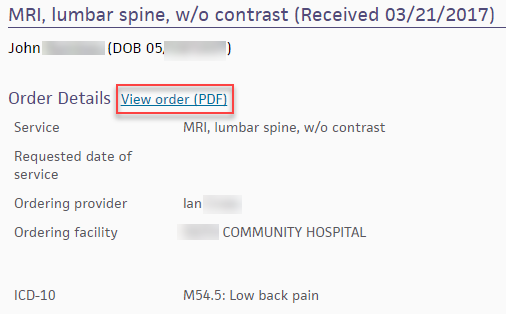
- Click the order in the Orders to Schedule worklist to display the patient's orders in the Workspace.
In the patient's list of orders
- If there are multiple unattached orders listed, you can check the box next to each order to be performed in a single visit.

- Scroll down to the New visit heading, and click Schedule visit.
The scheduling calendar appears.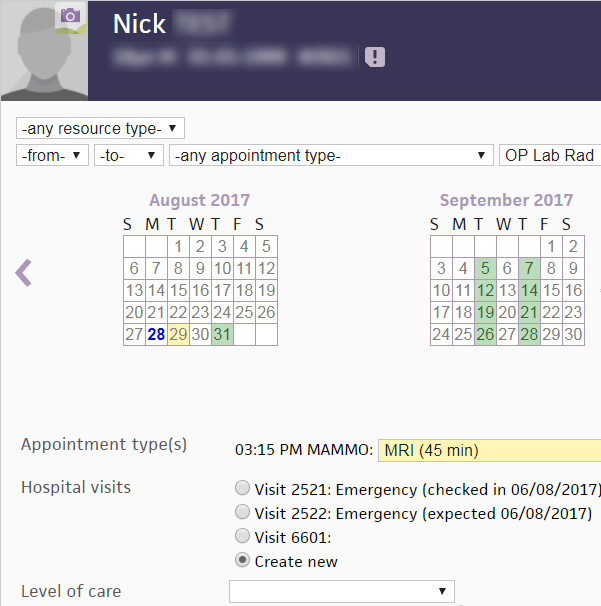
- Schedule the visit as you normally would.
athenaOne attaches the order to the scheduled visit automatically.
- Display the patient's Quickview: In the patient chart, click the Menu icon
 in the upper right corner and select Quickview.
 - Under Hospital Visits, click Schedule for the unattached order.
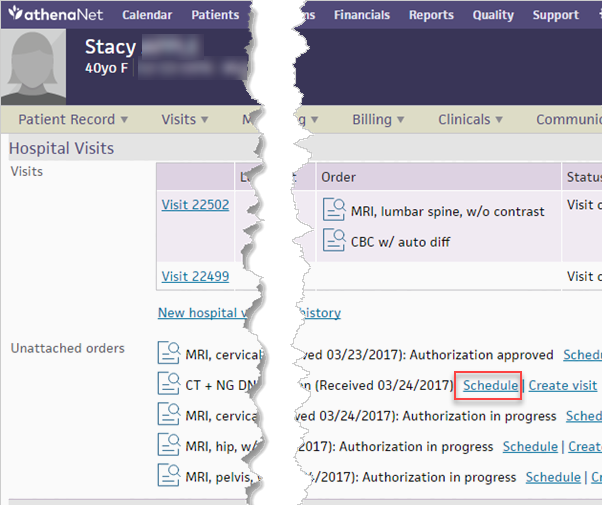
The scheduling calendar appears. - Schedule the visit as you normally would.
- Click Add Hospital Visit.
athenaOne attaches the order to the newly created visit.
Note: Clicking Cancel cancels the new hospital visit. The order remains an unattached order.
- Display the patient's Quickview: In the patient chart, click the Menu icon
 in the upper right corner and select Quickview.
 - Under Hospital Visits, click Return to provider in an unattached order.
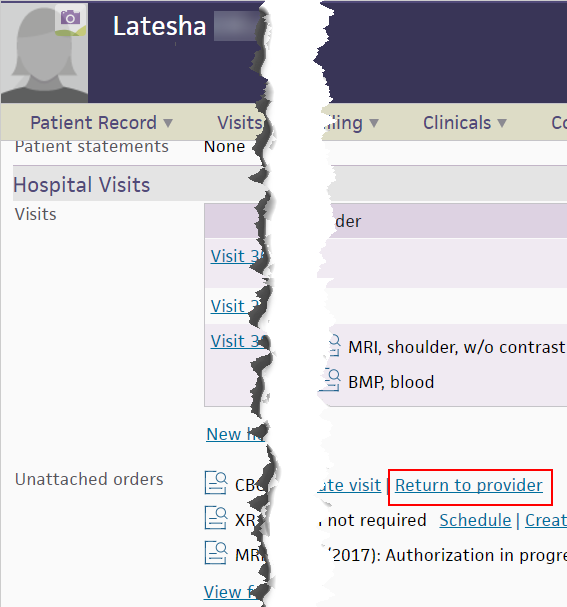
The Return to Ordering Provider window appears. - Note — Enter the reason you're returning the order.
- Click Submit.
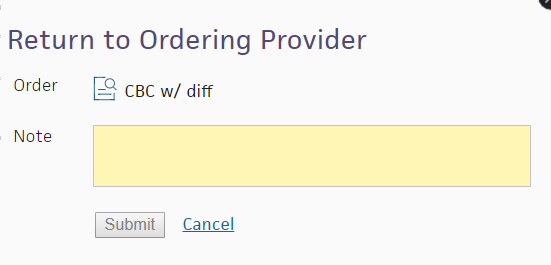
The Order Status on the Order History page changes from Unattached to Returned to provider.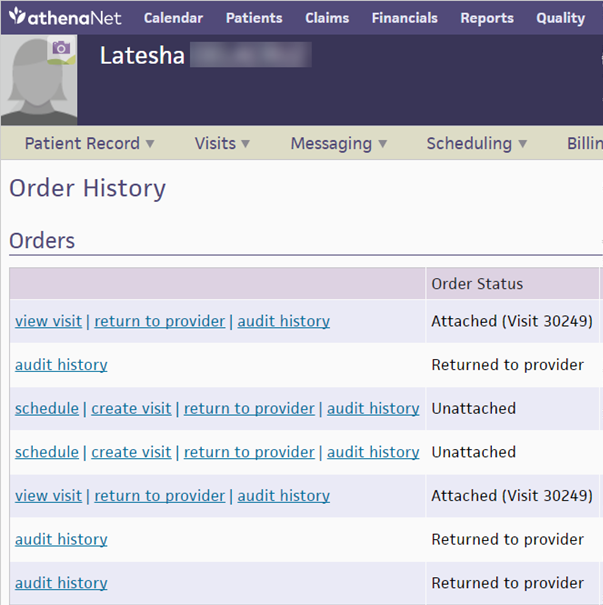
Note: You can also return an order to a provider on the Order History page.
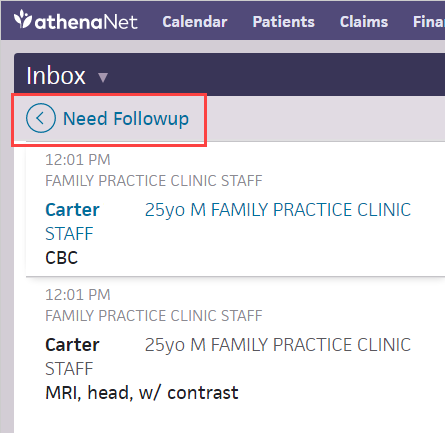
- In the Clinical Inbox, click Need Followup.
- Click the order to view.
A returned order displays the reason it was returned with a message at the top of the document and in the History section.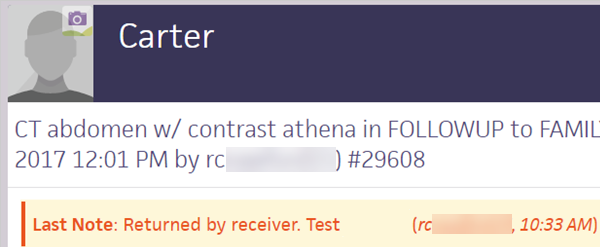
- Click VIEW ACTIONS.
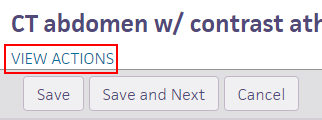
- If a hospital department returned the order, you can:
- Resubmit — Select Resubmit if the order was mistakenly returned.
- Cancel — Select Cancel if the order has the wrong information (e.g., CPT, laterality, contrast).
- Leave in FOLLOWUP — Select Leave in FOLLOWUP to add a note for a provider without resubmitting or cancelling the order.
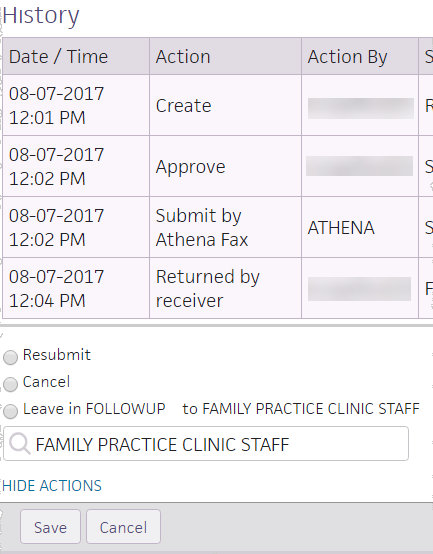
- Enter an Action Note.
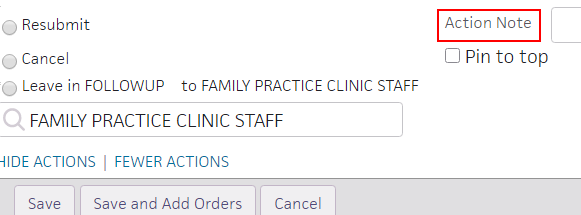
- Click Save.
- Display the Visit - Patient Access page: On the patient Quickview, under the Hospital Visits heading, click view for the visit you need.
- Click the Orders/Authorizations tab.
The list of available unattached orders appears.
Tip: To hide unattached orders, click Hide orders.
- Click the order preview icon
 to view the order. You can click View order (PDF) to view and print the .pdf file.
Note: You can save the .pdf file to your computer or print it.