Visit - Patient Access
athenaOne for Hospitals & Health Systems
You can use this page to view and update patient information related to a hospital or ER visit.
On the Main Menu, click Claims, and select Visit Search. In the Visit Search fields at the left, enter the search criteria and click Filter. In the search results, click the visit ID to display the Visit - Billing page in the Workspace. Click Go to Patient Access at the top of the page
At the top of the Visit - Billing page, click Go to Patient Access
On the patient Quickview, under the Hospital Visits heading, click view for the visit you need
You must be logged in to a department that uses athenaOne for Hospitals & Health Systems.
- Display the visit: On the patient Quickview, under the Hospital Visits heading, click view for the visit you need.
- In the Registration tab checklist, click Forms & Privacy.
- Documents — Select the documents you want to print.
- Click Print selected documents.
The print window appears. The documents now show this visit's information, regardless of whether the visit is in the past, present, or future. - Click the print icon to print the documents.
Note: The Zebra HC100 wristband printer must be installed and configured. The wristband label includes a barcode with the patient's current visit ID. You can scan the barcode to quickly add item-related charges to a patient's bill at the point of care without manual entry.
- Display the patient's Quickview.
- Scroll down to the Hospital Visits heading, and click view to display the or the visit you need.
- On the Registration tab checklist, click Forms & Privacy.
- Labels/wristband — Click Print wristband.
- On the patient Quickview, under the Hospital Visits heading, click view for the visit you need.
- Click the Authorizations tab.
- Authorization/referral number — Select an authorization or referral number.
- Click Save.
- On the patient Quickview, under the Hospital Visits heading, click view for the visit you need.
- Click the Authorizations tab.
- Authorization/referral number — Select Add new. Additional fields appear.
- Notes — Enter any notes about the authorization.
Note: These notes appear on the patient's Quickview. - Type — Select Pre-cert or referral.
- Insurance authorization number — Enter the insurance authorization number.
- Effective date — Enter or select the effective dates for this authorization or referral.
- Authorized visits/units — Select Visits or Units from the menu, and then enter the number of approved units or visits in both fields. athenaOne automatically decrements the number of authorized visits or units.
- Referred-to provider — Select the provider to whom the patient is being referred.
- Specialty — Select the specialty of the provider to whom the patient is being referred, for example, cardiology or general practice.
- Diagnosis code — Enter or select the diagnosis codes associated with the authorization. You can enter a period to access the Diagnosis Lookup tool in the ICD-9 or ICD-10 fields.
After you enter a diagnosis code, a description of the code is displayed to the right of it. - Procedure code — Enter or select the procedure codes associated with the authorization. You can enter a period to access the Procedure Lookup tool.
After you enter a procedure code, a description of the code is displayed to the right of it. - Additional information — Enter any additional information you want to record about this incoming authorization.
Note: This appears on the collapsed authorization view. - Click Save.
- On the patient Quickview, under the Hospital Visits heading, click view for the visit you need.
- Click the Authorizations tab.
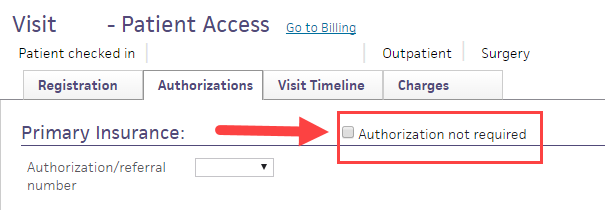
- Check the Authorization not required box.
- Click Save.
- Display the patient's Quickview: In the patient chart, click the Menu icon
 in the upper right corner and select Quickview.
 - On the patient Quickview, under the Hospital Visits heading, click view for the visit you need.
- Click the Orders/Authorizations tab. Ensure that there are no orders attached to the visit.
You must detach all orders before you can delete the visit. - At the bottom of the screen, click Delete visit.

Note: These instructions apply only to orders sent from a hospital's (ambulatory) clinic to that hospital's radiology or laboratory department.
- Display the Visit - Patient Access page: On the patient Quickview, under the Hospital Visits heading, click view for the visit you need.
- Click the Orders/Authorizations tab.
The list of available unattached orders appears.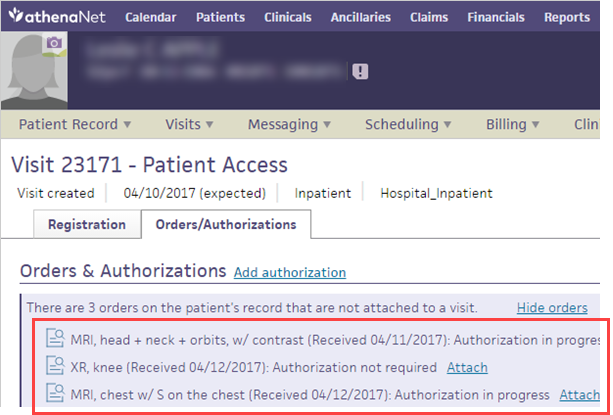
- Click Attach for the order to associate with the visit.
You can attach an order at any time. - You can click View order (PDF) to see the complete order details, including the ordering provider's signature.
Note: You can save the .pdf file to your computer or print it.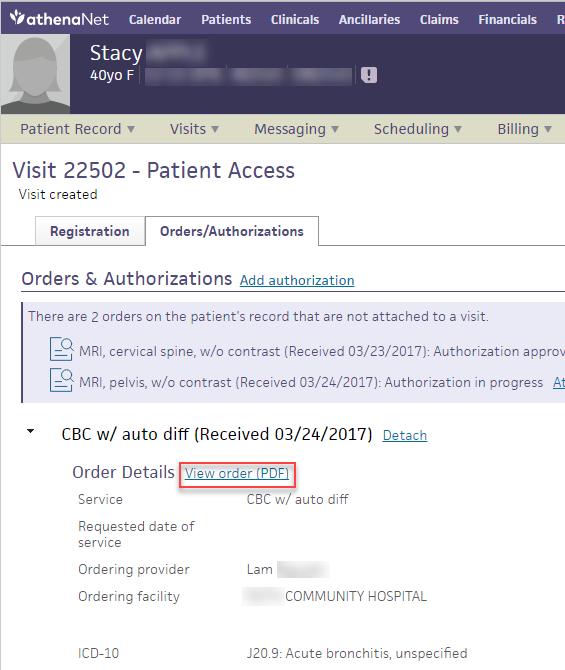
- Display the Visit - Patient Access page: On the patient Quickview, under the Hospital Visits heading, click view for the visit you need.
- Click the Orders/Authorizations tab.
The list of available unattached orders appears.
Tip You can click Hide orders to hide unattached orders.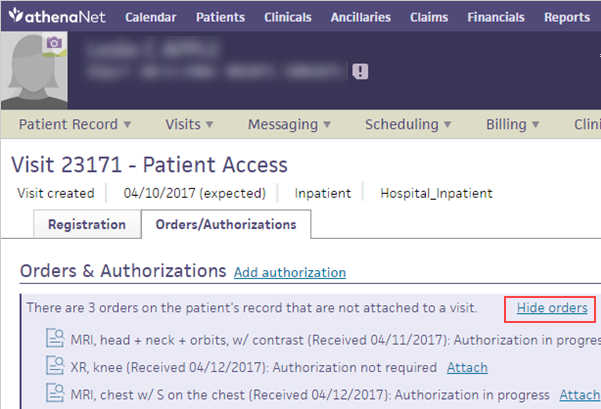
- Click Detach to remove an order from a visit.
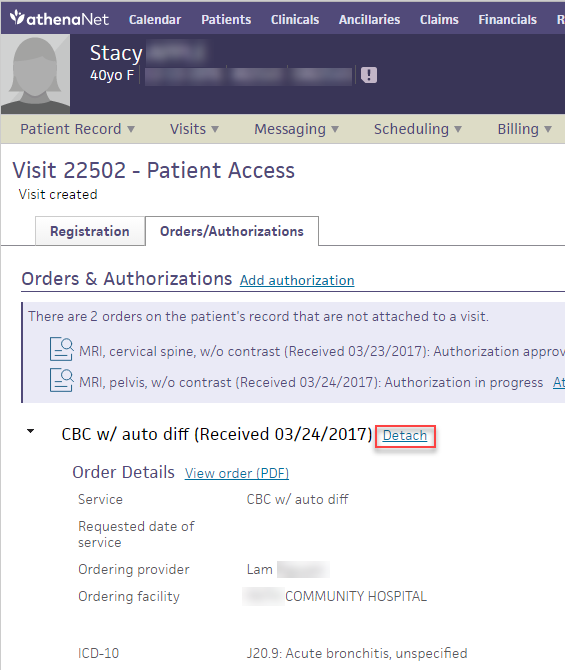
The order is now available to attach to other visits.
- Display the Visit - Patient Access page: On the patient Quickview, under the Hospital Visits heading, click view for the visit you need.
- On the Orders/Authorizations tab, click Add authorization.
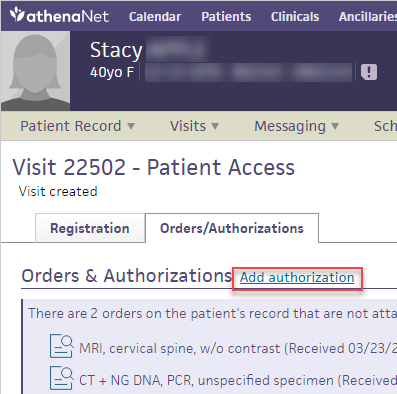
The Add Authorization window appears.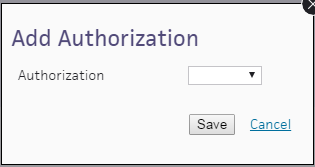
- If an authorization was added previously, select the existing authorization in the drop-down menu. You can either detach or update the existing authorization.
- If no authorization was added previously, click Add new to enter authorization information manually.
Note: The new authorization is associated with the primary insurance on the visit automatically. - Click Save.
The authorization appears on the Orders/Authorizations tab of the Visit - Patient Access page.
- Display the Visit - Patient Access page: On the patient Quickview, under the Hospital Visits heading, click view for the visit you need.
- Click the Orders/Authorizations tab.
The list of available unattached orders appears.
Tip: To hide unattached orders, click Hide orders.
- Click the order preview icon
 to view the order. You can click View order (PDF) to view and print the .pdf file.
Note: You can save the .pdf file to your computer or print it.

- Registration — Use the checklist at the left side of this tab to view and update patient demographics and other registration details.
- Orders/Authorizations — Use this tab to enter an authorization number for the hospital visit. If athenaOne® Authorization Management is enabled for your organization, the following details appear on the Visit — Patient Access page when you attach an order to a visit on the Orders/Authorizations tab:
• order name
• date the facility received the order
• name of the service
• requested date of service
• ordering facility
• ICD-10 code
• authorization status
- Visit Timeline — Use this tab to view / update the hospital visit date and time, attending provider, and admitting provider
- Charges — Use this tab to add, update, and transfer charges, to print a detailed statement, or to view the audit history for this hospital visit
With the Preferred Discharge Status feature, when a provider transfers a patient from the emergency level of care to the inpatient level of care, the discharge status is updated automatically. When you enable this feature, you can specify your preferred default discharge status (for example, "Admitted as an inpatient to this hospital").
You can still edit the discharge status: click edit under the Discharge heading in the patient access or billing view of the visit and select a different discharge status.
The following magic words for athenaOne for Hospitals display information pertaining to the patient's most recent hospital visit. You can use them in an HTML template or PDF document.
For use with Billing Slips and Forms, and Forms and Documents, use double brackets.
Example: [[CHECKINDATE]]
For use with Clinical Paper Forms, use double curly brackets.
Example: {{INPTADMITDATE}}
Note: Some magic words work only with Billing Slips and Forms and Forms and Documents.
Some magic words work only with Clinical Paper Forms.
[[ADMITTINGPROVIDER]]
[[ADMISSIONSOURCE]]
[[ADMISSIONTYPE]]
[[ATTENDINGPROVIDER]]
[[BARCODE]] — (athenaOne for Hospitals only) This makes athenaOne hospital visit ID conform to the 1D code 128 format (a 12-digit, zero-padded number with a "vz" prefix).
[[CHECKINDATE]]
[[CHECKINTIME]]
[[DISCHARGEDATE]]
[[DISCHARGETIME]]
[[OPERATINGPROVIDER]]
[[OTHEROPERATINGPROVIDER]]
[[VISITBED]]
[[VISITNUMBER]]
[[VISITPRIMARYINSURANCE]]
[[VISITROOM]]
[[VISITSECONDARYINSURANCE]]
[[VISITSURGERYPROCEDURENAME]] —This displays the procedure(s) of a surgery case on forms. Used for athenaOne for Hospitals & Health Systems
{{CLINICALPROVIDERADDRESS_TEXT}}
{{INPTADMITDATE}}
{{INPTADMITDIAGNOSES}}
{{INPTADMITLOCATION}}
{{INPTADMITTINGNAME}}
{{INPTALLDIAGNOSES}}
{{INPTATTENDINGADDRESS}}
{{INPTATTENDINGNAME}}
{{INPTATTENDINGPHONE}}
{{INPTDEPARTMENTSTAYTYPE}}
{{INPTDISCHARGECONDITION}}
{{INPTDISCHARGEDATE}}
{{INPTDISCHARGEDIAGNOSES}}
{{INPTDISCHARGEDISPOSITION}}
{{INPTDISCHARGEINSTRUCTIONS}}
{{INPTDISCHARGELOCATION}}
{{INPTDISCHARGEPROVIDER}}
{{INPTDISCHARGEORDERATTRIBUTION}}
{{INPTDISCHARGETRANSCRIPTION}}
{{INPTHOSPITALCOURSE}}
{{INPTHOSPITALNAME}}
{{INPTINPATIENTMEDORDERS}}
{{INPTLABTESTS}}
{{INPTLABRESULTS}}
{{INPTLABTESTRESULTSSTATUS}}
{{INPTORDERSPENDINGRESULTS}}
{{INPTMEASUREMENTS}}
{{INPTMEDDISCHARGEORDERS}}
{{INPTNONMEDDISCHARGEORDERS}}
{{INPTNOTETORECEIVINGFACILITY}}
{{INPTNURSEADDRESS}}
{{INPTNURSENAME}}
{{INPTNURSEPHONE}}
{{INPTPROCEDURES}}
{{INPTSURGPROCEDURES}}
{{INPTSURGPROCEDURENAMES}}
{{INPTCONSULTS}}
{{INPTIMAGINGTESTS}}
{{INPTRECEIVINGFACILITY}}
{{INPTUNSIGNEDMEDDISCHARGEORDERS}}
{{INPTDISCHARGEMEDICATIONLIST}}
{{INPTDISCHARGEMEDICATIONPHARMACIES}}
{{INPTADMISSIONMEDICATIONLIST}}
{{INPTSURGNURSENOTE}}
{{LOGINDEPARTMENT_ADDRESSBLOCK}}
{{LOGINDEPARTMENT_FAXTEXT}}
{{LOGINDEPARTMENT_PHONETEXT}}
{{PATIENTADDRESS_TEXT}}
| Authorization/referral number | You can select an existing referral number or select Add new. |
| Details for adding a new referral number | |
| Note |
Enter any notes about the authorization. |
| Type | Select Pre-cert or referral. |
| Insurance authorization number | Insurance authorization number — Enter the insurance authorization number. |
| Effective date | Enter or select the effective dates for this authorization or referral. |
| Authorized vists/units |
Select Visits or Units from the menu, and then enter the number of approved units or visits in both fields. athenaOne automatically decrements the number of authorized visits or units. |
| Referred-to provider | Select the provider to whom the patient is being referred. |
| Specialty |
Select the specialty of the provider to whom the patient is being referred, for example, cardiology or general practice. |
| Diagnosis code |
Enter or select the diagnosis codes associated with the authorization. You can enter a period to access the Diagnosis Lookup tool in the ICD-9 or ICD-10 fields. After you enter a diagnosis code, a description of the code is displayed to the right of it. |
| Procedure code | Enter or select the procedure codes associated with the authorization. You can enter a period to access the Procedure Lookup tool. After you enter a procedure code, a description of the code is displayed to the right of it. |
| Additional information |
Enter any additional information you want to record about this incoming authorization. Note: This field appears on the collapsed authorization view. |