 User Guide — Surgery Workflow for Schedulers
athenaOne for Hospitals & Health Systems
Table of Contents
To create surgeon schedule blocks
To create a surgical preference card
To print the operating room schedule by date
To print preference cards for scheduled surgeries by date
To print an individual preference card
To create surgeon schedule blocks
- Display the Block Schedule page: On the Main Menu, click Settings
 >Schedule. In the left menu, under Practice Links — Providers, click Surgery Block Schedule.
 - Click Add new.
Specify the block details
- Name — Enter a name for the schedule block.
- Department — Click the drop-down menu and select a department.
- Room — Click the drop-down menu and select a room.
- Resource — Click the drop-down menu and select a surgeon or staff member (usually, this is a surgeon).
- Days blocked — Check the boxes for the days to block off.
- Time range — Enter the time range to block off.
- Start date — Click the calendar icon
 and select the start date.
 - End date — Click the calendar icon and select the end date.
- Release hold — Enter the number of days ahead (including weekends and holidays) that open slots within the block are released, and made available to all providers.
- Click Save or Save and Add Another.
Once saved, the selected operating room will only be bookable by the selected provider when the block applies.
Scheduling surgery
To schedule a surgery
- Display the Operating Room Schedule page: On the Main Menu, click Calendar. Under APPOINTMENTS, click Operating Room Schedule.
View the schedule by room or by surgeon
- At the top of the page, you can click the View by arrow to display the schedule by Surgeon or by Room.
- Click an open time slot.
The Patient Selection page appears.
Select the patient
- Use the fields provided to search for the patient, and select the patient from the matching list.
If no patient matches your search, click CREATE PATIENT in the top right corner of the search results box, enter the patient information in the fields provided, and click Create.
Select a visit
- Select Add case to open visit to add this surgery to the hospital visit. The Schedule case page appears.
Note: If the patient is not already checked in to a visit for this surgery, select Create new visit for this case.
Schedule the case
- Primary surgeon — Enter the primary surgeon's name.
- Additional surgeons — Enter the additional surgeons' names.
- Procedure — Enter the procedure.
- Procedure display name — You can enter another name for the procedure.
- To add another procedure for the same case, click the plus icon
 next to Procedure 1 of 1 at the top of the form.
 - Preference card — athenaOne populates this automatically if a preference card exists for this combination of surgeon and procedure.
Complete the case details
- Setup — Click the menu to select the procedure's setup time.
- Procedure — Click the menus and how long the procedure will take (required).
- Cleanup — Click the menu to select the procedure's cleanup time.
- Admission Status — Click the menu to select the admission status.
- Patient has LATEX ALLERGY — Check the box if the patient has a latex allergy.
Resources
- Room — The room is selected automatically.
- Support staff — Enter the name of the support staff.
You can click the plus icon to add another staff member.
You can click the X icon to delete a staff member.
Case notes
- Equipment requested — Enter the equipment to request.
- Notes — Enter any notes.
- Click Schedule Surgery in the top right corner.
To reschedule a surgery date or time slot
- Display the Operating Room Schedule page: On the Main Menu, click Calendar. Under APPOINTMENTS, click Operating Room Schedule.
- Click the case to reschedule.
The surgical booking window appears. - Click Reschedule.
A blue banner appears at the top of the page, prompting you to select an open time slot to reschedule the patient's case. - To select a new date, click the arrow icon
 or the calendar icon at the top of the schedule to select a new date.
 - Click an open time slot.
The rescheduled patient's case appears in the new time slot.
Note: If you select a time slot that's already booked, you can either swap the cases, or insert the rescheduled case and "bump" the previously booked case down to a later slot. athenaOne asks you to confirm your changes.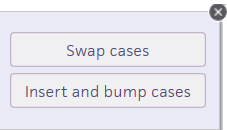
Your changes are saved automatically.
To edit surgery details
- Display the Operating Room Schedule page: On the Main Menu, click Calendar. Under APPOINTMENTS, click Operating Room Schedule.
- Click the case to reschedule.
The surgical booking window appears. - Click Edit.
The surgery case details appear. - Click reopen (at the right).
- Edit the case details as needed.
- Click Save.
To create a surgical preference card
Preference cards may be created for each procedure a provider performs. Preference cards are automatically associated with procedures at scheduling. Items on the preference card are added from available hospital inventory items.
- Display the Preference Cards page: On the Main Menu, click Settings >Billing. In the left menu, under Practice Links — Inventory, click Preference Cards.
- Under Preference Cards, click Add New.
Additional fields appear.
Enter the preference card details
- Description — Enter a unique name for the preference card (required).
- Provider — Click the text box and select the provider in the drop-down list (required).
- Procedure — Click the text box, start to enter the name of the procedure and select it in the drop-down list (required).
- Position — Enter the patient's position for this procedure.
- Instructions — Enter any instructions from the surgeon (e.g., glove size, patient preparation).
- Click Save and Add Items.
Additional fields appear.
Add and specify item details
- Item — Enter the name or inventory number of the item to add.
- Open Quantity — Enter an open quantity. You are required to enter either an open quantity or hold quantity.
- Hold Quantity — Enter a hold quantity. You are required to enter either an open quantity or hold quantity.
- Notes — Enter any notes about this item.
- Click Save to save the preference card, or click Save and Add Another to add more items to the preference card.
To add items to a preference card
You can add items from your hospital's inventory to a patient's preference card for the surgery. You can bill these items after the surgery is performed.
- Display the Preference Cards page: On the Main Menu, click Settings >Billing. In the left menu, under Practice Links — Inventory, click Preference Cards.
- Under Preference Cards, click edit for the preference card to add an item to.
Additional fields appear. - Under Items, click Add New.
Additional fields appear.
Add and specify item details
- Item — Enter the name or inventory number of the item to add.
- Open Quantity — Enter an open quantity. You are required to enter either an open quantity or hold quantity.
- Hold Quantity — Enter a hold quantity. You are required to enter either an open quantity or hold quantity.
- Notes — Enter any notes about this item.
- Click Save to save the preference card, or click Save and Add Another to add more items to the preference card.
To add or edit a preference card for a specific procedure
You can add or edit the preference card for a specific scheduled procedure. This feature is useful when a scheduled procedure requires unique instructions or supplies.
- Display the Operating Room Schedule page: On the Main Menu, click Calendar. Under APPOINTMENTS, click Operating Room Schedule.
- Click the scheduled surgery with the preference card to edit.
The surgical booking window appears.
- Click Edit.
The Edit Case page appears. - Preference card — Click EDIT.
The Case Preference Cards page appears.
Under the Procedure heading for the desired procedure
- Preference card — Click Edit.
Additional fields appear. You can complete the fields to add a new preference card, or edit an existing preference card for this procedure.
- Preference card — Enter a name for the preference card.
- Position — Enter the patient's position for the procedure.
- Instructions — Enter any instructions from the surgeon about this procedure, such as glove size, patient prep, etc.
- Click Save.
To print the operating room schedule by date
- Display the Operating Room Schedule page: On the Main Menu, click Calendar. Under APPOINTMENTS, click Operating Room Schedule.
- Click the PRINT icon
 at the top right.
The PRINT window appears. - Click the OR Schedule option.
Tip: You can click the Missing Preference Card orange arrow to view the missing preference cards for that procedure.
- Click Print.
To print preference cards for scheduled surgeries by date
- Display the Operating Room Schedule page: On the Main Menu, click Calendar. Under APPOINTMENTS, click Operating Room Schedule.
- Click the PRINT icon at the top right.
The PRINT window appears. - Click the Preference Cards radio button.
Tip: You can click the Missing Preference Card orange arrow to view the missing preference cards for that procedure. - Click Print.
To print an individual preference card
- Display the Operating Room Schedule page: On the Main Menu, click Calendar. Under APPOINTMENTS, click Operating Room Schedule.
- Click the scheduled surgery with the preference card to edit.
The surgical booking window appears.
- Click the Preference Card print icon .
To attach a document to a surgical case
You can upload and attach scanned documents to a patient's surgical case once the surgery is booked, and until the stay is closed. This allows you to attach documentation from outside athenaOne to a patient's surgical case.
- In the patient chart, click the Menu icon
 and select Add document.
- Tie to Stay — Leave this field blank.
- Tie To Surgical Case — Click the drop-down menu and select the surgical case the document is related to.
Use caution: Ensure that you select the correct surgical case. - Document Class — Click the drop-down menu and select the document class.
Additional fields appear.
Complete the relevant details, as needed
- Clinical Order Type — Enter the clinical order type.
- Observation Date And Time — Enter the time in the first text box and click the calendar icon to select the date.
- Click Choose File
- In the browse window, locate and select the document to upload, and then click Open to select the file.
- Click Save to attach the document to the selected surgical case.
To enter charges for surgery
You can enter charges for a surgery at any time after the surgery is scheduled. Doing so helps record charges both during and after the visit.
- Display the Hospital Activity Summary page: On the Main Menu, click Claims, and select Hospital Activity Summary.
- Under Visit Billing, click the total in the No Charges column.
The Visit Search bar appears on the left.
Filter the list of charges in the Task Bar
- Dept — Click the arrow and select the surgical department.
- Click Filter.
- Click Add charges for the desired patient to display the Charge Entry page in the Workspace.
Complete the charge entry fields
- Date of service — Click the calendar icon and select the date of service.
- Level of care — Click the menu and select the level of care.
- Rendering provider — Click the menu and select the rendering provider.
- Charge code — Enter the charge code.
- Description — Enter the charge code's description.
athenaOne populates the HCPCS code, Modifiers, Unit price, and Quantity fields automatically. - Click Save.
To run a perioperative report
You can run reports for your surgery department's scheduled and performed procedures, surgical schedule block utilization, and cancellations:
- Perioperative: Block Utilization
- Perioperative: Cancellation Reason Report
The Perioperative: Cancellation Report has an additional Cancellation Reason field where you can select a cancellation reason. - Perioperative: Scheduled Procedures
The Perioperative: Scheduled Procedures has an additional Procedure field where you can enter the name of a procedure.
- Display the Report Library: On the Main Menu, click Reports. Under General, click Report Library.
- Click the Schedules tab.
- Click Practice Reports.
- Click run for the perioperative report to run.
Specify the report details
- From date - To date — Click the first calendar icon and select the report start date. Click the second calendar icon and select the report end date. Alternatively, click the menu and select the time range.
- Department — Click the drop-down menu and select the department.
- Surgeon — Select the surgeon.
Select the report options
- Report Format — Select your report format.
- Report Options — Select your report options.
- Click Run Report.