 User Guide — Surgery Workflow for Surgeons
athenaOne for Hospitals & Health Systems
Table of Contents
To access the patient briefing from the Operating Room Schedule
To add a surgical H&P to a surgery case
To initiate the discharge process
User access and permissions
To access this functionality, your organization must be configured to use surgical documentation, and you must have the Inpatient Clinicals: Surgeon role.
To access the patient briefing from the Operating Room Schedule
- On the Main Menu, click Calendar. Under APPOINTMENTS, click Operating Room Schedule.
- Click a scheduled surgery.
- Click Go to Chart.
To enter a medication order
You can enter medication orders or order sets for medications for patients during perioperative care.
- Display the patient's Order Entry page: In the patient chart, click the arrow in the green workflow menu (at the upper right) and select Go to Orders. (The options available in the green workflow menu depend on your user role.)
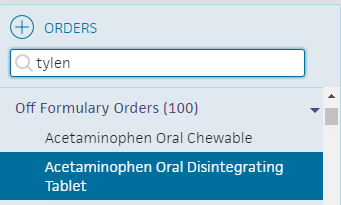
- Click the plus icon
 next to Order Entry to display the search tool.
 - Search for and select the type of medication to order. In the search results, relevant pharmacy formulary medications, as well as off-formulary meds appear.
- Click the new order form to expand the details.
- Ordering provider — Select the ordering provider, and then use the menu to the right to select how the order was given (verbal, phone, written, etc.).
- Priority — select the priority for this order:
- STAT: urgency to administer order.
- now: intended to be given within the next 30 minutes.
- routine: based on routine for that frequency in the facility. For example: twice a day.
- schedule - start first order by specific time.
Enter the sig
Note: To enter a free-text sig instead of using the structured fields, uncheck the Structured checkbox at the far right of the Sig field.
- Sig — Enter quantity, select units, and select duration from the available options.
Note: Dosage in mg allows you to set a schedule for it (for example, 10 mg every 8 hours) versus mg/hr., which allows for a continuous rate until discontinued.
Practices in Ohio and Nevada: If you practice in the state of Ohio or Nevada, new prescription orders for controlled substances and gabapentin include the Days supply field, which indicates the number of days for which a prescription should be dispensed. - PRN — Select this option for orders that will be administered as needed
Note: If PRN is checked, enter additional instructions in the Notes field.
If PRN is checked, the Priority selected for the order should be either routine or scheduled. -
First dose/Next dose — This field is calculated automatically, based on the Sig and Priority.
- If the Priority is STAT or now, this field is labeled Next dose.
- If the Priority is routine, this field is labeled First dose.
- If the Priority is scheduled, this field does not appear.
- Patient's own medication will be used — Check whether the patient's medication is to be used.
Signing orders
Note: Orders can be entered by a nurse, but must be signed by a physician, according to hospital and legal guidelines.
- To sign all orders for this patient, scroll to the top of the page and check Select all.
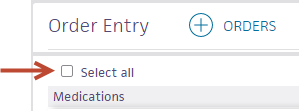
- To sign only selected orders, check the box for each order to sign.
- Click Sign Orders.
The new medication order appears in the MAR.
To add a surgical H&P to a surgery case
- Display the surgery case: In the patient briefing, under Scheduled Surgeries, click the surgery name.
- On the Surgery Case page, click the arrow in the green workflow menu (at the upper right) and select Add Surgical H&P. (The options available in the green workflow menu depend on your user role.)
The HPI stage of the Surgical H&P workflow appears. - Click the plus icon next to Chief Complaint.
- Search for and select the reason for the surgery.
The reason you select appears in the Chief Complaint section. - Click the plus icon next to History of Present Illness.
- Enter a finding or select a template from the menu.
- Click the finding and select the patient's symptoms.
You can click these options:- All Normal at the top of the illness to indicate the patient isn't showing any symptoms.
- Normal at the bottom of each section to mark all the symptoms as normal.
- Clear at the bottom of each section to clear the changes you've made.
- Click Next.
The ROS stage of the Surgical H&P workflow appears. - Click the plus icon next to Review of Systems.
- Enter a finding or select a template in the drop-down list.
- Click All Normal or click a header to record the patient's symptoms.
- Click Next.
The Hx stage of the Surgical H&P workflow appears. - Click the plus icon next to a section to document, as necessary:
- Problems
- Surgical History
- Home Medications
- Allergies
- Vaccines
- Family History
- Social History
- Click Next.
The PE stage of the Surgical H&P workflow appears. - Click the plus icon next to Physical Exam.
- Enter a finding or select a template in the drop-down list.
- Click All Normal or click a header to record the patient's symptoms.
- Click Next.
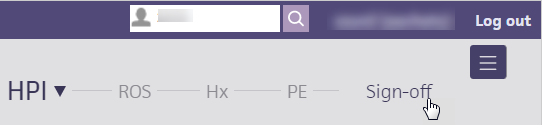
The Sign-off stage of the Surgical H&P workflow appears. - Review the summary and click Sign Note.
Note: The timestamp appears just below the Sign Note button.
You can click the timestamp to update the date and time, provided that the date you enter is within 30 days of the current date. When you update a timestamp, the note is marked "Late entry."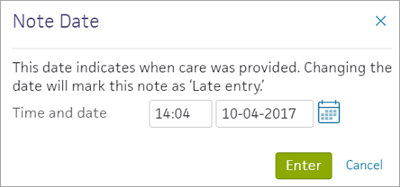
To amend a surgical H&P
- Display the surgery case: In the patient briefing, under Scheduled Surgeries, click the surgery name.
- Under Notes, click Surgical H&P.
- Click Sign-off on the surgical H&P navigation bar.
- Scroll to the bottom of the summary and click the plus icon next to ADDENDUM.
The Addendum text box appears. - Enter the information you need to add, indicating changes or no changes to the patient's condition, or other notes, as necessary.
- Click Sign Addendum.
To add an operative note
Users with the Inpatient Clinicals: Surgeon role can add operative notes to the surgical case. This structured note helps to maintain compliance with Joint Commission requirements. Including additional structured data about surgeries facilitates billing and helps hospitals produce reports.
- Display the surgery case: In the patient briefing, under Scheduled Surgeries, click the surgery name.
- In the green workflow menu, click Add Operative Note .
Performed Procedures
-
Performed Procedures — Click the plus icon
, enter the name or CPT code for the procedure, and select it from the matching list.
Operative Diagnoses
-
Preoperative diagnosis — Click the plus icon
, enter the name of the diagnosis, and select it from the matching list. -
Postoperative diagnosis — Click the plus icon
, enter the name of the diagnosis, and select it from the matching list.
The preoperative diagnosis appears as the first suggestion, but you can search for and select other diagnoses.
Operative Note
-
Operative note — Enter a brief or long operative note.

Tip: You can enter a period (".") followed by the shortcut name to search for previously saved content. To save your entry for later use, click the star icon to the right of the text box and enter a shortcut name.
 - Click Sign Note. The operative note appears under Notes for the surgical case, under Recent Notes in the patient's briefing, and in the Notes tab in the patient chart.
Note: The timestamp appears just below the Sign Note button.
You can click the timestamp to update the date and time, provided that the date you enter is within 30 days of the current date. When you update a timestamp, the note is marked "Late entry."
Discharging surgical patients
Any member of the care team can initiate the discharge process. Nurses must select the Ordering physician, and may enter the Final diagnoses, Condition, and Disposition if given a verbal order to do so by the ordering physician.
To initiate the discharge process

- Display the patient's Discharge tab: In the patient chart, click the arrow in the green workflow menu (at the upper right) and select Go to Discharge. (The options available in the green workflow menu depend on your user role.)
Record discharge order information
- Click Discharge Order.
- Ordering physician — Select the ordering physician. (This field appears for nurses only.)
- Final diagnosis — Search for and enter a final diagnosis.
- Condition — Enter the patient's condition the time of discharge.
- Disposition — Select the disposition of the patient after discharge.
To create or edit discharge orders

As part of the discharge process, nurses can enter diagnoses and orders, and reconcile medications if given a verbal order to do so by the ordering physician. Only physicians can sign orders.
- Display the patient's Discharge tab: In the patient chart, click the arrow in the green workflow menu (at the upper right) and select Go to Discharge. (The options available in the green workflow menu depend on your user role.)
- Click Post-Discharge Orders.
- Order Entry — Search for and select orders. If given a verbal order, a nurse can search for and select orders.
Tip: To order referrals, search for "referrals" and include summaries of care. You can search for "after your visit" to locate patient education orders.
Note: Some order types may require a diagnosis. -
To mark an order as not given, click Not Given when, for example, the patient refused the order, or a medication wasn't available. This action ensures that quality measures are not affected negatively.
You must then select a reason for not giving the order.
You can also include a note to the patient and an internal note.
Orders marked as Not Given are listed in the Medications Not Given section of the Discharge Summary, but not in the medication list or the Patient Portal. This ensures that the patient does not accidentally view an order or take a medication that was explicitly refused.
Reconcile the medications list
- If the Reconcile medications for discharge link is visible, click this link to review the patient's home and inpatient medications.
The patient's home medications are listed on the left, inpatient medications are listed in the center, and the discharge medication list appears on the right. - For each medication on the list, use the arrow icon to indication continue
 or use the X icon
  to discontinue upon discharge. The list of home medications marked continue produces the Discharge Home Medications list.
 - Click Reconcile Medications to create the Discharge Home Medications list.
(All medications in the list must be acted upon before the button appears green.) - Discharge Home Medications — Review the list of medications to be continued upon discharge. Click a medication to view or edit the details, or to remove it from the list.
Note: In the patient's chart, the medications flowsheet will reflect the changes made when medications are reconciled.
To create or edit the discharge instructions

The care team outlines future steps for the patient or next care facility to ensure the patient's well-being after discharge.
Note: Nurses can sign discharge instructions.
- Display the patient's Discharge tab: In the patient chart, click the arrow in the green workflow menu (at the upper right) and select Go to Discharge. (The options available in the green workflow menu depend on your user role.)
- Click Discharge Instructions.
- Nursing summary of care — Enter the nursing summary of care.
- Patient goals — Enter the patient goals.
- Patient instructions — Enter the patient instructions.
- Portal Registration — You can register the patient for the Patient Portal, if the patient consents.
Note: After discharge, patients registered for the Patient Portal can access their summary of care record on the My Health page of the Patient Portal. - Click Enter Instructions.
To review the discharge summary and close the stay

The care team summarizes for the patient why he or she was hospitalized and what was done.
The patient discharge instructions and the discharge summary documents are created automatically using information recorded during the hospital stay.
You can generate letters to go home with the patient, to send to another care provider, or to print a comprehensive discharge summary.
- Display the patient's Discharge tab: In the patient chart, click the arrow in the green workflow menu (at the upper right) and select Go to Discharge Plan. (The options available in the green workflow menu depend on your user role.) Alternatively, in the patient chart, click the Discharge chart tab at the left side of the page.
- Click Summary in the navigation bar at the top of the page.
- Letters — Click the Letters plus icon to display the Add Letter form, complete the fields provided, and select a delivery option.
If the patient has Patient Portal access, you can select Close and Email Patient. athenaOne may close certain Patient Care Summaries when you sign and approve them, so they do not appear in the Clinical Inbox unnecessarily.
Note: athenaOne automatically generates and sends the Summary of Care Record (SCR) via DIRECT to the Primary Care Physician (PCP) and Receiver Facility on record when you complete discharge and click Discharge Complete. The patient can access the Summary of Care record on the My Health page of the Patient Portal. - Click Done to complete the Discharge Plan.
Note: The discharge plan stays open until all steps are signed.
After discharge, patients registered for the Patient Portal can access their summary of care record on the My Health page of the Patient Portal. - After the patient leaves the hospital, on the patient briefing, enter the date and time that the patient left, and click Discharge Complete to close the stay. This removes the patient from the Patient List (or Tracking Board).

Note: If the patient has Patient Portal access, athenaOne automatically moves signed Patient Information orders and Patient Care Summaries from Review status to Notify by Portal status, and to Close status for other patient correspondence.
If the patient does not have Patient Portal access and the Paper option is selected in the Patient care summary and patient letter delivery preference field (under the Registration Information heading) on the Quickview, you should select Close manually.