Missing Slips
athenaOne for Hospitals & Health Systems
The Missing Slips worklist and the Missing Slips page display the list of checked-in appointments for which no claim has been created or which have not been updated as "not requiring charge entry."
The Missing Slips worklist has a color-based icon on each missing slip card to indicate the new Encounter status. The following color icons were added:
-
(Pre-existing) Green — Provider Review Complete
-
Blue — Encounter Closed, which can appear both by itself and alongside the Green (Provider Review Complete) icon
-
(Pre-existing) Purple — Saved on Charge Entry, which overrides the other two icons
 How do I get to this page?
On the Main Menu, click Claims and then click Workflow Dashboard. In the Workflow Dashboard, click any linked number in the Missing Slips column.
On the Main Menu, click Claims > Claims Worklists. The View Claims Worklists appear in the Task Bar, with links to worklist categories. Under Missing, click any link.
User access and permissions
To access this page, you must have these permissions: Edit Claims, Workflow Dashboard Access, and Claim Navigation Worklist.
Step-by-step instructions
To filter the Missing Slips worklist
- Display the Missing Slips worklist: On the Workflow Dashboard, click any linked number in the Missing Slips column.
By default, the list is sorted by provider name. - To sort the Missing Slips worklist by department, click the Department link.
- To filter the worklist, click Edit.
Additional fields appear. - Appointment Status — Select Checked In or Checked Out.
- Encounter Status — Select Open, Closed, Deleted, or No Encounter.
Note: A blue bar on a missing slip means the encounter is closed, which can appear both by itself and alongside the green bar (for Provider Review Complete) on the Claim Billing tab. - Provider Review — Select Complete or Incomplete.
Note: This field is available only for practices that use athenaClinicals. With athenaClinicals, a green bar on a missing slip means that it was marked as "Reviewed by provider" on the Claim Billing tab. - Charge Entry Status — Select Unsaved or Saved.
- Department — Click Selected and then select one or more departments.
- Provider — Click Selected and then select one or more providers.
- Dates of Service — Set from and to dates. You can enter dates manually or use the date picker.
- Click Filter.
To display advanced filters on the Missing Slips page
- Display the Missing Slips worklist: On the Workflow Dashboard, click any linked number in the Missing Slips column.
- Click Edit.
Additional fields appear. - Click Advanced filter.
The Missing Slips page opens in the Workspace. - Appointment Status — Select Checked In or Checked Out.
- Encounter Status — Select Open, Closed, Deleted, or No Encounter.
Note: A blue bar on a missing slip means the encounter is closed, which can appear both by itself and alongside the green bar (for Provider Review Complete) on the Claim Billing tab. - Provider Review — Select Complete or Incomplete.
Note: This field is available only for practices that use athenaClinicals. With athenaClinicals, a green bar on a missing slip means that it was marked as "Reviewed by provider" on the Claim Billing tab. - Charge Entry Status — Select Unsaved or Saved.
- Department — Click Selected and then select one or more departments.
- Provider — Click Selected and then select one or more providers.
- Date of service — Enter or select a date range for the missing slips.
- Appointment type — Click Selected and then select one or more appointment types.
- Day of week — Click Selected and then select one or more days of the week.
- Click Filter.
To return to the Missing Slips worklist from the patient chart
- Display the Missing Slips worklist: In the Workflow Dashboard, click any linked number in the Missing Slips column.
- Click a patient appointment in the worklist.
The Checkout page for the appointment appears in the Workspace. - Display the patient chart: On the Patient Actions Bar, click Clinicals, and then click Chart.
Note: You can also click a document link in the Checkout page. - To return to the Missing Slips worklist, click the Return to Missing Slips Worklist button at the top right of the page.
athenaOne displays the worklist in the left panel, focused on the patient you're reviewing. The Checkout page you were working on appears in the center panel.
Features and workflows
The Missing Slips worklist and page display the number of checked-in appointments for which no claim has been created or which have not been updated as "not requiring charge entry."
Note: Color-based icon on each missing slip card to indicate the new Encounter status on the Claim Billing tab:
-
If your practice uses athenaClinicals, a green bar indicates that the missing slip was marked reviewed by the provider
-
A blue bar on a missing slip means the encounter is closed, which can appear both by itself and alongside the green bar (for Provider Review Complete)
-
A purple bar means save on Charge Entry, which overrides the other two icons
Appointments appear in the Missing Slips worklist only if:
- The Missing Slips Worklist option is selected on the Providers page for the provider.
- The Billing slip required option is set to Yes on the Appointment Types page for the appointment.
Note: By default, athenaOne creates a billing slip for each appointment for the same patient on the same day. If you want athenaOne to create a billing slip only for the first of multiple appointments, contact the CSC from athenaOne by clicking Support > Success Community. In the Support Cases section, click Contact Client Support Center.
Best Practice: Enter charges daily after services are performed (within 3 days of service).
Save Progress While Creating Claims on Charge Entry
You can display a saved draft of a claim, make edits, save your progress, and return later to finalize your updates without losing your place.
- Access saved drafts of claims from the:
- Missing Slips worklist or
- Today's Appointments worklist (or section of the homepage)
- The Missing Slips worklist updates to show you when an draft claim was saved with pending changes.
- When you return to enter charges via the Missing Slips or Today's Appointments worklists, you'll skip the Billing Tab and see all your saved information on the Charge Entry page so you can pick up where you left off.
To save your progress while updating an appointment
You can save your progress when entering charges from the Missing Slips or Today's Appointments worklists and return later to finish your update.
Enter information and save progress
After you enter, or remove, information in the fields of the Charge Entry page via your usual workflow, you can click the Save Changes button located at the bottom of the page that allows you to save entered or edited information as a draft.
Important: Any information you enter into the Claim Note field is not saved.
When you click the Save Changes button, the page refreshes, which saves the information.
Note: The Create Claim button becomes inaccessible, and a spinning circle icon appears in the Save Changes button.
Then, a message appears near the top of the page. As well as next to the Save Changes button, with the time of the last save and who saved it.
After saving your progress, you can navigate away from the page and return to enter charges on that appointment via the Missing Slips workflow or Today's Appointment worklist (because a claim wasn’t created yet).
Return to work in progress
On the Missing Slips worklist
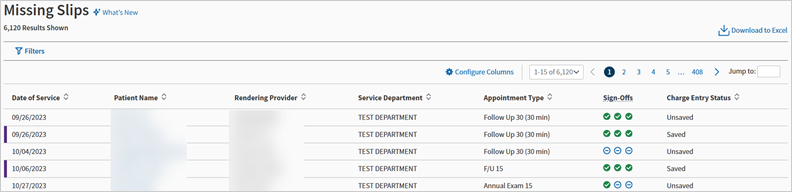
On the Missing Slips, saved progress is indicated with a purple color on left side of the box in the respective worklists.
Note: If progress is saved the color turns purple even if the color had been green (which indicates that the linked tab was reviewed).
You can hover over the purple bar to see a message stating the time of the last save and who saved it.
When clicking into an item on the worklist with a saved draft, you will go directly to Charge Entry, skipping the Billing Tab, and your saved information displays automatically. You can then continue to enter data before creating the claim, or save your progress again if needed.
On the Today's Appointment worklist
On the Today's Appointment worklist you can only return to Charge Entry for appointments at the checkout stage.
From the Today's Appointment worklist, you can click the name of any patient that has an appointment at the checkout stage to display Charge Entry.
This is a useful entry point to your saved draft of a claim if you are making claims with current encounters.
Field Reference
| Missing Slips Worklist | |
|---|---|
| Status |
Select Reviewed by provider or Requires provider review. |
| Department | Click Selected and then select one or more departments. |
| Provider | Click Selected and then select one or more providers. |
| Missing Slips page (includes advanced filters) | |
|
Appointment Status |
Select Checked In or Checked Out. |
| Encounter Status | Select Open, Closed, Deleted, or No Encounter. Note: A blue bar on a missing slip means the encounter is closed, which can appear both by itself and alongside the green bar (for Provider Review Complete) on the Claim Billing tab. |
| Provider Review |
Select Complete or Incomplete. Note: This field is available only for practices that use athenaClinicals. With athenaClinicals, a green bar on a missing slip means that it was marked as "Reviewed by provider" on the Claim Billing tab. |
| Charge Entry Status | Select Unsaved or Saved. |
| Department | Click Selected and then select one or more departments. |
| Provider | Click Selected and then select one or more providers. |
| Date of service |
Enter or select a date range for the missing slips. |
| Appointment type | Click Selected and then select one or more appointment types. |
| Day of week | Click Selected and then select one or more days of the week. |
| Missing Slips page, column headings | |
| Slip | Missing slip number. |
| Date of service | Date of service for the appointment. |
| Patient Name | Name of the patient on the missing slip. |
| Department |
Department of service for the appointment. |
| Provider |
Provider associated with the appointment with the missing slip. |
| Appointment Type |
Type of appointment associated with the missing slip. |
| Day of Week |
Day of the week for the appointment with the missing slip. |
Enhanced Missing Slips Task List for athenaOne
This feature applies to practices on athenaOne.
Note: This feature is not available for practices that utilize athenOne for Hospitals & Health Systems or the Medical Coding service.
The enhanced Missing Slips Task List is now available for billers, coders, and practice managers to work their tasks:
-
Personalize your list - quickly access the tasks you need by saving preferred filters, sorting, and column settings.
-
Improved usability — You're routed directly to a full task list, which helps you prioritize your missing slips prior to working them.
-
Quicker reference — Status indicators for encounter and check out to clearly show if the provider and front desk have completed their work.
-
Filter by Patient ID and Payer.
-
Option for patient focus — Hyperlink to a patient's missing slips from the patient action bar.
Overview
We are replacing the existing Missing Slips Worklist with a new enhanced Missing Slips Task List that provides greater visibility into which missing slips need claims created.
This update provides athenaOne practices multiple enhancements, including:
-
Enhanced visibility into what missing slips need to have claims created, so that you can organize you work based your priorities.
- Method of claim creation tells you if the missing slip can have a claim created with Automatic Claim Creation, or if Automatic Claim Creation was disabled due to an error.
-
Status of a missing slips indicates if claim creation is blocked
-
Action needed tells you why Automatic Claim Creation experienced an error when it initially attempted to create a claim.
-
Views help you quickly access the tasks you need. Save your preferred filters, sorting, and column settings so you can get back to your workflow in one click. What you can do with Views:
-
Switch between pre-configured views for common workflows
-
Create custom views tailored to your needs
-
Save your favorite column layouts, filters, and sort orders
-
Note
When a provider or department is deleted in athenaOne, the missing slips associated with that provider or department are automatically moved to the Missing Slips Archive. You can find these by clicking Go to Missing Slips Archive, clearing the Service Date filter, then filtering by the provider or department.
What improvements will you experience immediately?
-
Improved usability — You're routed directly to a full list, which helps you prioritize your missing slips prior to working them.
-
Additional insight into Automatic Claim Creation status with indicators telling you if the missing slips had Automatic Claim Creation enabled, what triggers remain, and why Automatic Claim Creation experienced an error.
-
Pre-configured views to instantly apply filters, sorts and column layouts
-
Customize your task list and save it as a View.
-
Adjust your settings – Choose which columns to display, apply filters, and set your preferred sort order
-
Click Save as new view — Give your view a descriptive name
-
Access anytime – Your view will appear in the views list for quick access
Tip
Start with an existing view and modify it to save time.
-
-
Modify your view
- Select the view you want to modify
-
Make your changes to filters, columns, or sorting
-
Click Save to update the view, or Save as new view to create a copy
Note
Pre-configured views cannot be edited, but you can save them as a new view with your modifications.
-
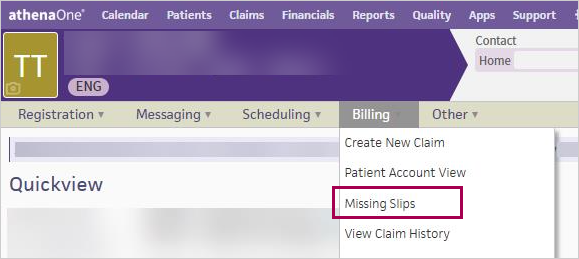
Go to Missing Slips from the Patient Actions bar on pages like Quickview: In Patient Actions bar, click Billing > Click Missing Slips. This route brings you to the new task list filtered by the Patient ID.
-
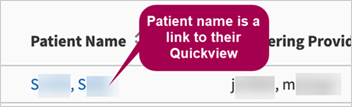
Patient names are linked to their Quickview, which lets you quickly access the patient's Quickview page.
-
Archiving missing slips with DOS over two years ago.
-
Departments you don't have access to are restricted.
What remains the same?
-
The Missing Slips Task List and page display the number of checked-in appointments for which no claim has been created or which have not been updated as "Not requiring charge entry".
-
Navigation to the page from the non-clinician homepage, workflow dashboard, and claims worklists.
-
Tasks appear in the Missing Slips Task List only if:
-
The Missing Slip option is selected on the Providers page for the provider.
-
The Billing slip required option is set to Yes on the Appointment Types page for the appointment.
-
-
When you select a row in the full page view, a side panel will appear so you can work down your prioritized list.
Display the enhanced Missing Slips Task List
To display the enhanced Missing Slips Task List
-
Non-Clinician Inbox > Missing Slips
-
Claims > Workflow Dashboard > Missing Slips
-
Claims Worklist > All Departments
-
Claims Worklist > Current Service Department
-
Patient Quickview > Patient Actions Bar > Billing > Missing Slips
Note
Missing Slips appears in the Patient Actions bar on several pages, not just Quickview. The Patient Actions bar appears on pages where actions related to a specific patient need to be performed. Its visibility and options depend on the page and user permissions.
User access and permissions
To access the Missing Slips Task List, you must have these permissions:
-
Edit Claims
-
Workflow Dashboard Access
-
Claim Navigation Worklist
Which permissions does the feature comply with?
| Permission | Description |
|---|---|
| Record access restricted patients |
|
| Provider access restrictions |
|
| Department Login Permissions |
|
Using the enhanced Missing Slips Task List
Note
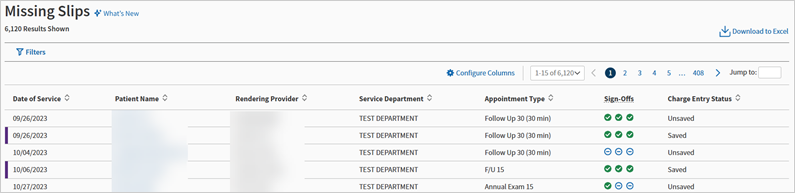
The purple bar on the left indicates that the Charge Entry page was saved, this matches the current behavior of the task list
On the enhanced Missing Slips Task List, you can:
| Functionality | Image |
|---|---|
| Go to Missing Slip — Select anywhere on the row, except the linked patient name, to navigate you to the Missing Slip (Charge Entry or Check Out). |

|
|
Go to Quickview — Patient names are linked to their Quickview, which lets you quickly access the patient's Quickview page if occasionally you need to check information prior to claim creation.
|
|
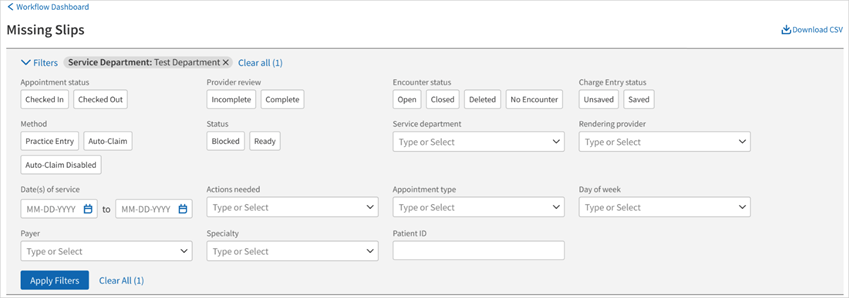
| Expand or collapse the Filters section. | Expanded
|
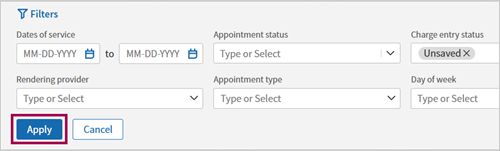
| Click Apply to filter the table. |
|
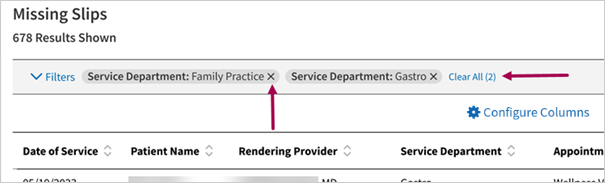
| Remove filters by clicking the X next to individual filters or click Clear all. |
|
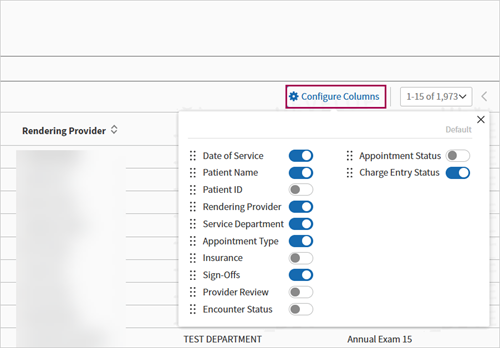
| Click Configure Columns to set which columns appear. The columns you select now persist when you return to the page, your previously configured columns will remain in place, saving you time and effort. |
|
|
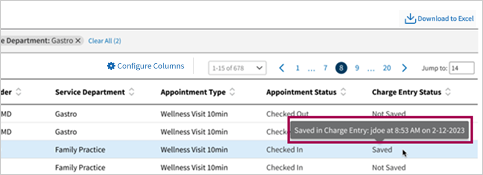
Hover over the status columns to see who checked the appointment out or saved charge entry and when.
|
Appointment status message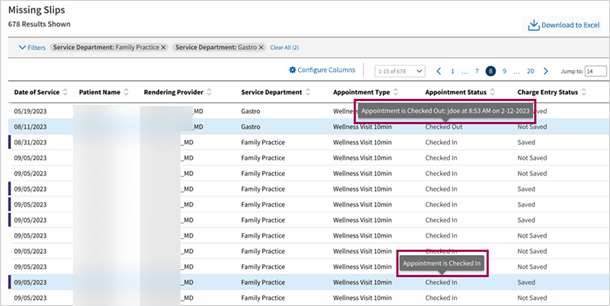 Charge entry status message |
|
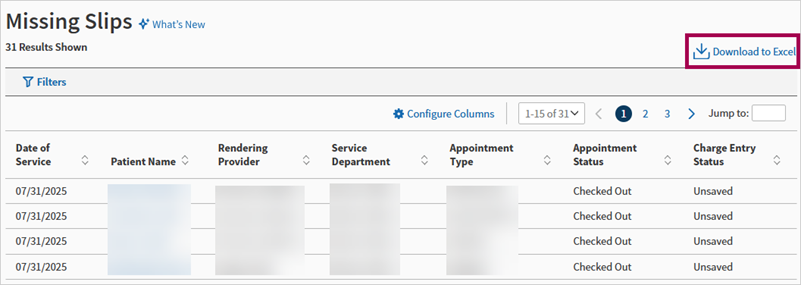
Downloading excel:
|
|
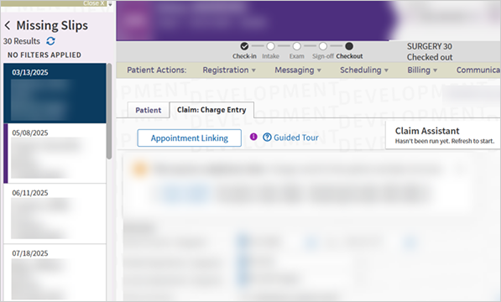
| By clicking an entry in the Missing Slips Task List, you'll go to either the Charge Entry or Checkout page (whichever is the next step). At that point is when the Missing Slips Task Bar appears. |
|
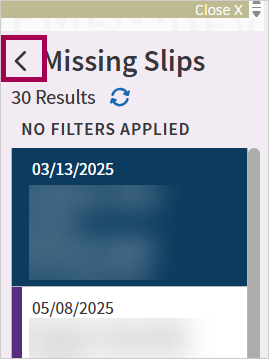
| Return to the full task list to adjust your filters, select the back arrow in the list on the left side of the screen. |
|
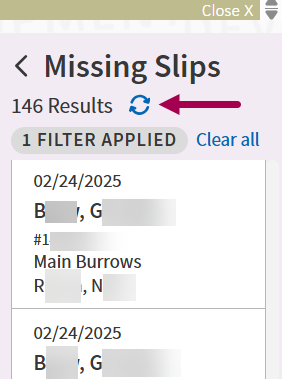
| Refresh your list to remove completed items, select the refresh button at the top of the page. |
|
|
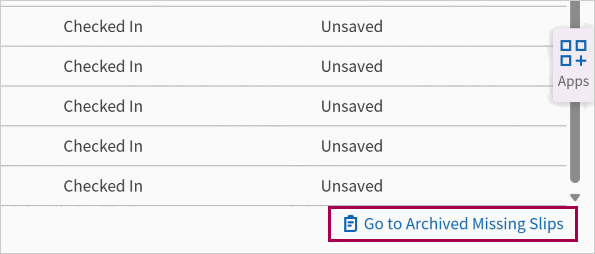
Archiving missing slips over two years old and deleted providers or departments:
|
|
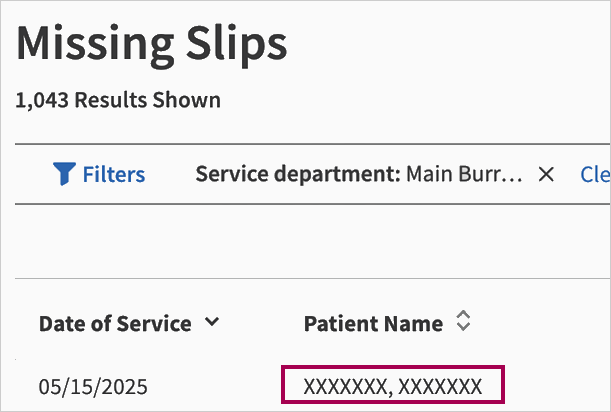
| Blocked patients are redacted if you don't have access to blocked patients. |
|
| The By Provider link in the View Claim Worklist side panel will no longer be available. To view a provider as a group, use the Provider filter options on the Missing Slips Task List. | n/a |
| When using your browser's Find functionality in both the Task Bar and the Missing Slips Task List: be aware that since there are now page numbers in these locations, the Find functionality only searches the page currently opened. | n/a |
| In some cases, a Missing Slip may not immediately close or update after you take action, such as completing billing or creating a claim. These items are automatically reviewed by an overnight reconciliation job and will be cleaned up without additional action. | n/a |
Note
You can switch between the new and old Missing Slips Task List, and set the old version as your default if needed. Click Set Default to Old Version.
Filters field reference
| Filter | Description |
|---|---|
| Dates of service | The specific dates when the healthcare services were provided to the patient. |
| Appointment status | Can be Checked-in or Checked out |
| Provider review | Occurs on the billing tab |
| Encounter status | Can be Open, Closed, or No encounter |
| Charge entry status | Either Saved or Unsaved |
| Service department | Is treated differently depending on the practice |
| Rendering provider | The healthcare professional who actually provided the service or treatment to the patient. |
| Appointment type | The classification of the appointment. |
| Day of week | Refers to the specific day on which an event occurs, typically represented by named days (e.g., Monday, Tuesday). |
| Payer | Refers to Insurance Reporting Category |
| Patient ID | A unique identifier assigned to each patient. It is the local ID, not the Enterprise ID |
| Method | Indicates how the claim will be created - manually by the practice or with Automatic Claim Creation. Also indicates if Automatic Claim Creation errored and was disabled |
| Actions needed | Indicates what data is missing |
Enhanced Missing Slips Task List for athenaCollector
Who can use this feature?
This feature is applicable to practices that only have athenaCollector.
This means that:
If even a small portion of departments are using athenaClinicals but the rest are not, it is still not available. It’s only applicable if the entire practice does not have athenaClinicals.
Overview
We are replacing the Missing Slips work list with a new enhanced view that gives you more visibility into what missing slips need to have claims created.
We're making this change because you requested it.
What improvements will you experience immediately?
These are the improvements to the Missing Slip process:
-
Improved usability — You're routed directly to a full task list, which helps you prioritize your missing slips prior to working them.
-
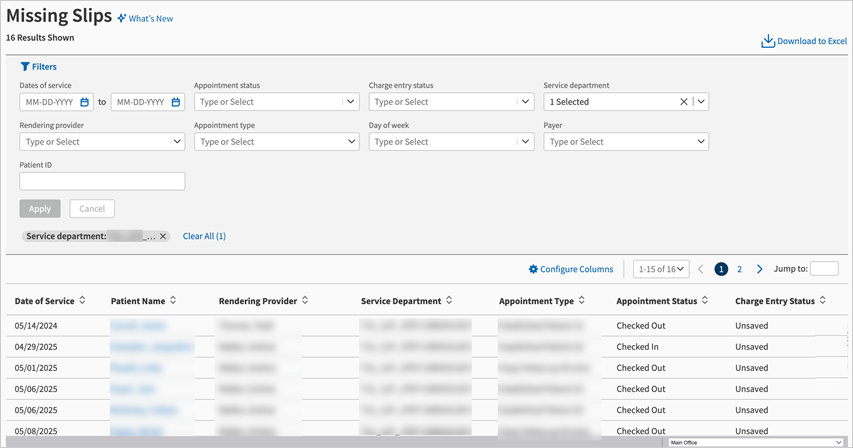
More Focused layout – Missing slips fields that are tailored to your practice.
-
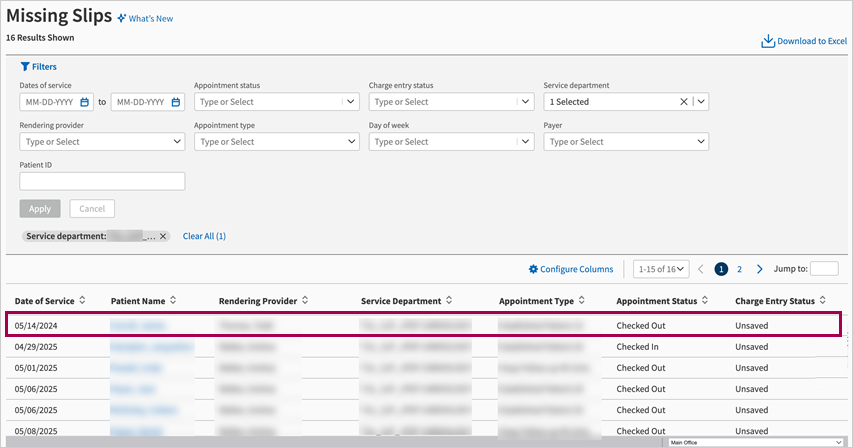
Select the row to go to the missing slips.
-
Patient names are linked to their Quickview, which lets you quickly access the patient's Quickview page
-
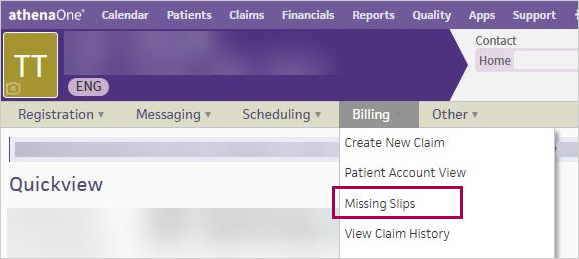
Go to Missing Slips from the Patient Actions bar on pages like Quickview: In Patient Actions bar, click Billing > Click Missing Slips.
Note
This route brings you to the new task list filtered by the patient ID. -
Archiving missing slips with date of service (DOS) over two years ago.
What remains the same?
-
The Missing Slips task list and page display the number of checked-in appointments for which no claim has been created or which have not been updated as "not requiring charge entry."
-
Appointments appear in the Missing Slips task list only if:
-
The Missing Slips Task List option is selected on the Providers page for the provider.
-
The Billing slip required option is set to Yes on the Appointment Types page for the appointment.
-
-
When you select a row in the full page view, a side panel will appear so you can work down your prioritized list.
Using the enhanced Missing Slips task list
Note
The purple bar on the left indicates that the Charge Entry page was saved, this matches the current behavior of the task list.
On the enhanced Missing Slips task list, you can:
| Functionality | Image |
|---|---|
| Go to Missing Slip — Select anywhere on the row, except the linked patient name, to navigate to the Missing Slip (Charge Entry or Check Out). |
|
|
Go to Quickview — Patient names are linked to their Quickview, which lets you quickly access the patient's Quickview page if occasionally you need to check information prior to claim creation.
|
|
| Expand or collapse the Filters section. | Expanded
|
| Click Apply to filter the table. |
|
| Remove filters by clicking the X next to individual filters or click Clear all. |
|
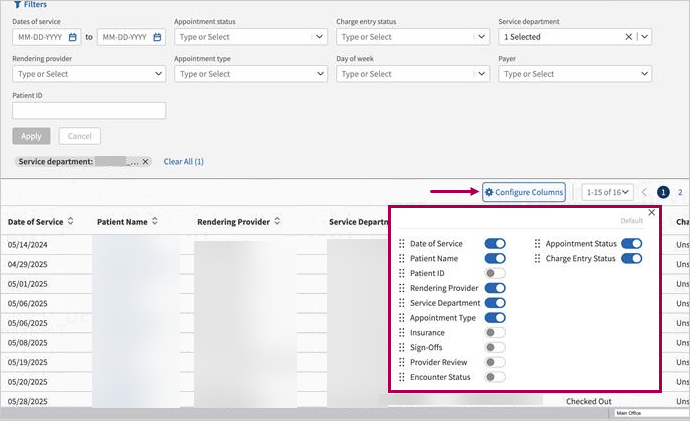
| Click Configure Columns to set which columns appear. The columns you select now persist when you return to the page. Your previously configured columns will remain in place, saving you time and effort. |
|
|
Hover over the status columns to see who checked the appointment out or saved charge entry and when.
|
Appointment status message Charge entry status message |
|
Downloading excel:
|
|
| Go to Checkout or Charge Entry and see information about the record you selected in the list on the left side of the screen. |
|
| Return to the full task list to adjust your filters. Select the back arrow in the list on the left side of the screen. |
|
| Refresh your list to remove completed items. Select the refresh button at the top of the page. |
|
|
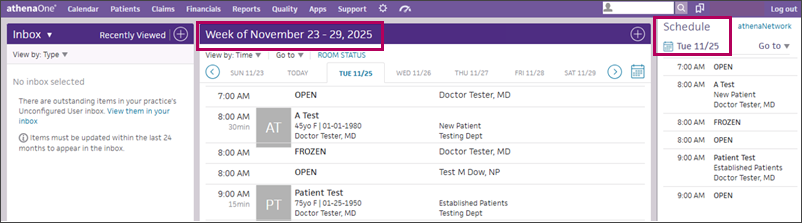
Archiving missing slips with DOS over two years ago:
|
|
Display the enhanced Missing Slips task list
To display the enhanced Missing Slips task list:
-
Non-Clinician Inbox > Missing Slips
-
Claims > Workflow Dashboard > Missing Slips
-
Claims Worklist > All Departments
-
Claims Worklist > Current Service Department
-
Patient Quickview > Patient Actions Bar > Billing > Missing Slips
Missing Slips task list now appears in the Patient Actions bar.
Note
Missing Slips appears in the Patient Actions bar on several pages, not just Quickview. The Patient Actions bar appears on pages where actions related to a specific patient need to be performed. Its visibility and options depend on the page and user permissions.
Which permissions does the feature comply with?
| Permission | Description |
|---|---|
| Record access restricted patients |
|
| Provider access restrictions |
|
| Department Login Permissions |
|