OB Episode
This page is accessible if your practice has the OB practice setting enabled. It allows you to create, view, and update an OB episode. For non-athenaClinicals practices, the OB Episode page allows you to create, view, and update an OB episode.
- Display the OB Episode page: On the Quickview, under the OB Episodes heading (at the bottom of the page), click Add episode.
- Episode Department — Select the department of service for the episode.
- Initial Date — Enter or select the date of the initial visit.
- EDD Date — Enter or select the estimated date of delivery.
- Weeks Gestation at Initial — Enter the patient's number of gestation weeks on the date of the initial visit.
- Initial Planned Delivery Site — Select the planned delivery site.
- Gravity — Select the number of pregnancies the patient has had.
- Parity — Select the number of deliveries the patient has had.
- Problems — Enter any problems or issues for the OB episode.
- General Notes — Enter any notes for the OB episode.
- Click Save. A confirmation message appears.
- Click Continue to return to the patient Quickview.
The OB episode appears on the Quickview under the OB Episodes heading at the bottom of the page.
- Display the OB Episode page: On the Quickview, under the OB Episodes heading (at the bottom of the page), click the link for an existing OB episode.
- Edit fields as needed.
- Click Save.
A confirmation message appears. - Click Continue to return to the patient Quickview.
The updated OB episode appears on the patient Quickview under the OB Episodes heading at the bottom of the page.
- Display the OB Episode page: On the Quickview, under the OB Episodes heading (at the bottom of the page), click the link for an existing OB episode.
- Billed? — Select Yes from the menu.
- Click Save.
A confirmation message appears. - Click Continue to return to the patient Quickview.
- Display the patient chart: On the Patient Actions Bar, click Clinicals, and then click Chart.
- Click the History tab on the left side of the page.

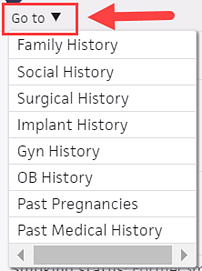
- At the top of the History section, click the Go to menu
 and select Past Pregnancies.
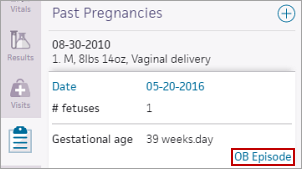
A list of past pregnancies appears. - Click a past pregnancy to display the details.
- If a closed OB episode is associated with this pregnancy, click the link to display the OB episode.

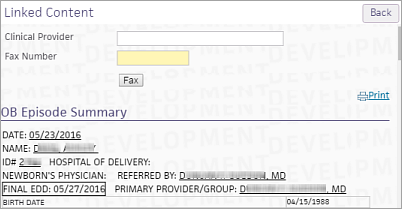
The OB episode appears in a new window. - To print or fax the OB episode, click the Print/Fax OB Episode Form link at the top right of the window.
The print/fax window appears.
- To print the OB episode, click the
 Print link.
 - To fax the OB episode:
- Clinical Provider — Enter the name of the clinical provider to whom you are faxing the OB episode (optional).
- Fax Number — Enter the fax number.
- Click Fax.
- Click Back to close the print window.
What is an OB episode?
athenaOne refers to the clinical and billing time period of a patient's pregnancy as an OB episode; the OB episode is a mechanism to track OB enrollments and information about clinical outcomes. Enrollment, EDD, and delivery reports organize information captured in the OB episode. Once saved, OB episode information is available for reporting. You can report on three main items: enrollment, EDD, and deliveries.
OB episode and athenaClinicals
In the patient chart, click the Menu icon ![]() and select Start OB episode. To view and edit an existing OB episode, click Pregnancy Problems in the Problems tab of the patient chart.
and select Start OB episode. To view and edit an existing OB episode, click Pregnancy Problems in the Problems tab of the patient chart.
Note: To help you care for your transgender and nonbinary patients, the Start OB episode option is available when the Assigned sex at birth field is set to any of these values: Female, Choose not to disclose, or Unknown.
After you create an OB episode, the patient banner displays the following information about the episode: gravidity and parity, duration of pregnancy expressed as "weeks.days," estimated date of delivery (EDD), and blood type.
Note: If your practice has different chart sharing groups, the OB episode information appears only when viewing the patient chart with the open OB episode.
The top section of the OB Episode tab is used to track initial information about the pregnancy and to estimate the patient's EDD. After the initial data is saved, the Prenatal Flowsheet section also appears in the OB Episode tab.
After this information is completed and the OB episode is closed, the Past Pregnancies section and Obstetric History section of the patient's chart are automatically updated according to the OB episode outcome.
Note: When a provider orders a RhoGam injection (using any order type that is considered RhoGam), an entry appears on the Results section of the patient's OB Episode tab indicating the date of the injection. This information also prints on the OB Episode form.
If your practice has both athenaClinicals and the OB Episode tracking feature enabled, the two pieces of functionality share much of the same data.
The following fields are auto-populated with data from the OB page in the patient chart:
- Episode Department
- Initial Date
- EDD Date (based on the Final EDD indicated in the patient chart, not the estimated EDD)
- Weeks Gestation at Initial
When the clinical OB episode is closed (from the patient chart), the revenue cycle OB Episode is also closed, and the link in the patient's Quickview is updated to indicate that the episode is closed.
Note: The OB Episode: EDD List Generation report includes patients only when the Final EDD field is filled in on the OB episode. OB episodes with an autocalculated Final EDD date that have not been saved do not appear in the report. The Final EDD date must be saved or manually entered for the patient to appear in the OB Episode: EDD List Generation report.
At the top of the OB Episode tab is a link to Print/Fax OB Episode Form. This form includes information from the patient level, the episode level, and even the encounter level. Click the link to view the form, and then click Print to print a copy of the form.
To determine which forms should be printed, you can use the OB reports. Using the OB Episode: EDD List Generation page, you can identify all patients due to deliver in a certain time frame. In that way, you can determine which patients need a form printed and sent to the hospital.
The OB Episode form (similar to the ACOG Antepartum Record) can be automatically faxed to an outside clinical provider (e.g., the Labor and Delivery floor of the hospital).
- In the OB Episode tab in the patient chart, click the Print/Fax OB Episode Form link at the top of the page.
- To select the fax destination, enter the hospital name in the Clinical Provider search field. The fax number for that clinical provider (if available) is filled in.
- Click Fax to send the form to the selected recipient. This action creates a new document assigned to ATHENAFAX.
Note: To locate this task in the Clinical Inbox, click the Total row for tasks assigned to ATHENAFAX. The document is labeled "OB Episode Summary" in SUBMIT status. At the bottom of the document, the action history includes the time that the document was sent and the user that sent it. Once submitted, the document no longer appears in the Clinical Inbox.
See also: OB Episode: EDD List Generation to generate a list of patients who need forms sent to the hospital.
{{CLINICALEPISODESECTION_DELIVERYINFORMATION}} *
{{CLINICALEPISODESECTION_EDDCALCULATION}} *
{{CLINICALEPISODESECTION_EDDUPDATE}} * — The final episode calculation.
{{CLINICALEPISODESECTION_GENETICSCREENINGINFECTIONHISTORY}}
{{CLINICALEPISODESECTION_INITIALPHYSICAL}}
{{CLINICALEPISODESECTION_LABRESULTS}}
{{CLINICALEPISODESECTION_OBINFORMATION}} *
{{CLINICALEPISODESECTION_PASTMEDICALHISTORY}} *
{{CLINICALEPISODESECTION_PREGNANCYPROBLEMLIST}} — This uses SMOMED-CT terminology.
{{CLINICALEPISODESECTION_PRENATALFLOWSHEET}}
{{FATHER}} * — The father documented for the relevant OB episode.
{{FATHERPHONE}} * — The father's phone documented for the relevant OB episode.
{{HUSBANDDOMESTICPARTNER}} *
{{HUSBANDDOMESTICPARTNERPHONE}} *
| Registration Department |
Select the department where the patient is registered. |
|---|---|
| Primary Department |
Select the department in which the patient receives primary care. |
| Episode Department |
Select the department of service for the episode. |
| Initial Date |
Enter or select the date of the first prenatal visit. |
| EDD Date |
Enter or select the estimated delivery date. |
| Weeks Gestation at Initial |
Number of weeks pregnant the patient was on the date of the initial visit. |
| Initial Planned Delivery Site |
The delivery site selected during the initial visit. |
| Final Planned Delivery Site |
The delivery site selected after the initial visit. |
| Delivery Date |
The actual date of the delivery. |
| Actual Delivery Site |
The actual site of the delivery. |
| AP Transfer/Loss Reason |
If the OB episode does not result in a delivery, the reason for the patient transfer or loss of fetus (AP = antepartum). |
| AP Medical Transfer Reason (if other) |
If "Medical Transfer: Other" is selected from the AP Transfer/Loss Reason list, enter the reason for the transfer. The list of reasons is maintained by your practice on the AP Transfer Codes page. |
| IP Transfer Reason |
If the patient is transferred during delivery, the reason for the transfer (IP = intra-partum). The list of reasons is maintained by your practice on the IP Transfer Codes page. |
| Problems |
Document any problems with the OB episode. |
| General Notes |
Any notes about this episode. |
| Live Birth? |
Yes or No. |
| Sex |
Gender of the baby. |
| Gravity |
The number of pregnancies the patient has had. |
| Parity |
The number of deliveries the patient has had. |
| Delivery Type |
List of delivery types. The list is maintained by your practice via the Delivery Types page. |
| Baby Weight |
The weight of the baby at delivery in pounds and ounces. |
| Baby Weight (gms) |
The weight of the baby at delivery in grams. |
| Admitted to NICU |
Indicates whether the baby was admitted to the NICU (neonatal intensive care unit). |
| Post-Partum Visit No-Show? |
Yes indicates that the mother did not return for a postpartum visit. |
| Post-Partum Visit Date |
The date of the postpartum visit. |
| Status |
The status of the OB episode. |
| Billed? |
Yes indicates that the practice has billed for the OB episode. |