 Quick Reference — To view secure message attachments sent by patients from the Patient Portal
Patients can securely attach documents and images to the messages they send to your practice from the Patient Portal. For example, a patient can send:
- PDF files — Multi-page medical form with a signature on each page
- PNG files — Photograph of a symptom (for example, a wound or rash) or a photograph of each page of a signed consent form
If a patient sends a password-protected file, you see an error message and you can't display the attachment. Contact the patient and ask them to remove password protection and re-send the attachment.
Patients can attach up to 10 files (PDF, JPEG, JPG, or PNG) per message with a maximum file size of 10 MB each. Video files are not supported.
Note: When replying to a patient's message, practice users can attach files to the patient case, including orders, results, medications, letters, and more, via the attachments icon  . In addition, if the patient needs a form signed by the provider, such as return to work or return to school letters, see To send a provider-signed patient letter to the Patient Portal.
For information about how patients can attach files to messages that they send from the Patient Portal, see:
- To send a message with attachments to your practice (instructions for patients using a smartphone)
- To send a message with attachments to your practice (instructions for patients using a desktop computer)
When a patient (or other portal user) sends a message from the Patient Portal, the message and any attachments appear in athenaOne as a patient case. Attachments become a historical part of the patient case. These patient cases are routed to the Clinical Inbox (Patient Cases column in the PORTAL row) and to the patient chart (Visits tab).
Important: You can view attachments from patients in athenaOne only on your desktop computer.
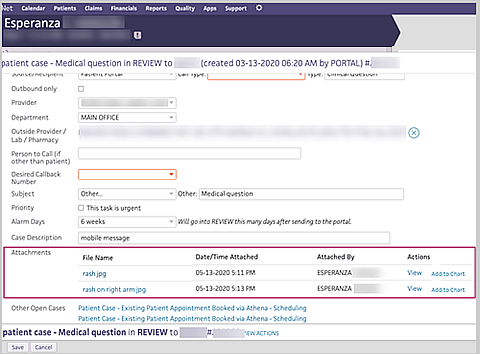
The Attachments section of the patient case lists the files that your patient attached to the message.
- File Name — Name that the patient gave the attached file
- Date/Time Attached — When the file was sent
- Attached By — Name of the Patient Portal user who attached the files
Note: If a patient sends a Patient Portal message without attachments, the following text appears in the Attachments section: No attachments have been added to this case.
You can act on patient cases for Patient Portal messages as follows:
- To reply to the message, see To reply to an open patient case.
Note: When you reply to a patient's message, you cannot add your own attachment to the patient case. If the patient needs a form signed by the provider, such as return to work or return to school letters, see To send a provider-signed patient letter to the Patient Portal. - To display an attachment, click the file name of the attachment or click View.
- To save an attachment to the patient chart, click Add to Chart.
Note: athenaOne does not check patient attachments for viruses. When you save an attachment sent by a patient, you can scan the file with your anti-virus software.
To save an attachment from a patient cases to the patient chart
You can save the attachments that patients send from the Patient Portal to the patient's chart in athenaOne.
Note: If a patient attaches more than one document to a message, you must add each attachment one at a time to the chart.
- In the Attachments section of the patient case, click Add to Chart.

The document appears in DATAENTRY status on the Process Document page.
Identify the document
- Department — This field defaults to the department that the Patient Portal message was sent to, but you can select another department from the menu.
- Patient — The patient whose chart you are adding the attachment to.
Classify the document
- Class — Select a document classification (for example, Clinical Document or Admin - Signed Forms & Letters).
Note: See Document Classifications for more information about document types and document processing. - Document Label — Click
 Select a document label to open the document label selector and select a document label.
 - If you cannot find an appropriate label after searching the full list of labels:
- Click the Document label not listed link at the bottom of the selector.
Note: To suggest additions to the global document label list, open a support case from athenaOne > Support > Success Community > Contact Client Support Center. - Internal Note — Enter a description of the document in this field.
Save the attachment to the chart
- Select the Data Entry Completed option.
- Click Save and Back to return to the patient case.
The Add to Chart link is replaced with the text "Added to Chart."
If you don't save the attachment on the Process Document page
- If you leave the Process Document page before you save the document, you can find the partially processed document in the Other documents section of the Find tab in the patient chart.
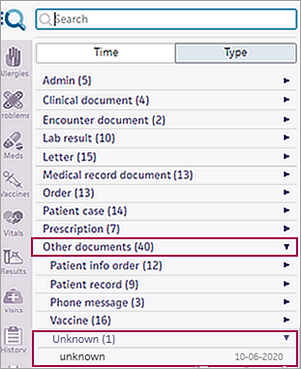
- Click Other documents to display them.
- Click Unknown.
- Click the document under Unknown to open it (the date that the document was added to the patient chart is shown).
- Complete the processing of the attachment document on the the Process Document page and save the document.
After you save an attachment from a patient case to the chart
After you save an attachment from a patient case to the patient chart, you can search for and display the attachment in the chart. If the attachment is a JPEG, JPG, or PNG image file, the file appears smaller than its actual size. To zoom the file display, click here.
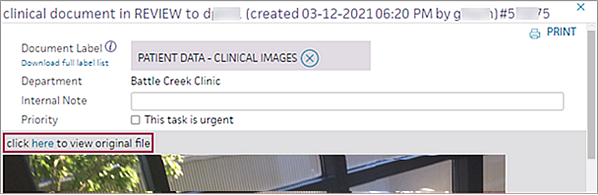
The entire image is displayed in a new window (you do not need to scroll to see the whole image).