Appointment
This page allows you to view and edit appointment information for an individual appointment in the schedule. This page is the start of the 5-stage patient encounter.
On the Non-Clinician home page, click a patient name in the schedule
- Display the Appointment page: On the Non-Clinician home page, click a patient name in the schedule.
- Click the Edit Appointment Prior to Arrival link.
- Edit the information as needed.
- Click Save to save your changes.
You can click Back to return without changing the information. - On the day of check-in, use the Edit Appointment Prior to Arrival link prior to the patient's arrival only.
- If the patient is checking in and you need to edit appointment information, click Start Check-in and edit the appointment information on the Check-in page.
- If you change the Department in the Edit Appointment page, and then Save the changes:
- Any existing cost estimate becomes outdated.
- Warning icons and messages appear so you know which information was updated.
- Click Refresh cost estimate.
Best practice for editing appointments
This functionality is available if the No Surprises Act Consent feature has been enabled for your practice. For reference, see the User Guide — athenaOne Support for Compliance with No Surprise Billing Legislation.
You can flag upcoming appointments that may allow for consent to balance bill (Out-of-Network Billing Consent), and manage the patient consent requirements from either of these pages:
- Eligibility and Phone page
- Appointment page
From either page, clicking Manage consent brings you to a new Out-of-Network Billing Consent pop-up window to manage the consent steps.
Best practice: If you intend to balance bill for applicable services, the No Surprises Act requires that you notify patients about a qualifying out-of-network provider within specified timeframes before their appointment and receive appropriate consent.
- Display the Eligibility and Phone page: On the Main Menu, click Calendar. Under APPOINTMENTS, click Eligibility and Phone List.
-
View — select Out-of-Network Billing Consent to display the new Filter fields.
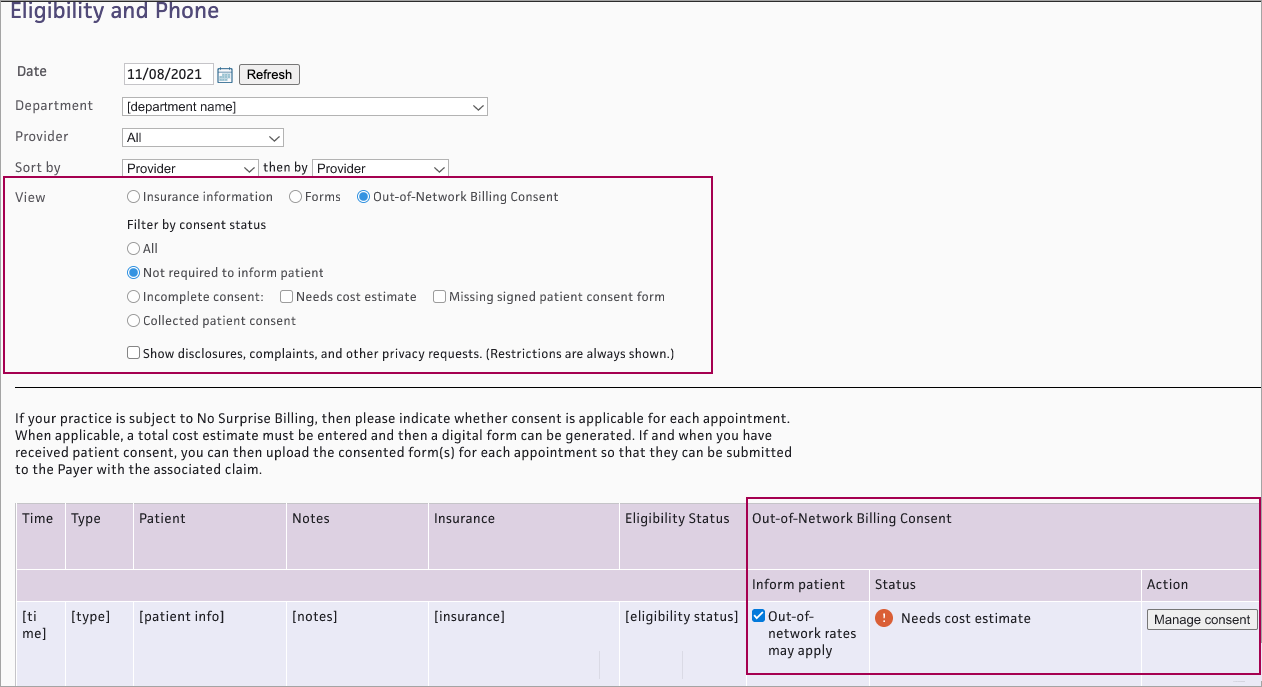
- Filter by consent status — Select a status:
- All — Shows appointments with any consent status
- Not required to inform patient — Shows appointments that have not been flagged as Out-of-network rates may apply, so patient consent is not available
- Incomplete consent — Shows appointments with incomplete consent. (If you select Incomplete consent, both Needs cost estimate and Missing signed patient consent form are automatically checked. You can also select either status independently.)
- Collected patient consent — Shows appointments with a signed patient consent form attached
- The list appears with the following new Out-of-Network Billing Consent columns for each appointment:
- Inform patient — Check the box Out-of-network rates may apply if applicable
- Status — Shows current Out-of-Network Billing Consent status for each appointment that has been flagged as Out-of-network rates may apply. See Out-of-Network Billing Consent Status for details.
- Action — Click Manage consent if needed to complete consent steps
- Display the Appointment page: On the Main Menu, click Calendar. Under APPOINTMENTS, click Today's Appointments.
- At the top of the Task Bar, select a specific Dept and Date, then click Go. The list of patients scheduled for that day appears below. Click a patient name in the schedule.
- Review the appointment information. If the appointment has an out-of-network provider: at the bottom of the Appointment Information section, select Out-of-Network rates may apply.
- The consent status and Manage consent button appear.
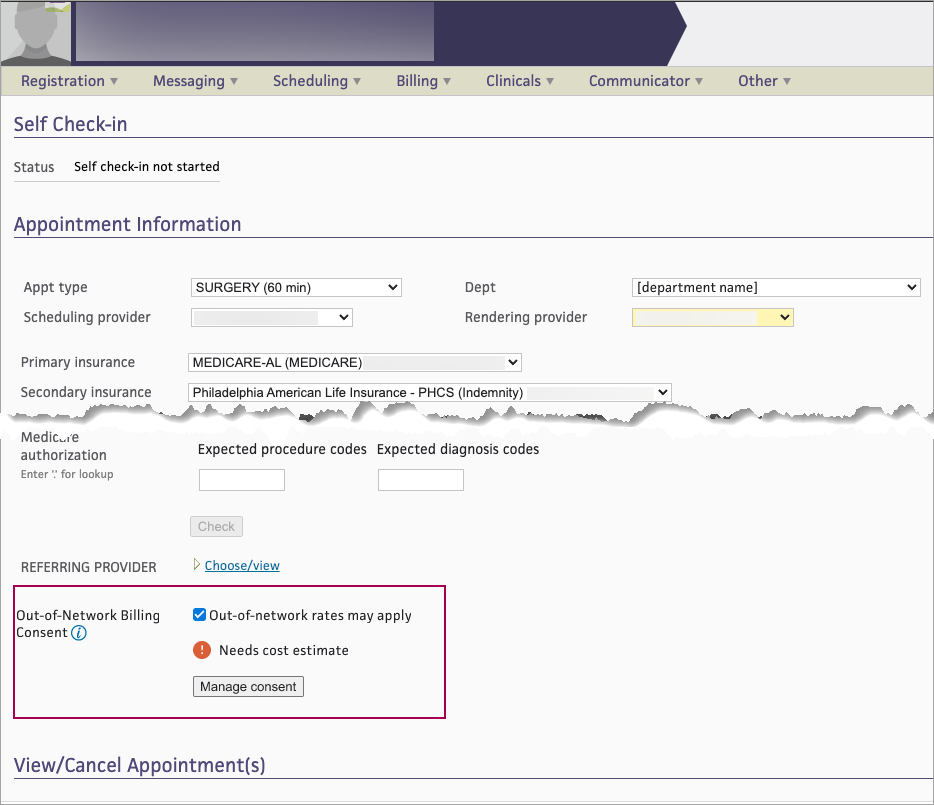
On either the Eligibility and Phone worklist or the Appointment page, you can see the current Out-of-Network Billing Consent status for each appointment that has been flagged as Out-of-network rates may apply. The status will change as the appointment moves through the steps in the patient consent process.
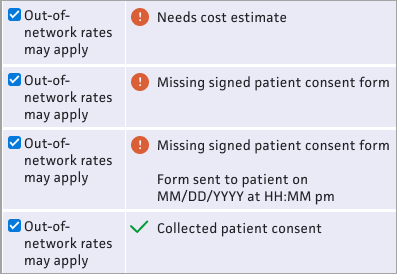
- Needs cost estimate — This status appears if the appointment has no cost estimate
- Missing signed patient consent form — This status appears if the appointment has a cost estimate but no signed consent form attached.
- Missing signed patient consent form / Form sent to patient on [MM/DD/YYYY at HH:MM pm] — This status appears if the appointment has a cost estimate, the consent form was sent to the patient, but no signed consent form is attached.
- Collected patient consent — This status appears if a signed consent form is attached to the appointment
On either the Eligibility and Phone worklist or the Appointment page, for each appointment that has been flagged as Out-of-network rates may apply, you can see the current Out-of-Network Billing Consent status and click Manage consent to complete the steps in the patient consent process.
- From either the Eligibility and Phone page or the Appointment page, click Manage consent.
-
The Out-of-Network Billing Consent window appears. The athenaOne system will use the information you enter here to populate the patient consent form.
Cost estimate
This estimate will include co-providers and/or co-facilities — When this box is checked, you are responsible for calculating and documenting the total cost estimate including costs for your practice and for each co-provider/co-facility.-
Enter the total cost estimate on the Total cost only tab.
- The consent form will include pages for you to write in the itemized services and subtotal for each provider and facility.
 Total cost only tab
Total cost only tab Field name Description Total cost estimate Enter the cost estimate Alternative in-network providers (Required for post-stabilization services) — Enter provider name(s) to be included on the HHS consent form 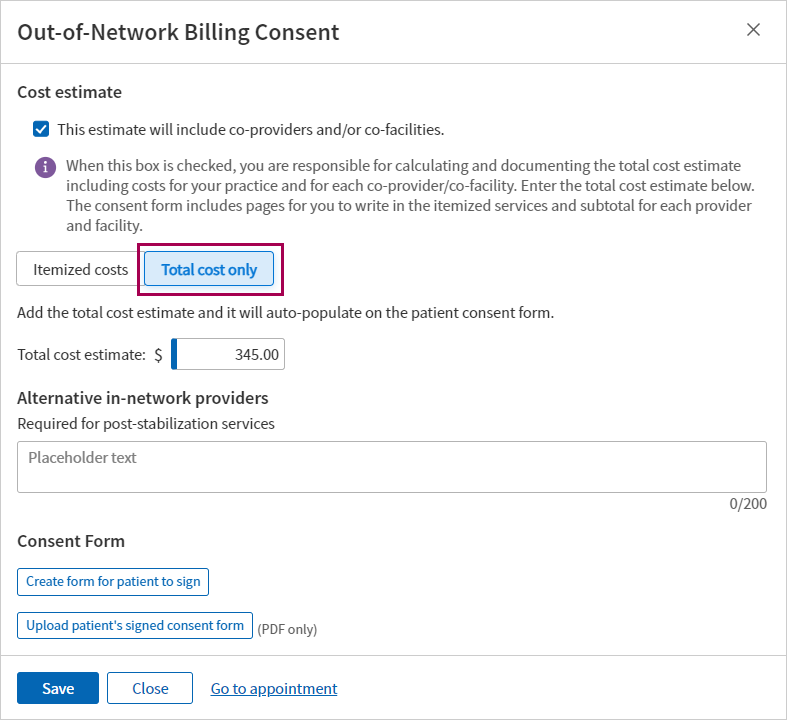
If the estimate will NOT include co-providers and/or co-facilities:
- Use the Itemized costs tab to enter up to ten specific procedure codes and estimated costs to populate the HHS consent form.
 Itemized costs tab
Itemized costs tab Field name Description Procedure code Enter a CPT code or type a period to use the lookup Cost Enter the estimated cost for the procedure Description Displays a description for the procedure code entered Total cost estimate Displays the total of the costs entered above Alternative in-network providers (Required for post-stabilization services) — Enter provider name(s) to be included on the HHS consent form 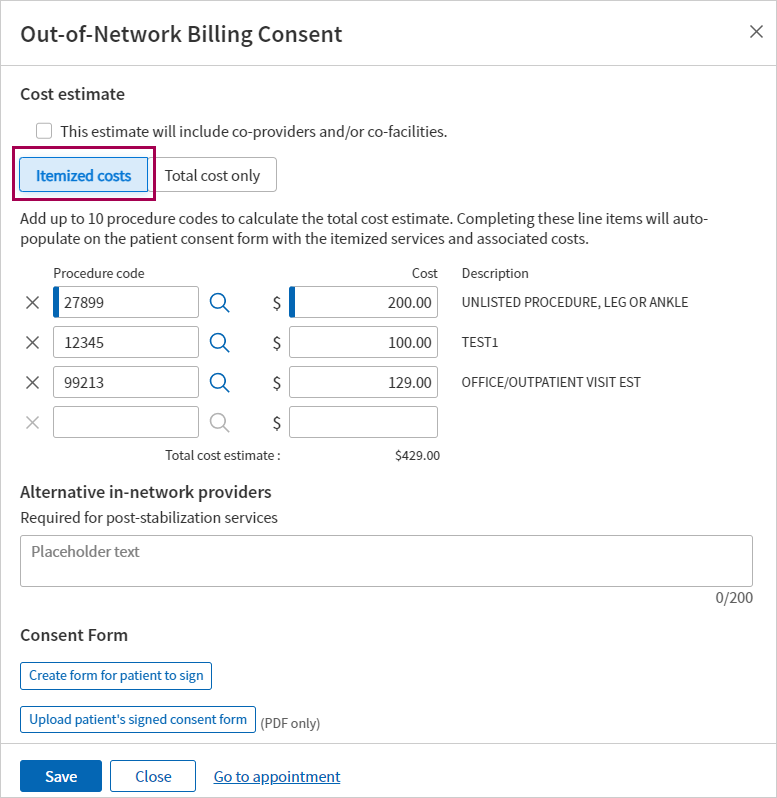
-
-
Click Save.
- If you’re ready to create and send the consent form to the patient, you can do that now. Otherwise, you can save now and return to the appointment later to send the form.
- From either the Eligibility and Phone page or the Appointment page, find appointments that have an Out-of-Network Billing Consent status: Missing a signed patient consent form (appointments in this status already have a cost estimate).
- Click Manage consent. The Out-of-Network Billing Consent window appears.
- Scroll to the bottom of the page and click Create form for patient to sign .
- A digitized version of the HHS Consent Form appears, populated with the patient’s appointment data, cost estimate, and any procedure code(s) and alternative in-network provider(s) entered.
Note: For details on what athenahealth populates in the form, see the athenahealth’s digitized version of the HHS Consent Form in the User Guide — athenaOne Support for Compliance with No Surprise Billing Legislation. -
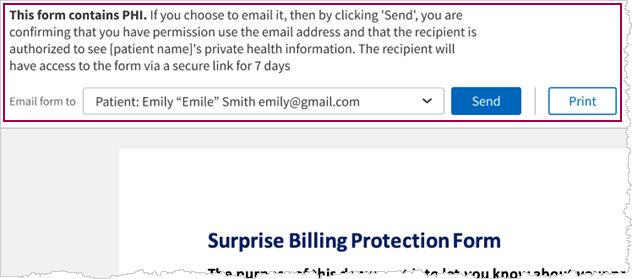
At the top of the form, you can choose to Send or Print the form.
Note: If you selected This estimate will include co-providers and/or co-facilities, the Send button is not available. You must Print the consent form and write in the itemized services and subtotal for each co-provider and co-facility.
-
If you select Send:
- Email form to — Select one of the following:
- Patient (default)
- Another recipient from the list of patient’s contacts on the patient registration record
- Other — Enter the email for a contact that is not listed
- Click Send
- The athenaOne system sends an email with the form.
Important: This form will only be available for 7 days and then will expire and need to be re-generated and resent to the patient
- You will need to have a PDF file of the patient’s signed consent form.
- Save the file to your system.
- From either the Eligibility and Phone page or the Appointment page, find appointments that have the Out-of-Network Billing Consent status: Missing a signed patient consent form.
- Click Manage consent. The Out-of-Network Billing Consent window appears.
- Scroll to the bottom of the window and click Upload patient’s signed consent form .
- Navigate to the location of the signed form on your system, select the file, then click Open.
- Click Save .
A message appears with details about who uploaded the file, along with a date/time stamp.
Important: If you reschedule an appointment, you must re-enter the consent information and re-attach the signed form. Be sure to have a copy of any signed consent forms before moving the appointment.
This process may be best supported by having your Billing staff and Front Desk staff share the workflow/responsibilities:
-
Billers have the knowledge of the CPTs
-
Front Desk staff are more familiar with managing patient communications such as sharing the cost estimate
 To create a Cost Estimate
-
View an existing patient appointment that hasn't been checked in yet.
-
The following fields on the Appointment page can impact the cost estimate:
Field name Description Department The Department for this appointment
Note: If the Department is changed, any existing Cost Estimate will display warning icons and messages so you know the estimate is outdated. You can click Refresh cost estimate to update the estimate based on the updated Department.
Primary Insurance - Select Self-Pay or No-Insurance/Self Pay.
If your practice has the Post-Adjudication Sliding Fee Plans practice setting = OFF:
- To apply a sliding fee discount in the cost estimate, select a sliding fee plan as the patient's Primary Insurance on the Appointment page.
Sliding Fee Plan Note: This field will only appear if:
- Your practice has the Post-Adjudication Sliding Fee Plans practice setting = ON
AND
- The patient has sliding fee plans defined in their insurance in Quickview:
To apply a sliding fee discount in the cost estimate, select a sliding fee plan here.
Tip: Click the image to see an expanded view
Upcoming appointment The date/time of the upcoming appointment
-
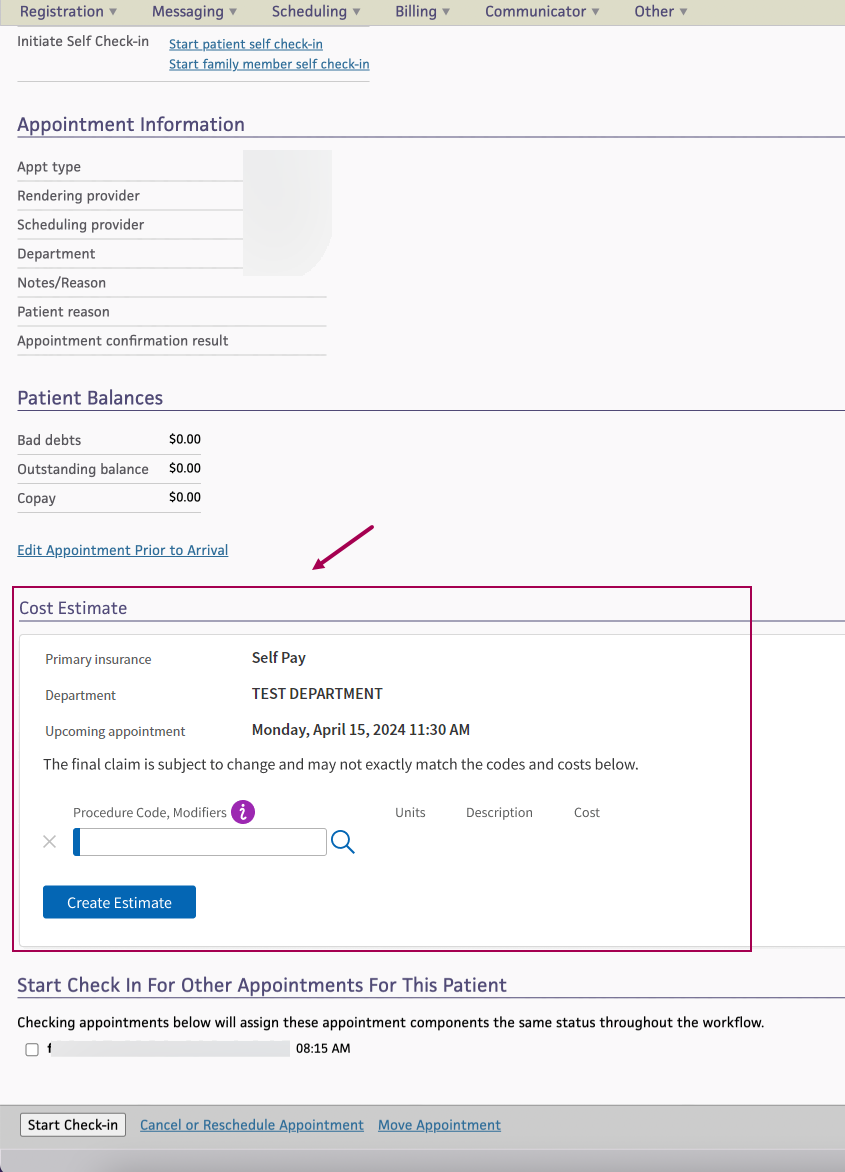
In the Cost Estimate section, you can create a self-pay cost estimate:
Note: The Cost Estimate section will only appear if the patient's Primary Insurance is Self-Pay or No-Insurance/Self Pay.
Tip: Click the image to see an expanded view
Field name Description Primary Insurance (view-only)
Department (view-only)
Sliding fee plan (view-only) Upcoming appointment (view-only)
Select a template below or enter procedure codes and modifiers Select a Cost Estimation Template based on the department.
(if your organization has not created any Cost Estimation Templates in athenaOne, the template menu will be blank and you will need to manually enter procedure codes and applicable modifiers.)
Procedure Code, Modifiers
Units
If you selected a Cost Estimation Template: athenaOne automatically populates the Procedure code,Modifiers and Units fields with the procedures your organization defined in the selected template. Edit the defaulted values if needed.
Note: Adding or removing procedure codes or units during estimate creation does not change the template.
If you did not select a Cost Estimation Template:
Enter Procedure Codes, Modifiers and Units for the patient's appointment.
- This field uses the same Procedure Code Lookup which is available on many athenaOne pages such as Charge Entry and Claim Edit. Enter "." or "?" to search for a procedure code by description or code.
The following appears for each Procedure you enter:
- Description — The description of the procedure
- Cost — The cost of the procedure based on the Units entered and the fee schedule
Note: You need at least one procedure code/procedure code-modifier combination to create a self-pay cost estimate.
-
Click Create Estimate.
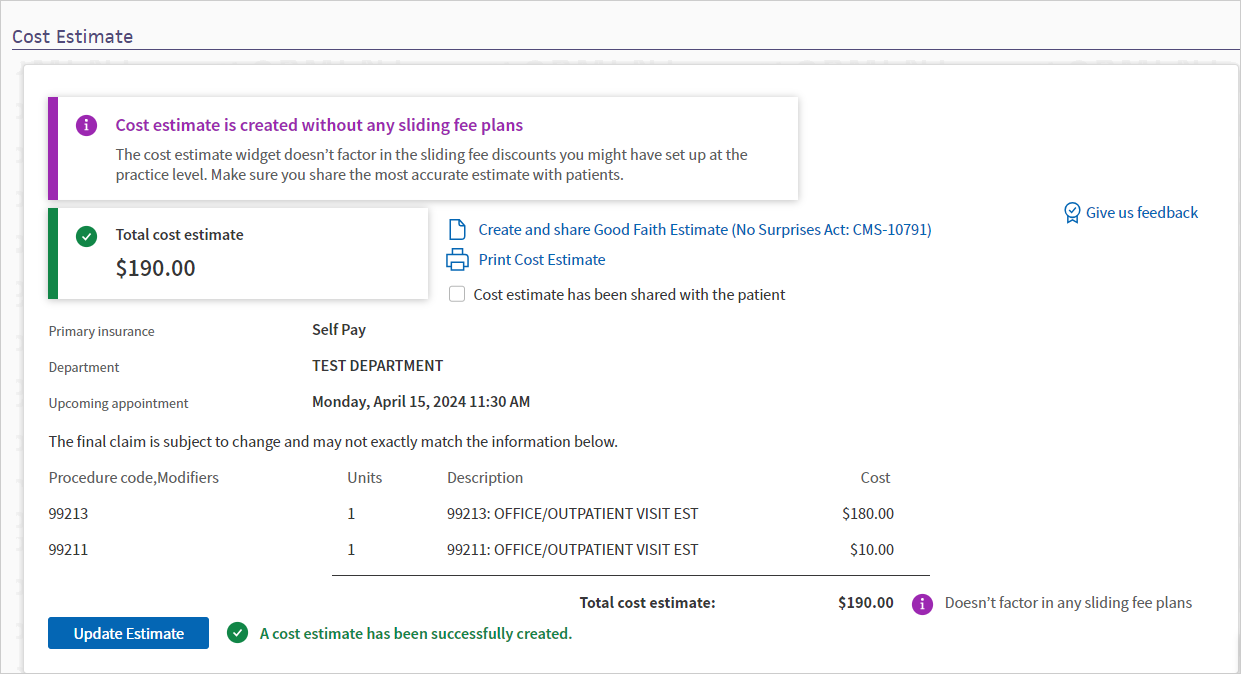
The estimate appears, with the sliding fee discount applied if applicable, and a message letting you know the status of the estimate creation.
Tip: Click the image to see an expanded view
Note:
- The cost estimate will not reflect any local rule sliding fee adjustments.
-
If your organization has Practice Setting: Post-Adjudication Sliding Fee Plans = OFF) — The cost estimate uses the sliding fee plan selected in the Primary Insurance in the Appointment.
-
If your organization has Practice Setting: Post-Adjudication Sliding Fee Plans = ON) — The cost estimate uses the Sliding fee plan selected in the Appointment.
- Click Print Cost Estimate to send the estimate to a printer.
- If you share the cost estimate with the patient, click the box next to Cost estimate has been shared with the patient.
 To create and share Good Faith Estimate (CMS-10791 form)
In the View Appointment page, once you have a cost estimate created for a self-pay patient, you can also create and share a Good Faith Estimate form (CMS-10791 form).
- The form can be printed or emailed to patients to support compliance with the No Surprise Billing legislation (i.e. No Surprises Act).
-
When you send (email) or print a cost estimate, athenaOne saves a record in the View Patient Appointments page and can also save the cost estimate in the Patient Chart.
Note:athenaOne will only upload self-pay cost estimates to patients' charts whenever all these conditions are true:
- Your practice uses athenaClinicals (it doesn't matter if the athenaOne user who is creating and sharing the cost estimate has access to patient charts).
-
Your department has Clinicals set to ON in Practice Settings. If you aren't sure about your Clinicals settings, contact your CSM.
- The Good Faith Estimate was shared with the patient via Send/Print button.
- The On send/print, automatically upload a copy to the patient's chart checkbox is selected.
-
In the Cost Estimate section, click Create and share Good Faith Estimate (No Surprises Act: CMS-10791) .
A pop-up window appears.
-
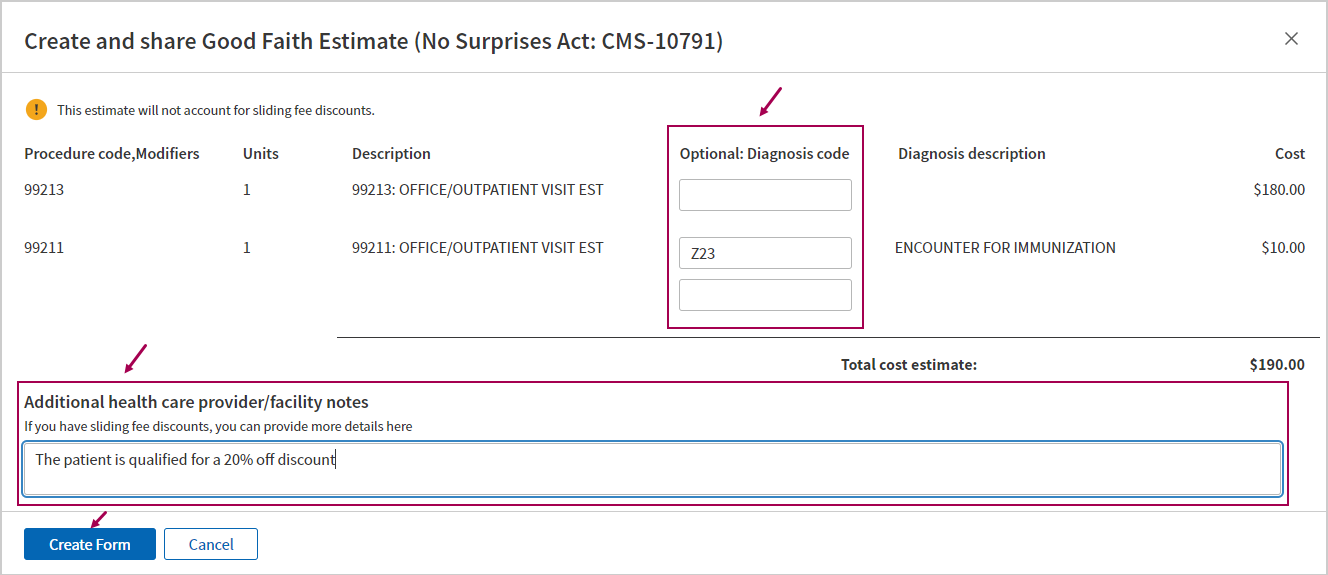
Create and share Good Faith Estimate (No Surprises Act: CMS-10791)
Tip: Click the image to see an expanded view
Field name Description Procedure, Modifiers (view only) Units (view only) Description (view only) Optional: Diagnosis code Enter a diagnosis code for each of the CPT codes in the cost estimate.
You can enter up to four Diagnosis codes for each CPT code.
Note: The system does not validate the diagnosis code. (Even if you enter an invalid diagnosis code, you can still generate the form.)
Diagnosis description (view only) Cost (view only) Additional health care provider/facility notes Enter any additional notes to appear on the Good Faith Estimate form.
- If you have sliding fee discounts, you can enter details here.
- This field is limited to 500 characters.
-
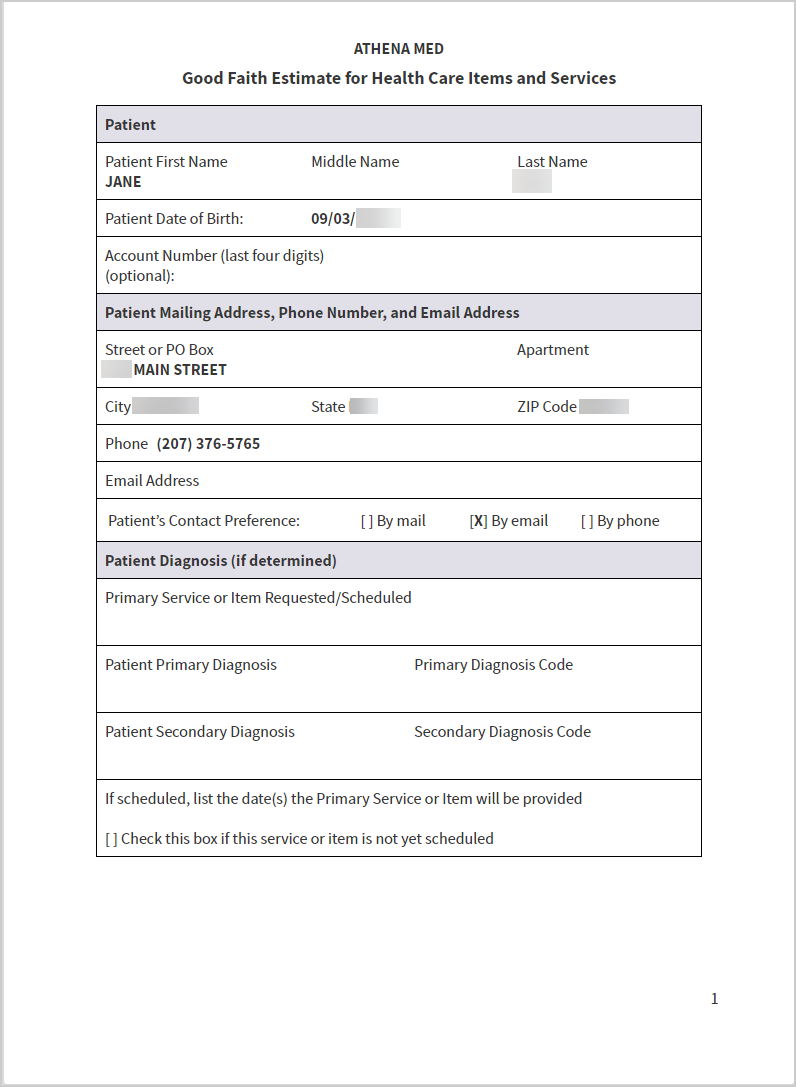
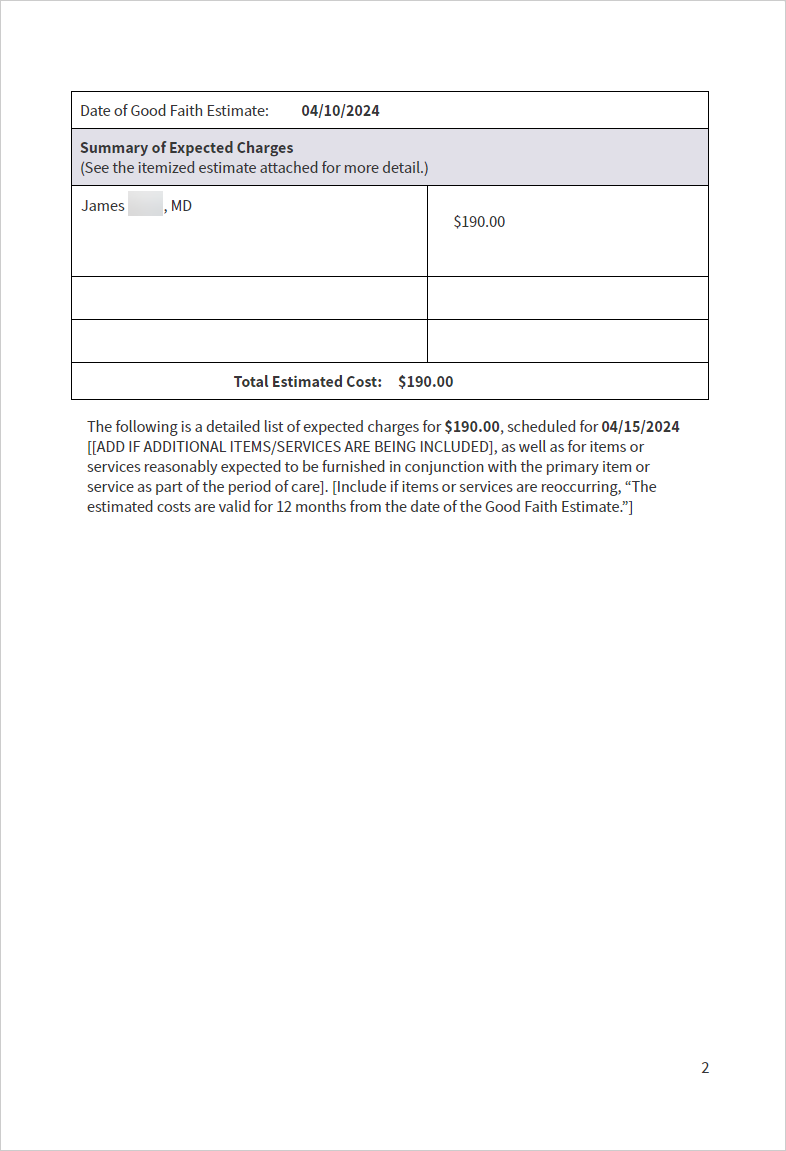
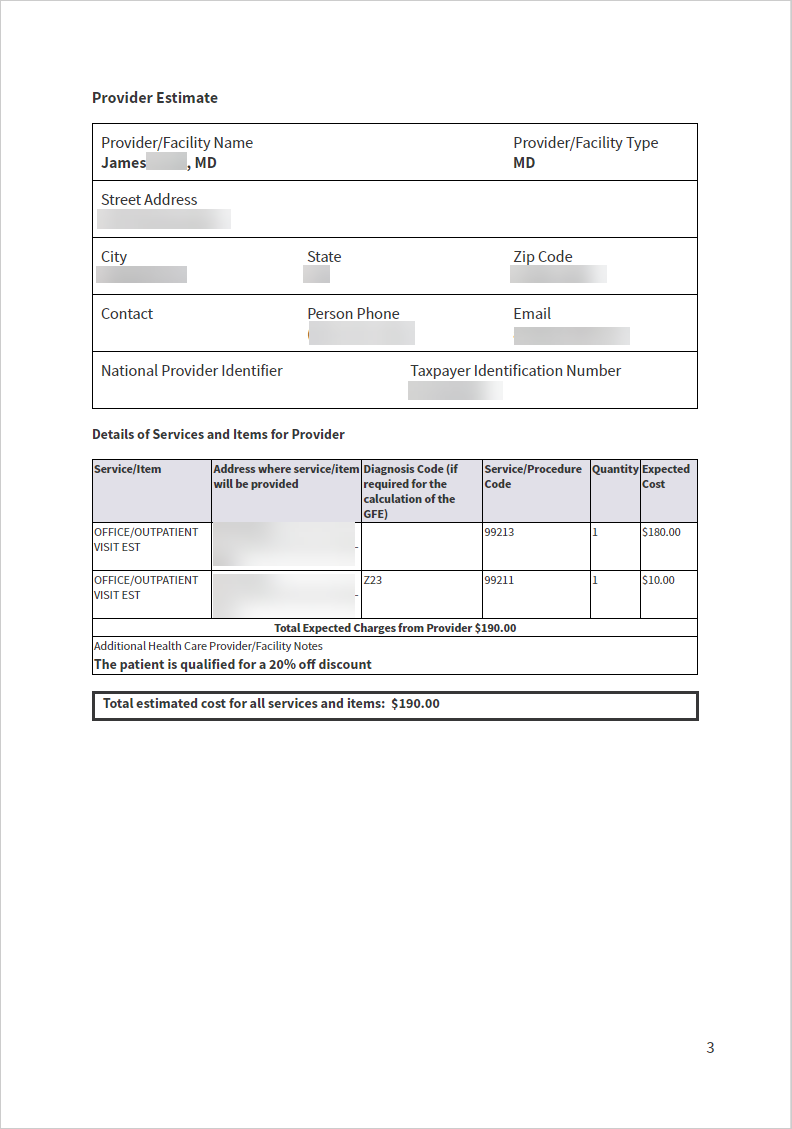
Click Create Form to generate a digitized copy of the CMS-10791 Good Faith Estimate for Health Care Items and Services form, with the following fields populated:
Fields Populated from... Patient information the patient's appointment data and registration information in athenaOne Procedures/ Modifiers,
Estimated Cost
information entered in the Cost Estimate section of the appointment Diagnoses/
Additional health care provider/facility notes
information entered in the Create and Share Cost Estimate window Provider details
- Street Address
- City
- State
- Zip Code
- Contact
- Person Phone
- Address where service/item will be provided
the provider specific to the appointment Department (the physical location where the services are rendered);
if Department information is not available, then use provider from the Medical Group
(except for the Contact field — if information is not available from the Department, the field is left blank)
-
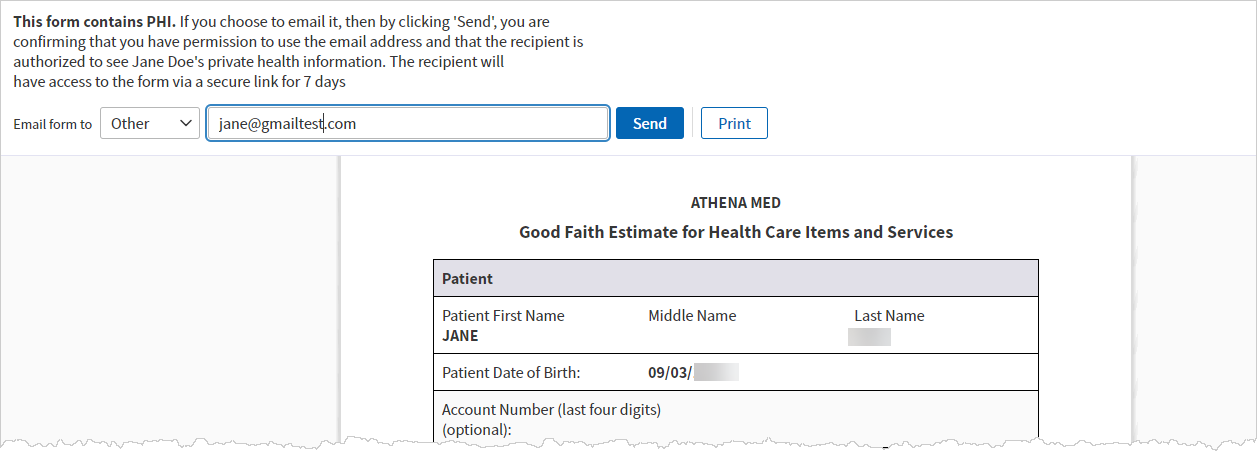
Use the options at the top to email or print the form:
-
Email form to — Select one of the listed contacts from the patient's registration or select Other, which allows you to type in an email address.
-
Send — Email the form to the selected address.
-
Print — Print the form.
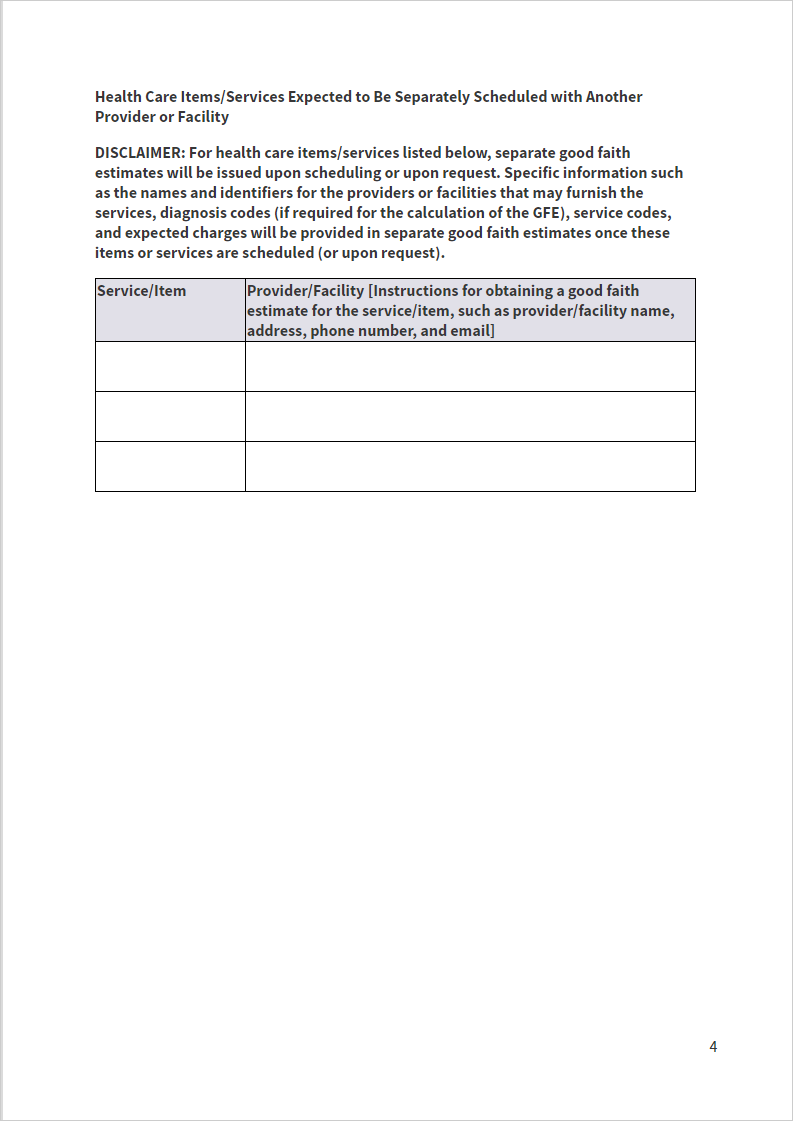
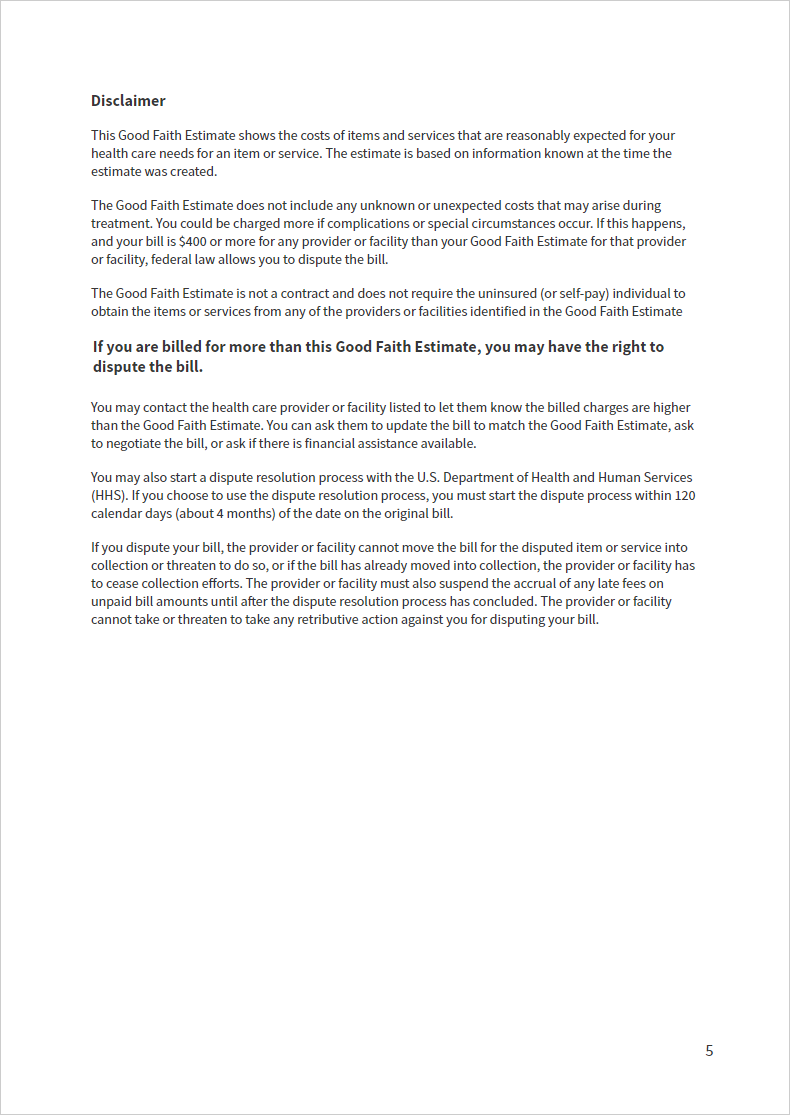
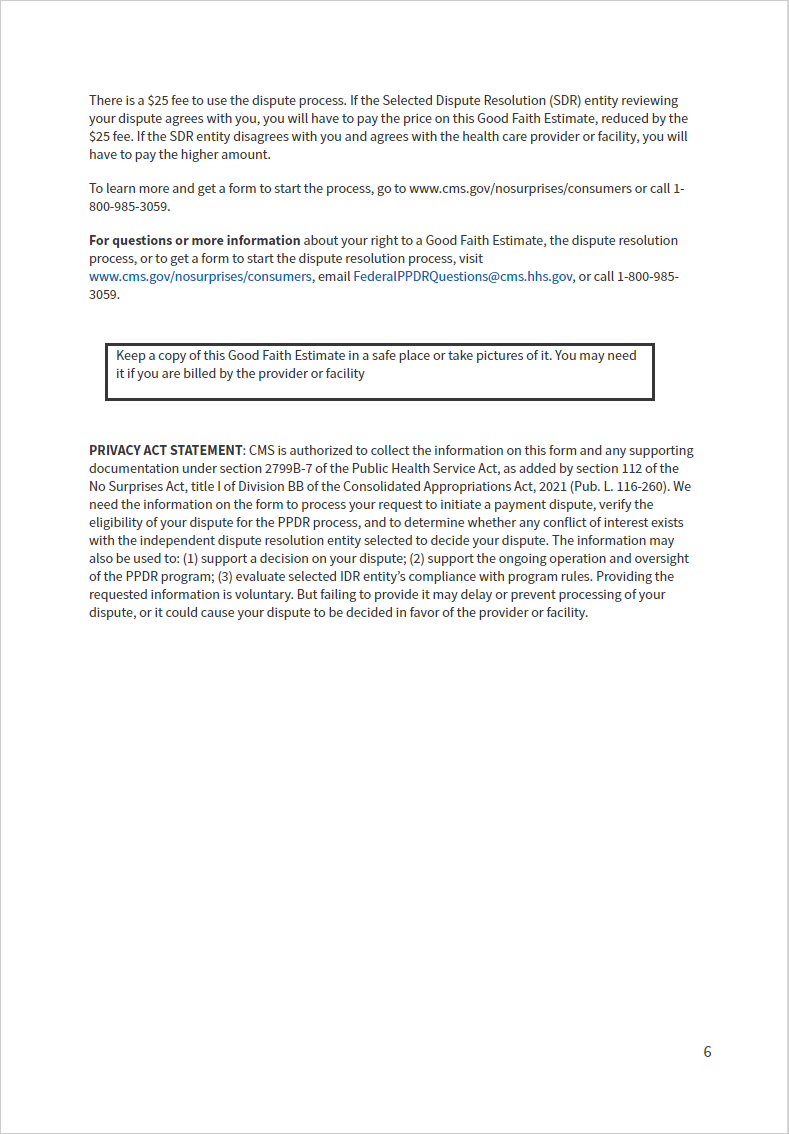
See the Good Faith Estimate — generated email and form (images) section below for an example of the generated email and form.
When you send (email) or print a cost estimate, athenaOne saves a record in the View Patient Appointments page and can also save the cost estimate in the Patient Chart.
Note:athenaOne will only upload self-pay cost estimates to patients' charts whenever all these conditions are true:
- Your practice uses athenaClinicals (it doesn't matter if the athenaOne user who is creating and sharing the cost estimate has access to patient charts).
-
Your department has Clinicals set to ON in Practice Settings. If you aren't sure about your Clinicals settings, contact your CSM.
- The Good Faith Estimate was shared with the patient via Send/Print button.
- The On send/print, automatically upload a copy to the patient's chart checkbox is selected.
-
You can choose not to upload a copy to the patient chart (for example, if you want to re-send or re-print an estimate that has had no changes since the last time it was shared).
Tip: Click the image to see an expanded view.
-
If you only create a cost estimate but you don't share it with the patient (via the Send or Print button), it will not be saved in athenaOne.
-
-
Close the window to return to the Cost Estimate section in the View Appointment page.
-
After you have created and shared a Good Faith Estimate, you'll see different options at the top of the Cost Estimate section:
Link Description Share existing Good Faith Estimate Last shared: MM/DD/YYYY Click this link to share the existing version of the Good Faith estimate form(CMS-10791 Form), which was printed or emailed to the patient upon creation of the form.
The timestamp shows when it was last shared.
Create and share new Good Faith Estimate Click this link to create a new version of the form.
- The pop-up window appears — enter the Diagnosis Codes and Additional Notes.
- Then click Create Form to generate a new version of the Good Faith estimate form with the updated Diagnosis Codes and Additional notes.
Good Faith Estimate — generated email and form (images)
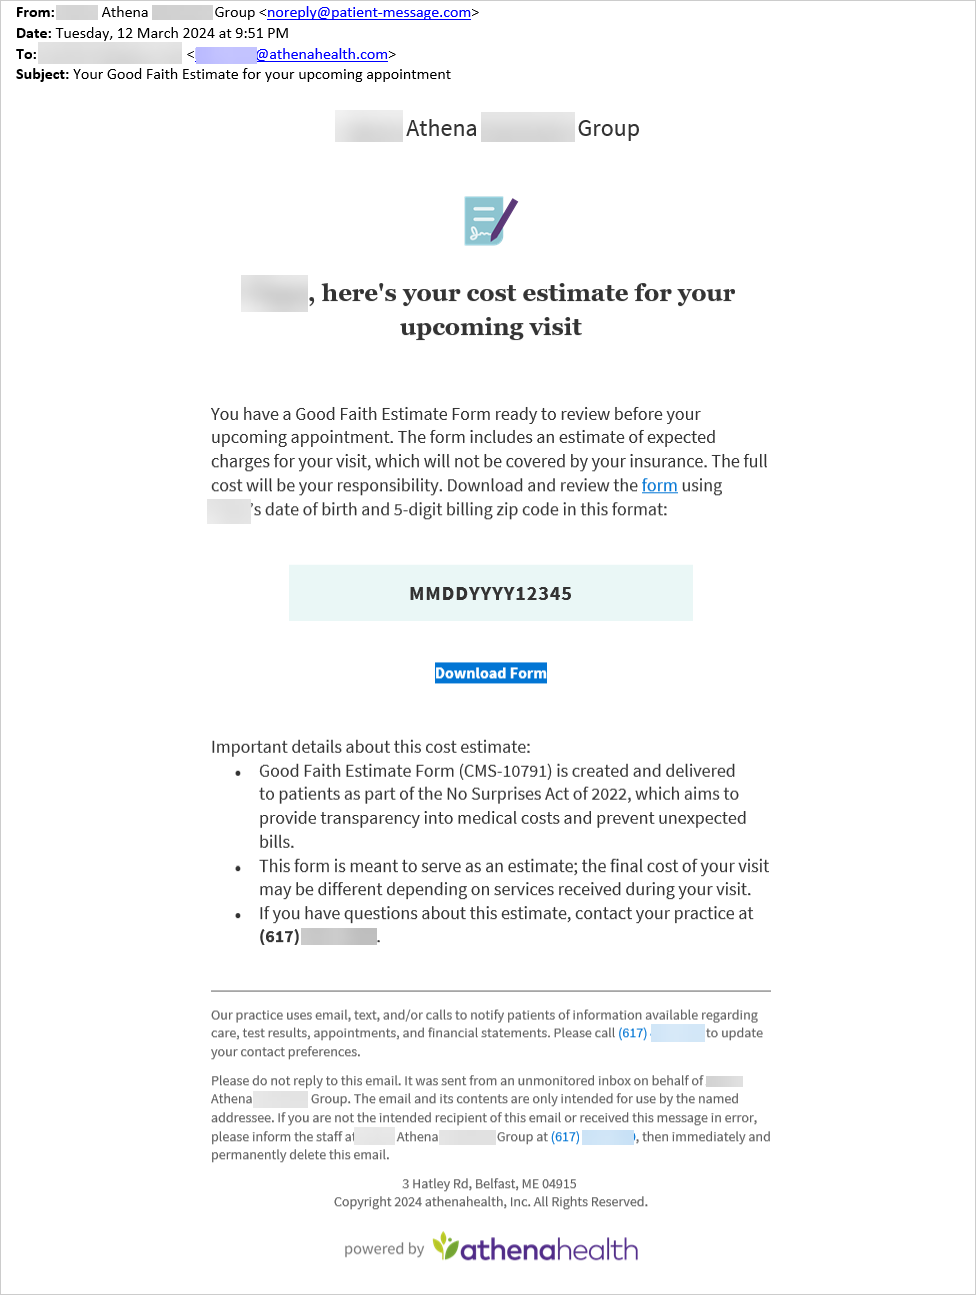
This is an example of the email that is sent to the patient if you choose to email from the Create and share Good Faith Estimate (No Surprises Act: CMS-10791) window:
Tip: Click on the image to see an expanded view
The email to patients includes a phone number that patients can use to contact your practice if they have questions about the cost estimate.
- This phone number is defined in your practice's Patient Communication Content Management settings > Billing Display Settings for the department.
 To update a Cost Estimate
Note:
-
Once a patient is checked in, you can no longer go back to the Appointment page and therefore can no longer update the cost estimate.
- Once a claim is created for an appointment, you can no longer view or change the cost estimate.
-
View an appointment that has not been checked in yet.
- In the Cost Estimate section, click Update Estimate .
-
Procedure Code, Modifiers — Add, edit or remove Procedure Codes and Modifiers.
- Click Create Estimate to update the existing estimate, or click Cancel.
- If you updated the procedure/modifier combinations and then click the Create and share new Good Faith Estimate link, you'll see the updated cost estimate in the pop-up window and the workflow continues as explained above.
 To refresh a Cost Estimate if the Appointment information changes
If there is a change in any of the Appointment information used in the cost estimate, the cost estimate will need to be updated (refreshed).
| If you change the patient's Primary Insurance from Self-Pay or No-Insurance/Self Pay to another plan... | The appointment's cost estimate will be removed (but will be restored if the Primary Insurance is changed back to Self-Pay or No-Insurance/Self Pay). |
| If you change other fields in the Appointment, and then Save the changes... |
If the appointment has an existing cost estimate, will display warning icons and messages to let you know the cost estimate is outdated, and which appointment details were updated.
Click Refresh cost estimate.
The system displays an updated cost estimate based on the updated appointment details. |
You can move an appointment to a different time or provider within the same day. You can reschedule the appointment into an open slot or you can double-book it.
Note: If you want to make other changes to an appointment (such as changing the day, the appointment type, or the appointment duration), you must use the full rescheduling workflow.
- Display the Appointment page: On the Non-Clinician home page, click a patient name in the schedule.
- Click the Move Appointment link at the bottom of the page.
The Move Appointment window appears.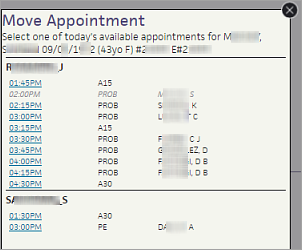
- Select a new appointment slot on this day.
You can select an appointment slot for a different provider, as well as for a different time.
The appointment is moved to the new slot.
- Display the Appointment page: On the Non-Clinician home page, click a patient name in the schedule.
- Click Cancel or Reschedule Appointment. The Cancel Appointment page appears in the Workspace.
- Select any appointments that you want to cancel.
- Reason for cancellation — Select a reason for the cancellation.
- Click Cancel Appointment. The Appointment Rescheduling page appears, so that you can reschedule the appointment.
- Display the Appointment page: On the Non-Clinician home page, click a patient name in the schedule.
- Click Start Check-in.
- Verify the appointment information and update it if necessary.
- Verify the patient registration information and update it if necessary.
- Verify the insurance information and update it if necessary:
- Click view detail to display the Eligibility Detail page and view the full eligibility text without rechecking eligibility.
- Add a case policy
(if appropriate) — For appointments related to on-the-job injuries and
auto accidents, you should use case policy insurance (MVA or workers'
comp). Do not use the patient's primary or secondary insurance for such appointments. Instead, you can click the Add case policy link
(in the Insurances section). See also: Add
Case Policy, Add/Update Auto Insurance Policy Details, and Add/Update
Workers' Comp Policy Details for more information.
Note: You cannot check in a patient until insurance policy information has been entered or self-pay has been selected for the patient. - Collect patient payment.
- Click Done with Check-in to proceed to the next stage in the 5-stage patient encounter.
- Display the Appointment page: On the Non-Clinician home page, click a patient name in the schedule.
- Click Start Check-in.
- Rendering — Ensure that the selected rendering
provider is correct.
Note: If the Supervising provider field appears and the rendering provider has been designated as requiring cosigner oversight, enter the supervising provider in the field. - Primary insurance — Verify that the correct primary insurance is selected, or edit the selection.
- Secondary insurance — Verify that the correct secondary insurance is selected, if needed, or edit the selection.
- Notes/Reason
— Add
any notes for this appointment.
Caution: You cannot delete an appointment note after you add it. - Authorization — Select an authorization
(if required by the patient's insurance policy).
Note: You can select authorizations with a status of Not Required. - Patient's condition related to — If the patient's condition is related to employment, an auto accident, or other accident, set the appropriate field to Yes. The Patient's condition fields drive referral rules and are used as the default values when you create a claim. (If you change the Appointment Insurance, these fields automatically change to reflect the newly chosen policy.)
- If the patient's condition
is employment-related or MVA-related, you must add a case policy: click
the Add case policy link (in the Insurances section).
See Add Case Policy for more detailed instructions on adding a case policy.
- Verify the patient's registration information to ensure that the patient address and phone number are current and correct.
- Patient notes — You can enter a patient note in this field. The notes you enter here also appear in the Patient notes field on the Quickview and Patient Registration pages. The note is not printed on any form.
- Portal access — If your practice uses the athenaCommunicator Patient Portal, the URL is the Patient Portal URL.
If your practice does not use the athenaCommunicator Patient Portal:
The Patient Information Center URL is: https://YOURPRACTICEID.portal.athenahealth.com/
(Your practice ID is located in the title bar of your athenaOne window.)
If your practice uses provider groups, add a dash and digit after your practice ID to distinguish the different provider groups:
https://YOURPRACTICEID-1.portal.athenahealth.com/
https://YOURPRACTICEID-2.portal.athenahealth.com/
- Request the patient's insurance card, and scan or make a copy of the insurance card.
- Verify the insurance information displayed on this page using the information on the card. Make corrections if needed.
- (athenaCollector) You can click view
detail to display the Eligibility Detail page and view the full eligibility text without rechecking eligibility.
Note: Claims denied for eligibility related reasons (for example, service not covered, wrong insurer, patient demographic issues), take 20 to 50 days longer to pay than "clean" claims, so eligibility checking is critical to your cash flow.
The Payment and Balances section provides the following information, making it easier for you to review outstanding balances.
- Bad debt, unapplied money, and pre-existing card on file agreements appear above the Today's Visit information.
- If a card on file agreement needs to be updated (for example, when the card on file limit is about to run out or the card is about to expire), an alert appears.
- Save card option allows you to save a card on file outside the TOS payment collection workflow.
- Claims in hold, statements in hold, and balances in other provider groups appear below the information in the Payments and Balances section.
Note: If you prefer to do most collection at checkout instead of check-in, you can contact the CSC from athenaOne > Support > Success Community > Contact Client Support Center to request this change.
You must have Credit Card Plus activated to collect credit card payments.
- During Check-in (or Checkout), scroll down to the Payment and Balances section.
- Review the information about outstanding balances, bad debt, and pre-existing card agreements.
Past Visits
- Outstanding balance — If the patient has an outstanding balance, enter a payment in this field, even if it is $0.00.
If the patient cannot pay the full amount or any of the outstanding balance, select the reason from the Reason for not collecting in full menu. - Balance sent to collections — If the patient has balances that were sent to a collection agency, you can click Show details to display this information. You can collect a full or partial payment for this balance. Any payment made is posted as a recovery adjustment and decreases the patient's collections outstanding amount.
Today's Visit
- Copay — Enter the copay amount that the patient gives you.
Note: If the patient has secondary insurance, a message states that a copay may not be required. If you want athenaOne to automatically set the default copay amount to $0 when a patient has secondary insurance, contact your Customer Success Manager. - If the copay type is not correct, click Edit, then select the correct copay type from the Copay menu. You can see the copay types and amounts for the insurance package under the Insurances heading.
- If athenaOne automatically sets the default copay amount to $0 for patients with secondary insurance, you can click the Reset link to enter a copay amount.
Note: For more information, see Copays for patients with secondary insurance policies. - If you enter a dollar amount smaller than the total copay amount, the Reason for different co-pay menu appears.
- Reason for different co-pay — If the patient does not pay the full copay amount, select the reason for not collecting the full copay from the menu, for example, Patient was unable to pay or Co-pay may not be correct.
- Additional payment for today's services — Enter any additional payments.
- Click Next.
How will the patient pay?
- Payment type — Select Credit Card.
- Card on File — Select one of these options:
- Yes, authorize card — This option saves the credit card as a card on file for future payments.
- No, patient declined
- Yearly limit (Optional) — Click Edit to change the annual or single-visit limit for the saved card, then click Save.
- Click Collect Payment.
A new window appears. - Swipe or insert the credit card, or enter the card information manually.
- Billing address — Enter the patient or guarantor's address information.
- Click Collect Payment.
Note: If you do not make a selection, a message appears asking you to do so.
- During Check-in (or Checkout), scroll down to the Payment and Balances section.
- Review the information about outstanding balances, bad debt, and pre-existing card agreements.
Past Visits
- Outstanding balance — If the patient has an outstanding balance, enter a payment in this field, even if it is $0.00.
If the patient cannot pay the full amount or any of the outstanding balance, select the reason from the Reason for not collecting in full menu. - Balance sent to collections — If the patient has balances that were sent to a collection agency, you can click Show details to display this information. You can collect a full or partial payment for this balance. Any payment made is posted as a recovery adjustment and decreases the patient's collections outstanding amount.
Today's Visit
- Copay — Enter the copay amount that the patient gives you.
Note: If the patient has secondary insurance, a message states that a copay may not be required. If you want athenaOne to automatically set the default copay amount to $0 when a patient has secondary insurance, contact your Customer Success Manager. - If the copay type is not correct, click Edit, then select the correct copay type from the Copay menu. You can see the copay types and amounts for the insurance package under the Insurances heading.
- If athenaOne automatically sets the default copay amount to $0 for patients with secondary insurance, you can click the Reset link to enter a copay amount.
Note: For more information, see Copays for patients with secondary insurance policies. - If you enter a dollar amount smaller than the total copay amount, the Reason for different co-pay menu appears.
- Reason for different co-pay — If the patient does not pay the full copay amount, select the reason for not collecting the full copay from the menu, for example, Patient was unable to pay or Co-pay may not be correct.
- Additional payment for today's services — Enter any additional payments.
- Click Next.
How will the patient pay?
- Payment type — Select Cash/Other.
Note: The Check option in the Payment type menu is for electronic checks only. For personal checks from patients, select Cash/Other from the Payment type menu. - Payment method — Select Check or Cash.
- If you selected Cash as the payment method, click Collect Payment.
- If you selected Check as the payment method:
- Check number — Enter the check number.
- Click Collect Payment.
You can collect patient bad debt balances at the time of service.
Note: This feature improves the payment collection workflow at TOS. However, it does not change your existing workflows. You can continue to collect patient balances via cash, credit card, and check as you normally would.
Click Show details to expand more information
The patient bad debt balance appears in the Bad debts field of the Patient Balances section.
You can click Show details to display additional information about the patient bad debt balance.
Non-family patient view
- Bad debts — In Bad Debts field, enter the amount you intend to collect.
Note: Click Collect All to collect the entire amount in the Total due field. - Enter any other amounts for outstanding balances or copay per your usual workflow.
- Click Continue.
The Total amount to be collected section appears - Payment type — Select an option from the list.
- Payment method — Select an option from the list.
- Click Collect Payment.
Note: There is no change to the patient receipt but it does additionally list the bad debt money collected at charge level as outstanding money collected.
Family billing patient view
- Bad debts — In Bad Debts field, you can:
Note: Click Collect All to collect the entire amount in the Total due field.- Enter the amount you intend to collect in the Bad Debts field.
- Family Outstanding balance — Enter an amount in the Family Outstanding balance field or click View individual balances to enter amounts for specific family members of the patient.
- Enter the amount you intend to collect in the Bad Debts field.
- Once you choose how to collect the patient bad debt balance, enter any other amounts for outstanding balances or copay per your usual workflow.
- Click Continue.
The Total amount to be collected section appears. - Payment type — Select an option from the list.
- Payment method — Select an option from the list.
- Click Collect Payment.
Note: There is no change to the patient receipt but it does additionally list the bad debt money collected at charge level as outstanding money collected.
Collect a partial or zero dollar amount
If there is a partial amount or no amount collected against the bad debt, you can select a reason from the Reason for not collecting in full list. If you select 'Other', enter details in the note/comment field.
If you choose to collect zero (0.00) dollars at TOS, you’ll see a message informing you that no payment was collected from the patient.
Note: There is no change to the patient receipt but it does additionally list the bad debt money collected at charge level as outstanding money collected.
- You can print a Receipt if you collected money during check-in.
- You can print the appropriate billing slip and any forms needed for this visit.
- Click Done with Check-in..
In the Non-Clinician view of the schedule, checked-in patients are indicated by the "Ready for Staff" status.
Note: If you check in a patient for an appointment related to an accident or work-related injury and the patient has no active case policy, the Case Policy Alert page appears when you click Done with Check-in. The Case Policy Alert page provides buttons that allow you to create a new case policy or continue the workflow without creating one.
Note: By default, athenaOne creates a billing slip for each appointment for the same patient on the same day. If you want athenaOne to create a billing slip only for the first of multiple appointments, contact the CSC from athenaOne > Support > Success Community > Contact Client Support Center.
- Display the Appointment page: On the Non-Clinician home page, click a patient name in the schedule.
- Click Start Check-in. The Check-in page appears.
The associated multi-resource appointments are also checked in together by default. athenaOne assigns the same status to the associated appointments, so that when you check in one of the multi-resource appointments, all the multi-resource appointments are checked in. The same is true for checkout.
Note: If you accidentally start check-in for other appointments for the patient, click Cancel Check-in on the Check-in page, and then start check-in for the appropriate appointment. - Follow the steps above to check in a patient.
- Click Save.
- Click Done with Check-in to move to the next stage in the 5-stage patient encounter. The selected appointments are tied together throughout the 5-stage patient encounter.
Note: The checkboxes on the Charge Entry page reflect any selections you made on the Check-in page. On the Charge Entry page, you'll need to select a reason for not requiring charge entry for any selected appointments.
Note: If you access the Checkout page for a multi-resource appointment and one of the related appointments does not have all previous steps completed, the Checkout page displays links to all the related appointments, so that you can access the appointment and complete the work.
The No Surprises Act was signed into law on December 27, 2020 as part of the Consolidated Appropriations Act of 2021. The legislation became effective on January 1, 2022 (for claims with a Date of Service of January 1, 2022 or later).
The No Surprises Act:
- Protects patients from surprise medical bills for emergency services and certain services performed by out-of-network providers at in-network facilities
- Requires that providers and facilities provide patients good faith estimates of charges for scheduled health care services for uninsured (or self-pay patients), and provide insured patients good faith estimates if consenting to applicable out-of-network provider services at in-network facilities
- Establishes an independent dispute resolution (IDR) process to resolve payment disputes between a provider or health care facility and a patient's health plan
Your practice must determine whether your providers and care facilities are subject to the No Surprises Act requirements. Use of these athenaOne features does not guarantee compliance, but will facilitate your organization’s efforts to meet relevant regulations.
If you intend to balance bill for applicable services, the No Surprises Act requires that you notify patients about a qualifying out-of-network provider within specified timeframes before their appointment and receive appropriate consent. This functionality is available if the No Surprises Act Consent feature has been enabled for your practice. For reference, see the User Guide — athenaOne Support for Compliance with No Surprise Billing Legislation.
You can use the Self-Pay Cost Estimate tool to generate a cost estimate for self-pay patients when viewing an appointment that hasn't been checked in yet.
- Enter the expected procedures/modifiers for the appointment. You can use Cost Estimation Templates for specific departments to automatically populate the Procedure code fields, instead of manually entering procedure codes.
-
The athenaOne system generates an estimate based on costs defined in your fee schedules.
-
When you send (email) or print a cost estimate, athenaOne saves a record in the View Patient Appointments page and can also save the cost estimate in the Patient Chart.
Note:athenaOne will only upload self-pay cost estimates to patients' charts whenever all these conditions are true:
- Your practice uses athenaClinicals (it doesn't matter if the athenaOne user who is creating and sharing the cost estimate has access to patient charts).
-
Your department has Clinicals set to ON in Practice Settings. If you aren't sure about your Clinicals settings, contact your CSM.
- The Good Faith Estimate was shared with the patient via Send/Print button.
- The On send/print, automatically upload a copy to the patient's chart checkbox is selected.
Benefits:
- Surface cost estimates to patients before the encounter
- Automatically pull from your organization's fee schedule based on entered CPTs
- Create and share a Good Faith Estimate (CMS-10791 Form), to support No Surprise Billing for self-pay patients
- Improve transparency between your organization and patients, increasing probability of patient payment
- If the patient cannot pay an outstanding balance in full, offer a clearly defined payment plan.
- Ask the patient for the information to confirm all patient demographic information (for example, "What is your current address?" instead of "Are you still at 19 Elm Street?").
- Ask the patient to present the most current insurance card, and scan the image of this card.
- Confirm that the patient has a signature on file for HIPAA, release of medical information, and assignment of benefits.
- Collect 100% of copayments, coinsurance, and/or patient outstanding balances.
- If the patient cannot pay an outstanding balance in full, offer a clearly defined payment plan.
Patient validation messages alert you to potential billing or workflow issues. Validation messages appear on these pages: Quickview, Check-in, Update Policy Details, Appointment, and Schedule Appointment. By addressing these issues, you reduce work for your billing staff and increase the probability of successful claim adjudication. These issues include:
- Demographic mismatches
- Missing patient demographic data
- Missing insurance card images
- Insurance package review issues
- Coordination of benefits issues
Note: Primary insurance is checked on the Quickview, Check-in, Update Policy Details, Appointment, and Schedule Appointment pages. Secondary insurance is checked only on the Update Policy Details page.
These validation checks are based on rules from the athenahealth billing rules engine and the patient rules engine. If a patient validation rule is triggered, a message indicating the potential issue appears on one or more of these pages.
- A red warning message alerts you to issues that will cause the patient's claim to go into HOLD or MGRHOLD.
- A purple informational message indicates issues that you should be aware of but that may not hold the claim.
To ignore a warning message, click Dismiss in the warning message. To reduce the likelihood of claims being sent to your HOLD and MGRHOLD queues, correct these issues before claim creation.
The Patient Validation Rules report provides visibility into staff behavior and creates training opportunities for your practice. This report, which you can find on the Front Office Operations tab of the Report Library, displays the following information:
- For each user and each rule, the number of times that the user dismissed the rule at check-in.
- Number of claims created in HOLD with that rule.
| Appointment information for the current date | |
|---|---|
| Appt type |
The appointment type. See also: Appointment Types page. |
| Rendering provider |
The provider who actually renders the service to the patient for this appointment. Note: This field is typically used for internal tracking and reporting purposes; the selected provider will generally not appear as the rendering provider on the claim. |
| Scheduling provider | The provider scheduled for this appointment. |
| Department | The department of service for this appointment. |
| Notes/Reason | Any notes about this appointment, including the reason for this appointment. |
| Patient reason | Patient reason for this appointment. |
| Appointment confirmation result |
athenaCommunicator only The result returned by an automated phone appointment confirmation service, such as ReminderCall. |
| Appointment Information (for a future date) | |
| Appt type |
The appointment type for this appointment. |
| Dept |
The department of service for this appointment. |
| Scheduling provider |
The provider scheduled for this appointment. |
| Rendering |
The provider who will actually render service to the patient for this appointment. |
| Primary insurance |
The primary insurance policy for this appointment.
If your practice has the Post-Adjudication Sliding Fee Plans practice setting = OFF:
Note: The Cost Estimate tool will only appear if the patient's Primary Insurance is Self-Pay or No-Insurance/Self Pay. |
| Sliding Fee Plan |
Note: This field will only appear if:
To apply a sliding fee discount in the cost estimate, select a sliding fee plan here.
|
| Secondary insurance |
The secondary insurance policy for this appointment. |
| Notes/Reason | Any notes about this appointment, including the reason for this appointment. |
| Urgency |
Select this option if this appointment is urgent. Note: This option appears only if your practice uses the Walk-in Encounter Management Feature. |
| Appointment confirmation result |
athenaCommunicator only The result returned by an automated phone appointment confirmation service, such as ReminderCall. |
| Authorization |
Authorization or referral number. If entered, this number will be associated with the appointment and will print in CMS-1500 block 23 (Prior Authorization Number). |
| Patient's condition related to |
Select the appropriate Yes or No response These selections determine the referral rules used for the claim and are used as the default values for the same questions on the Charge Entry page. But if you also change the Primary insurance here, these Yes/No responses are reset to those set for the newly selected policy. |
| Employment |
Select Yes to indicate that the patient's condition is employment-related. |
| Auto accident |
Select Yes to indicate that the patient's condition is related to an auto accident. |
| Other accident |
Select Yes to indicate that the patient's condition is related to an accident other than an auto accident. |
| Out-of-Network Billing Consent |
This functionality is available if the No Surprises Act Consent feature has been enabled for your practice. For reference, see the User Guide — athenaOne Support for Compliance with No Surprise Billing Legislation.
|
| Verify & Edit Registration Information | |
| Patient notes |
The notes you enter here also appear in the Patient notes field on the Quickview and Patient Registration pages. This note is not printed on any form. |
|---|---|
| Patient Outstanding |
(athenaCollector) The patient's outstanding balance. Debit amounts appear in red. Credit amounts appear in green. If the balance is over $100, the amount appears in red, with the message (LARGE PATIENT BALANCE).
If the patient has had balances written off to bad debt, the sum total appears in blue (Adjusted off to bad debt). This is visible only if you have the View Bad Debt Write-Off Amount permission (included in the Practice Superuser and Billing Admin roles).
(Click view billing summary to see the details.) |
| Family Outstanding |
This field shows the combined outstanding balance for the patient's family. This field appears only if the patient has other family members registered in the practice, and if your practice has the Family Billing feature enabled. |
| Currently Admitted To |
This appears only if your practice has the Patient Rounding Lists practice setting enabled. Displays the department of admission if patient has been admitted; and links to edit admission, discharge patient, and view admit history. Otherwise, displays "Not admitted." |
|
|
|
| Patient Privacy |
Up to three privacy checkboxes may appear: Notice Given, Release of Info on File, and Assignment of Benefits on File. The number of checkboxes that appear depends on the "Number of Patient Privacy Checkboxes" practice setting. If the patient has any privacy notes and requests, they appear below the checkboxes. These items are administered on the Privacy Information page. |
| Notice Given |
Indicates whether the patient received the Notice of Privacy Practices. |
| Release of Info on File |
Indicates whether the provider has on file a signed statement from the patient or authorized person permitting release of claim information for billing purposes. |
| Assignment of Benefits on File |
Indicates whether the provider has on file a signed statement from the patient or authorized person permitting the payer to assign benefits to the provider (i.e., authorizes the payer to remit payment to the provider directly). |
| Last Name |
The last name (surname) of the patient. |
| First Name |
The first name (given name) of the patient. |
| M. Name + Suffix |
The middle name of the patient; name suffix (i.e., Jr., Sr., III, etc.). |
| Previous name (last, first) |
Enter the patient's previous first and last names (if applicable): last name in the left-most field and first name in the right-most field. |
| DOB |
The patient's date of birth in the format: mm/dd/yyyy. |
| SSN |
The patient's Social Security number. |
| Address |
The first line of the patient's address. For apartments, use this format: 1199 Whitney Ave #310. |
| Address (ctd) |
The second line of the patient's address (use only if needed). |
| Zip |
The patient's 5-digit ZIP code. The ZIP code will autopopulate the City and State fields from the athenahealth ZIP code database. (If you find an error, please contact the CSC from athenaOne > Support > Success Community > Contact Client Support Center.) |
| City |
The patient's city. |
| State |
The patient's state. |
| Country |
The patient's country. This field is displayed only if the "Foreign Patient Addresses" feature is enabled for your practice. If you need the Country field, contact the CSC from athenaOne > Support > Success Community > Contact Client Support Center to request it. Some countries have an address format that differs from the U.S. default of address, city, state, and ZIP code. athenaOne automatically formats foreign mailing addresses according to the country's specifications for all claims, bills, statements, and other correspondence. Note: If the Country field is enabled for your practice and the country is not the United States, select the country from the menu, and then enter the two-letter postal abbreviation for the country in the State field. |
|
The patient's email address. This is not currently used to communicate with the patient for security reasons; it is merely a field reference. |
|
| Driver License Image |
Appears if your practice has the card scanning feature enabled. Contains a link to the scanned image or the add card image link. |
| Status |
The patient status within the practice. |
| Sex |
The patient's legal sex (male or female) on legal documents such as the insurance card or driver's license. Read here to understand how this data impacts measure enrollment in Quality Reporting programs. Note: Exam templates — such as the History of Present Illness Templates, Review of Systems Templates, and Physical Exam Templates — can be configured for male or female patients only. If your practice does not require the patient's gender/sex to be specified as part of patient registration or the check-in process, some of your exam templates may not be available when you see patients in an expedited encounter. |
| Home Phone |
The patient's home phone number; format: (999) 999-9999. |
| Work Phone |
The patient's business phone number; format: (999) 999-9999. |
| Primary Department |
The patient's current active department. This is typically the department at which the chart is kept. It may differ from the department of registration if the patient has been transferred from one department to another. |
| Usual Provider |
The patient's primary provider at this practice. By default, the name of the rendering provider is printed at the top of patient statements. If you prefer to print the name of the usual provider at the top of patient statements, please contact the CSC from athenaOne > Support > Success Community > Contact Client Support Center. |
| Marital Status |
The patient's marital status. |
| Language |
The patient's primary language. The contents of this menu are administered by athenahealth. |
| Race |
The patient's race. The first Race menu includes your practice's most used options. To see the full list of races, select Other in the Race menu. The expanded list appears in a separate menu.
Patient Declined checkbox — This checkbox is used to populate the value "941^Patient Declined" for race in outbound interfaces. |
| Ethnicity |
The patient's ethnic affiliation. To select more than one ethnicity, click the plus icon Note: athenaOne uses the CDC Race and Ethnicity Code Set Version 1.0 for races and ethnicities.
Patient Declined checkbox — This checkbox is used to populate the value "61^Patient Declined" for ethnicity in outbound interfaces. |
| Insurance | |
| Primary |
The patient's primary insurance. |
| Secondary |
The patient's secondary insurance. |
| Collect Payment (athenaCollector) | |
|---|---|
| Post Date |
The date the patient payment is collected (defaults to the current date). |
| Time-Of-Service Batch |
The batch number of the user's current open time-of-service batch. |
| Method |
The payment method used to make the payment at check-in time (this menu is administered on the Payment Methods page). |
| Check # / Last 4 digits of CC # |
The check number or the last four digits of the credit card number the patient used to make the payment (if appropriate). If the payment method is check, the check number is required. |
| Column Headings (open charge items, if any — athenaCollector) | |
| Service Date |
The date of service for the charge item (in bold green type). |
| Procedure |
The procedure code and short procedure description for the charge item. |
| Outstanding Amount |
The amount of the expected payments. |
| Today's Payment |
Enter the payment amount you that collect from the patient for this charge item. |
| (athenaCollector) | |
| Today's Copay expected (this field is the drop-down copay "type") |
The field auto-populates based on the provider type and the place of service; you may override the type by selecting a different copay type from the menu. This menu affects the amount of the copay; the insurance package may require a different copay amount for the different procedure categories listed in this menu. |
| copay $ |
The copay amount required by the patient's insurance policy for the selected procedure (above). |
| Coinsurance (usual coinsurance |
The coinsurance percentage required by the patient's insurance policy. Coinsurance is an alternative to copay. Use either copay $ or Coinsurance, but not both.
Coinsurance is calculated using the allowable amount from the allowable schedule for the payer and procedure code. If there is no allowable schedule for the payer and procedure code, athenaOne uses the procedure code amount as specified in the fee schedule.
For example, for a $100 charge with a 20% coinsurance, where the payer allowable schedule specifies $80 as the allowable amount, the expected coinsurance is calculated as 20% of $80, or $16. If there were no allowable schedule, the coinsurance amount is calculated as 20% of $100, or $20. |
| Other Payment Amount reason |
If the patient makes an additional payment at check-in, select the reason for the additional payment. |
| TOTAL |
The total amount paid by the patient at check-in. This field is auto-filled as amounts are entered in $ fields under the Today's Payment column. |
|
Cost Estimate
Note: The Cost Estimate section will only appear if the patient's Primary Insurance is Self-Pay or No-Insurance/Self Pay. |
|
| Primary Insurance |
(view-only) |
| Department |
(view-only) |
| Upcoming appointment |
(view-only) |
| Select a template below or enter procedure codes and modifiers |
Select a Cost Estimation Template based on the department.
(if your organization has not created any Cost Estimation Templates in athenaOne, the template menu will be blank and you will need to manually enter procedure codes and applicable modifiers.) |
|
Procedure Code, Modifiers
Units |
If you selected a Cost Estimation Template: athenaOne automatically populates the Procedure code,Modifiers and Units fields with the procedures your organization defined in the selected template. Edit the defaulted values if needed. Note: Adding or removing procedure codes or units during estimate creation does not change the template.
If you did not select a Cost Estimation Template: Enter Procedure Codes and Modifiers for the patient's appointment.
The following appears for each Procedure you enter:
|
| Create and share Good Faith Estimate (No Surprises Act: CMS-10791) | |
| Procedure, Modifiers | (view only) |
| Units | (view only) |
| Description | (view only) |
| Optional: Diagnosis code |
Enter a diagnosis code for each of the CPT codes in the cost estimate. You can enter up to four Diagnosis codes for each CPT code.
Note: The system does not validate the diagnosis code. (Even if you enter an invalid diagnosis code, you can still generate the form.) |
| Diagnosis description | (view only) |
| Cost | (view only) |
| Additional health care provider/facility notes |
Enter any additional notes to appear on the Good Faith Estimate form.
|
| Check In Other Appointments For This Patient | |
|
|
Checkboxes appear for appear for any appointments scheduled for the patient on the same day and department, listed chronologically. |

