 User Guide — Processing NSF Checks (bad checks)
Please follow this guidance when you process an NSF check received as remittance.
athenahealth handles nonsufficient funds (NSF) checks automatically. You do not need to take any action if:
- Your practice uses Credit Card Plus. athenahealth handles NSF e-checks for you.
- Your practice uses athenaMailbox. NSF checks sent by a patient to your athenahealth P.O. box are deposited into U.S. Bank. U.S. Bank notifies athenahealth about NSF checks, and we handle NSF checks for you.
Note: If you want to add an NSF fee to the patient's account, use the appropriate MISC code on the patient claim. If no claim was involved, you can create a new claim with only the MISC code and a date of service matching the date when the check bounced from the relevant bank.
If your practice does not use Credit Card Plus or athenaMailbox and you need to process an NSF check in athenaOne, you must determine whether the check was collected as a time-of-service (TOS) payment or recorded as part of a remittance payment batch. To make this determination, you can use the Manage Payment Batches page to search for the payment batch by check date, or you can use the Billing Worklists page to search by check number.
You must also determine whether the money was recorded as a payment transaction or whether the funds are still included in the patient's unapplied account.
- Close any open remittance payment batch and reconcile your cash drawer, if you have not already done so (to close any open TOS payment batches).
- Locate the patient account to which the payment was made.
- Use the Find Patient tool to search for the patient using the name on the check.
- Display the Billing Worklists page: On the Main Menu, click Claims. Under CLAIM MANAGEMENT, click Billing Worklists. In the "Search for Payments by Check Number" section, search for the check number.
- Display the Quickview page for the patient who wrote the bounced check, and click the View billing summary link to display the Billing Summary page.
- Using the date of the check as a guide, try to locate the payment corresponding to the returned check on the Billing Summary page.
If you find the payment on the Billing Summary, the payment exists as a payment transaction:
- If the check was recorded as a TOS payment, follow the steps to process an NSF check for a TOS payment transaction.
- If the check was recorded as part of a remittance payment batch, follow the steps to process an NSF check for a remittance payment.
If you do not find the payment on the Billing Summary, the funds are recorded in the patient's unapplied account. Follow the steps to process an NSF check for an unapplied amount.
To remove the returned check payment, you void the payment transaction so that the funds return to the patient's unapplied balance and then void the original, unapplied transaction. Follow these steps:
- Review the "Overview and critical guidance" section on this page.
- Display the Billing Summary page: On the Quickview, click View billing summary.
- Click the linked claim number (at the far left of the payment) to display the Claim Edit page.
- On the Claim Edit page, scroll down to the charge-level transactions, identify the payment corresponding to the returned check, and click Void.
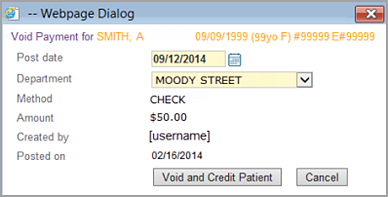
- If athenaOne displays the following dialog box:

- Verify that the post date and department for the void are correct.
- Click Void and Credit Patient.
- Display the Patient Activity page and click Detail view.
- Locate the original unapplied transaction and click the void link.
- Click Void in the dialog box.
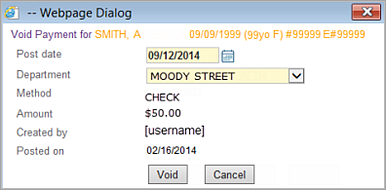
- If athenaOne displays the following dialog box:

- Verify that the post date and department for the void are correct.
- Click the Void button in the dialog box.
- Create the negative TOS deposit batch as follows.
- Display the Manage Time-of-Service Money page: On the Main Menu, click Financials > Under PAYMENTS, click Time-of-Service Money, and then click the Create Deposits - Cash & Checks tab.
-
Select the negative payment batch that contains your voided payment, then click Add Checked Items to Deposit Batch.
- Select the bank account that corresponds to the bank into which the returned check was originally processed.
- Enter a deposit amount equal to the amount of the returned check; this will be a negative deposit amount.
- Enter a deposit date that corresponds to the date on which the returned check appeared on your bank statement.
- Click Save & Close to create the negative deposit batch.
To remove the returned check payment, you void the payment transaction so that the funds return to the patient's unapplied balance and then void the original, unapplied transaction. Follow these steps:
- Review the "Overview and critical guidance" section on this page.
- Display the Billing Summary page: On the Quickview, click View billing summary.
- Click the linked claim number (at the far left of the payment) to display the Claim Edit page.
- On the Claim
Edit page, scroll down to the charge-level transactions, identify
the payment corresponding to the returned check, and click Void. If the payment corresponding to the returned
check was originally collected in a remittance payment batch, athenaOne
displays a dialog box with a note saying:
YOU MUST OPEN A PAYMENT BATCH BEFORE YOU POST PAYMENTS/ADJUSTMENTS. If you are posting only adjustments, you must create a zero-dollar payment batch. - Click Create New Batch.
- Create a deposit batch/payment
batch pair to represent the returned check payment:
- Enter a deposit date that corresponds to the date on which the returned check appeared on your bank statement.
- Select the bank account that corresponds to the bank into which the returned check was originally processed.
- Enter a deposit amount equal to the amount of the returned check; this will be a negative deposit amount.
- Enter a payment batch target amount equal to the amount of the returned check; this will be a negative amount.
- Click Save.
- Click Assign Payment Batch.
- Click Continue.
The Void Transaction page appears.
- From the Payment Batch menu, select the payment batch that you just created for your returned check.
- Click Void This Transaction.
- Click Continue. The Claim Edit page reappears for the claim from which you voided the payment.
- Display the Payment Batch page: On the Main Menu, click Financials > Under MONEY MANAGEMENT, click Begin/End Payment Batch.
- Click Close This Payment Batch.
- Review the "Overview and critical guidance" section on this page.
- Display the Patient Activity page: On the Quickview, click View patient activity.
- Click Detail view to display the detailed view of the Patient Activity page.
- Locate the original unapplied transaction and click
void.
athenaOne displays a dialog box. - Click Void in the dialog box.
- Create a TOS deposit
batch to represent the returned check as follows.
- Display the Manage Time-of-Service Money page: On the Main Menu, click Financials > Under PAYMENTS, click Time-of-Service Money.
- Click the Create Deposits - Cash & Checks tab.
Note: If the voided NSF payment does not appear on the Create Deposits - Cash & Checks tab, click the Create Deposits - Credit Cards tab; from the Bank Deposit Type menu, select OTHER. The voided NSF payment should appear under the Choose Payment Batches to Include in Deposit heading on the Create Deposits - Credit Cards tab. - Select the negative payment batch that contains your voided payment and click Add Checked Items to Deposit Batch.
- Select the bank account that corresponds to the bank into which the returned check was originally processed.
- Enter a deposit amount equal to the amount of the returned check; this will be a negative deposit amount.
- Enter a deposit date that corresponds to the date on which the returned check appeared on your bank statement.
- Click Save
& Close to create the negative deposit batch.
Note: If patients are charged additional fees for returned check items, you can add additional charges to the claims from which the returned check payments are being voided.