 User Guide — Reporting Networks
A reporting network consists of a parent tablespace and the child tablespaces that are tied together under the parent. A reporting network connects all the practices/tablespaces within an organization, allowing you to coordinate policies and enhance reporting throughout the organization, as well as allowing athenahealth to provide performance metrics for your entire organization.
Note: If your organization is interested in setting up a reporting network, please contact your Customer Success Manager.
To use the network features available in a reporting network, superusers need the following roles or permissions (granted at the reporting network level):
- Practice Switcher role or permission
- Enterprise: Network Dashboard role or permission
The following roles or permissions are recommended for users to easily navigate the reporting network:
- Access to all Departments role or permission
- Access to all Providers role or permission
- *Billing Admin role
A reporting network consists of a parent organization and the smaller (child) entities under the parent umbrella. If your organization owns and operates multiple practices, athenahealth can set up a reporting network for you to help you coordinate policies and reporting across your organization. Large national organizations and management services organizations (MSOs) are ideal candidates for a reporting network, which offers centralized visibility and control over certain aspects of their various business units.
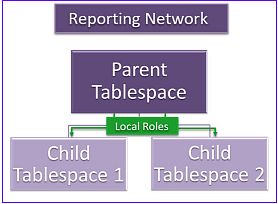
A reporting network connects all practices within a healthcare organization, allowing you to standardize certain configurations and policies throughout the organization and allowing athenahealth to provide performance metrics for your entire organization.
Note: If your organization is interested in connecting your practices in a reporting network, please contact your Customer Success Manager.
A reporting network provides additional capabilities available only to networked clients. Practices linked in a reporting network become child sites to a parent-level reporting network hub.
Note: The parent-level tablespace in the reporting network does not contain patient or financial data and cannot be logged in to in the same way that you log in to a practice.
A reporting network provides the following features to your organization:
- Cross-practice reporting, including the Activity Wizard, the A/R Aging Wizard, and the Report Builder.
Note: The ability of a user to run a cross-practice report depends on the permissions granted to that user in specific practices. - Network Dashboard (cross-practice workflow dashboard).
- Network superuser roles and permissions managed and standardized across the entire network.
- Local roles standardized and applied to users across the network.
- athenaOne major releases deployed throughout the network on the same day.
A reporting network can also be subdivided, with an additional layer that groups tablespaces by region, for example. For large organizations with many tablespaces, it is often useful to create multiple smaller networks within the larger organizational network to allow for reporting and governance across individual business segments, as well as across the organization as a whole.
Note: Multilevel reporting networks are often used by organizations with affiliate programs that differ from their core business unit.
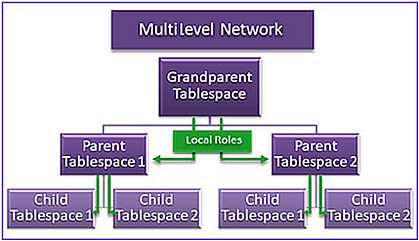
Only two levels of network tablespaces can be configured for a reporting network. That is, a child practice in a reporting network can have only a parent tablespace and a grandparent tablespace that encompasses the entire reporting network.
In a reporting network, global user roles can be granted — and local roles can be created — at both the network level and the practice level. Practices (child-level tablespaces) inherit the global user roles and local roles configured at the network level, but user roles and local roles configured at the practice level apply only to the individual practice.
Note: Local roles can be restricted to a specific practice. If your organization requested that local roles be associated with a specific practice only, the Context ID column on the Local Roles page lists a child context ID instead of the reporting network ID. (To change this configuration option, contact your CSM.)
The figure below shows a network that links two child practices (in green) to a single reporting network (in blue). The blue lines and symbols show the direction and behavior of role inheritance.
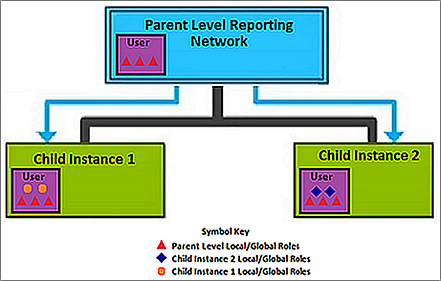
Global user roles can be assigned to users at the network (parent) level and at the practice (child) level. In a reporting network, global user roles are applied as follows:
- When you assign a user role to a user at the network level, that user has the access specified in the role in every practice tablespace within the reporting network.
Important: User roles granted at the network level apply to every practice within the reporting network; for this reason, be very careful about granting roles at the network level. - When you assign a user role to a user at the practice (child) level, that user has the access specified in the role only in that practice tablespace.
In a reporting network, the user roles assigned to a specific user include both:
- Roles assigned to the user at the network level
- Roles assigned to the user at the practice level
In a multilevel reporting network, child practices inherit user roles granted at the parent network level and at the grandparent (hub) network level.
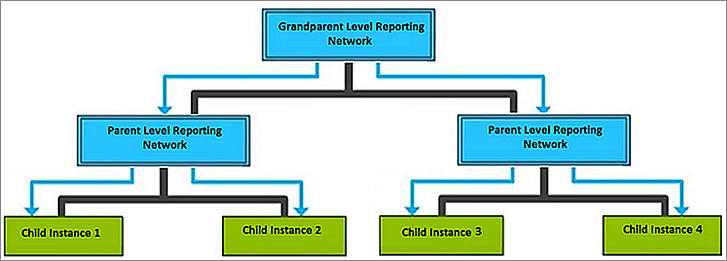
In this reporting network, roles granted to users at the grandparent level apply to those users in any practice in the network, that is, in child practices 1–4. Users in child practice 1 and child practice 2 also inherit user roles granted at the parent level; however, roles granted to child practice 3 and child practice 4 at the parent level for those child practices do not apply to child practice 1 and child practice 2.
Local roles can exist at both the network level and the practice level. In a reporting network, local roles are applied as follows:
- Local roles created at the network level can be used by all users in any practice tablespace across the whole network.
- Local roles created at the practice (child) level can be used only in that practice tablespace (these local roles are not available to other practices in the reporting network).
Note: If a user in one tablespace was assigned a local role that was created elsewhere in the network and that user's tablespace is removed from the network, the user loses access to the local role.
In a reporting network, the local roles assigned to a specific user include both:
- Local roles created at the network level and assigned to the user
- Local roles created at the practice level and assigned to the user
Note: Avoid assigning local roles to one user that contain redundant or conflicting permissions. If, at the practice level, you grant a user a local role that provides view only access but, at the network level, you grant the same user a local role that provides superuser access, the user will have superuser access in the child practice (the local role created at the network level overrides the role created at the practice level).
Creating and editing local roles in a reporting network
To create or edit local roles at the network or practice level, a user must have access to local roles at the network level.
Note: If a user had access to local roles at the practice level before the reporting network was set up, the user can continue to assign and revoke the existing local roles in that practice. However, the user cannot edit the local role unless she has permission to edit local roles at the network level.
To use the network features available in a reporting network, superusers need the following roles or permissions (granted at the reporting network level):
- Practice Switcher role or permission
- Enterprise: Network Dashboard role or permission
The following roles or permissions are recommended for users to easily navigate the reporting network:
- Access to all Departments role or permission
- Access to all Providers role or permission
- *Billing Admin role
If you have the required permissions, you can see a list of all tablespaces included in the reporting network and display the Workflow Dashboard for one or more of these practices.
- Log in to a practice connected to the reporting network.
- Display the Billing Admin menu: On the Main Menu, click Settings
 >Under ADMIN, click Billing.
The Switch Practice field appears at the top of the Billing Admin task bar.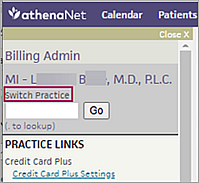
- Switch Practice — Enter the parent ID of the enterprise reporting network and click Go.
The Network Dashboard link appears in the Billing Admin task bar (under Miscellaneous). - Click the Network Dashboard link to display the list of practices connected to the reporting network.
The Network Dashboard appears in the Workspace.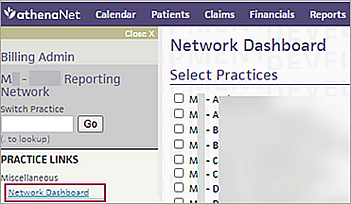
- Select one or more practices in the list and click Submit.
The Workflow Dashboard for each selected practice appears, one atop the other. You can work on any task in any of the Workflow Dashboards. - If you select a task in the Workflow Dashboard of a practice other than the practice you are logged in to, you are prompted to switch your login to that tablespace.
- Click OK to display the Workflow Dashboard of the other practice.
You are now logged in to the destination practice. - Click Cancel to stay on the Network Dashboard.
- Click OK to display the Workflow Dashboard of the other practice.
User roles and local roles configured at the parent level of a reporting network are inherited by all child practices in the network. To access the network-level roles, follow these instructions.
Note: For information about how user roles and local roles work in a reporting network, see Global user roles and local roles in a reporting network.
- Log in to a practice connected to the reporting network.
- Display the User Admin menu: On the Main Menu, click Settings
 >Under ADMIN, click User.
The Switch Practice field appears at the top of the User Admin task bar.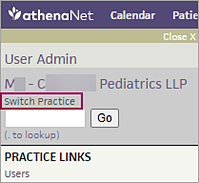
- Switch Practice — Enter the parent ID of the enterprise reporting network and click Go.
The User Admin links in the task bar are redisplayed. These links allow you to configure user roles and local roles at the network level. - To configure users roles at the network level, click Users.
- To configure local roles at the network level, click Local Roles.
User interaction with claim worklists in a reporting network is slightly different from the same actions in a non-networked practice.
- Claims accessed from the claims worklist open in a separate browser window if the claim exists in a practice other than the one that the user is logged in to.
- Some claim inbox actions available in non-networked practices are not available in a reporting network.
Exception: See To enable more custom claim worklists functionality for a reporting network.
For more information about claim worklists, see Claim Worklists Feature.
Practices who are part of a reporting network can request access to the same custom claim worklists functionality that non-networked practices have as follows:
-
Before contacting athenahealth, complete your worklists, or get a list of your queued claims.
-
Contact your CSM or onboarding project team and request that the Additional Custom Claim Worklists Functionality for Practices in Reporting Network feature be enabled.
Important: When this feature is enabled, your queues are reset, so any queued claims will be removed from the queues and reset to their original state.
If your practice is part of a reporting network, you can access the following functionality only if the Additional Custom Claim Worklists Functionality for Practices in Reporting Network feature is enabled for your organization. This allows you to access the same functionality that's available to non-networked practices.
Additional options within the filter
The following additional fields appear on the My Claims, Pended Claims, and Escalations tabs of the Claim Inbox page when you click Update Filter Criteria:
-
Diagnosis codes
-
Patient department
-
Primary department
-
Specialty
Additional options within Configure Table Columns
The following additional fields appear on the My Claims tab of the Claim Inbox page when you click Configure Columns:
-
Diagnosis codes
-
Patient Department
-
Primary Department
-
Referring Provider
-
Specialty
Ability to work all tasks within the Claim Edit page
You have additional options to work tasks within the Claim Edit page:
-
The Claim Inbox menu appears in the top right, next to the Resources menu, and contains the following options:
-
Assign Claim
-
Go to Claim Inbox
-
-
Additional option in the Resources menu:
-
View Clinical Encounter
-
-
Additional options in the claim Actions menu on the Claim Action page:
-
Adjust Balance
-
Appeal Denial
-
Cross-practice reports generate significantly more data than single-practice reports. For this reason, use the Practice filter field and other filter fields — such as date, provider, provider group, department, or insurance reporting category — to specify the search criteria for your cross-practice reports.
athenahealth recommends that you run cross-practice reports offline (to be delivered to the Report Inbox) for best results.
If your organization uses a reporting network, you can run a cross-practice version of the Activity Wizard or A/R Aging Wizard report.
- Display the report page:
- On the Main Menu, click Reports. Under FINANCIALS, click Activity Wizard.
- On the Main Menu, click Reports. Under FINANCIALS, click Accounts Receivable Aging Wizard.
- Scroll down to the bottom of the page and click the Cross-Practice button.

The advanced view of the Activity Wizard or the A/R Aging Wizard page is displayed. - Enter the date range for your report.
- Practice — Select the practices in your reporting network that you want to report on.
Note: If you select the Show All option, the report displays results for each practice individually. - Split out practices — Select this option to display the report results by practice.
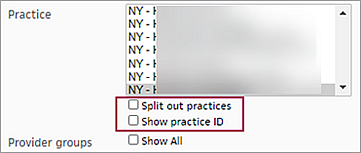
- Show practice ID — Select this option to display the practice ID in the report results.
- Set all other options for the report (see Activity Wizard or A/R Aging Wizard).
- Run the report now or generate the report offline to a .csv file (see Activity Wizard or A/R Aging Wizard).
Note: To create cross-practice reports, you must have access to multiple athenaOne practices and you must have the Report: Report Builder: Cross-Practice Beta role or permission in the parent tablespace (the network hub). You can only select the Cross-Practice option if your organization is part of a reporting network and you have the required cross-practice reporting permissions. If you want to run a cross-practice report but are unable to select the option, contact your administrator or athenahealth CSM to enable the required user permission.
Report previews for cross-practice reports return only the first 30 rows for the practice you are logged in to. If this practice is a reporting network hub with no data, the results for the first practice in that network only appear. This limitation is in place for performance reasons.
Note: Cross-practice reports return a very large amount of data. For this reason, some fields and filters are unavailable in cross-practice reports.
- Display the Report Builder page: On the Main Menu, click Reports. Under General, click Report Builder.
The Choose Report Type tab appears. - Type — Select the type of report that you want to create on the Choose Report Type tab.
-
Select Cross-Practice.
Note: You can only select the Cross-Practice option if your organization is part of a reporting network and you have the required cross-practice reporting permissions. If you want to run a cross-practice report but are unable to select the option, contact your administrator or athenahealth CSM to enable the required user permission.
- Click Next to display the Choose Display Columns page.
- Click the plus sign
 next to Cross-Practice.
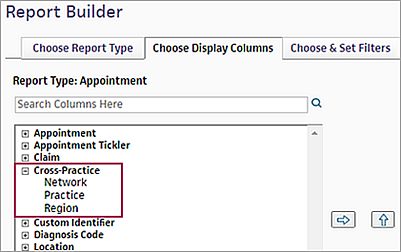
- To display the report results by network, practice, or region, select Network, Practice, or Region and click the right arrow
 .
.
Note: You can select more than one of these columns. - Select the other display columns for your report.
- Click Next or click the Choose & Set Filters tab.
-
Filter Criteria — Click the plus sign
 next to Cross-Practice to expand the category. Select Network or Region and click the right arrow
  .
.
Note: The Practice filter is always included in the selected filters for a cross-practice report. Select the practices that you want to report on. - Enter filter criteria as you normally would.
- Click Run Report or click the View Results tab.
- Select the report format and click OK.
Your report results appear.