 User Guide — Discharge Workflow
athenaOne for Hospitals & Health Systems
Table of Contents
To initiate the discharge plan
To access the discharge plan in progress
To create orders for post-discharge needs
To create and edit discharge instructions
Discharge documents and letters
To add letters to the discharge plan
Introduction
There are six parts to the discharge workflow: Discharge Planning, Patient Education, Post-Discharge Orders, Discharge Instructions, Documents, and Discharge Order. The care team can access and complete these parts in any order, over the course of the patient's stay. Some can be completed by a nurse, some require a physician.
To initiate the discharge plan
The care team outlines details about the patient's expected discharge and coordinates the patient's post-visit care. Any member of the patient's care team can initiate discharge planning.
- Display the patient's Discharge tab: In the patient chart, click the arrow in the green workflow menu (at the upper right) and select Go to Discharge. (The options available in the green workflow menu depend on your user role.)
Enter discharge planning information
- Estimated Discharge Date — Select the expected date and time for the patient's discharge.
- Expected Disposition — Select the location where the patient is expected to go. If the patient will be transferred to another facility, complete the additional fields provided.
- Note To Receiver — Enter a note to be included in the discharge documentation sent to the facility.
- Durable Medical Equipment (DME) — List any durable medical equipment the patient will need upon discharge.
- Home Health — List any home care services the patient will need. athenaOne lists who last modified the information and when for each field and saves your changes when you navigate away from the Discharge Planning page.
Add a planning note
- In the Planning Notes section, click Add Planning Note. The Add Planning Note window appears.
- Note Date - Required — If necessary, you can change the current date and time.
- Planning Note - Required — Enter a note to help the care team plan for the patient's post-visit care. The note entered in this field will be visible to the care team only within your facility. It won't be visible to the care team at another facility if the patient is transferred.
Tip: To use macros in this field, enter a period and begin typing the name of the macro. Then select the macro in from the matching list. This field doesn't support macros with formatted text (for example, macros that use HTML coding to bold or italicize text). - Click Enter Note to save.
Discharge planning notes appear listed under the Planning Notes heading in chronological order, the most recent note first.
Note: The discharge planning notes are not included in the discharge documentation, but you can share these notes, and see a complete audit history of changes made to the discharge plan using the chart export function.
To access the discharge plan in progress
You can access the discharge plan at any time: In the patient chart, click the arrow in the green workflow menu (at the upper right) and select Go to Discharge. (The options available in the green workflow menu depend on your user role.).
After the discharge plan is initiated, you can also access the Discharge tab as follows:
- If the admission order is signed, click GO TO DISCHARGE in the Discharge Status section of the patient briefing.
- If planning notes have been entered, click the Notes tab
 , Planning Notes, and GO TO DISCHARGE.
To add educational materials to the discharge plan
The care team educates the patient about how to care for their condition. Use the Patient Education section to:
- Document how and when you provided the education, as well as how the patient responded to the education
- Order multiple educational materials at the same time
- See suggested education based on the patient's diagnoses, medications, and labs
- Preview and print educational materials
- Display the patient's Discharge tab: In the patient chart, click the arrow in the green workflow menu (at the upper right) and select Go to Discharge. (The options available in the green workflow menu depend on your user role.)
- Click Patient Education.
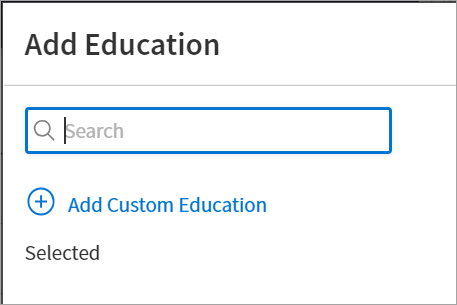
- Click Add Education at the top right of the page. The Add Education search tool appears with options to search, add suggested education (based on the patient's diagnoses, medications, and labs), and add custom education.
- Search for the education sheets and forms you need.
- Check any suggested items you want to add to the patient's education list.
- To create new education materials, click
 Add Custom Education, enter a description in the field, and then click Add to save the new form.
 - Click Add Education at the bottom of the window to order all selected education.
Selected items appear in the table on the Patient Education page.
To preview patient education
- Display the patient's Discharge tab: In the patient chart, click the arrow in the green workflow menu (at the upper right) and select Go to Discharge. (The options available in the green workflow menu depend on your user role.)
- Click Patient Education.
- Click the title (in blue) of any topic to preview the educational materials.
To delete patient education
- Display the patient's Discharge tab: In the patient chart, click the arrow in the green workflow menu (at the upper right) and select Go to Discharge. (The options available in the green workflow menu depend on your user role.)
- Click Patient Education.
- Click the More Options icon
 , then select
  Delete.
To print patient education
- Display the patient's Discharge tab: In the patient chart, click the arrow in the green workflow menu (at the upper right) and select Go to Discharge. (The options available in the green workflow menu depend on your user role.)
- Click Patient Education.
- Click Print next to the topic.
Your printing options, along with a preview of the patient educational materials, appears. - Click Print.
To evaluate patient education
- Display the patient's Discharge tab: In the patient chart, click the arrow in the green workflow menu (at the upper right) and select Go to Discharge. (The options available in the green workflow menu depend on your user role.)
- Click Patient Education.
You can click Show more at the bottom of the evaluation details to see a history of evaluations. This history may help you gain insight into the patient's progress with regard to patient education. - Click Evaluate next to a topic.
The Education Review window appears. - Reviewed - Required — By default, the current date and time appear, but you can change it to reflect when the education was provided to the patient.
- Teaching Method — Select an option to describe how you provided the education to the patient. You can select:
- Demonstration
- Educational Video
- Verbal Explanation
- Written Materials Provided
- Other
Note: If you select Other, enter a description of the teaching method.
- Evaluation — Select an option to describe how the patient responded to the education. You can select:
- Verbalizes Understanding
- Returns Demonstration
- Requires Reinforcement
- Refuses Education
- Other
Note: If you selectOther, enter a description of how the patient responded to the education.
- Comments — You can optionally add notes or comments to the evaluation.
- To evaluate another topic, click the topic in the menu on the left in the Education Review window and repeat steps 3 to 7.
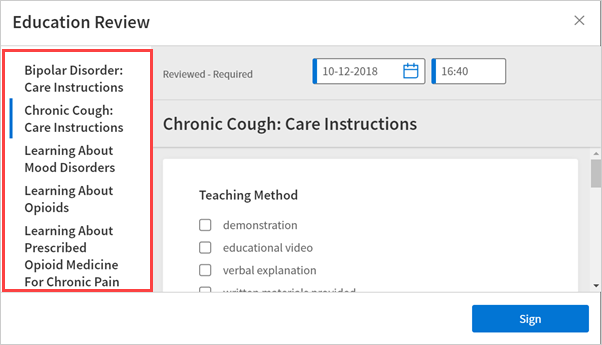
- Click Sign.
The details you entered appear under Evaluation in the Patient Education table.
To reevaluate patient education
- Display the patient's Discharge tab: In the patient chart, click the arrow in the green workflow menu (at the upper right) and select Go to Discharge. (The options available in the green workflow menu depend on your user role.)
- Click Patient Education.
- Click Reevaluate next to a topic.
The Education Review window appears. - Modify the fields as necessary.
- Click Sign.
The details you entered appear under Evaluation for that topic.
To create orders for post-discharge needs
The care team creates orders for the patient's post-visit needs, and the physician signs the orders.
As part of the discharge process, nurses can enter diagnoses and orders, and reconcile medications if given a verbal order to do so by the ordering physician. Only physicians can sign orders.
- Display the patient's Discharge tab: In the patient chart, click the arrow in the green workflow menu (at the upper right) and select Go to Discharge. (The options available in the green workflow menu depend on your user role.)
- Click Post-Discharge Orders.
- Order Entry — Search for and select orders. If given a verbal order, a nurse can search for and select orders.
Tip: To order referrals, search for "referrals" and include summaries of care. You can search for "after your visit" to locate patient education orders.
Note: Some order types may require a diagnosis. -
To mark an order as not given, click Not Given when, for example, the patient refused the order, or a medication wasn't available. This action ensures that quality measures are not affected negatively.
You must then select a reason for not giving the order.
You can also include a note to the patient and an internal note.
Orders marked as Not Given are listed in the Medications Not Given section of the Discharge Summary, but not in the medication list or the Patient Portal. This ensures that the patient does not accidentally view an order or take a medication that was explicitly refused.
Reconcile the medications list
- If the Reconcile medications for discharge link is visible, click this link to review the patient's home and inpatient medications.
The patient's home medications are listed on the left, inpatient medications are listed in the center, and the discharge medication list appears on the right. - For each medication on the list, use the arrow icon to indication continue
 or use the X icon
  to discontinue upon discharge. The list of home medications marked continue produces the Discharge Home Medications list.
 - Click Reconcile Medications to create the Discharge Home Medications list.
(All medications in the list must be acted upon before the button appears green.) - Discharge Home Medications — Review the list of medications to be continued upon discharge. Click a medication to view or edit the details, or to remove it from the list.
Note: In the patient's chart, the medications flowsheet will reflect the changes made when medications are reconciled.
To create and edit discharge instructions
Note: Nurses can sign discharge instructions.
- Display the patient's Discharge tab: In the patient chart, click the arrow in the green workflow menu (at the upper right) and select Go to Discharge. (The options available in the green workflow menu depend on your user role.)
- Click Discharge Instructions.
- Nursing summary of care — Enter the nursing summary of care.
- Patient goals — Enter the patient goals.
- Patient instructions — Enter the patient instructions.
- Portal Registration — You can register the patient for the Patient Portal, if the patient consents.
Note: After discharge, patients registered for the Patient Portal can access their summary of care record on the My Health page of the Patient Portal. - Click Enter Instructions.
To enter the discharge order
At the direction of a provider, the care team creates an order for the patient's discharge that outlines the patient's final diagnosis, condition, and disposition at the time of discharge.
- Display the patient's Discharge tab: In the patient chart, click the arrow in the green workflow menu (at the upper right) and select Go to Discharge. (The options available in the green workflow menu depend on your user role.)
Record discharge order information
- Click Discharge Order.
- Ordering physician — Select the ordering physician. (This field appears for nurses only.)
- Final diagnosis — Search for and enter a final diagnosis.
- Condition — Enter the patient's condition the time of discharge.
- Disposition — Select the disposition of the patient after discharge.
Discharge documents and letters
The care team accesses and prints common discharge documents and other letters to distribute to the patient, their PCP, and their next care facility.
The patient discharge instructions and the discharge summary documents are created automatically using information recorded during the hospital stay.
To view and print each document, click View Document and then click ![]() Print.
Print.
You can also generate letters to go home with the patient, to send to another care provider.
To add letters to the discharge plan
- Display the patient's Discharge tab: In the patient chart, click the arrow in the green workflow menu (at the upper right) and select Go to Discharge Plan. (The options available in the green workflow menu depend on your user role.) Alternatively, in the patient chart, click the Discharge chart tab at the left side of the page.
- Click Documents.
- Letters — Click the Letters plus icon
 to display the Add Letter form, complete the fields provided, and select a delivery option.
If the patient has Patient Portal access, you can select Close and Email Patient. athenaOne may close certain Patient Care Summaries when you sign and approve them, so that they do not appear in the Clinical Inbox unnecessarily.
Note: If the Send the summary of care to this patient's PCP (name) and receiving provider (name) at discharge option is selected and the approving provider and recipient both have a Direct address, athenaOne automatically generates and sends the Discharge Summary via Direct to the primary care physician (PCP) and receiver facility on record after you complete discharge and click Discharge Complete.
To add a Summary of Care to the discharge plan
- Display the patient's Discharge tab: In the patient chart, click the arrow in the green workflow menu (at the upper right) and select Go to Discharge Plan. (The options available in the green workflow menu depend on your user role.) Alternatively, in the patient chart, click the Discharge chart tab at the left side of the page.
- Click Documents.
- Click the Add Letter plus icon and select [Inpatient] Summary of Care Record.

The Summary of Care Record appears in the Letters section. - Click VIEW to open the Summary of Care Record in a window.
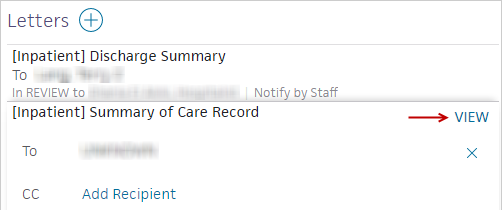
- Click view actions at the bottom of the Summary of Care window to expand the options.
- You can approve, duplicate, delete, or leave the record in review.
Note: You can change the status of the Summary of Care Record from Leave in Review to Approve now to print directly from the Summary page.
To print a Transport Report
The Transport Report letter describes the treatment to be administered to the patient in the ambulance during a transfer to another facility. Providing transport staff with information about the patient's treatment at the discharging facility, current condition and diagnosis, and other relevant information helps ensure that patient care is not disrupted during transport.
Note: You must have the Inpatient Clinicals: Transfer/Discharge Sign-Off permission to print the Transport Report letter.
- Display the Discharge tab: In the patient chart, click the arrow in the green workflow menu (at the upper right) and select Go to Discharge Plan. (The options available in the green workflow menu depend on your user role.) Alternatively, in the patient chart, click the Discharge chart tab at the left side of the page.
- Click Documents.
- Click the plus icon to add a letter.
- Type — Select Transport Report.
- To — Click inside the To field and select a recipient.
- Click Add. The report expands to display the details.
- Delivery — Notify by Staff is automatically selected. Select Approve now if your patient is ready to be discharged.
Note: athenahealth recommends that you select Approve now for the transport workflow. - Assign — If you selected Approve now in the Delivery field, you can select an attending provider for record keeping, but this is not required.
If you select Leave in Review, assign it to an attending physician.
Note: The task appears in the ambulatory Clinical Inbox for the attending physician, if applicable, but also appears in the hospital patient chart. - Click VIEW to view the Transport Report. Click Save or click the X icon in the top right corner to exit.
- Click Approve.
- Hover over the report and click the print icon
 on the right.
 - Click Done.
- Complete the paper form and hand it to the person managing the transport.
To complete the discharge plan
- Display the Discharge tab: In the patient chart, click the arrow in the green workflow menu (at the upper right) and select Go to Discharge Plan. (The options available in the green workflow menu depend on your user role.) Alternatively, in the patient chart, click the Discharge chart tab at the left side of the page.
- Click Documents.
- Click Done (in the upper right corner) to complete the Discharge Plan.
Note: The discharge plan stays open until all steps are signed.
After discharge, patients registered for the Patient Portal can access their summary of care record on the My Health page of the Patient Portal.
Set a discharge time and date on the patient briefing
- Patient discharged — On the patient briefing, enter the date and time that the patient is leaving, and click Discharge Complete to close the stay. You can enter a date up to seven days in the future. This removes the patient from the Patient List (or Tracking Board).

Note: If the patient has Patient Portal access, athenaOne automatically moves signed Patient Information orders
If the patient does not have Patient Portal access and the Paper option is selected in the Patient care summary and patient letter delivery preference field (under the Registration Information heading) on the Quickview, you should select Close manually.
To close the hospital stay
To meet CMS requirements that hospitals complete a patient's documentation within a reasonable amount of time after discharging a patient, and to reduce manual data entry, athenaOne uses the auto-close feature, which automatically closes stays 45 days after the patient's discharge. athenahealth recommends 45 days, but you can request a different number of days when you enable the feature.
To enable the auto-close feature for your department, please contact your Customer Success Manager. After the auto-close feature is enabled, athenaOne closes any stay that has been open for the selected number of days. The auto-close feature does not apply retroactively.
If a stay includes open notes, closing the stay does not sign them. You must sign open notes manually before closing the stay. If you create a claim for a stay with open notes, a warning message appears to close the open notes or proceed. You cannot sign open notes after a stay is closed.
Note: You can still close the stay manually, either before or after you create the claim, with this feature enabled.
Patient List color-coding
 Purple — Pre-admission. This status describes a patient who has been checked-in via athenaCollector but has no admission order entered or signed.
 Blue — Admission in progress. Once a physician or nurse enters or signs an Admission Order, the patient status changes to "Admission in progress."
 White — Currently admitted.
 Pink — Discharge in progress. Indicates that the Discharge Plan has been accessed at least once.
 Orange — Discharge complete. Indicates that the Discharge Note has been signed.
 Gray — Stay Complete — Indicates that the patient's hospital departure time has been recorded.