 User Guide — Physician Workflow
athenaOne for Hospitals & Health Systems
Table of Contents
To acknowledge lab and imaging results
To acknowledge clinical documents
To review and sign an admission order
Adding and signing progress notes
To initiate the discharge process
To create or edit discharge orders
To create or edit the hospital course
Supervising Physicians - co-signing notes
The Clinical Inbox
From your Clinical Inbox (Hospital Version) you can view, acknowledge, and sign orders. You can also review lab and imaging results as well as other clinical documents that need your attention.
To sign orders
- Click the athenaOne logo in a department that uses athenaOne for Hospitals & Health Systems. Your Clinical Inbox appears in the left pane.
- To populate your Clinical Inbox, click the plus icon and select patients, whose orders you want to view, under your name.
Note: You can enter your name in the search bar to filter the provider list. - Click the Orders row to display all your unsigned orders in a list. You can view by Patient or Priority.
- Click an order to expand the document view.
- If there are multiple orders, check the box next to the orders you want to sign. Click on an order to view more details.
- If you have no further review, click Sign. Otherwise, click GO TO ORDERS to display the Order Entry page of the patient chart. From there, you can review the order details, and then click Sign Orders.
To acknowledge lab and imaging results
- Click the athenaOne logo in a department that uses athenaOne for Hospitals & Health Systems. Your Clinical Inbox appears in the left pane.
- Click the Lab/Imaging row to display all lab or imaging orders in a list. You can view by Patient or Priority.
- Click a lab or imaging result to view the details in the center pane.
- For a lab result, you can click OPEN IN CHART to view the results in table or graph format as well as the document view.
- Click Acknowledge to indicate that you have reviewed the results.
When you do, the result document is removed from the Inbox list, and the next result document in the Inbox list appears in the center pane. The acknowledged result is available in the patients chart.
Tip: You can use the Find tab in the patient chart to locate documents associated with the patient.
To acknowledge clinical documents
- Click the athenaOne logo in a department that uses athenaOne for Hospitals & Health Systems. Your Clinical Inbox appears in the left pane.
- Click the Clinical Documents row to display all clinical documents in a list. You can view by Patient or Priority.
- Click a document to view the details in the center pane.
- Click Acknowledge to indicate that you have reviewed the document.
When you do, the document is removed from the Inbox list, and the next document in the Inbox list appears in the center pane. The acknowledged document is available in the patients chart.
Tip: You can use the Find tab in the patient chart to locate documents associated with the patient.
Admitting patients
The Admission Order is the first step of the admission process in a patient's stay.
To review and sign an admission order
- In the patient chart, click the arrow in the green workflow menu (at the upper right) and select Go To Admission Order. (The options available in the green workflow menu depend on your user role.)
Review (or update) the order details
- Admission date and time — Enter the time and date of admission.
Tip: You can enter "now" in the time field to input the current time and date, or you can enter "t" in the date field for the current date. - Department — Select the admitting or receiving department.
- Admitting physician — Select the admitting physician.
- Attending physician — Select the attending physician.
- Service — Select the service.
- Telemetry — Click Yes, No, or Remote.
- Level of care — Select the level of care.
- Primary diagnosis — You can click the plus icon
 to add a diagnosis, or click the X icon
  to delete a diagnosis.
 - Condition — Select the patient's condition.
- Precautions — You can click the plus icon to add a risk, or click the X icon to delete a risk.
- Expect patient to be discharged or transferred within 96 hours — Click Yes or No.
- Elective admissions — Click Yes or No.
- Enrolled in clinical trial — Click Yes or No.
- Click Sign to sign the admission order.
When you sign the order, athenaOne notifies you that the patient requires care and treatment, and the ordering provider's clinical judgment must be (1) reasonable and necessary and (2) supported by the assessment and plan documented in the patient's medical record.
Adding an admission history & physical (H&P)
In the Admission History & Plan (H&P), you record the reason for the patient's admission, and any instructions for their initial care. There are five steps:
- History of Present Illness (HPI)
- Medical History (Hx)
- Review of Systems (ROS)
- Physical Exam (PE)
- Assessment & Plan (A&P)
An H&P Summary (Sign-off) is generated automatically.
- In the patient chart, click the arrow in the green workflow menu (at the upper right) and select Go to Admission H&P. (The options available in the green workflow menu depend on your user role.)
Complete the HPI (History of Present Illness) step

- Chief Complaint — Click the plus icon to enter the patient's main complaint.
You can click the note icon to record instructions for the patient's initial care.
 - Inpatient Diagnoses — Click the plus icon to enter a diagnosis. You can add multiple diagnoses.
- History of Present Illness — Click the plus icon to select an HPI template and record the history of the patient's the present illness.
- Click Next to proceed to the Review of Systems (ROS) step, the next step in the admission process.
Complete the ROS (Review of Systems) step

- Click plus icon to search for and select an ROS template.
- Click on findings as you assess the patient.
Tip: If all findings are normal, click Normal for a system - Click Next to proceed to the Hx (Medical History) step, the next step in the admission process.
Complete the Hx (Medical History) step

In this step, document the patient's medical history prior to admission. You can click the note icon ![]() to add a note under any field.
to add a note under any field.
- Problems — Click the plus icon to add a historical problem.
- Surgical History — Click the plus icon to add a historical surgical procedure.
- Home Medications — Click the plus icon to add home medications.
- Allergies — Click the plus icon to add any known allergies.
- Family History — Click the plus icon to add
- Social History — Click the plus icon to add a social history template.
- Complete these social history fields:
- Advance directive — Click Yes or No.
- Tobacco smoking status — Select the patient's smoking status.
- Tobacco - years of use — Enter the number of years the patient used tobacco.
- Click Next to proceed to the Physical Exam (PE) step, the next step in the admission process
Complete the PE (Physical Exam) step

- Click plus icon to search for and select a physical exam template.
- Click on findings as you assess the patient.
Tip: If all findings are normal, click Normal for a system. - Click Next to proceed to the Assessment & Plan (A&P) step, the next step in the admission process.
Complete the A&P (Assessment & Plan) step

If a patient has unreconciled home medications, click Reconcile home medications to open the Medication Reconciliation window. Reconciliation must be completed before proceeding with the A&P step.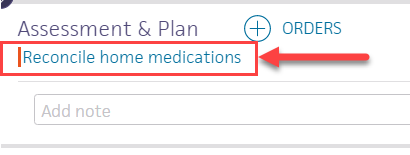
Reconcile medications
The Medication Reconciliation window has columns for Home, Inpatient, and Reconciled Medications. Each listed medication includes the medication name and dose. A red vertical bar appears to the left if reconciliation is required for that medication.
- To discontinue a medication during the patient's stay, click the delete icon
 . Deleted medications appear listed with a strike-through.
 - To continue a home medication, click the send to icon
 to copy it to the Reconciled Medications list. If athenaOne finds a match, it adds the medication to the reconciled list. If multiple matches appear, select the matching medication.
If the matching list does not list the medication you need, click the plus icon to search for a better match to the medication.
Note: If the medication is not available in the formulary, a window appears to confirm if the patient has the medication with them. - When you have reconciled all the medication, and there are no red bars, click Reconcile Medications.
The newly reconciled medications appear listed in the Assessment & Plan list of orders, checked as ready to sign.
Review and update the Assessment / Plan list of orders
- To remove an order before you sign it, highlight the order and click the X icon at the far right.
- To add an order, click the plus icon , select the medication, and complete all sig and order details in the fields provided.
You can make the order set available to all providers or only to yourself in the Provider field.
Click Add to Orders.
Tip: If you regularly prescribe the same group of orders for a specific diagnosis or treatment, you can click the Favorites icon to create an order set. - Click Sign Orders. The Recent Changes section now includes the orders you signed.
Note: A red vertical bar indicates a required field is missing information. You cannot click the Sign Orders button until you enter information in all required fields. - Click Next or click Sign-off to proceed to the Sign-off step.
Complete the Sign-off (Summary) step to complete the H&P

Until the note is signed, the Admission H&P remains open so you can edit or finish it later. (open) appears next to the note in the patient briefing and in the Notes tab when open. This disappears after you close the note.
- Read the summary, and then click Sign Note.
Note: If you use transcription, you can click the arrow in the green workflow menu and select Pending Transcription.
The patient briefing appears. The Admission H&P is now recorded with your name in the Recent Notes section.
To enter and sign orders
- Display the patient's Order Entry page: In the patient chart, click the arrow in the green workflow menu (at the upper right) and select Go to Orders. (The options available in the green workflow menu depend on your user role.)
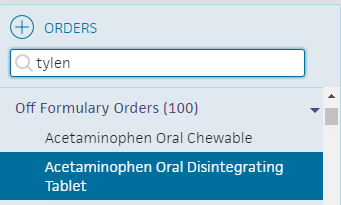
- Click the plus icon to search for and select the order type you need. In the search results, relevant pharmacy formulary medications, as well as off-formulary medications appear.
- Click the order to expand the details.
- Enter the sig and order details in the fields provided. Click outside of the order to close the form.
Signing orders
Note: Orders can be entered by a nurse, but must be signed by a physician, according to hospital and legal guidelines.
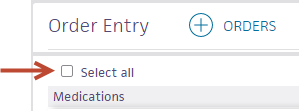
- To sign all orders for this patient, scroll to the top of the page and check Select all.
- To sign only selected orders, check the box for each order to sign.
- Click Sign Orders.
- Click Done.
Adding and signing progress notes
Use the progress note to record a patient's status and events during the course of hospitalization.
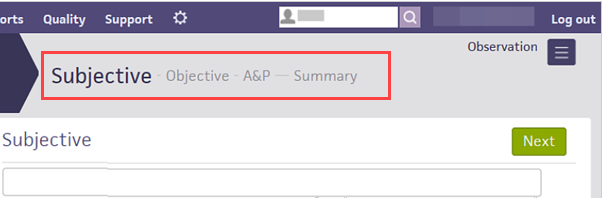
Progress notes use the SOAP structure: Subjective — Objective — A&P — Summary.
Physicians can use the A&P section to enter and sign new orders, right from the progress note.
Progress notes are labeled according to your provider type.
- On the patient's chart, click the arrow in the green workflow menu (at the upper right) and select Add Progress Note. (The options available in the green workflow menu depend on your user role.)
The Subjective stage of the add progress note workflow appears.
Subjective
- Enter subjective information and click Next.
Tip: To save the note as a progress note template, click the star icon, enter a shortcut name for the new template, and click Save. To use a previously saved template, enter a "." followed by the shortcut name wherever the star icon appears.
The Objective stage appears.
Objective
- Under Vitals, the Include vitals in summary checkbox is checked by default, showing all vitals recorded in the last 36 hours for the patient. You can uncheck to exclude vitals.
- Under Recent Labs, the Include recent labs in summary checkbox is checked by default, showing all lab results received in the last 36 hours for the patient. You can uncheck to exclude vitals.
- Under Active Medications, the Include active medications in summary is checked by default. You can uncheck to exclude active medications from the summary.
- Click the plus icon next to Physical Exam and select the physical exam template to add.
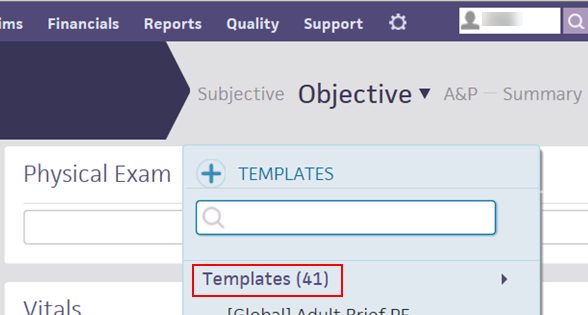
The physical exam template appears in the Physical Exam section. - Click each section to expand it and select your observations.
You can click:- All Normal if all sections appear normal.
- Clear to clear the observations you've selected.
- The blue arrow next to Clear to expand all sections.
- Enter any objective data in the Physical Exam text box.
- Review the patient's vitals. You can click the drop-down arrow next to Objective to view only the Physical Exam, Vitals, or Active Medications.
- Click Next. The A&P stage appears.
A&P
- Click the plus icon to search for and select an order to add. The selected order appears listed under the Assessment & Plan heading.
- Click the order to expand it, and complete the order details in the fields provided.
- Check the checkbox at the top left corner of the order form, and click Sign Order.
- Click Next.
The Summary stage appears.
Summary
- Review each summaries to ensure that the patient's information is correct.
- Subjective
- Objective
- Assessment & Plan
You can delete a note before you sign, but you cannot delete unsigned notes.
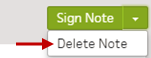
- Click Sign Note. The progress note appears in the hospital chart in the Notes tab
 and in the Recent Notes section in the patient's briefing.
Note: The timestamp appears just below the Sign Note button.
You can click the timestamp to update the date and time, provided that the date you enter is within 30 days of the current date. When you update a timestamp, the note is marked "Late entry."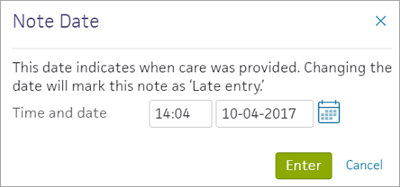
To enter and sign procedure notes
Procedure note templates are customized for each procedure type. Use them to record details such as procedure date and time, procedure name, indications, patient consent, lab values, anesthesia, procedure description, complications, blood loss, and the patient's disposition.
- In the patient's chart, click the arrow in the green workflow menu (at the upper right) and select Add Procedure Note. (The options available in the green workflow menu depend on your user role.)
- Click the plus icon and select a procedure template.
- Complete the template and click Sign Note.
Note: The timestamp appears just below the Sign Note button.
You can click the timestamp to update the date and time, provided that the date you enter is within 30 days of the current date. When you update a timestamp, the note is marked "Late entry."
Completing the discharge plan
The care team, including you and the nurse, uses the discharge plan to summarize the following:
- Why the patient was hospitalized.
- The patient's treatment, including orders and procedures.
- Future steps for the patient or the next care facility.
You or a nurse can also generate the Patient Care Summary, Summary of Care Record, and the Discharge Summary.
To initiate the discharge process
Any member of the care team can initiate the discharge process. Nurses must select the Ordering physician, and may enter the Final diagnoses, Condition, and Disposition if given a verbal order to do so by the ordering physician.
- Display the patient's Discharge tab: In the patient chart, click the arrow in the green workflow menu (at the upper right) and select Go to Discharge. (The options available in the green workflow menu depend on your user role.)
Record discharge order information
- Click Discharge Order.
- Ordering physician — Select the ordering physician. (This field appears for nurses only.)
- Final diagnosis — Search for and enter a final diagnosis.
- Condition — Enter the patient's condition the time of discharge.
- Disposition — Select the disposition of the patient after discharge.
To create or edit discharge orders
As part of the discharge process, nurses can enter diagnoses and orders, and reconcile medications if given a verbal order to do so by the ordering physician. Only physicians can sign orders.
- Display the patient's Discharge tab: In the patient chart, click the arrow in the green workflow menu (at the upper right) and select Go to Discharge. (The options available in the green workflow menu depend on your user role.)
- Click Post-Discharge Orders.
- Order Entry — Search for and select orders. If given a verbal order, a nurse can search for and select orders.
Tip: To order referrals, search for "referrals" and include summaries of care. You can search for "after your visit" to locate patient education orders.
Note: Some order types may require a diagnosis. -
To mark an order as not given, click Not Given when, for example, the patient refused the order, or a medication wasn't available. This action ensures that quality measures are not affected negatively.
You must then select a reason for not giving the order.
You can also include a note to the patient and an internal note.
Orders marked as Not Given are listed in the Medications Not Given section of the Discharge Summary, but not in the medication list or the Patient Portal. This ensures that the patient does not accidentally view an order or take a medication that was explicitly refused.
Reconcile the medications list
- If the Reconcile medications for discharge link is visible, click this link to review the patient's home and inpatient medications.
The patient's home medications are listed on the left, inpatient medications are listed in the center, and the discharge medication list appears on the right. - For each medication on the list, use the arrow icon to indication continue or use the X icon to discontinue upon discharge. The list of home medications marked continue produces the Discharge Home Medications list.
- Click Reconcile Medications to create the Discharge Home Medications list.
(All medications in the list must be acted upon before the button appears green.) - Discharge Home Medications — Review the list of medications to be continued upon discharge. Click a medication to view or edit the details, or to remove it from the list.
Note: In the patient's chart, the medications flowsheet will reflect the changes made when medications are reconciled.
To create or edit the hospital course
You must be have a physician role to create and sign the hospital course.
Note: You can sign the hospital course only once, and once signed, it cannot be re-opened. You can, however, append notes to a signed hospital course. Note attributions appear for appended notes.
- In the patient chart, click the Discharge chart tab at the left side of the screen, then click Hospital Course.
- Hospital Course — Enter the chronology of hospital care the patient received during the stay. The Hospital Course describes, from a clinical standpoint, what was done during the course of hospitalization.

- Click Sign Note to close the note.
The hospital course appears in the patient briefing under Recent Notes.
To create or edit the discharge instructions
The care team outlines future steps for the patient or next care facility to ensure the patient's well-being after discharge.
Note: Nurses can sign discharge instructions.
- Display the patient's Discharge tab: In the patient chart, click the arrow in the green workflow menu (at the upper right) and select Go to Discharge. (The options available in the green workflow menu depend on your user role.)
- Click Discharge Instructions.
- Nursing summary of care — Enter the nursing summary of care.
- Patient goals — Enter the patient goals.
- Patient instructions — Enter the patient instructions.
- Portal Registration — You can register the patient for the Patient Portal, if the patient consents.
Note: After discharge, patients registered for the Patient Portal can access their summary of care record on the My Health page of the Patient Portal. - Click Enter Instructions.
To review the discharge summary and close the stay
The patient discharge instructions and the discharge summary documents are created automatically using information recorded during the hospital stay.
You can generate letters to go home with the patient, to send to another care provider, or to print a comprehensive discharge summary.
- Display the patient's Discharge tab: In the patient chart, click the arrow in the green workflow menu (at the upper right) and select Go to Discharge Plan. (The options available in the green workflow menu depend on your user role.) Alternatively, in the patient chart, click the Discharge chart tab at the left side of the page.
- Click Summary in the navigation bar at the top of the page.
- Letters — Click the Letters plus icon to display the Add Letter form, complete the fields provided, and select a delivery option.
If the patient has Patient Portal access, you can select Close and Email Patient. athenaOne may close certain Patient Care Summaries when you sign and approve them, so they do not appear in the Clinical Inbox unnecessarily.
Note: athenaOne automatically generates and sends the Summary of Care Record (SCR) via DIRECT to the Primary Care Physician (PCP) and Receiver Facility on record when you complete discharge and click Discharge Complete. The patient can access the Summary of Care record on the My Health page of the Patient Portal. - Click Done to complete the Discharge Plan.
Note: The discharge plan stays open until all steps are signed.
After discharge, patients registered for the Patient Portal can access their summary of care record on the My Health page of the Patient Portal. - After the patient leaves the hospital, on the patient briefing, enter the date and time that the patient left, and click Discharge Complete to close the stay. This removes the patient from the Patient List (or Tracking Board).

Note: If the patient has Patient Portal access, athenaOne automatically moves signed Patient Information orders and Patient Care Summaries from Review status to Notify by Portal status, and to Close status for other patient correspondence.
If the patient does not have Patient Portal access and the Paper option is selected in the Patient care summary and patient letter delivery preference field (under the Registration Information heading) on the Quickview, you should select Close manually.
Supervising Physicians - co-signing notes
Physicians can co-sign the Admission H&P, ED Provider Assessment, progress and consult notes of their nurse practitioners and physician assistants.
To review and co-sign notes
To review and sign notes, click the Notes row in your Clinical Inbox to review notes waiting for your co-signature.
Click the note task in your Clinical Inbox to expand the view so you can review the task, and then click Co-sign. The co-sign note task appears for the whole care team. If one person clicks Co-sign, the note task disappears for the whole team.
You must be assigned to the patient's care team to receive co-sign task notifications. To receive these tasks in the Notes row of your Clinical Inbox, make sure that your name appears as part of the patient's care team. (Display the patient chart. In the patient banner, click the view more icon  to display additional demographic information, and then click the plus icon
 ![]() next to Care team.)
next to Care team.)
You can also display the briefing of your midlevels' patients, In the Recent Notes area, click the following notes:
- (open) — If (open) appears next to a note, the midlevel has not signed it. Click the note for a read-only summary view of the note.
- (Co-sign Required) — If (Co-sign Required) appears next to a note, the midlevel has signed it. Click the note for a summary view of the note. You can co-sign the note and add comments. In the comments, you can add feedback, revisions or corrections, statements, and circumstantial details (for example, "I was not around to interact with the patient but I agree with the content of this note").
Note: A note with the (Co-sign Required) status is a closed note. A nurse or physician can close a stay even if these notes are unsigned.
Amending notes
To amend a signed note, you cannot edit the note directly; instead, you must add an addendum. Click the plus icon ![]() next to ADDENDUM in a note.
next to ADDENDUM in a note.
Midlevels can amend notes after they sign their notes, but before their supervising physicians co-sign them. Physicians can amend notes only after their midlevels have signed and they have co-signed the notes.
Note: To set midlevels as the Admitting and Attending Physicians in either Inpatient or the Emergency Department, contact the CSC from athenaOne > Support > Success Community > Contact Client Support Center.
To locate a patient's hospital chart
Use the Patient List to find patients in your current department
To access the Patient List, click the athenaOne logo  in the top left corner of the Main Menu.
The Patient List includes patients admitted for services in the department you are logged in to. You can filter the list by ADMITTED, DISCHARGED, and ALL.
Use the Search tool to find patients, visits, and claims in any department
The search tool  is located in the Main Menu, at the upper right.
You can enter an ID number to search for visits and claims by ID number.
You can also search for patients by patient name, insurance number, custom ID, or guarantor. The search results include patients from all departments.