eCQM Data (Clinical Quality Measure Report)
You can use the eCQM Data page to preview your organization's quality data for the current year, and previous years, as calculated from quality results for your athenaOne data and from imported QRDA I files. You can then export your quality report results in both QRDA I and QRDA III report formats.
On the Main Menu, click Quality> eCQM Data.
To access this page, you must have the Clinicals user permission. This page shows certified performance data for all supported electronic Clinical Quality Measures (eCQMs) regardless of provider or medical group enrollment.
To run quality management and eCQM reports, your organization must have at least one provider enrolled in a quality management program or have the clinical guidelines feature enabled (see the Clinical Guidelines page).
Note: To export quality management reports in .csv format, you must also have the Report: Report Builder: Clinicals role or permission.
Use these instructions to create a report for an entire reporting year. To create a report for a shorter period, for example, one month or 90 days, see To create a custom-date report.
- Display the eCQM Data page: On the Main Menu, click Quality > Under REPORTS, click eCQM Data.
Select the filter criteria for program and measure data
- Programs — You can filter the report to display data about one of these quality programs: ACO MSSP (eCQM option), MIPS Group, MIPS Individual, or PCF. When you select a program, you can add other filters to display your data by measure, by group, or by provider.
Note: If you do not select a program in this field, you can display a provider's performance for all measures in all programs in which the provider is enrolled. - Measure Information — Select one or more quality measures. If you selected a quality program using the Programs field, only the eCQMs for the selected program appear in the list. By default, all clinical quality measures for a selected program appear in the report.
- Attribution — Each quality program has a default attribution model. You can filter the program data using a different attribution model by selecting one of these options from the menu: Usual Provider, Performed By Provider, or Supervising Provider (see Attribution models for quality programs).
Important: Do not override the default attribution model by clearing the Attribution field (leaving the field blank). When no option is selected, all attribution models are applied to the data for the program.
Select the filter criteria for the program reporting year under Time Filters
- Measurement Period — Select a reporting year. The report provides data from January 1 to December 31 of the selected year.
Note: If you want to create a report for a shorter period, see To create a custom-date report.
Select the filter criteria for patients under Patient Demographics
- Age as on — Specify the date by which the patient should be the age you specify in the Older than or equal to and Younger than fields.
- Older than or equal to — Select the minimum age for patients to appear in the report data.
- Younger than or equal to — Select the age that the patient must be younger than to appear in the report data.
- Patient sex — Select the patient sex demographic: Male, Female, or Unknown.
- Ethnicity — Select a patient ethnicity demographic.
- Insurance — Select a health insurance program.
- Race — Select a patient race demographic.
Select the filter criteria for clinical data
- Patient problems — Select one or more patient problems to report on.
Select the APM Entity Identifer
- APM Entity Identifier — If you selected ACO MSSP (eCQM option) or PCF from the Programs menu, you must select a practice site ID or ACO entity ID. The PCF practice site ID is configured for a department in athenaOne. You configure the ACO entity ID for a medical group.
Note: For more information see APM Entity Identifier filter (practice site ID).
Select the filter criteria for the department
- Filter By — Select the address type for the departments that you want to report on. (If you selected ACO MSSP (eCQM option) or PCF from the Programs menu, this option is not available.)
- Patient Encounter Department — Location associated with the supervising or rendering provider for the patient encounter (this option is the default). When you select Patient Encounter Department, the options provided in the Address, City, State, and Zip Code fields are based on the location associated with the patient encounter.
- Attributed Provider Department — Location associated with the provider to whom the encounter is attributed. When you select Attributed Provider Department, the options provided in the Address, City, State, and Zip Code fields are based on the location associated with the attributed provider.
- Address — Select the street address for the department. The available selections depend on the value of the Filter By field.
- City — Select the city for the department. The available selections depend on the value of the Filter By field.
- State — Select the state for the department. The available selections depend on the value of the Filter By field.
- Zip Code — Select the ZIP code for the department. The available selections depend on the value of the Filter By field.
Select the filter criteria for the provider
- Provider Name (NPI) — Select the provider name and NPI (National Provider Identifier) number from the menu.
Note: If you selected a quality program using the Programs field, the menu includes only providers enrolled in that program. The list of providers also depends on the attribution model selected using the Attribution field (see Attribution models for quality programs). - Provider TIN — Select a provider TIN (Taxpayer Identification Number).
For the ACO MSSP and PCF programs, it is recommended that you include both the provider name/NPI and the TIN.
Important: When you select an NPI, make sure that you select the corresponding TIN under which that NPI bills. - Show enrolled measures — If you selected a quality program using the Programs field and a provider using the Provider Name (NPI) or Provider TIN field, you can select this option to display the provider's performance in only the enrolled measures of the program.
- Provider Type — Select the provider type or specialty.
Select a data filter view
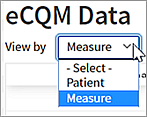
- View by — Select a view for the data (the Measure view appears by default).
- Select Patient to see patient-level results for the measures you're reporting on.
- Select Measure to see the cumulative performance of the measures you're reporting on.
- If you selected a quality program using the Programs field, you can export your data to a QRDA I or QRDA III file (see To export QRDA I or QRDA III files).
Note: You can also export and download your data to a CSV file for analysis (see To export eCQM data to a CSV file).
On the eCQM Data page, you can create reports for periods shorter than the entire reporting year by selecting the Custom Date Reports option from the Programs field. You can create up to 20 custom-date reports for the current submission period to calculate quality measures for the MIPS and Medicaid PI programs.
- You can create custom programs for dates within the current program year or for the prior year, during the open submission window for the parent program.
- The minimum time period for which a custom program can be created is 28 days.
- Custom-date reports take up to two days to calculate results.
You can export custom program results as QRDA III and as CSV files (see To export QRDA I or QRDA III files and To export eCQM data to a CSV file). You and other users in your organization can display, edit, recalculate, and delete any custom-date report.
Note: To create a report for an entire reporting year, see To preview your eCQM data.
- Display the eCQM Data page: On the Main Menu, click Quality > eCQM Data.
- Programs — Select Custom Date Reports.
The Custom Date Reports window opens. If your organization has existing custom-date reports, the Reports tab appears. - Click the Create tab.
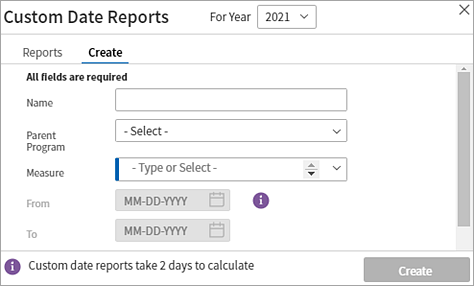
Important: If you attempt to create a custom report that has exactly the same attributes as an existing custom report (For Year, Parent Program, Measure, and start and end dates), you see a warning and you cannot click the Create button. - For Year — The current reporting year (in this example, 2025) is selected by default. You can select the previous reporting year from the menu during the open submission window for the quality program.
- Name — Enter a unique name for this custom report (200 characters maximum).
- Parent Program — Select the parent program for the report, for example: MIPS Group or MIPS Individual.
After you select the program, all the measures in that program appear in the Measure list. - Measure — By default, all clinical quality measures for the selected program appear in the report. To exclude measures from your custom report, click the X next to each individual measure that you want to exclude.
- Enter the start date for the report in the From date field, and enter the end date for the report in the To date field. The date range must be within the open submission period and must span at least 28 days.
Note: The To date cannot be set to today's date or to any future date. - Click Create.
When the report is completed (after approximately 48 hours), it is listed on the Reports tab of the Custom Date Reports window. From the Reports tab, you can display the report, recalculate the data, edit the report, and delete it.
You can view the results of any completed custom report from the Custom Date Reports window. You can also filter the custom report using the fields on the left side of the eCQM Data page. For example, you might want to filter your custom report by patient demographics or by provider TIN.
- Display the eCQM Data page: On the Main Menu, click Quality > eCQM Data.
- Programs — Select Custom Date Reports.
The Custom Date Reports window opens with the Reports tab displayed. - On the Reports tab, locate the custom report and click View Report.
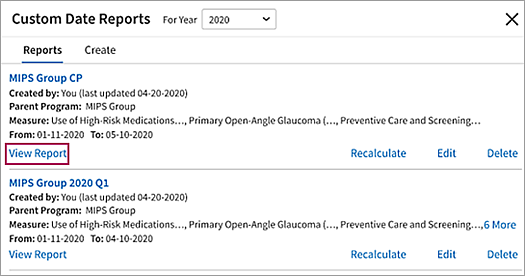
- You can apply additional filters to your report using the fields on the left side of the eCQM Data page (see the Field Reference for descriptions of the filter options). For example, you can filter your custom report by patient demographics or by provider TIN.
- You can export custom program results as QRDA III files (see To export QRDA I or QRDA III files) and as CSV files (see To export eCQM data to a CSV file).
You can recalculate the data in a custom report at any time. The report is run again to retrieve data that was unavailable when the report was last run. The reassessment of the data used to calculate measure satisfaction in the custom report takes up to 48 hours to complete.
- Display the eCQM Data page: On the Main Menu, click Quality > eCQM Data.
- Programs — Select Custom Date Reports.
The Custom Date Reports window opens with the Reports tab displayed. - On the Reports tab, locate the custom report and click Recalculate.
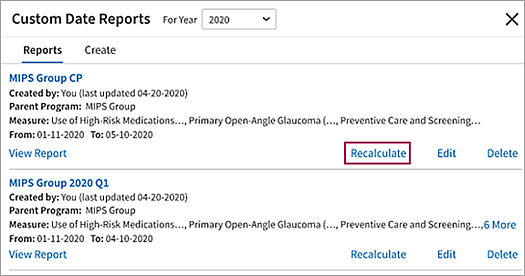
When the recalculation of the data is completed (after approximately 48 hours), the updated report is listed on the Reports tab of the Custom Date Reports window.
You can edit a custom report in the Custom Date Reports window, for example, to rename the report, to add or delete measures in the report, or to change the date range of the report.
- Display the eCQM Data page: On the Main Menu, click Quality > eCQM Data.
- Programs — Select Custom Date Reports.
The Custom Date Reports window opens with the Reports tab displayed. - On the Reports tab, locate the custom report and click Edit.
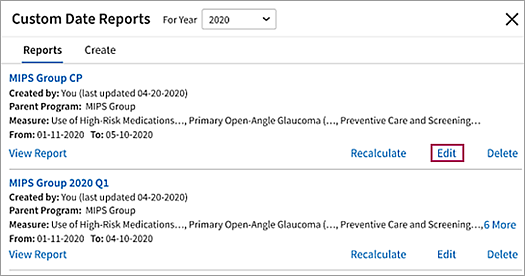
- Edit the report as needed. For example, you can select measures in the list to add them to the list of measures evaluated in the report.
- Click Edit. This option is available only if you made edits to the custom report.
The report data is recalculated. After approximately 48 hours, the updated report is available on the Reports tab of the Custom Date Reports window.
Note: If you edited only the name of the report, no recalculation takes place. You can view the custom report immediately.
You can create up to 20 custom-date reports on the eCQM Data page. If you or another user created similar reports or if you no longer need one of the custom reports, you can delete a report.
- Display the eCQM Data page: On the Main Menu, click Quality > eCQM Data.
- Programs — Select Custom Date Reports.
The Custom Date Reports window opens with the Reports tab displayed. - On the Reports tab, locate the custom report that you want to delete and click Delete.
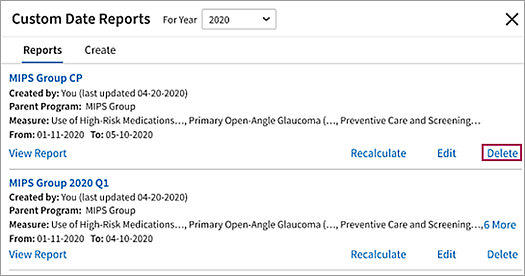
A warning message informs you that the report cannot be recovered after you delete it. - Click Delete again to permanently remove the custom report.
The QRDA I file that you plan to import must be zipped and in XML format. There are no limits on the file size.
mportant: After you import QRDA I data using the eCQM Data page, that data cannot be deleted and will affect submission data.
- Make sure that the QRDA I file that you plan to import is accurate and includes each provider's NPI and TIN. For PCF, the file must also include the practice site ID.
Note: For more information, see Data aggregation using the Import feature. - Display the eCQM Data page: On the Main Menu, click Quality > eCQM Data.
- Select a reporting year in the Measurement Period field under Time Filters.
- Click Upload at the top right of the page.
A file picker or Explorer window opens. - Locate the compatible ZIP file from your local desktop.
Note: If you select a file other than a ZIP file, you'll receive an error message (see Error logs and troubleshooting). - Double-click the ZIP file that you want to import.
An import status message appears and the upload process begins..png)
Important: Do not close the eCQM Data report page until the upload process is fully complete. Closing the page prematurely will stop the import and prevent successful data upload. This caution is now especially critical because file imports no longer have file size limitations–allowing larger files to be uploaded means the process may take longer. To continue working without interrupting your upload, open a new session in a separate browser tab instead of closing the current page. - Once the upload is complete, the de-duplication process begins and you're free to close the eCQM Data report page. Click View to display a progress tracking bar for the import.
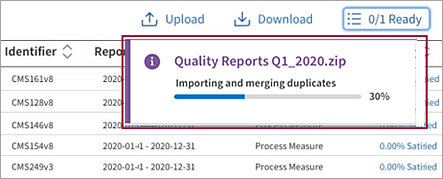
Note: If any files in the ZIP file cannot be imported, an error log is created but processing of the ZIP file continues. For more information, see Error logs and troubleshooting. - When the import process is completed, you see a success message that shows you the number of patients merged. Click the here link to download and review the deduplication report (see Patient deduplication report).
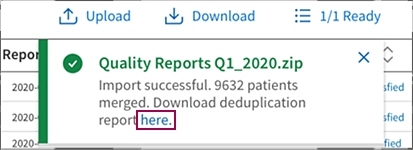
- After 24 hours, run the eCQM Data report to verify that the data you imported has been aggregated into the report (see To preview your eCQM Data).
ACO or PCF enrolled providers who are moving between athenaOne practices, or ACO or PCF enrolled providers who are moving into athenaClinicals from a different EHR, can aggregate clinical and supplemental data from external sources into athenaOne for reporting quality measures under their ACO or PCF IDs. athenaOne maps your incoming ACO Entity ID or PCF Practice Site ID with existing data in athenaClinicals using a segment within the QRDA-1 import file called id.extension. Before you begin a QRDA-1 import, your ACO Entity ID or PCF Practice Site ID must be configured in athenaOne. See O-help: To enter an ACO entity ID for a medical group and To assign a PCF practice site ID to a department for more information.
Note: athenahealth will not support data aggregation for non-athenaOne medical groups/TINs. If you're not using athenaOne for clinical documentation, then do not import a QRDA-1 file for those TINs. If you are importing QRDA-1 file from an external EHR, please ensure that your previous EHR vendor is providing APM Entity ID (ACO ID) or Practice Site ID (PCF ID).
For ACO Data Aggregation
To map incoming QRDA-1 to your ACO ID, the APM Entity ID (ACO ID) must be included in the id.extension like this:
<documentationOf><serviceEvent><performer><assignedEntity><representedOrganization><id>
You'll also need to ensure that the id.root is 2.16.840.1.113883.3.249.5.4
For PCF Data Aggregation
To map incoming QRDA-1 to your PCF ID, the Practice Site ID (PCF ID) must be included in the id.extension like this:
<documentationOf><serviceEvent><performer><assignedEntity><representedOrganization><id>
You'll also need to ensure that the id.root is 2.16.840.1.113883.3.249.5.3
Once imported, aggregated data for ACO or PCF reporting will be visible on eCQM report within 24-48 hours. Ensure that you are selecting appropriate filters for ACO or PCF reporting on eCQM report page.
Note: You will be able to view and filter imported data in the eCQM report tool.
If you import data for a Medical Group (ACO ID) or for a Practice Site (PCF ID) that is not configured in athenaOne, you will see those practice sites or medical group IDs in the eCQM Report; however, submission for those medical groups or practice sites is not possible since they're not part of athenaOne.
If you select a file to import that is not in the .zip format, you receive an error message and the import process is not started (see Requirements for imported QRDA I files).
If athenaOne encounters errors within the ZIP folder while downloading the files, processing continues. When the import is complete, an error log provides processing results. You can download and print the CSV error log.
If a processing error occurs during file import, athenaOne displays a message similar to this:

Click Error List in the message to download the error log as a CSV file. The error log contains the names of any files that were not downloaded. You can review the description of why files failed and use this information to fix most of the upload errors yourself. After you fix the files with errors, you can re-upload only those files.
Note: The data processed from the fixed import files will be available in reports within 24 hours.
Following are descriptions of the import errors captured in the error log. These errors can occur during the upload stage, the preprocessing stage, and the processing stage.
Note: If you cannot resolve a problem with a file after you review the error log, create a support case from athenaOne > Support > Success Community > Contact Client Support Center. Click the Quality Management category, click Quality Management/P4P, and then click Create Online Case.
The upload error prevents the ZIP file from being processed. You must fix the file before you can import it.
Error message
This file is the wrong file type. Only ZIP files (.zip format) can be imported.
Meaning
The import file is in an incorrect format.
How to fix the error
Make sure that the file is in .zip format and contains only XML files. Also, make sure that the file is not password protected or corrupt.
Preprocessing errors prevent the ZIP file from being processed. You must fix the file before you can import it.
Error message
This file can't be uploaded. It is corrupt or password protected.
Meaning
The import file could not be unzipped.
How to fix the error
Make sure that the file is in .zip format and is not password protected or corrupt.
Processing errors do not prevent the ZIP file from being processed. However, you should review the error log after the import is done to locate files that were not imported and fix them. After you fix these files, you can import the fixed files on the eCQM Data page.
Error message
This file is the wrong file type. Only XML files can be imported. If this isn't a QRDA I file, remove it from the ZIP file. If it is a QRDA I file but not an XML file, change the file extension to .xml and try importing it again.
Meaning
The ZIP file contains a file that is not an XML file.
How to fix the error
If this file is not a QRDA I file, remove it from the ZIP file. If the file is a QRDA I file, but is not saved as an XML file, change the file extension to .xml and upload only the fixed file.
Error message
QRDA-III file uploaded. QRDA-III file can not be uploaded for data aggregation, only QRDA-1 files are acceptable.
Meaning
The uploaded ZIP file contains QRDA-III files which are not acceptable for data aggregation.
How to fix the error
Remove any QRDA-III files from the ZIP and replace them with QRDA-I file for that provider.
Error message
The contents of this file are not in the QRDA I format. If this is a patient QRDA I file, check that the contents are in the QRDA I format.
Meaning
The ZIP file contains a file that is not a QRDA I file. This file was not processed because it is not a valid QRDA I file.
How to fix the error
If this file is a patient QRDA I file, make sure it's in the correct QRDA I format.
Error message
The contents of this file are not formatted correctly. Check that the contents follow the QRDA I guidelines.
Meaning
Malformatted QRDA I file.
How to fix the error
Make sure that the imported file adheres to the QRDA I format.
The import feature of the eCQM Data page matches incoming QRDA I patient data to existing patients in athenaClinicals and to patient data in other QRDA I files that you import in the same ZIP file. The import algorithm uses a number of demographic attributes to match patients; when the demographic information matches an existing patient in your system, the data is consolidated and becomes available in the eCQM report.
Important: Imported eCQM result data is available only on the eCQM Data page. This data does not appear in the patient chart.
Deduplication Report - New folder structure
After a QRDA I ZIP file is imported, you can download a deduplication report. The deduplication report is in CSV format, in an organized folder structure that separates patient records by their match status. The report contains the complete list of patients that were included in the ZIP file and provides details about:
- Patients records that were deduplicated (merged with existing records)
- Patient records that were not deduplicated (not merged with existing records)
- Reason that a record was not merged with an existing (similar) record
Imported patients that were merged appear along with the corresponding matched patients from athenaOne or from another QRDA I file.
For patients whose data was not merged, these scenarios account for when no match occurs:
- No patient matches found — In this scenario, you receive the status message "No Matches Found" in column "AE" of the deduplication report.
- Multiple patient matches found — Found too many patients to determine the match. In this scenario, you receive the status message "Multiple Patient Matches Prevented a Merge" in column "AE" of the deduplication report.
- Multiple charts found for a patient — Found the existing matching patient, but the patient has too many charts to determine which chart to match the data to. In this scenario, you receive the status message "Multiple Charts Prevented a Merge" in column "AE" of the deduplication report.
Note: For the second and third scenarios above, you must complete the action shown in column AF of the patient deduplication report ("Resolution").
Review the patient deduplication report
Download and review the patient deduplication report. Flag or annotate any errors and bring them to your Customer Success Manager (CSM). Here's an overview of the suggested best practice for reporting data aggregation issues to your CSM.
- After you complete a successful import, download and open the deduplication report (.csv format).
- In the report, compare the athenaClinicals (source) patient data (columns A-N) against the QRDA I patient data (columns O – AF).
- Use the last column (AG) to note any discrepancies or inputs that you want to report.
- In the case of a false positive (patient record was incorrectly merged with an existing patient record), indicate whether to unmerge the records and create a new patient record from the QRDA file, or to merge the imported QRDA patient record with another patient record (provide the patient ID and chart sharing group ID of the new patient that you want to merge the imported QRDA record with).
- In the case of a false negative (patient record should have been merged with an existing patient record), provide the patient ID and chart sharing group ID of the patient that you would like to merge with the imported QRDA patient record.
- Create a support case from athenaOne > Support > Success Community > Contact Client Support Center. Click the Quality Management category, click Quality Management/P4P, and then click Create Online Case.
Note: Attach your annotated CSV deduplication file to the case.
athenahealth will review your comments in the CSV file and take steps to fix the error. Your CSM or the CSC may contact you with any questions.
Note: Make sure that the report and information is sent in a secure manner.
After you create your report for a program, you can export the data to a Quality Reporting Document Architecture (QRDA I or QRDA III) file. To export your data to a QRDA I or QRDA III file, you must select a quality program using the Programs field. For the PCF program, you must also select a practice site ID and a provider name and NPI.
NOTE: The only QRDA-III files athenahealth supports for submission now come from the Submission Dashboard page. ACO eCQMs and PCF QRDA-III files for submission should not be downloaded from the eCQM Data report. Additionally, CMS has announced that the PCF program will conclude as of December 31, 2025. No further submission of quality measure results (i.e., for PY2025) is required.
athenahealth notifies you when your data and files are ready for QRDA III program submission.
When exporting QRDA III files, you are not required to select a provider taxpayer identification number (TIN), but, for the PCF programs, it is recommended that you include both the provider name/NPI and TIN (see Requirements for QRDA III files).
athenaClinicals will provide the APM Entity ID (ACO ID) or the Practice Site ID (PCF ID) in the exported QRDA-1 files under the following paths:
-
Practice Site ID (PCF ID): <documentationOf><serviceEvent><performer><assignedEntity><representedOrganization><id>
-
APM Entity ID (ACO ID): <documentationOf><serviceEvent><performer><assignedEntity><representedOrganization><id>
For more information about ACO or PCF, see the FAQ: Accountable Care Organization (ACO) or About Primary Care First (PCF) articles on the Success Community.
Important: When you select an NPI, make sure that you select the corresponding TIN under which that NPI bills.
- Display the eCQM Data page: On the Main Menu, click Quality > eCQM Data.
- Programs — Select the quality program to report on: MIPS Group, MIPS Individual, PCF, or PI Medicaid.
- Select other filters (see To preview your eCQM Data).
- View by — Select the view of the data that you want to export (the Measure view is selected by default).
- Click Download at the top right of the page to export your eCQM data in the form of a QRDA file. QRDA I files are exported as ZIP files. QRDA III files are exported as XML files.
The Export Quality Data window opens.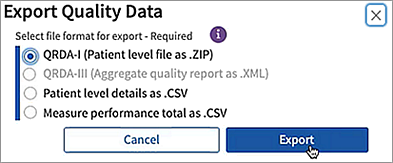
Note: If your report does not include required information (for example, the practice site ID for PCF program), you see an error message in the Export Quality Data window. - Select the file format — QRDA I or QRDA III — and then click Export.
A status message opens.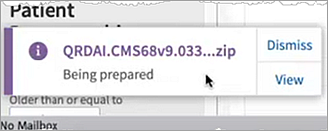
- Click Dismiss to close the message and continue working.
The export job is processed in the background even if you log off from your session.
Note: You can export another QRDA file while the first file is being processed. - To view the status of an export job, click the Downloads button at the top right of the page.
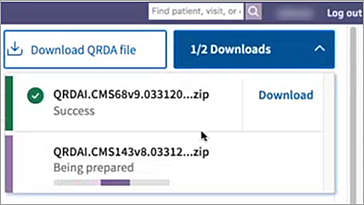
In this example, one export job is complete and the second job is still running. The In Queue status message let's you know that your report is in progress. - When an export job is complete, click Download to save the QRDA file to your local Downloads folder (the export job is removed from the list). The Download All option is available when the report is complete and the results are very large.
Tip: Disable your browser's pop-up blockers, as they will prevent the Download All function from working. "Download all" opens new tabs for each file in the export, and blockers will stop the process after the first download. (For Google Chrome, you'll find pop-up controls under Settings > Privacy and security> Site settings> Content.)
After you create an eCQM report, you can export and download the data to a CSV file (comma-separated values) for analysis. You can download the data by measure or by patient. The CSV file includes comprehensive eCQM data in the same format as the Quality Management Reporting CSV export file, along with additional information, such as enrollment status of providers, TIN, and so on.
Note: You can download reports created for the entire year and custom date-range reports to a CSV file.
- Display the eCQM Data page: On the Main Menu, click Quality > eCQM Data.
- Programs — Select the quality program to report on: ACO MSSP (eCQM option), MIPS Group, MIPS Individual, PCF, or PI Medicaid.
Note: You can also select Custom Date Reports to create a custom-date report or to download an existing custom-date report. - Measure Information — Select one or more quality measures from the list. (Only eCQMs for the selected program appear in the list.)
- Select other filters (see To preview your eCQM Data).
- View by — Select the view of the data that you want to export (the Measure view is selected by default).

- Click Download at the top right of the page to export your eCQM data to a CSV file.
The Export Quality Data window opens.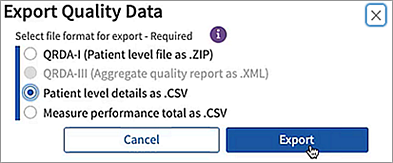
- Select the contents of your CSV output:
- Patient level details as .CSV — The output file contains approximately 35 columns of patient-level data similar to the information shown using the CSV option on the Quality Management Reporting page.
- Measure performance total as .CSV — The output file summarizes eCQM data by measure totals across your practice.
- Click Export.
A status message opens. The CSV files are exported as GZIP compressed files (.gz).
Note: You can click Dismiss in the status message to close the message and continue working. You can export another CSV or QRDA file while the first file is being processed (the export job is processed in the background even if you log off from your session). - Click View to see the status of your current and previous export jobs.
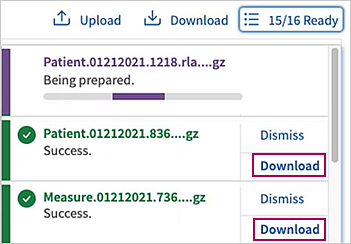
In this example, 15 export jobs are complete and one job is still running. - When an export job is complete, click Download or Download All to save a compressed CSV file to your local Downloads folder (the export job is removed from the list).
A file navigation window opens, where you can select a location and name for the GZIP file; click Save to download the file.
Note: GZIP files can be opened with various file compression programs, such as WinZip or WinRAR.
You can use the eCQM Data page to preview your organization's quality data for the current year, and previous years, as calculated from quality results for your athenaOne data and from imported QRDA I files. The eCQM Data report is the athenahealth certified tool for QRDA imports and exports.
The Quality Management Reporting page is the most robust source of quality data in athenaOne. We recommend that you use the Quality Management Reporting page and the MIPS Dashboard as your primary tools for reporting on quality program performance for MIPS, and ACO.
Note: If you use eCQMs in custom program reports, you should continue to use the eCQM Data report for these measures.
On the eCQM Data page, you can select one of these quality programs to track performance for the selected program.
- ACO MSSP (eCQM option)
- MIPS Group
- MIPS Individual
- PCF
- PCMH eCQM
- PI Medicaid
After you select a program, more filtering is done automatically for you:
- Measure Information filter — Only the eCQMs associated with the selected program are available. Use this filter to select one or more quality measures to report on. By default, all clinical quality measures for the program appear in the report results.
- Attribution filter — The default attribution model for the quality program is selected (see Attribution models for quality programs). Use this filter to select a different attribution model to report on.
- Provider Information filter — Only providers who qualify for the selected program are available in the Provider Information filters. Use these filters to select the providers you want to report on.
When you select a quality program on the eCQM Data page, the default attribution model for that program appears in the Attribution field.
- ACO MSSP (eCQM option) — Supervising Provider (that is, billing provider)
- MIPS Group — Supervising Provider (that is, billing provider)
- MIPS Individual — Supervising Provider (that is, billing provider)
- PCF — Performed By Provider (that is, rendering provider)
With the exception of the ACO MSSP program, you can override the default attribution model for the selected quality program.
Note: If you override the default attribution model for a program, the quality information on the eCQM Data page may differ from the information on the Quality Management Reporting page (which does not include an attribution filter).
athenahealth best practice
Do not override the default attribution model by clearing the Attribution field (leaving the field blank). When no option is selected, all attribution models are applied to the data for the program.
Use the APM Entity Identifier field on the eCQM Data page to select specific identifiers for these quality programs:
- PCF program — Use this field to select practice site IDs for this program
- ACO MSSP (eCQM option) program — Use this field to select ACO entity IDs for this program. This filters data for patients seen in the department associated with the practice site ID.
Note: Practice site location in athenaOne is defined as a department.
Practice-site level reporting includes all patients who:
- Were seen one or more times at the practice site location during the performance period by one or more clinicians on the PCF roster.
- Meet the inclusion criteria for the initial patient population (IPP), as specified in each measure.
Note: Multiple departments can be associated with the same practice site ID, but you must assign that number to each department individually on the Department Numbers page.
The import feature of the eCQM Data page is optimized for aggregating athenaOne electronic Clinical Quality Measures (eCQM) quality data with eCQM data from other EHRs for MIPS and ACO programs. athenahealth uses the Quality Reporting Document Architecture I (QRDA I) format required for CEHRT.
Important: After you import QRDA I data using the eCQM Data page, that data cannot be deleted and will affect submission data.
To import a QRDA I file using the eCQM Data page, the file must meet these requirements:
- File must be zipped and in contents must be in XMLformat.
athenahealth suggests that you use a QRDA I file that meets 2020 QRDA I specifications.
Before you import a QRDA I file using the eCQM Data page, make sure that the file includes this information:
- National Provider Identifier (NPI) for each provider
- Taxpayer Identification Number (TIN)
- Practice site ID (PCF program)
- ACO entity ID (ACO MSSP (eCQM option) program)
Important: If this information is not included in the QRDA I file, the data will not be properly aggregated. Therefore, the data will not be available in a QRDA III file export and will not be included in submission data.
For ACO Data Aggregation
To map incoming QRDA-1 to your ACO ID, the APM Entity ID (ACO ID) must be included in the id.extension like this:
<documentationOf><serviceEvent><performer><assignedEntity><representedOrganization><id>
You'll also need to ensure that the id.root is 2.16.840.1.113883.3.249.5.4
For PCF Data Aggregation
To map incoming QRDA-1 to your PCF ID, the Practice Site ID (PCF ID) must be included in the id.extension like this:
<documentationOf><serviceEvent><performer><assignedEntity><representedOrganization><id>
You'll also need to ensure that the id.root is 2.16.840.1.113883.3.249.5.3
Note: Once imported, aggregated data for ACO or PCF reporting will be visible on eCQM report within 24-48 hours. Ensure that you are selecting appropriate filters for ACO or PCF reporting on eCQM report page.
After you import a QRDA I file using the eCQM Data page, the aggregated data for providers is available on the eQCM Data page for the MIPS quality program.
The MIPS Dashboard will also reflect the new, aggregated data.
Note: The Quality Management Reporting page includes only the eCQM data from athenaClinicals. After you upload non-athenaOne data for a provider, the provider's performance information on the eCQM Data page will differ from the information on the Quality Management Reporting page.
Limitations
We do not support data aggregation for MIPS CQMs (formerly known as Registry measures) in athenaOne.
Duplicate patient records in an imported QRDA I file are recognized and deduplicated; the most recently imported record is kept. Duplicate records within a QRDA I file are identified by the "recordTarget" field, with identical "root" and "extension" fields.
Note: For more information about these QRDA I fields, see the 2021 CMS Implementation Guide for Quality Reporting Document Architecture Category I, section 5.1.2.
If you import a QRDA I file and a duplicate patient record exists in athenaClinicals, you may see two patient records (rows): one record from athenaClinicals and the other record from the imported QRDA I data source. The Data Source column (rightmost column in the Patient view of the eCQM Data report) displays the source of the patient record: athenaClinicals or QRDA.
Note: The import algorithm uses patient demographic data to deduplicate patient records (see Patient deduplication report).
If a provider is enrolled in MIPS but does not yet have a full year of eCQM data, a prompt on the MIPS Dashboard encourages the provider to import eCQM data from another EHR.

For MIPS Quality Program category submission, CMS advises using the EHR that meets data completeness requirements for at least 70% of the reporting year.
If you determine that your eCQM data in athenaOne will not meet the data completeness threshold and you would like athenahealth to submit a full year of MIPS Quality data, you must aggregate your non-athenaOne eCQM quality data using the QRDA I import process (see To import QRDA I files).
Note: athenahealth does not support data aggregation for MIPS CQMs (formerly known as Registry measures) in athenaOne.
If you do not want athenahealth to submit your MIPS Quality Program data but would still like to use the Quality Management Reporting page to monitor your performance in athenaOne:
- Create a support case (from athenaOne > Support > Success Community > Contact Client Support Center).
- Request that you be unenrolled from the MIPS Quality program and instead be enrolled in the MIPS Quality "Not for Attestation" program.
You can then aggregate your athenaOne quality data with non-athenaOne data outside athenaOne for submission on your own.
To create a QRDA III file from your program data, the report must include certain fields, depending on the quality program. If your filter selections do not meet the program reporting requirements, you receive a notification.
Note: QRDA-III files for submission should be retrieved from the Submission Dashboard.
The following information is required when you export your data to a QRDA III file. (Use the filter fields to specify the report information.)
| Program | Reporting Requirements |
|---|---|
| MIPS Individual | Single NPI and corresponding TIN are required. |
| MIPS Group | Single TIN is required (NPI cannot be selected). |
| ACO MSSP (eCQM option) |
Single ACO entity ID is required. NPI is required. Corresponding TIN is optional but recommended. |
| PCF |
Single practice site ID is required. NPI is required. Corresponding TIN is optional but recommended. |
Test patients are patient records created strictly for testing purposes and do not represent a real person's chart. To remain compliant with government regulations for quality programs, make sure that you report and submit data for real patients only.
Note: In accordance with CMS and other quality program sponsors, inactive patients are included in athenahealth certified eCQMs and in quality program submission data on the MIPS Dashboard, the Pay for Performance Dashboard, the eCQM Data page, the Quality Management Reporting page, and in UDS reports.
You can use the Test Patients Identification page to find test patients and mark dummy patients as test patients. Use this page to make sure that test patients are not included in quality reporting when you create test claims, encounters, problems, or diagnoses within the test patient chart.
Note: Patients marked as test patients on the Test Patients Identification page are not included in quality program submission data on the MIPS Dashboard, the Pay for Performance Dashboard, the eCQM Data page, the Quality Management Reporting page, or in UDS reports. (Quality measures appear on the Quality tab of the test patient's chart for testing purposes only.)
The following social history questions count towards the Preventive Care and Screening: Tobacco Use: Screening and Cessation Intervention clinical quality measure for the MIPS, Medicaid PI, ACO, UDS, and other quality programs. The results of these questions also appear in the eCQM Data report.
- Do you or have you ever smoked tobacco?
- Do you or have you ever used smokeless tobacco?
- How much tobacco do you chew?
Only one of these questions needs to be answered to receive credit for the measure.
Note: Answering only the Do you or have you ever used e-cigarettes or vape? question does not count toward satisfying this quality measure.
When you review the tobacco use screening questions with a patient, enter a date in these fields to satisfy the Tobacco Use: Screening and Cessation Intervention clinical quality measure:
- What was the date of your most recent tobacco screening? — You must explicitly enter the date that the most recent tobacco use screening was performed.
- On what date was tobacco cessation counseling provided? — For current tobacco users, you must explicitly enter the date that the most recent tobacco cessation counseling was provided.
For the purposes of the Preventive Care and Screening: Tobacco Use: Screening and Cessation Intervention quality measure, if a patient is identified as a tobacco user (either a tobacco smoker or a user of smokeless tobacco), you must also provide tobacco cessation intervention on or after the date of the most recent tobacco screening. You can use any of the following methods for documenting a cessation intervention in athenaClinicals:
- Entering a date in the On what date was tobacco cessation counseling provided? social history question
- Discussion topic for tobacco cessation
- Patient education information about tobacco cessation
- Referral to a specialist for tobacco cessation counseling therapy
- Prescription for tobacco cessation pharmacotherapy
- Active medication on the medication list for tobacco cessation pharmacotherapy
| Filter fields | |
| Programs |
You can filter the report to display data about one of these quality programs: ACO MSSP (eCQM option), MIPS Group, MIPS Individual, PCF, or PI Medicaid. When you select a program, you can add other filters to display your data by measure, by group, or by provider. Note: If you do not select a program in this field, you can display a provider's performance for all measures in all programs in which the provider is enrolled. |
| Measure Information |
Select one or more quality measures. If you selected a quality program using the Programs field, only the eCQMs for the selected program appear in the list. By default, all clinical quality measures for a selected program appear in the report. |
| Attribution |
When you select a quality program using the Programs field, the default attribution model for that program appears in the Attribution field (see Attribution models for quality programs). You can filter the program data using a different attribution model by selecting one of these options from the menu: Usual Provider, Performed By Provider, or Supervising Provider. Note: If you override the default attribution model for a program, the quality information on the eCQM Data page may differ from the information on the Quality Management Reporting page (which does not include an attribution filter).
athenahealth best practice Do not override the default attribution model by clearing the Attribution field (leaving the field blank). When no option is selected, all attribution models are applied to the data for the program. |
| Time Filters | |
| Measurement Period Jan 01 to Dec 31 |
Select a reporting year. The report provides data from January 1 to December 31 of the selected year. |
| Patient Demographic | |
| Age as on |
Select the date by which the patient should be the age you specify in the Older than or equal to and Younger than fields. |
| Older than or equal to |
Select the minimum age for patients to appear in the report data. |
| Younger than |
Select the age that the patient must be younger than to appear in the report data. |
| Patient sex |
Select the patient sex demographic: Male, Female, or Unknown. |
| Ethnicity | Select a patient ethnicity demographic. |
| Insurance | Select a health insurance program. |
| Race | Select a patient race demographic. |
| Clinical Data | |
| Patient problems | Select one or more patient problems. |
| APM Entity Identifier | |
| APM Entity Identifier |
If you selected ACO MSSP (eCQM option) or PCF from the Programs menu, you must select a practice site ID or ACO entity ID. The PCF practice site ID is configured for a department in athenaOne. You configure the ACO entity ID for a medical group. Note: For more information, see APM Entity Identifier filter (practice site ID). |
| Department Address | |
| Filter By |
Select the address type for the departments that you want to report on. Note: If you selected ACO MSSP (eCQM option) or PCF from the Programs menu, this option is not available.
|
| Address | Select the street address for the department. The available selections depend on the value of the Filter By field. |
| City | Select the city for the department. The available selections depend on the value of the Filter By field. |
| State | Select the state for the department. The available selections depend on the value of the Filter By field. |
| Zip Code |
Select the ZIP code for the department. The available selections depend on the value of the Filter By field. |
| Provider Information | |
| Provider Name (NPI) |
Select the provider name and NPI (National Provider Identifier) number from the menu. If you selected a quality program using the Programs field, the menu includes only providers enrolled in that program. The list of providers also depends on the attribution model selected using the Attribution field (see Attribution models for quality programs). |
| Provider TIN |
Select a provider TIN (Taxpayer Identification Number). For the ACO MSSP and PCF programs, it is recommended that you include both the provider name/NPI and the TIN. Important: When you select an NPI, make sure that you select the corresponding TIN under which that NPI bills. |
| Show enrolled measures |
This option appears if you selected a quality program using the Programs field and a provider using the Provider Name (NPI) or Provider TIN field. Select this option to display the provider's performance in only the enrolled measures of the program. |
| Provider Type |
Select the provider type or specialty. |
| Custom Date Reports fields (Create and Edit Report) | |
| For Year |
The current reporting year is selected by default. You can select the previous reporting year from the menu during the open submission window for the quality program. |
| Name | Enter a unique name for this custom report (200 characters maximum). |
| Parent Program |
Select the parent program for the report: MIPS Group, MIPS Individual, or PI Medicaid. |
| Measure |
When you create a custom report, all clinical quality measures for the selected program appear in the list.
|
| From |
Enter the start date for the report. The date range for a custom report must be within the open submission period for the parent program and must span at least 28 days. |
| To |
Enter the end date for the report. The date range for a custom report must be within the open submission period for the parent program and must span at least 28 days. Note: The To date cannot be set to today's date or to any future date. |
| Column headings — Measure view | |
| Measure name | Name of the quality measure. If you selected a quality program using the Programs field, only eCQMs for the selected program appear in the report. |
| Measure ID | CMS ID of the quality measure. If you selected a quality program using the Programs field, only eCQMs for the selected program appear in the report. |
| Reporting Period | Reporting period — January 1 through December 31 — for the selected reporting year. |
| Type | Measure type. |
| Result | Indicates whether the measure has been satisfied and the satisfied percentage. |
| Column headings — Patient view | |
| Patient Name |
Name of the patient. |
| Insurance | Insurance policy for the patient. |
| Date Of Birth | Patient's date of birth. |
| Sex | Patient's sex. |
| Race |
Patient's race. |
| Ethnicity | Patient's ethnicity. |
| Problems | Patient problem. |
| Measure | Quality measure. |
| Satisfied Date | Date that the measure was most recently satisfied. |
| Result | Measure result: Satisfied or Not Satisfied. |
| Data Source | Source of the patient record: athenaClinicals or QRDA (that is, data imported from a QRDA I file). |