UDS Reports
athenaCollector + athenaClinicals
The Uniform Data System (UDS) is a reporting requirement for Health Resources and Services Administration (HRSA) grantees. If your organization has at least one department designated as a federally qualified health center (FQHC) on the Department Government Designations page, you can run UDS reports from the UDS tab in the Report Library. For more information about UDS reporting requirements, see the FQHC Resource Center and the 2023 UDS Manual on HRSA.gov.
- UDS Reports (user guide)
- Run UDS Reports
- QA UDS Table 3A
- QA UDS Table 3B
- QA UDS Table Patients by Zip
- QA UDS Table 9D
- QA UDS Table 6A
- QA UDS Table 5
- QA UDS Table 5 – Selected Services Detail Addendum
- QA UDS Table 4
- QA UDS Tables 7B and 7C
- QA UDS Table 7A
- QA UDS Table 6B
- UDS Provider Type Mapping
- UDS Reporting Overview — CPT Inclusions and Exclusions
Display the Report Library: On the Main Menu, click Reports. Under General, click Report Library. Click the UDS tab, and then click run next to one of the UDS reports.
To access UDS reports, you must have the UDS Admin role or the UDS Report Administrator role, and you must have at least one department designated as a federally qualified health center (FQHC) on the Department Government Designations page.
Use this procedure to run the following UDS reports:
- UDS Patients by Zip Code
- UDS Table 3A - Patients by Age and by Sex Assigned at Birth
- UDS Table 3B - Demographic Characteristics
- UDS Table 4 - Selected Patient Characteristics
- UDS Table 5 - Staffing and Utilization
- UDS Table 5 Addendum - Selected Services Detail
- UDS Table 6A - Selected Diagnoses and Services Rendered
- UDS Table 6B - Quality of Care Indicators
- UDS Table 7 - Section A: Deliveries and Birth Weight
- UDS Table 7 - Section B: Controlling High Blood Pressure
- UDS Table 7 - Section C: Diabetes: Hemoglobin A1c Poor Control
- UDS Table 9D - Patient Related Revenue
Because UDS reports are very large, you must run them overnight. The report appears in your Report Inbox the morning after you run it.
- Display the Report Library: On the Main Menu, click Reports. Under General, click Report Library.
- Click the UDS tab.
- In the Standard Reports section of the tab, click run next to the UDS report name.
The Run Report page appears. - Date Range — Enter or select the date range for the report. The date range specifies the dates of service and the program year of the UDS report.
Note: If your fiscal year does not align with the calendar year, you can select date ranges for the fiscal year or the calendar year, for example, Fiscal Quarter-to-Date, Previous Fiscal Year, Previous Calendar Quarter, or Calendar Year thru Previous Month. - Type of Report — Select an option from the menu to specify how the data is formatted in the report.
- Rolled Up Data — Displays the data in the format used for HRSA reporting. Use this report type to preview or generate your report submission.
- Filtered Data — Displays the complete data used to produce the rolled-up report view. Use this report type if you want to roll up your own data using pivot tables, or if you want to verify the data contained in the rolled-up data report.
Note: When you run Table 4 - Selected Patient Characteristics, you must choose either Filtered by Patient or Filtered by Visit. - Filtered by Patient — When you run Table 6A - Selected Diagnoses and Services Rendered, you can choose Filtered by Patient to display the number of all visits that satisfy each 6A measure for each patient (the Filtered Data report type for Table 6A shows a count of measures by claim and encounter pair). For each qualifying measure, the 6A Filtered by Patient report type also includes all data for which patients received lab results.
- Raw Data — Displays all claim and encounter data from the FQHC department, including data from non-UDS visits. Use this report type to troubleshoot a report, for example, to determine why UDS data that should have been included in your rolled-up or filtered report was not included. (This report type is not available for the Table 5 Addendum - Selected Services Detail report.)
- Special Population (2018+ only) — To run a report for a specific population only, select one of these options (All Patients is the default value).
- Agricultural Worker — Run a report on Agricultural Worker patients only.
- Homeless — Run a report on homeless patients only.
- Public Housing — Run a report on public housing patients only.
- Report Year — Select the version of the report based on the HRSA specifications. This field defaults to the most recent edition of the report.
Note: The Report Year field does not appear on the Run Report page for Table 6B, Table 7A, Table 7B, or Table 7C. - Report Format — Because UDS reports are very large and must be run overnight, select one of these options:
- Text (tab-delimited)
- Text (comma-delimited) (recommended)
- Report Options — Select the Run Offline (will appear in your Report Inbox tomorrow morning) option. You can also select or deselect any of these options:
- Suppress Column Headings — Select this option to remove column headings from the report results.
- Suppress Report Name — Select this option to remove the report name from the report results.
- Show Filter Criteria — Select this option to include your selected filter criteria in the report results.
- Click Run Report.
A message informs you that your report will be available in your Report Inbox tomorrow morning. - Click Continue.
The UDS tab of the Report Library is displayed.
Note: This field appears on the Run Report page for Table 3A, Table 3B, Table 4, Table 5, and Table 6A.
The report results will be exported to a .csv file and delivered to your Report Inbox the next morning.
Run the UDS Visit Inclusion report to review how athenaOne categorizes encounters and determine whether you need to apply a UDS visit type override to any encounters to increase UDS reporting accuracy. You can also review provider classifications and classifications of grant-specific populations. For more information, see Using the UDS Visit Inclusion report.
Tip: Because the UDS Visit Inclusion report is very large, you should run it overnight. The report appears in your Report Inbox the morning after you run it.
- Display the Report Library: On the Main Menu, click Reports. Under General, click Report Library.
- Click the UDS tab.
- In the Standard Reports section of the tab, click run next to UDS Visit Inclusion.
The Run Report: UDS Visit Inclusion page appears. - Date Range — Enter or select the date range for the report. The date range specifies the dates of service and the program year of the UDS report.
Note: If your fiscal year does not align with the calendar year, you can select date ranges for the fiscal year or the calendar year, for example, Fiscal Quarter-to-Date, Previous Fiscal Year, Previous Calendar Quarter, or Calendar Year thru Previous Month. - Report Format — Because UDS reports are very large and must be run overnight, select one of these options:
- Text (tab-delimited)
- Text (comma-delimited) (recommended)
- Report Options — Select the Run Offline (will appear in your Report Inbox tomorrow morning) option. You can also select or deselect any of these options:
- Suppress Column Headings — Select this option to remove column headings from the report results.
- Suppress Report Name — Select this option to remove the report name from the report results.
- Show Filter Criteria — Select this option to include your selected filter criteria in the report results.
- Click Run Report.
A message informs you that your report will be available in your Report Inbox tomorrow morning. - Click Continue.
The UDS tab of the Report Library is displayed.
The report results will be exported to a .csv file and delivered to your Report Inbox the next morning.
The rolled‑up report output from UDS Table 9D contains only data about the charges and payments posted on claims. The UDS Table 9D Helper report displays all remittance records (also known as unpostables) in athenaOne that may be relevant to your annual report to provide a more complete view of the total payments received in the prior year.
Use the UDS Table 9D Helper report to update UDS Table 9D column B. The UDS Table 9D Helper report helps you identify remittance records that you should include and exclude as you complete UDS Table 9D. With the output from the Helper report, you can update UDS Table 9D column B to:
- Include payments from unpostables.
- Categorize unpostable payments in the appropriate insurance categories.
- Cross-reference the remittance with other systems to remove non-athenaOne payments that are already being reported.
For more information about how to extract information from the UDS Table 9D Helper report, see Using the UDS Table 9D Helper report.
- Display the Report Library: On the Main Menu, click Reports. Under General, click Report Library.
- Click the UDS tab.
- In the Standard Reports section of the tab, click run next to UDS Table 9D Helper.
The Run Report: UDS Table 9D Helper page appears. - Date Range — Enter or select the date range for the report. The date range specifies the dates of service and the program year of the UDS report.
Note: If your fiscal year does not align with the calendar year, you can select date ranges for the fiscal year or the calendar year, for example, Fiscal Quarter-to-Date, Previous Fiscal Year, Previous Calendar Quarter, or Calendar Year thru Previous Month. - Report Format — Because UDS reports are very large and must be run overnight, select one of these options:
- Text (tab-delimited)
- Text (comma-delimited) (recommended)
- Report Options — Select the Run Offline (will appear in your Report Inbox tomorrow morning) option. You can also select or deselect any of these options:
- Suppress Column Headings — Select this option to remove column headings from the report results.
- Suppress Report Name — Select this option to remove the report name from the report results.
- Show Filter Criteria — Select this option to include your selected filter criteria in the report results.
- Click Run Report.
A message informs you that your report will be available in your Report Inbox tomorrow morning. - Click Continue.
The UDS tab of the Report Library is displayed.
The report results will be exported to a .csv file and delivered to your Report Inbox the next morning.
You can display an individual remittance record (unpostable) or a group of records, such as incentive payment records.
- Display the Find Unpostables page: On the Main Menu, click Financials. Under PAYMENTS, click Unpostables. In the left menu,under UNPOSTABLE REMITTANCE, click Find Unpostables.
- To display an individual remittance record (unpostable):
- Enter the unpostable ID in the Unpostable ID field and click Generate Worklist.
- In the Unpostables Worklist, click the record number to display the Remittance Record page.
- To display a group of remittance records:
- Enter or select the search criteria, (for example, use the Unpostable category and Unpostable type fields) and click Generate Worklist.
- In the Unpostables Worklist, click an unpostable category to display all records in that category, or use the Sort by menu to sort the list by unpostable status or responsible party.
- Locate a record that should be included in UDS Table 9D.
- Add the dollar amount of this record to the total in the appropriate cell in UDS Table 9D column B.
If your organization submits UDS reports, you can designate a department as a service delivery site for UDS reporting. The Departments page provides two fields for these departments:
-
UDS School-Based Health Center — Use this field to specify whether the department is a school-based health center.
-
UDS Public Housing Department — Use this field to specify whether the department is a public housing health center.
Note: These fields appear on the Departments page only for organizations that have at least one department designated as a federally qualified health center (FQHC) on the Department Government Designations page.
UDS reports use these fields to determine whether a patient was seen at a school-based site or at a service delivery site located in or immediately accessible to public housing. Visits in school-based sites and public housing departments are included in patient counts in UDS Table 4. Also, athenaOne uses the information in the UDS Public Housing Department field when you select Public Housing from the Special Population filter (Table 3A, Table 3B, Table 4, Table 5, or Table 6A).
- Display the Departments page: On the Main Menu, click Settings
 >Billing. In the left menu, under Practice Links — Departments, click Departments.
 - Click the update
link for the department. The department details appear in the fields at the top of the page.
Note: If you're creating a new department, complete the required fields (see To add a new department). - UDS School-Based Health Center — Select Y.
Visits in school-based departments are counted in UDS Table 4. - UDS Public Housing Department — Select Y.
Visits in public housing departments are counted in UDS Table 4 and are used in UDS special population reporting. - Click Save.
Important: For reporting year 2021, athenahealth is deprecating the UDS Table 6A Helper report, which was created in 2020. A new report type (Filtered by Patient) replaces the UDS Table 6A Helper report; this option is available in the Type of Report menu when you run Table 6A. You can still run the UDS Table 6A Helper report for 2020 UDS data.
The UDS Table 6A - Selected Diagnoses and Services Rendered rolled-up report includes results from the following tests, even if the tests are not tied to a visit or claim (that is, no corresponding procedure code exists). You can run the UDS Table 6A Helper report to help you validate the data for these tests in the Table 6A rolled-up report.
- HIV
- Hepatitis B
- Hepatitis C
- SARS-CoV-2 diagnostic test
- SARS-CoV-2 antibody test
- Mammogram
- Pap test
Note: The UDS Table 6A -Selected Diagnoses and Services Rendered report supports SNOMED codes. However, this does not apply to claim SNOMED codes because SNOMED codes are not entered directly onto claims. The logic for clinical encounters makes athenaOne only use the SNOMED codes that you specifically entered in the encounter.
The UDS Table 6A Helper report returns the following data within the selected reporting period for individual patients:
- Number of qualifying UDS visits during the reporting period
- Number of unique test results that your organization received for that patient, including test results not tied to a visit (the number of test results in the UDS Table 6A Helper report corresponds to the lab results in the patient chart)
Note: If there are more test results than UDS visits during the reporting period, athenahealth counts only one result per visit per type of test in the UDS Table 6A report. For example, if a patient has three tests but only two qualifying encounters, only two tests are included in Table 6A. For more information, review the Table 6A QA tip sheet and the UDS Guide to Success.
- Display the Report Library: On the Main Menu, click Reports. Under General, click Report Library.
- Click the UDS tab.
- In the Standard Reports section of the tab, click run next to UDS Table 6A Helper.
The Run Report: UDS Table 6A Helper page appears. - Date Range — Enter or select the date range for the report. The date range specifies the dates of service and the program year of the UDS report.
Note: If your fiscal year does not align with the calendar year, you can select date ranges for the fiscal year or the calendar year, for example, Fiscal Quarter-to-Date, Previous Fiscal Year, Previous Calendar Quarter, or Calendar Year thru Previous Month. - Report Year — Select the version of the report based on the HRSA specifications. This field defaults to the most recent edition of the report.
- Report Format — Because UDS reports are very large and must be run overnight, select one of these options:
- Text (tab-delimited)
- Text (comma-delimited) (recommended)
- Report Options — Select the Run Offline (will appear in your Report Inbox tomorrow morning) option. You can also select or deselect any of these options:
- Suppress Column Headings — Select this option to remove column headings from the report results.
- Suppress Report Name — Select this option to remove the report name from the report results.
- Show Filter Criteria — Select this option to include your selected filter criteria in the report results.
- Click Run Report.
A message informs you that your report will be available in your Report Inbox tomorrow morning. - Click Continue.
The UDS tab of the Report Library is displayed.
The report results will be exported to a .csv file and delivered to your Report Inbox the next morning.
- On the Main Menu, click Support > Success Community > Contact Client Support Center.
The case classification page appears. - Click the Clinicals category.
The Clinicals subcategories appear. - Click Clinicals Reporting and then click Create Online Case.
Note: To speak to a CSC agent, click Call us! instead of Create Online Case. - If you selected Create Online Case, fill in the fields on the case creation page.
Important: Provide as much detail as possible, but do not enter protected health information (PHI), such as patient name or diagnosis. - athenaOne Record Type — Select a record type, for example, Claim or Patient. If possible, provide a patient ID or claim ID example to replicate the issue, but do not enter PHI, such as patient name or diagnosis.
- athenaOne Record ID — If you selected a type from the athenaOne Record Type menu, enter a patient ID or claim ID example to replicate the issue, but do not enter PHI, such as patient name or diagnosis.
- Subject — Include the word "UDS" and the report that you're running, for example, "UDS Table 5, Provider visits aren't appearing in report."
- Description — Include the table name, date range, and type of report, for example, "Table 5, Date range: 01/01/2020-12/13/2020, Type of report: Rolled up data."
- Click Create Online Case.
A case confirmation page appears with the case number. - If you have screenshots or other files that you want to send with your case, click Add Attachment and select the file.
- You can track the progress of your case on the Support page of the Success Community.
athenahealth generates the majority of the required Uniform Data System (UDS) tables. For more information about running UDS reports, see the HRSA Uniform Data System (UDS) Resources page for all supported reports.
To access the UDS reports, you must have the UDS Report Administrator role or the UDS Admin role, and you must have at least one department designated as a federally qualified health center (FQHC) on the Department Government Designations page.
Test patients are patient records created strictly for testing purposes and do not represent a real person's chart. To remain compliant with government regulations for quality programs, make sure that you report and submit data for real patients only.
Note: In accordance with CMS and other quality program sponsors, inactive patients are included in athenahealth certified eCQMs and in quality program submission data on the MIPS Dashboard, the Pay for Performance Dashboard, the eCQM Data page, the Quality Management Reporting page, and in UDS reports.
You can use the Test Patients Identification page to find test patients and mark dummy patients as test patients. Use this page to make sure that test patients are not included in quality reporting when you create test claims, encounters, problems, or diagnoses within the test patient chart.
Note: Patients marked as test patients on the Test Patients Identification page are not included in quality program submission data on the MIPS Dashboard, the Pay for Performance Dashboard, the eCQM Data page, the Quality Management Reporting page, or in UDS reports. (Quality measures appear on the Quality tab of the test patient's chart for testing purposes only.)
The UDS tab in the Report Library enables you to run the following UDS reports.
- UDS Patients by Zip Code
- UDS Table 3A - Patients by Age and by Sex Assigned at Birth
- UDS Table 3B - Demographic Characteristics
- UDS Table 4 - Selected Patient Characteristics
- UDS Table 5 - Staffing and Utilization
- UDS Table 5 Addendum - Selected Services Detail
- UDS Table 6A - Selected Diagnoses and Services Rendered
- UDS Table 6A Helper
- UDS Table 6B - Quality of Care Indicators
- UDS Table 7 - Section A: Deliveries and Birth Weight
- UDS Table 7 - Section B: Controlling High Blood Pressure
- UDS Table 7 - Section C: Diabetes: Hemoglobin A1c Poor Control
- UDS Table 9D - Patient Related Revenue
- UDS Table 9D Helper
- UDS Visit Inclusion
For detailed information about these reports, see the 2021 UDS Guide to Success in the FQHC Resource Center.
When you run a UDS report, you select one of the following report formats using the Type of Report field.
The rolled-up data report type displays the data in the format used for HRSA reporting and is based on the data in the Filtered report type. Use the rolled-up data report type to preview or generate your report submission.
In the rolled-up data report format (only), the first column in the following reports is the Line column. The Line column is part of the specifications for these tables in the 2021 UDS Manual on HRSA.gov.
- UDS Table 3A - Patients by Age and by Sex Assigned at Birth
- UDS Table 3B - Demographic Characteristics
- UDS Table 4 - Selected Patient Characteristics
- UDS Table 5 - Staffing and Utilization
- UDS Table 5 Addendum - Selected Services Detail
- UDS Table 6A - Selected Diagnoses and Services Rendered
- UDS Table 6B - Quality of Care Indicators
- UDS Table 7 - Section A: Deliveries and Birth Weight
- UDS Table 7 - Section B: Controlling High Blood Pressure
- UDS Table 7 - Section C: Diabetes: Hemoglobin A1c Poor Control
- UDS Table 9D - Patient Related Revenue
The filtered report type displays the complete data used to produce the rolled-up report view that you submit to HRSA.
- The raw data report contains all visits.
- The filtered data report includes the most recent qualifying UDS visit per patient.
Use the filtered data report type if you want to roll up your own data using pivot tables, or if you want to verify the data contained in the rolled-up data report. The data in the filtered report can be sorted to match the numbers generated in the rolled-up data report format.
The columns specific to a UDS table appear first. If applicable, any columns related to grant reporting appear next. The final columns in the report are related to the claim or encounter with a valid UDS visit that was included in the report.
The raw data report type displays the raw claim and encounter data from the FQHC department, including data from non-UDS visits. You may see results for a single patient encounter in multiple rows. These rows represent clinical orders, labs, claims, encounters, OB episode entries, and so on. If the patient had one UDS visit on a selected date of service, the patient's data will be included in the filtered and rolled-up report formats.
Use the raw data report type if you need to troubleshoot a report, for example, to determine why UDS data that should have been included in your rolled-up or filtered report was not included.
Note: You can use the UDS visit field on the Procedure Fees page to indicate that a procedure code (or procedure code,modifier combination) qualifies a clinical encounter as a UDS visit (see To update a procedure code for UDS reporting).
If a UDS report does not look correct, you can use these basic troubleshooting steps.
Make sure that you selected the correct date range when you ran the report.
The date range must include the dates of service that you want to report on.
Confirm that the department you want to report on is designated as an FQHC on the Department Government Designations page.
If the department is not listed on the Department Government Designations page with the Government Designation field set to FQHC, contact the CSC from athenaOne > Support > Success Community > Contact Client Support Center to add the department to this page.
Locate a claim or an encounter that you expected to appear in the report.
Make sure that the CPT codes on the claim or encounter are valid.
- If you want to include visits with custom ("dummy") codes in UDS reports, your organization must have the UDS reporting service type add-on enabled. To enable the service type add-on, contact the CSC from athenaOne > Support > Success Community > Contact Client Support Center.
- You can use the UDS visit field on the Procedure Fees page to indicate that a procedure code (or procedure code,modifier combination) qualifies a clinical encounter as a UDS visit (see To update a procedure code for UDS reporting).
Note: athenaOne makes no changes to claims with a UDS visit type service type add-on override.
For troubleshooting steps specific to each report, see the FQHC Resource Center.
The following tip sheets in O-help provide information about the report filters and formats and where the data in the report can be found in athenaOne.
- How to Run UDS Reports
- How to QA UDS Table Patients by Zip
- How to QA UDS Table 3A
- How to QA UDS Table 3B
- How to QA UDS Table 4
- How to QA UDS Table 5
- How to QA UDS Table 6A
- How to QA UDS Table 6B
- How to QA UDS Table 7A
- How to QA UDS Table 7B and 7C
- How to QA UDS Table 9D
Tables 6B, 7B, and 7C report on quality management (QM) measures. For information about how to satisfy quality measures, see the measurement satisfaction documents on the Quality Resources page of the Success Community.
The UDS Visit Inclusion report helps you determine whether all relevant visits are included in the UDS reports and whether they're categorized into the correct Visit Type.
Note: The report determines that a visit is virtual (telehealth) if the procedure code on the claim or encounter has one of these modifiers: .GQ, .GT, .G0, or .95.
With the UDS Visit Inclusion report, you can:
- Verify that athenaOne is correctly including UDS visits and excluding non-UDS visits.
athenaOne categorizes all CPT codes into included and excluded lists (see the CPT Inclusion-Exclusion List in O-help). Any visit with a CPT code on the inclusion list is a UDS-eligible visit. The IS_UDS column in the report indicates whether the encounter is included or excluded (Y means the visit is UDS eligible; N means the visit is not UDS eligible because it lacks a UDS-qualifying CPT code). The report also helps you to determine whether certain departments are using ineligible CPT codes or codes that disagree with the athenaOne classification. - Determine why athenaOne excludes certain visits.
If you see excluded visits that you believe should be included, locate those visits in the UDS Visit Inclusion report by filtering for the relevant patient ID, claim ID, or appointment ID. We recommend filtering for the patient ID because you can check whether the patient had multiple qualifying visits of the same type on a single day (athenaOne counts only one visit per patient per visit type per day). The report includes all CPT codes tied to that visit and indicates which ones, if any, qualify the visit as UDS eligible. - Check for visits that might be miscategorized in Table 5 (Staffing and Utilization).
The UDS Visit Inclusion report indicates the visit type, any service type add‑on (STAO) that might override the visit type, the provider and specialty, and the department. Using the department record, you can check for visit types that might be out of the ordinary for a department and check for configuration errors in athenaOne or process errors in the department.
You can use the UDS visit field on the Procedure Fees page to indicate that a procedure code qualifies a clinical encounter as a UDS visit. For more information, see To update a procedure code for UDS reporting.
Note: athenaOne makes no changes to claims with a UDS visit type service type add-on override.
In your fee schedules, you can set the UDS visit field separately for a base procedure code without a modifier (for example, 99211) and the same procedure code with a modifier (for example, 99211,CO).
Note: Base procedure codes and their related codes with modifiers must be set up individually in your fee schedules.
As an example, the base procedure code 99211: OFFICE/OUTPATIENT VISIT EST qualifies a visit as a UDS visit, but the related procedure code,modifier combination 99211,CO: EST. PATIENT COVID-19 TEST does not quality a visit as a UDS visit.
The default value of the UDS visit field (Default) indicates that this procedure code qualifies — or does not qualify — a visit as UDS eligible based on the default value specified in the CPT Inclusion-Exclusion list in O-help. The default value — Yes or No — appears below the field.
To override the default value specified in the CPT Inclusion-Exclusion list, select one of these options:
- Yes — Select this option to indicate that this procedure code (or procedure code,modifier combination) qualifies a clinical encounter as a UDS visit in your UDS reports.
- No — Select this option to indicate that this procedure code (or procedure code,modifier combination) does not qualify a clinical encounter as a UDS visit in your UDS reports.
- Default — Select this option if you previously set this field to Yes or No but now want to reset the procedure code to the default value specified in the CPT Inclusion-Exclusion list.
When you reset the UDS visit field, athenaOne reclassifies all visits that use this procedure code (or procedure code,modifier combination) as either UDS eligible or not UDS eligible since the beginning of the calendar year.
Note: athenaOne reclassifies visits overnight; you'll see your claims updated the following morning.
If you reset the UDS visit field before April 1 of the current year, athenaOne reclassifies visits for the prior year as well as visits for the current year. For example, if you set the UDS visit field to Yes for a procedure code on March 15, 2022, athenaOne reclassifies all visits with that procedure code dated from January 1, 2021 – March 15, 2022, as UDS-eligible visits.
Important: athenaOne makes no changes to claims with a UDS visit type service type add-on override.
You'll notice the following improvements to the UDS Visit Inclusion report:
-
Adding a new column for the UDS_PROVIDER_CATEGORY that specifies the provider type category of the provider on the claim and encounter.
-
Adding a new column for IS_OVERRIDDEN.
-
Updating the IS_UDS column to take into account whether the provider qualifies.
-
Moving the columns that directly inform IS_UDS so they appear before it in the column order.
- John Smith, CFO at Seven Hills Medical Group, knows that some nurses float between providing medical services and mental health services based on patient volume. John wants to make sure that all the float nurse visits are categorized correctly in UDS Table 5 - Staffing and Utilization.
- John runs the UDS Visit Inclusion report for 2021 and sets the Report Format to Text (comma-delimited) so that he can use Excel to sort and filter the data.
- In Excel, he filters the report to include only float nurses. He then uses the PROCEDURE_CODE_GROUPS column to quickly validate most visits.
- He reviews the remaining visits for the float nurses and compares the CPT codes and department to the visit type. He flags all visits that require follow‑up.
- John looks up the claim or encounter in athenaOne for each flagged visit and either confirms that the visit is categorized correctly or adds a UDS visit type override, as necessary.
Beginning with the 2019 reporting year, the Health Resources and Services Administration (HRSA) requires you to report on virtual (telehealth) visits using Table 5 - Staffing and Utilization.
athenaOne determines whether a visit is virtual based on:
- Department place of service code (POS 02 - Telehealth)
- Certain modifiers on procedure codes on the claim or encounter (.GQ, .GT, .G0, or .95)
- Certain procedure codes
Note: You can find the list of virtual-only procedure codes on the CPT Inclusion-Exclusion List in O-help.
If your organization enabled the UDS service type add‑on (STAO), you can manually override the classification of a visit as Clinic or Virtual in UDS reports.
- On the Claim Edit page, scroll down to the Charges section and locate Service Type Add-Ons.
- Select UDS Reporting.
The UDS fields appear. - Clinic or Virtual — This field displays the visit type (Clinic or Virtual) selected by athenaOne based on the department's place of service code (POS 02 - Telehealth), certain modifiers on procedure codes on the claim or encounter (.GT, .G0, or .95), or certain procedure codes.
- Clinic or Virtual Override — To override the value in the Clinic or Virtual field, select Clinic or Virtual from the menu.
To enable the UDS Reporting service type add-on, contact the CSC from athenaOne > Support > Success Community > Contact Client Support Center.
Note: Enable the UDS Reporting STAO only if you want to change the athenaOne classification of a visit or to make additional manual inclusions to a visit.
Beginning with the 2019 reporting year, the Health Resources and Services Administration (HRSA) requires you to run and submit the UDS Table 5 Addendum - Selected Services Detail report. The Table 5 Addendum report is located on the UDS tab of the Report Library.
The addendum captures mental health and substance use disorder services provided to patients during a medical visit where the provider type is not included in lines 20a-20c of the main part of Table 5.
To identify mental health and substance use disorder services provided by a provider type not listed in lines 20a-20c of Table 5, athenaOne finds visits with the appropriate ICD‑10 or CPT codes specified in Table 6A:
- Lines 18 through 19a — Substance use disorder treatment
- Lines 20a through 20d — Mental health treatment
The UDS Table 9D Helper report helps you identify remittance records (also known as unpostables) that you should include or exclude as you complete UDS Table 9D. With the output from the Helper report, you can update UDS Table 9D column B to:
- Include payments from unpostables.
- Categorize unpostable payments in the appropriate insurance categories.
- Cross-reference the remittance with other systems to remove non-athenaOne payments that are already being reported.
After you run the UDS Table 9D Helper report, you can determine whether any records displayed in the Helper report should appear in UDS Table 9D column B. Export the report to Excel, where you can sort by column and delete rows.
Use the payer detail provided in the INSURANCE_PACKAGE, INSURANCE_REPORTING_CATEGORY, and KICK_REASON_CATEGORY columns to help sort records into the correct payer categorization rows in UDS Table 9D column B.
Note: A single record may contain both dental and medical records or payments for two medical groups that share the same tax ID. Use this record for reporting only once when combining payments from multiple billing systems.
- In the report output, group the unpostables by payer. If you know that payments from certain payers should not be included, remove records from these payers immediately.
- Organize the report by unpostable type to continue reviewing whether records should be included or excluded.
- Open any EFT, cashed check, and check deposit unpostables identified by the UDS Table 9D Helper report in athenaOne to review them. If the item is from a payer who may issue UDS reportable payments and athenahealth has been unable to retrieve the remittance on your behalf, review your records, athenaOne, and the payer portal to attempt to locate the matching remittance.
- If you locate the remittance, upload it using the Review Missing Remittance tab on the Manage Remittance page so that athenahealth can match the remittance and post it to the appropriate claims. If athenahealth determines that these claim payments should be included in Table 9D, they appear in the Table 9D rolled-up report the next time you run it.
Note: If you run the Helper report a second time, this EFT or check unpostable will not appear in the report output. - If you are unable to locate the remittance in athenaOne, determine whether you want to include the bulk amount of this payment in your final report.
- Group incentive payments, other program payments, and management fees by program name in the UDS Table 9D report. Some programs, such as Medicaid Wrap Around Payment, contain UDS reportable payments. Review payments assigned to Other programs or with no assigned program in athenaOne to ensure that they are classified correctly.
- Review provider takebacks and readjudications for inclusion in UDS Table 9D by reviewing open records in athenaOne. Disregard records that are in a closed status because these financial transactions are already applied.
- Review unmatched athenaOne records and no matching charge/patient records for possible inclusion.
- Review capitation payments to determine whether they are related to a reportable capitation contract set up in the Capitation Wizard. If no capitation contract is assigned to the payment, review the EOB for more details about the payer and payee.
- Categorize medical record payment transactions by payer to review whether they're eligible for inclusion in UDS Table 9D.
- Use the payer detail provided in the INSURANCE_PACKAGE and INSURANCE_REPORTING_CATEGORY fields to sort records into the correct payer categorization rows in column B. If the INSURANCE_PACKAGE and INSURANCE_REPORTING_CATEGORY fields are blank, use the KICK_REASON_CATEGORY field or refer directly to any associated claims.
- If a record should be included in UDS Table 9D column B, add the dollar amount of the record to the total in the appropriate cell.
athenaOne automatically determines UDS visit types based on procedure code and provider. For detailed information about the provider types and procedure codes used to make this determination, see these documents on the FQHC Resource Center or the following topics in O-help:
You can include custom CPT codes in UDS reports and you can manually include or exclude a visit as a UDS visit with the UDS Reporting service type add‑on (STAO). To enable the UDS Reporting service type add-on, contact the CSC from athenaOne > Support > Success Community > Contact Client Support Center.
Note: Enable the UDS Reporting STAO only if you want to change the athenaOne classification of a visit or to make additional manual inclusions to a visit.
The UDS STAO works only on claims. If you create a clinical encounter with no associated claim, athenaOne automatically flags the encounter as a UDS visit type for reporting, and you cannot change the visit type in athenaOne. Your UDS report details (filtered and raw files) will include all encounters, in addition to claims.
Reclassifying procedure codes
You can use the UDS visit field on the Procedure Fees page to indicate that a procedure code (or procedure code,modifier combination) qualifies a clinical encounter as a UDS visit (see Setting procedure codes as UDS qualifying in fee schedules).
Note: athenaOne makes no changes to claims with a UDS visit type service type add-on override.
To use the UDS Reporting STAO, you must have the UDS Admin role.
- Access the Clinical Add-Ons section in the Intake checklist or in the Review step of the Exam stage.
Note: You can also access the UDS Reporting STAO on the Claim: Billing tab during the encounter Sign-off stage, as well as on the Charge Entry and Claim Edit pages. - Under Clinical Add-Ons, click the UDS Reporting option to open the service type add-on.
Note: On the Charge Entry and Claim Edit pages, the UDS Reporting option is under Service Type Add-Ons. - UDS Visit Type — This field displays the visit type selected by athenaOne based on procedure code and provider.
- UDS Visit Type Override — Select the override type from the menu. To exclude the visit from UDS reporting, select Non-UDS Visit from the menu.
- Internal note — Enter a note to document the UDS visit override.
- Click Save.
If your practice is a federally qualified health center (FQHC), you can use the following fields on the Quickview, Patient Registration, or Check-in page to collect data and calculate the federal poverty level of patients. This information also improves data collection for UDS reporting.
Note: The School-based health center patient and Public housing patient fields are not used in UDS reporting. However, you can designate a department as a school-based site or as a public housing service delivery site for UDS reporting. See To configure a department for UDS reporting.
- Family size
- Income
- Income level
- Agricultural worker
- Homeless status
- School-based health center patient
- Veteran status
- Public housing patient
Note: The data in the Family size, Income, and Income level fields is masked to protect patient privacy and avoid disclosure of sensitive demographic information. To edit these fields, click Edit or View.
Note: The UDS Financials section appears on Quickview and Check-In.
You can collect Federal Poverty Level data for UDS reporting and review a patient's UDS Federal Poverty Level history in a Federal Poverty Level — Calculation section.
-
Better collect household size and income on Quickview and Check-in.
-
Accurately see the Federal Poverty Level for the patient based on household size and income using guidelines in effect at the time of collection (while viewing history).
-
Quickly see the reporting expiration date for the collected information.
-
Easily see a patient's UDS Table 4 reporting history for 2023 and beyond.
You collect household size and income information in the Federal Poverty Level — Calculation box of the UDS Financials section.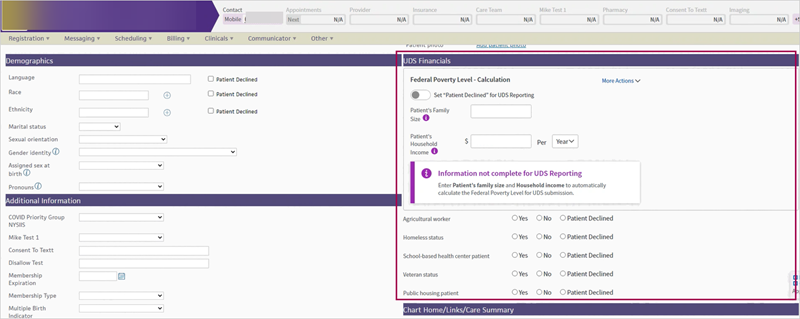
In the Federal Poverty Level — Calculation box, you can enter Patient's Family Size and Patient's Household Income for athenaOne to automatically calculate the Federal Poverty Level for UDS submission.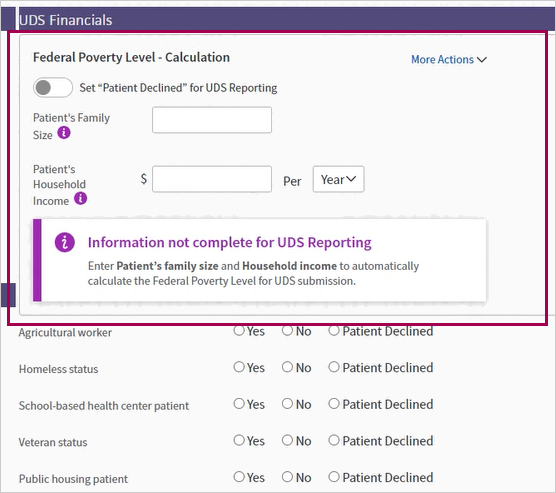
Note: The Health Resources and Services Administration (HRSA) requires that patient Federal Poverty Level data be collected within 12 months of the last calendar year visit or else be reported as "unknown" on UDS Table 4.
Does your practice use data differently than other practices and require a manual experience more similar to the legacy Financial section?
If your practice wants to manually calculate the range of the Federal Poverty Level (FPL), and then only enter that range, you can request the range version of this feature.
See Manually enter FPL range— setting required for more information.
This feature provides the following benefits:
-
Provides more accurate accounting of patients whose incomes are not collected
-
Provides more accurate UDS reporting
-
Reduces time entering income data
-
Increases satisfaction with UDS Federal Poverty Level data collection workflow
After completing the Patient's Family Size and Patient's Household Income fields:
-
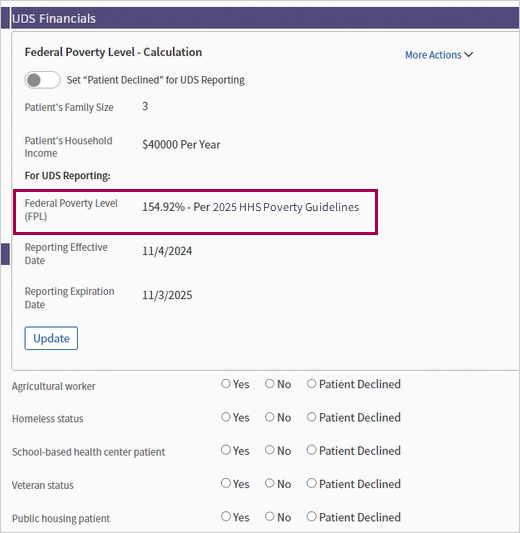
athenaOne calculates the patient's Federal Poverty Level. For more information completing the fields in the Federal Poverty Level — Calculation box, see the Complete Federal Poverty Level — Calculation workflow section of this release note.
-
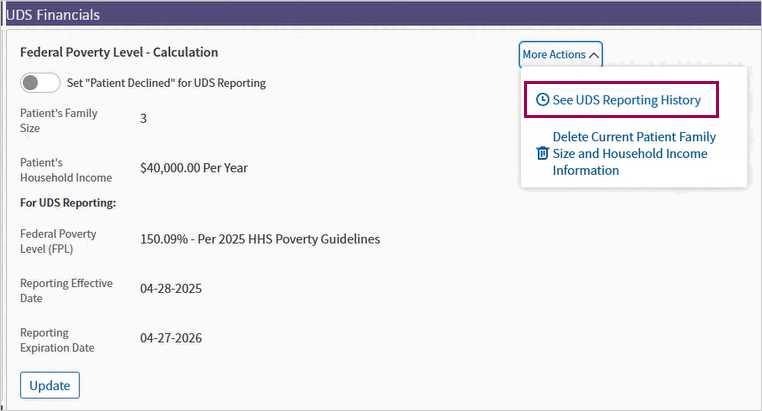
You can review a patient's Federal Poverty Level history, under More actions. For more information, see the Complete More Actions section of this release note.
A patient must have an address with state specified on file to calculate Federal Poverty Level; if there is no state entered an alert appears informing you to enter address information.
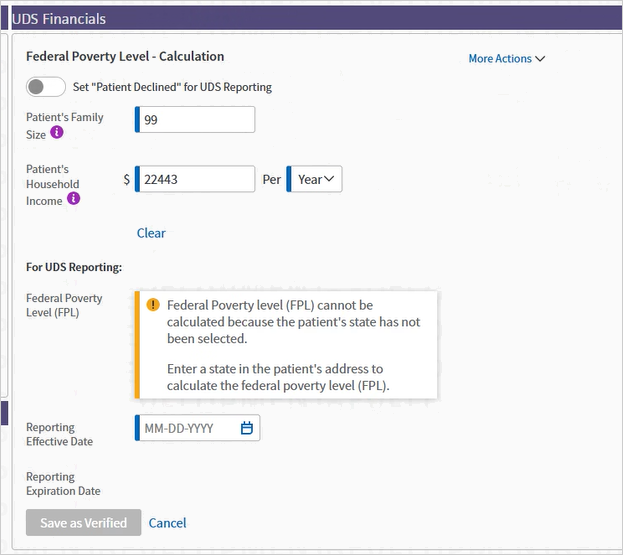
In UDS Financials section, you can:
- Collect household size and income on Quickview and Check-in
- See the reporting effective and expiration date for the collected information
- See a patient's UDS Table 4 reporting history for 2023 and beyond.
- See an historical view of the patient's Federal Poverty Level and which UDS guidelines were in effect at the time of collection.
- Delete previously entered income
You can click the Set "Patient Declined" for UDS Reporting option in the Federal Poverty Level — Calculation box.
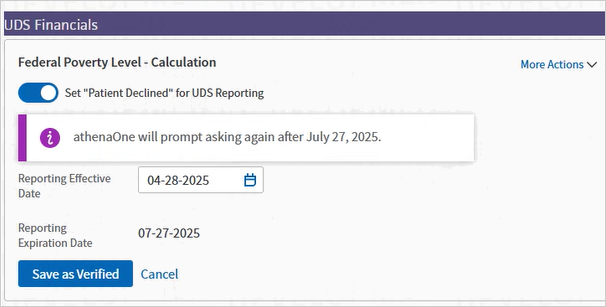
Note: When the patient declines UDS reporting, athenaOne tells you when you will be prompted to collect patient financials again. The reminder occurs three months from the date that the patient declined UDS reporting. If you would like to change the length of time, contact athenahealth Support or your Onboarding project team.
The prompt can be customized to appear any amount of time less than a year and can be set to a number of days, weeks, or months depending on when you want practice staff to ask again.
If you enter a 0 in the income field, the same alert appears.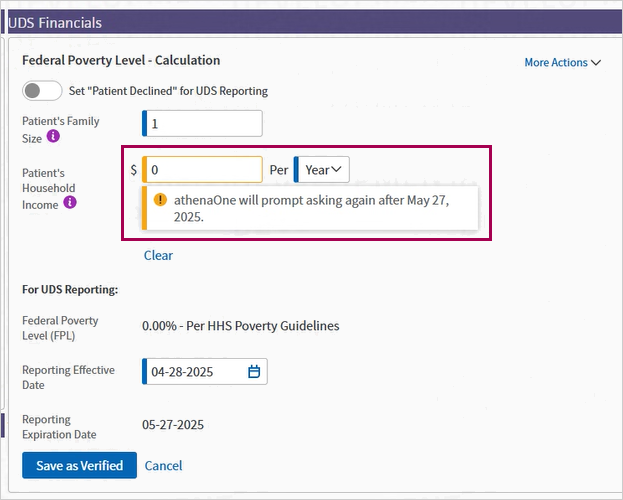
-
The history component of the app will only show one row per program year, rather than every update to patient Federal Poverty Level data. However, users can still see an audit history of all updates in the Patient Registration audit.
-
The legacy Federal Poverty Level fields on the Full Registration page will become read-only
-
The ability to upload documentation, editing the previous year's data, and leaving notes within the audit history will be available soon.
To access the Quickview, you must have the Quickview (or Quickview no financials) role or permission.
The reminder to collect this information again occurs three months from the date that the patient declined UDS reporting. If you would like to change the length of time, contact athenahealth Support or your Onboarding project team.
Your practice can request the range version of this feature by requesting that the Population Demographics - Federal Poverty Level Fields setting be enabled. Contact athenahealth Support or your Onboarding project team.
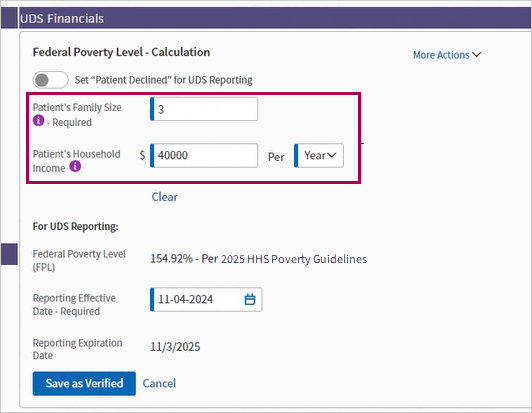
From the Federal Poverty Level — Calculation box in the UDS Financials section:
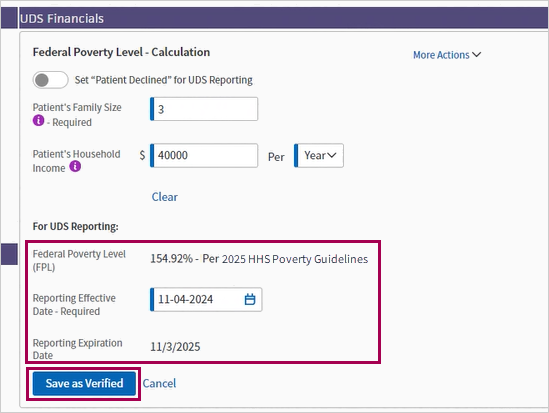
Federal Poverty Level — Calculation
-
Patient's Family Size — Enter the size of the patient's household.
-
Patient's Household Income — Enter the income of the patient's household.
-
Per — Choose the rate at which the household receives the income. You can select:
-
Year
-
Month
-
2 Weeks
-
Week
-
For UDS Reporting
-
Federal Poverty Level (FPL) — athenaOne automatically fills this field based on the information you added in the Patient's Family Size, Patient's Household Income, and Per fields. Once you complete those fields, the Federal Poverty Level value appears automatically.
-
Reporting Effective Date — Enter a date or choose one using the calendar icon.
-
Reporting Expiration Date — The expiration date automatically fills in as one year from the effective date.
-
Click Save as Verified.
Once you click Save as Verified, the Federal Poverty Level — Calculation box reloads and is then read-only. Click Update to edit the information.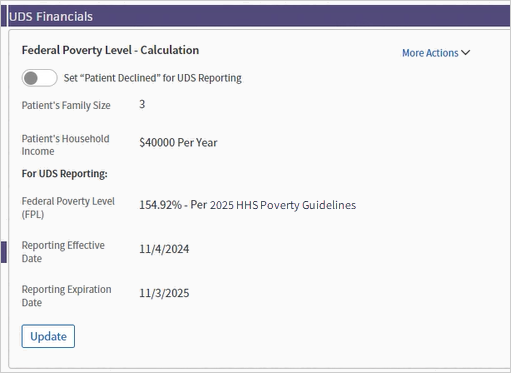
Whenever you return to the Federal Poverty Level — Calculation box, you can see the reporting effective and expiration dates right with the other Federal Poverty Level information.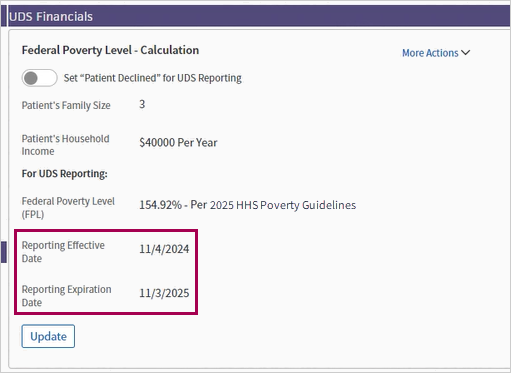
Under More Actions, you can click See UDS Reporting History to review a patient's UDS Table 4 reporting history for 2023 and beyond.
The UDS Financial Reporting History window appears over the Quickview or Check-in pages where you can easily see the Federal Poverty Level for the patient based on household size and income using guidelines in effect at the time of collection.
From the UDS Reporting History window, in the Poverty Level Guideline Used column, you can see the guidelines used for calculating the patient's Federal Poverty Level represented as the yearly version used at the time of collection (for example the year 2024).
The user, be it a practice user or an athenahealth user, appears in the Last Saved By column.

To delete previously entered income:
- Click More Actions.
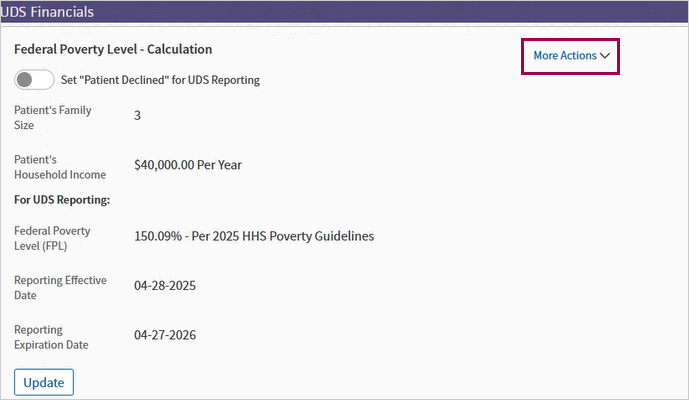
- click Delete Current Patient Family Size and Household Income Information. A pop-up window appears where you're asked if you want to proceed.
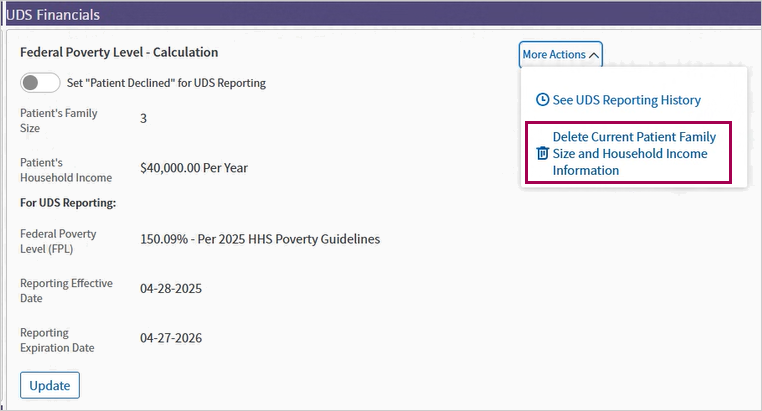
-
Click OK to delete previously entered information.

-
View the alert that appears informing you that information for UDS reporting is not complete.
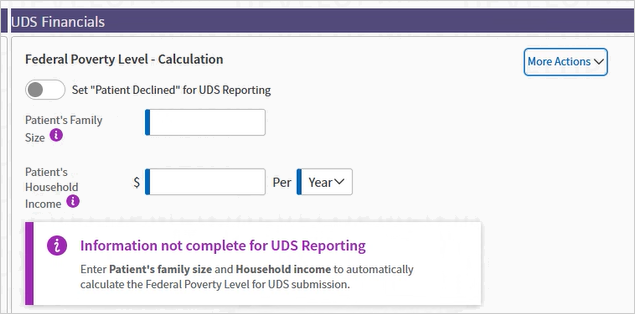
Your practice may use data differently than other practices. If your practice wants to manually calculate the range of the Federal Poverty Level (FPL) and then only enter that range.
Your practice can request the range version of this feature by requesting that the Population Demographics - Federal Poverty Level Fields setting be enabled.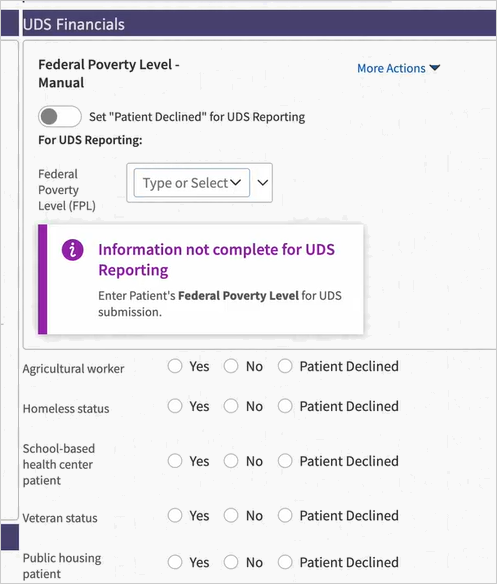
- Federal Poverty Level (FPL) — You can enter a date manually or click the calendar date icon to select a date.
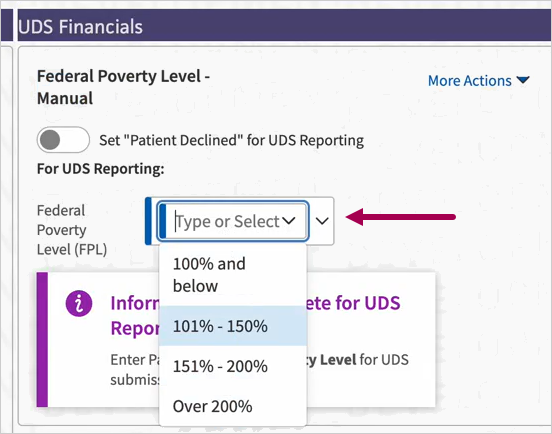
-
Reporting Effective Date — You can:
-
Enter a date manually
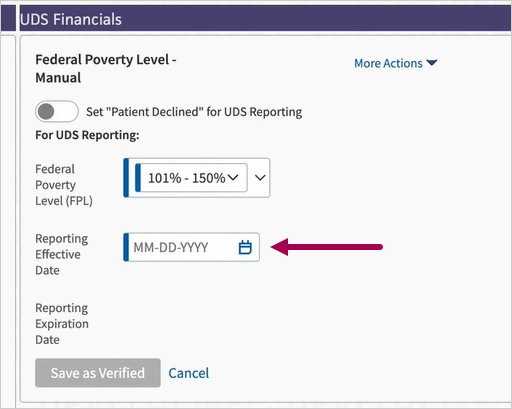
-
Click the calendar icon to select a date
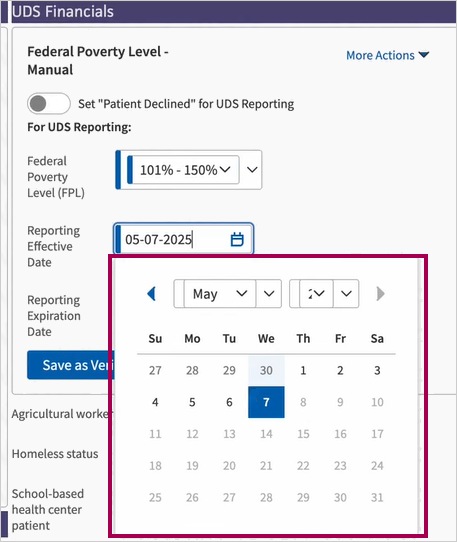
-
-
Reporting Expiration Date — athenaOne fills this field automatically as one year from the Reporting Effective Date.
-
Click Save as Verified.
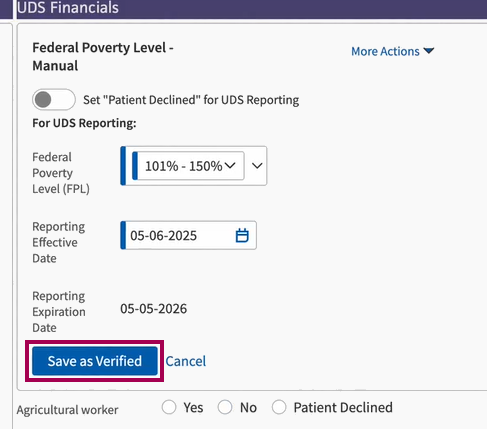
The UDS Financials section is read-only once you click Save as Verified. Click Update to edit the fields.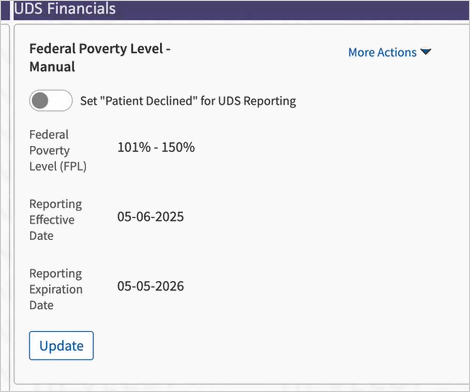
To update the FPL range, click Update.
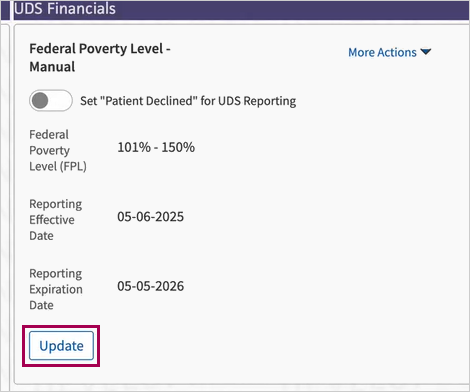
You can edit the Federal Poverty Level (FPL) and Reporting Expiration Date fields. athenaOne fills the Reporting Expiration Date field automatically as one year from the Reporting Effective Date.
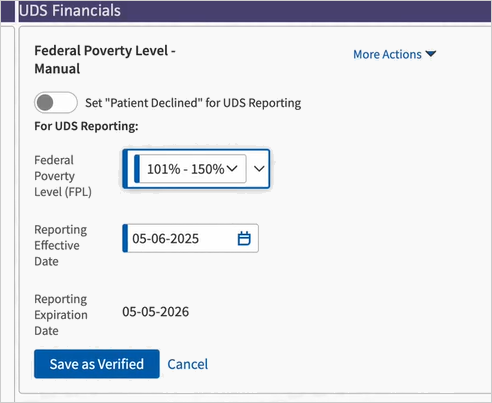
Click Save as Verified to submit the update.
Click More Actions to:
-
See UDS reporting history
-
Delete Patient Family Size and Household Income Information
-
Click More Actions.
-
Click See UDS reporting history.
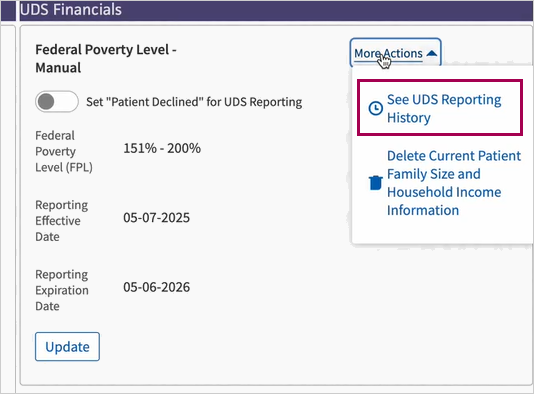
-
View the UDS reporting history.

-
Click More Actions.
-
Click Delete Patient Family Size and Household Income Information.
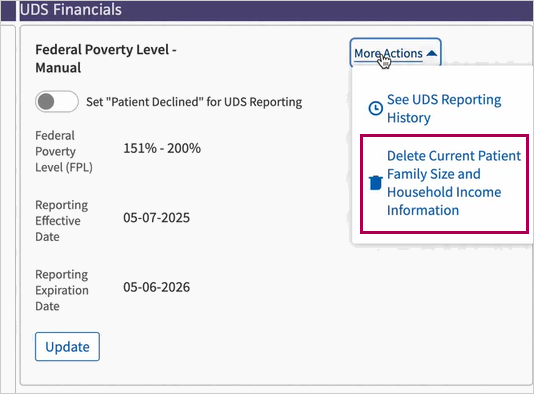
-
Confirm the UDS Financials section only displays the empty Federal Poverty Level (FPL) field.
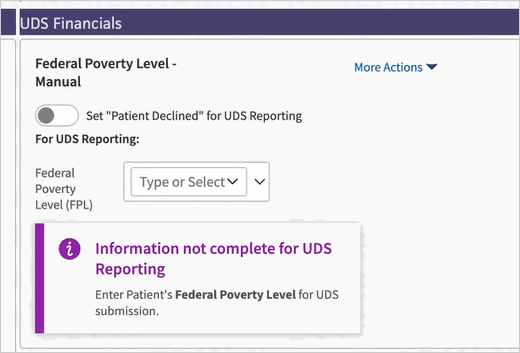
You can click the Set "Patient Declined" for UDS Reporting option in the Federal Poverty Level — Calculation box.

Note: When the patient declines UDS reporting, athenaOne tells you when you will be prompted to collect patient financials again. The reminder occurs three months from the date that the patient declined UDS reporting. If you would like to change the length of time, contact athenahealth Support or your Onboarding project team.
The prompt can be customized to appear any amount of time less than a year and can be set to a number of days, weeks, or months depending on when you want practice staff to ask again.
The Health Resources and Services Administration (HRSA) Uniform Data System (UDS) report requires community health centers with 330g and 330h grants to provide specific values for homeless and agricultural worker status. You can require more specific values for the Agricultural worker and Homeless status fields and you can make these fields required during check-in.
Note: To set the level of specificity for these fields or to make them required during check-in, please contact the CSC from athenaOne > Support > Success Community > Contact Client Support Center.
In the total homeless count for UDS Table 4, athenaOne includes all patients whose homeless status is Yes (you can edit a patient's homeless status on the Quickview, Patient Registration, and Check-in pages). athenaOne includes patients in the total homeless count using their first recorded year of homeless status, even if their status changes later. For example, if a patient is homeless on January 1, 2021, and receives housing by the time they visit on February 1, 2021, the patient is still included in the yearly total homeless count.
The Patient Demographics report type in the Report Builder provides the following display columns and filters (in the Patient category). You can use these display columns and filters to create your own reports instead of requesting custom reports or running a full UDS Table 4 report for this information.
- Agricultural Worker
- Agricultural Worker Type
- Family Size
- Homeless Status
- Homeless Type
- Income
- Income Level
- Patient Gender Identity
- Patient Sexual Orientation
- Public Housing Patient
- School-Based Health Center Patient
- Veteran Status