Authorization Tracker
athenaCollector + athenaClinicals
athenaOne for Hospitals & Health Systems
If your organization subscribes to athenaOne® Authorization Management, you can use this page to monitor and update your referral and authorization tasks. You can also reopen closed authorization tasks.
Note: To learn more about athenaOne Authorization Management, please contact your Customer Success Manager.
On the Main Menu, click Patients > (Care Coordination) Authorization Tracker.
To access this page, your organization must have athenaOne Authorization Management enabled (this feature is included with athenaOne for Hospitals & Health Systems), and you must have the Billing Staff - Clinicals role.
The Authorization Tracker adheres to the Department Login Permissions setting if your practice has it enabled.
Important: There is no impact to practices who do not have the Department Login Permissions setting enabled.
Note:
-
Since the Authorization Tracker adheres to this setting (if enabled for your practice), you may notice that some patients are removed from your view and that the overall count on the Authorization Tracker has decreased.
-
If you're unable to view patients as expected due to your department permissions, a user admin at your practice may grant you access to any necessary departments.
To enable the Department Login Permissions setting, contact the CSC.
On the Main Menu, click Support > Success Community > Contact Client Support Center.
For additional information, see the O-help topic: User Access to Departments.
athenaOne® Authorization Management is an optional add-on service for organizations that use both the athenaCollector and athenaClinicals services (the service is included in athenaOne for Hospitals & Health Systems).
With athenaOne Authorization Management, athenahealth completes authorization work for you, including:
- Obtaining precertification to perform future services
- Logging referrals with payers, based on payer requirements
- Following up with payers to continually check on the status of the authorization
-
Attaching prior authorization approvals and denials from the payer to the patient's clinical chart
The Authorization Tracker displays the progress of your authorization tasks and each interaction with payers.
- athenahealth manages requests for additional documentation and assigns tasks to you only when absolutely necessary or when a conversation is needed.
-
You can locate orders that require authorization using the filters on the Authorization Tracker page, or you can locate the order from the patient chart.
Note: This page documents authorizations (precertifications) and referrals; we refer to these items collectively as "authorizations."
- An embedded authorization status window at the top of the order document shows whether an authorization is required or not.

- You can click View details to open the detailed authorization or referral status window and:
- Learn why an authorization is in its current status.
- Enter missing information or fix incorrect information to resolve a problem.
- Edit an authorization.
- Cancel an authorization.
- Ask athenahealth to review an authorization.
- athenaOne guides you through the steps you need to take to resolve any issues with authorization tasks.
![]() Demo video — Guided Authorization Experience
Demo video — Guided Authorization Experience
If an authorization has not been started or needs additional information to proceed, this window supplies customized instructions and information.This information depends on the type of authorization and the information that is needed.
![]()
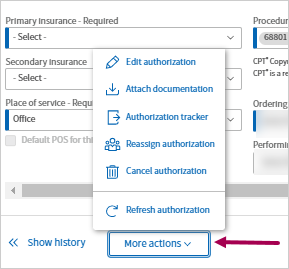
To edit or resubmit an authorization, you can click More actions in the authorization status window at the top of the order document, or you can click the More actions menu in the detailed authorization status window.
![]()
The options available in the More actions menu depend on the status of the authorization or referral.
- Edit authorization — Edit the full authorization as needed. For example, you can update insurance information, update the estimated start date, or add and remove procedure codes.
- Attach documentation — If the authorization requires additional documentation, you can attach documentation from the patient chart (see To add a document from the patient chart to an authorization).
Note: This option appears in the More actions menu only when appropriate. - Request review — Request that athenahealth review the authorization. Select a reason for the requested review and enter a message for athenahealth (for example, you think athenahealth incorrectly marked the authorization as unsupported).
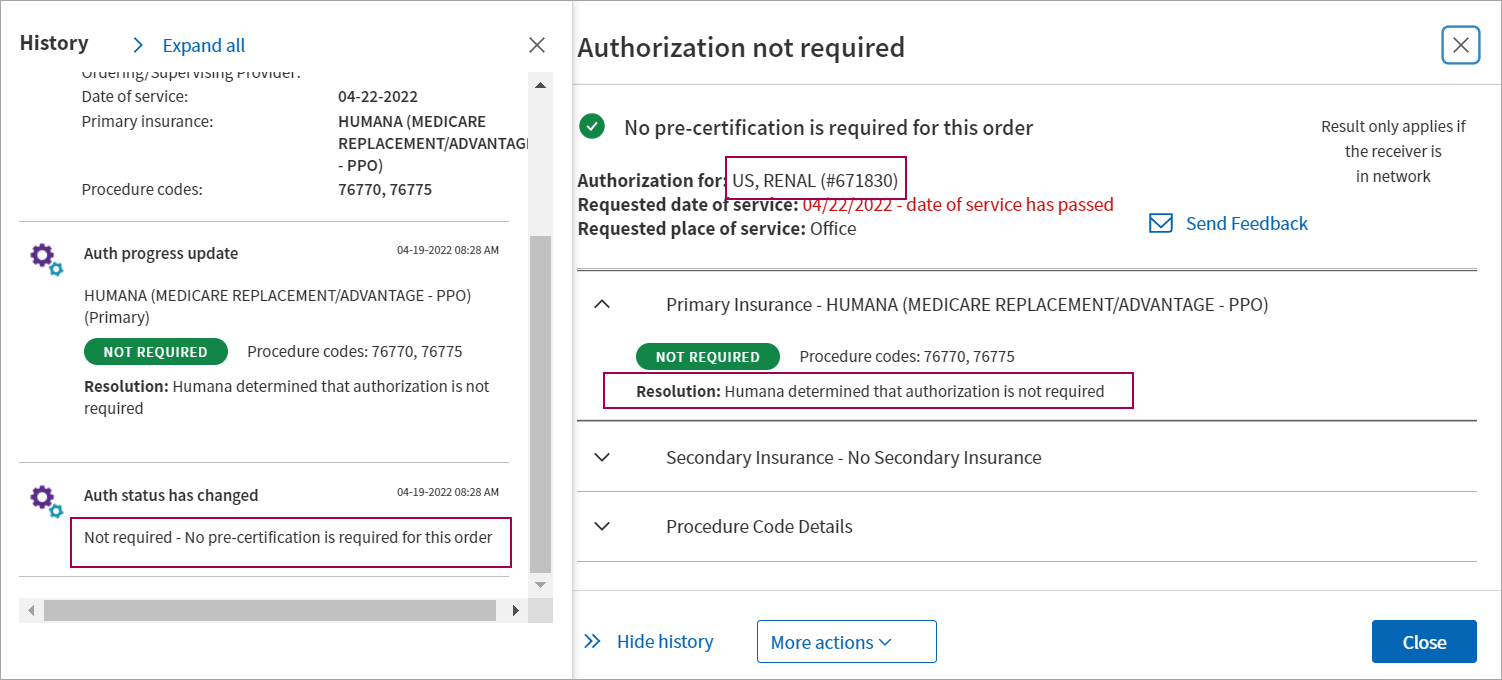
- View history — View a full list of the actions taken on the authorization task. The authorization status details window appears, with the History section to the left of it.
- Authorization tracker — Select this option to return to the Authorization Tracker page.
- Cancel authorization — Select a reason for the cancellation and enter a message for athenahealth explaining why.
- Refresh authorization — Use this option to update the authorization if you have completed additional work on it.
Note: athenaOne does not create authorizations for orders that were created before the go-live date for athenaOne Authorization Management.
You can save time completing Authorization Management workflows using the Authorization Tracker, which provides you an efficient, time-saving, and more modern experience.
- See most important work first — The task statuses bar at the top of the page shows you what needs your attention.
- Use filters to focus your work — Use the task statuses bar at the top or additional filters in the left panel to focus on specific authorization tasks. You can also save your favorite filter set as custom views.
-
View and update authorization orders without leaving the Authorization Tracker — When you open an authorization order from the task table, it appears in a window right over the table, which saves you time and lets you remain in your Authorization Tracker workflows.

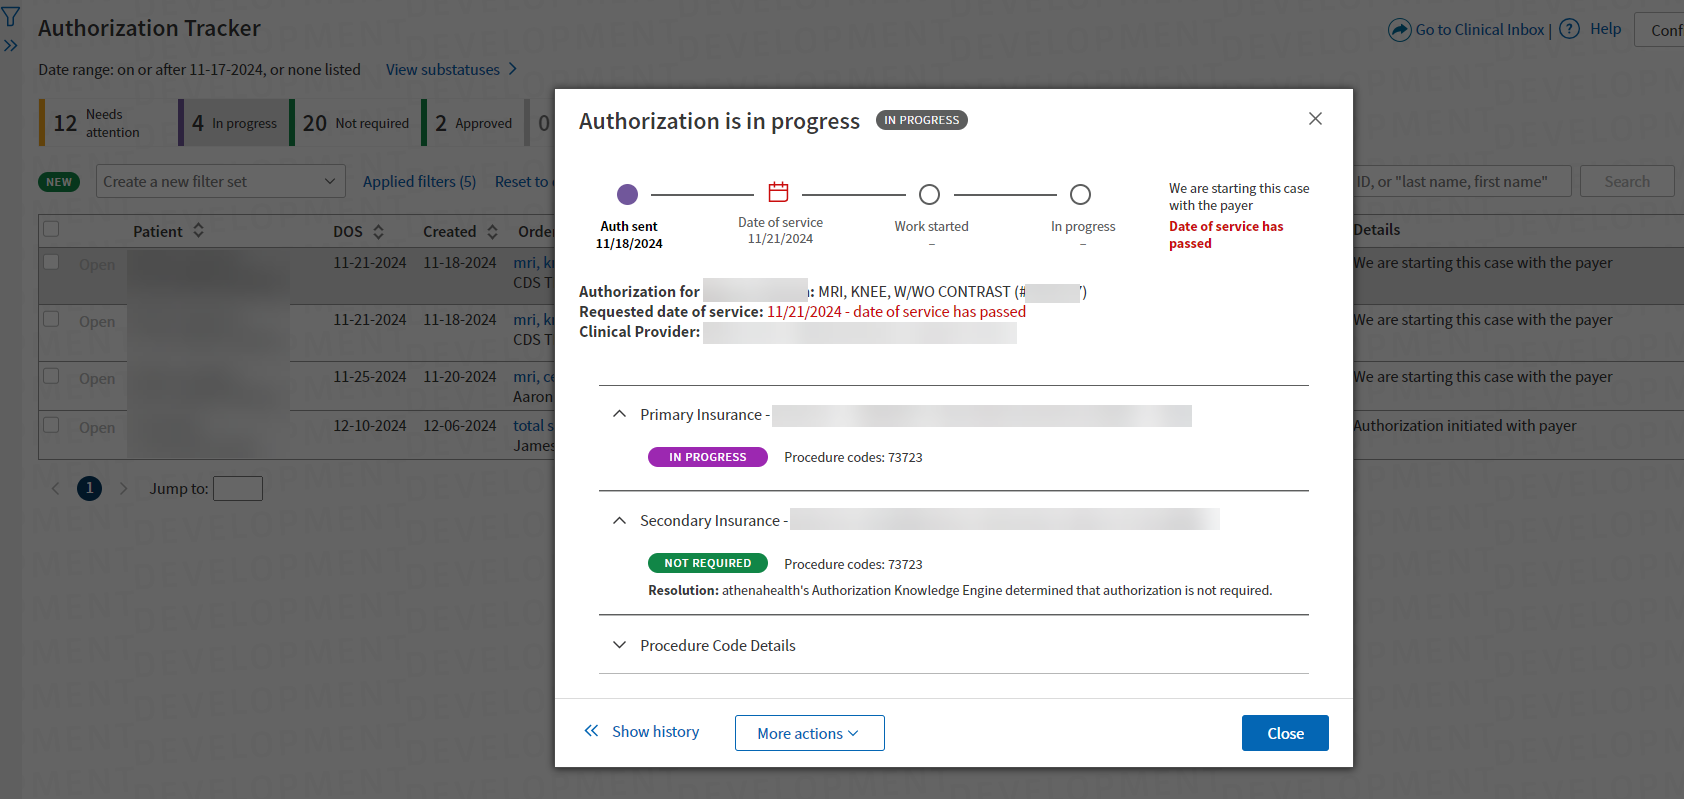
The task statuses bar shows you what needs your attention as the first thing you see under the page header.
-
Click a specific status to filter and display only task for that status.
-
You can also toggle between View substatuses and Hide substatuses.

-
Click any info icon see more details.
You can export Authorization Tracker data to a CSV file.
-
Modify and manipulate data as needed.
-
The data is exported based on the current filter configuration of the Authorization Tracker.
-
Provide feedback on what additional data you want added to the Authorization Tracker.
The filters section is in an expandable side panel that you can open or close as needed.
-
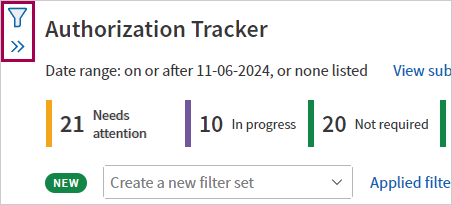
Click the filter icon in the top left-hand corner of the page to reveal the filter panel.
-
Click Hide to close the filter panel.
-
You can set any filters as needed and then click Filter to refresh the table of authorization tasks and see the filtered results. (For details, see To filter in the side panel.)
Tip: Click the image to see an expanded view
-
Save your favorite filter sets as views of the Authorization Tracker
-
Quickly switch to different views without selecting multiple filters
- Search — Search the table by patient name, patient ID, or Order ID.
- Bulk Actions — Select tasks and then use Bulk Actions to mark all the selected tasks Hidden or Visible.
- Reset to default — Reset the table to default filter settings:
- Date of service date range: Starting 30 days ago, no end date
- Include auths with no date of service
- Marked: Visible
-
Click Open in the row of an authorization task and the authorization order appears in a window over the Authorization Tracker.
-
Use the page selector at the bottom if there are multiple pages.
- Click any info icon to see more details.
When you open an authorization order from the Authorization Tracker, it appears in a window right over the page itself, which saves you time and lets you remain in your Authorization Tracker workflows.
-
Click Open in the row of an authorization task.
-
The authorization order appears in a window over the Authorization Tracker.
- To return to the Authorization Tracker, close the window by clicking Close.
- The same information in the authorization order appears in the authorization order pop-up window, including:
- Patient information
- Status information
- Respective workflows to complete
- All features that are available in the authorization order are available in the pop-up window. For example, you can:
- Access More actions
- Show history— By default, the History panel is collapsed. Click Show history to expand the History panel. Click Hide history to collapse the History panel
- Access More actions
You can hide tasks that you do not wish to see in the Authorization Tracker.
-
Terminology Update:
All references to "Mark Complete" in the user interface and admin pages are replaced with "Hide."
-
Default Hiding Options:
Defaults automatically hide lower priority tasks that do not require attention. These default hidden tasks will still be accessible by filtering for 'Hidden' authorizations, but they will not clutter the main view of the Authorization Tracker.
-
Automatic Task Closure:
"Waiting to Start" tasks that are more than 60 days past the Date of Service or over one year old without a Date of Service will be automatically closed. -
Expanded Hiding Criteria:
You can configure additional criteria for automatically hiding tasks from the Authorization Tracker.
-
Bulk Actions Update:
"Mark Complete" and "Mark Not Complete" are renamed to "Mark as hidden" and "Mark as visible."
Authorization tasks in a practice hold status that are 60 days past their date of service are automatically cancelled. If a task was cancelled in error, please place the order again to re-create the authorization task.
Note: You can also see authorization tasks that need your attention in the Clinical Inbox.
- Display the Authorization Tracker page: On the Main Menu, click Patients > (Care Coordination) Authorization Tracker.
- To filter by authorization status, use the status bar at the top of the page. (For details, see To filter in the status bar.)
- Select other filters in the filter side-panel if needed. (For details, see To filter in the side panel.)
- View the list of tasks needing your attention.
Note: The first time you use the Authorization Tracker, you may see old authorization tasks that you no longer need. You can cancel these tasks so that they don't obscure more important authorization tasks.
- Display the Authorization Tracker page: On the Main Menu, click Patients > (Care Coordination) Authorization Tracker
-
In the status bar at the top of the page, click a specific status to filter and display only tasks for that status.
- Needs attention — Select this option to display all authorization tasks that require practice attention.
Note: You can deselect Waiting to start, Action required, or Denied to display two of the three types of tasks. - Waiting to start — These tasks require practice attention before athenahealth can begin work on them, for example, if a task is missing a clinical provider, requested date of service, requested service length, or requested procedure codes, or if the order has not been signed.
- Action required — athenahealth began work on these tasks, but we require clarification or additional information to complete them (the task is on hold until you take action). For example, you may need to obtain a referral from the PCP or add an insurance plan.
- Denied — After all the codes for a task are approved or denied, athenaOne displays partial or complete denials for your review.
- Needs attention — Select this option to display all authorization tasks that require practice attention.
- Click View substatuses if needed. The status filter bar expands.
-
Click a specific substatus to filter and display only tasks for that substatus.
- Display the Authorization Tracker page: On the Main Menu, click Patients > (Care Coordination) Authorization Tracker
- Click the filter icon in the upper left-hand corner of the main page. The filter panel expands.
-
Select the filters and filter criteria:
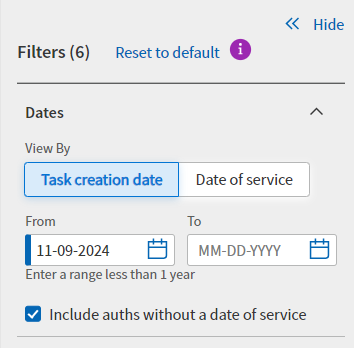
- Dates — Select the date filter.
- View by — You can view byTask creation date or by Date of service.
- Date of service — By default, the Date of service filter is set to the last 120 days. You can change this date range.
Note: To display all historical results, clear the date range Include auths without a date of service — To include tasks with no date of service in your search results, select this option. To exclude tasks without a date of service from your search results, deselect this option.
-
Basic filters -
- Auths marked — Select one or both of the options:
- Visible
- Hidden

Note: Authorizations marked Hidden will not appear in any filter results unless the Hidden button is selected here.
- Order type — Select the appropriate order types to view their associated tasks.
- Ordering provider — Select the appropriate ordering provider to view their associated tasks.
- Clinical provider — Select the appropriate clinical provider to view their associated tasks.
- Department — Select the appropriate departments to view their associated tasks.
Note: An authorization task is associated with the department in which the order that triggered the authorization task was created. - Insurance Reporting Category — Select the appropriate payers to view their associated tasks.
- Flagged Authorizations — Select the appropriate authorization flag.
- Status filters — Select one or more statuses to display only authorization tasks with those statuses.
- Dates — Select the date filter.
- Click Filter. The table of authorization tasks displays the filtered results.
-
Click Reset to default to reset the filter panel. Default filter settings:
- Status: Total
- Date of service range: Starting 30 days ago, no end date
- Include auths with no date of service
- Marked: Visible
You can save frequently used filter sets as custom views of the Authorization Tracker.
- Display the Authorization Tracker page: On the Main Menu, click Patients > (Care Coordination) Authorization Tracker
- Click Create a new filter set.
-
Click Manage saved filter sets. The Filters panel expands automatically and scrolls to the bottom to reveal the Manage saved filter sets section.
-
Add at least one filter, for example Order Type. The Save filters as new set link becomes accessible.
-
Click Save filters as new set.
-
Name new filter set — Enter a name for the custom view, for example "Surgery View".
-
-
Click Save. A success message appears.
Note: To edit a saved view you must delete it and create it as a new filter set with your desired modifications. For more information see To delete views section of this release note.
Note: To delete a saved view you must do it from the filter panel.
- Display the Authorization Tracker page: On the Main Menu, click Patients > (Care Coordination) Authorization Tracker
-
Find the filter set you want to delete.
-
Click the downward arrow on the Create a new filter set button.
-
Click Manage saved filter sets. The Filters panel expands automatically displaying the Manage saved filter sets section.
-
-
Click the Delete icon
 next to the saved filter set that you want to delete.
- Display the Authorization Tracker page: On the Main Menu, click Patients > (Care Coordination) Authorization Tracker
-
Find the filter set you want to use.
-
Click the downward arrow on the Create a new filter set button.
-
Click one of your saved filter sets.
-
The Authorization Tracker refreshes the list of authorization orders based on the custom filters you selected.
-
On the Authorization Tracker page, filter the data as needed then click Export to CSV.
Note:
-
If you have more than 10,000 rows, you will get a message stating there is a limit of 10,000 rows. Please use filters to narrow the selections.
-
This will export all information currently filtered on. This may take up to 2 minutes depending on amount of data.
The Export tracker data to CSV pop-up window appears.
-
- Enter a reason for your export.
-
Click Submit feedback and export to CSV. You will see messages about the export status and the download icon will appear on the top right of the page.
-
Go to your download folder where you can open this CSV file using an application like Excel.
Columns in the CSV file:
Hidden fields such as Clinical Order ID are included.
-
Clinical Order ID
-
Patient Name
-
Patient DOB
-
Patient ID
-
Date of Service
-
Created (date)
-
Order (e.g. 'mri, cervical spine, w/o contrast')
-
Procedure Codes (e.g. 74177, 74178, 12345)
-
Ordering Provider
-
Ordering/Supervising Provider
-
Clinical Provider
-
Performing Provider
-
Place of Service
-
Status
-
Assigned To
-
Primary Insurance
-
Last note from Primary Insurance
-
Secondary Insurance
-
Last Note from Secondary Insurance
-
Details
-
- Display the Authorization Tracker page: On the Main Menu, click Patients > (Care Coordination) Authorization Tracker.
- In the search field above the task table, enter the patient's name, patient's ID number, or the authorization task ID.
For patient name search: Enter at least 2 letters of both last name and first name. In rare cases a Patient ID and Order ID could have the same number. -
Click Search.
Tip: The Search button is grayed out until you type something in the search field.

Note: This search temporarily clears all other filter criteria. Your previously selected filter criteria will still be in effect the next time you display the Authorization Tracker.
You can use this procedure to indicate that you reviewed authorization tasks that were denied. The task is still listed as Not complete.
- Display the Authorization Tracker page: On the Main Menu, click Patients > (Care Coordination) Authorization Tracker.
- Filter by substatus: Denied
- At the top of the page, click View substatuses. The status filter bar expands.
- Click the substatus you want to find tasks for. Authorization tasks with the selected substatus will display in the table.
- Set additional filters (for example, Order type or Clinical provider) if needed. (For details, see To filter in the side panel.) The table of authorization tasks displays the filtered results.
- View and update the task:
- Click Open on the row you wish to see. The authorization task appears over the tracker with the authorization status displayed at the top.
- To indicate that you reviewed the denied authorization task, click the Acknowledge Denial button. athenaOne updates the task status to Denial reviewed and removes the task from the Needs practice attention list.
Note: To locate this authorization task on the Authorization Tracker, select the Denial reviewed option in the filter window. - If you want to edit or resubmit the authorization, click More actions at the bottom of the task window and select an option.
- To return to the Authorization Tracker, close the window by clicking Close.
They will be available for review with other 'Waiting to start' authorizations.
To review potential duplicates:
-
Display the Authorization Tracker page: On the Main Menu, click Patients > (Care Coordination) Authorization Tracker.
- Filter by the Needs Practice Attention substatus: Waiting to Start.
- At the top of the page, click View substatuses. The status filter bar expands.
- Click the substatus you want to find tasks for. Authorization tasks with the selected substatus will display in the table. Duplicate authorizations appear along with other tasks.
- View and update the task:
Click Open on a duplicate task. The authorization task window appears over the tracker with a link to the other potential duplicate task.
- Review the other authorization and determine if it is a duplicate or not.
- Click Select how to proceed and select one of the options:
(In this example, Authorization #123456789 is an existing authorization in athenaOne.)- Proceed with both authorizations
- Cancel this authorization (#123456789) and proceed with the other
Cancel other authorization (#987654321) and proceed with this one
Note: The options available under Select how to proceed will depend on the Status of the other authorization. Options for Select how to proceed
If the Status of the other Authorization is... Options displayed In Progress All three options are displayed
Needs Attention Approved, Denied, Not Required Since the other Authorization is complete, you will not be able to select
"Cancel other authorization (<Auth#>) and proceed with this one"
Canceled Since the other Authorization is already Canceled, you will not be able to select
"Cancel this authorization and proceed with the other (<Auth#>)"
If you choose to cancel one of the authorizations, a popup message appears.
Click Confirm or Do not cancel.
-
After you cancel the authorization, Authorization Management:
-
Updates the status of the canceled authorization to Canceled - Duplicate Authorization.
-
Proceeds with the appropriate task and removes it from the Needs practice attention list.
-
- Display the Authorization Tracker page: On the Main Menu, click Patients > (Care Coordination) Authorization Tracker.
- Filter by substatus: Waiting to start
- At the top of the page, click View substatuses. The status filter bar expands.
- Click the substatus you want to find tasks for. Authorization tasks with the selected substatus will display in the table.
- Set additional filters (for example, Order type or Clinical provider) if needed. (For details, see To filter in the side panel.) The table of authorization tasks displays the filtered results.
- View and update the task:
Click Open on the row you wish to see. The authorization task appears over the tracker with the authorization status displayed at the top.

Note: The Send now option may indicate that you configured certain authorizations to be reviewed before they are sent to athenahealth (see Authorization Management Admin — Hold Authorization for Review).
Review the details of this authorization by selecting View history from the More actions menu.
- To indicate that you obtained the authorization, click the More actions menu and select Cancel authorization.
The Action: Cancel authorization window opens.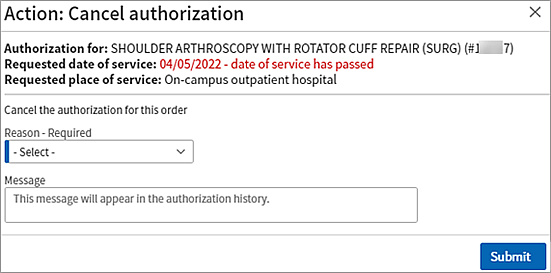
Complete the fields:
- Reason — Select Practice obtained authorization.
- Reason for Practice Obtained Authorization — Select the appropriate reason you are obtaining this authorization yourself.
- Change authorization status for primary insurance to — Select which status you are changing this task to: Approved, Not required, or Denied.
Once you select a status you can fill out the rest of the fields which include:
Effective dates
Authorization number
Message — You can enter a message if you choose (the message will be included in the authorization history).
- Click Submit.
athenaOne updates the authorization status to Approved.
- To return to the Authorization Tracker, select Authorization tracker from the More actions menu.
You may need to take an action before athenahealth can proceed with an authorization. One of the more common actions required is to attach documentation to the order from the patient chart.
- Display the Authorization Tracker page: On the Main Menu, click Patients > (Care Coordination) Authorization Tracker.
- Filter by substatus: Action required
- At the top of the page, click View substatuses. The status filter bar expands.
- Click the substatus you want to find tasks for. Authorization tasks with the selected substatus will display in the table.
- Set additional filters (for example, Order type or Clinical provider) if needed. (For details, see To filter in the side panel.) The table of authorization tasks displays the filtered results.
- View and update the task:
Click Openon the row you wish to see. The authorization task appears over the tracker with the authorization status displayed at the top.
- To see the status of the entire authorization request, including the last action notes, click the In-progress overview tab.
- To perform the required action, click the Needs attention tab.
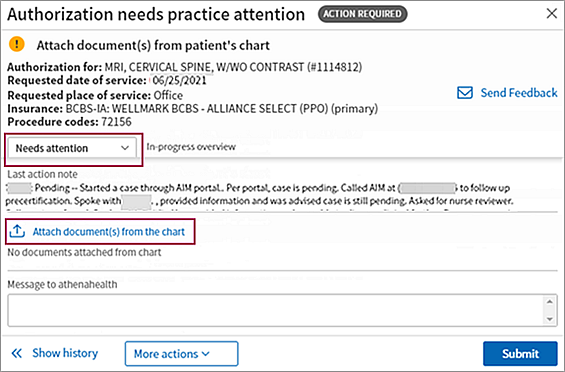
- Click Attach document(s) from the chart to open the Attach chart documents window.
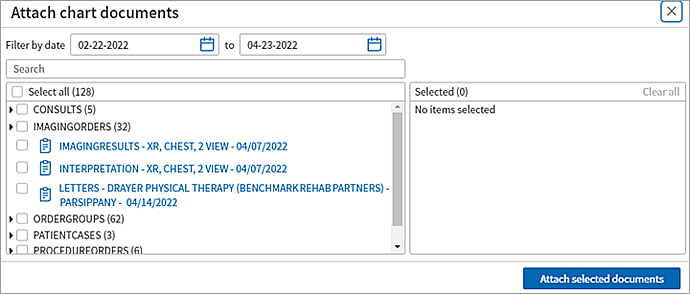
- Select the documents that you need to attach to the order (selected documents appear in the Selected list on the right of the window).
Note: If you do not see the document you need, you can upload it to the patient chart (see Add Document). - Click Attach selected documents.
The Authorization needs practice attention window opens with the documents you added shown. - Make sure that you attached the correct documents and then click Submit.
The Authorization is in progress window opens. Your action of attaching a document is recorded in the Message from practice field.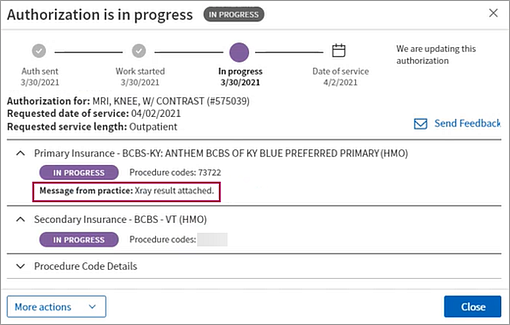
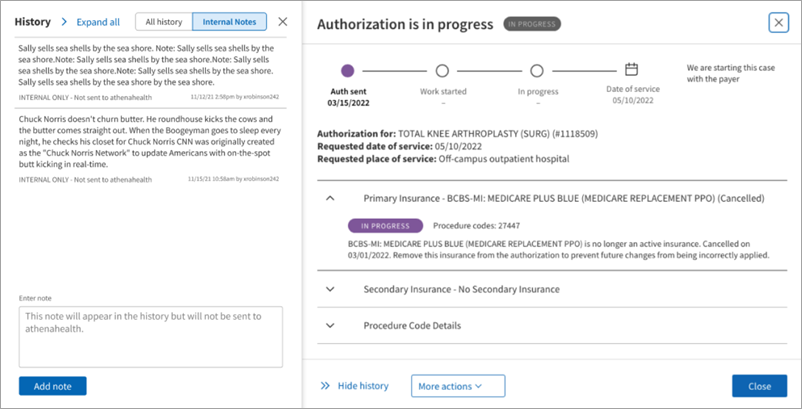
Your practice can add internal notes to the History section of an authorization task.
- These notes are internal to your practice and will not be used by Authorization Management in obtaining your authorization.
- This optional note functionality may be useful if you have complex workflows that require some extra information for your staff. For example, if you do not need to take action on a specific task immediately, but want to note that you plan to work on it in the future, you can add a note laying out this plan so that members of your staff are aware.
- These internal notes are never required to complete your workflow but are available as a helpful option for your practice.
- Display theAuthorization Tracker page: On the Main Menu, click Patients > (Care Coordination) Authorization Tracker.
- View and update the task:
Click Open on the row you wish to see. The authorization task appears over the tracker.
Click Show History. The History panel expands.
Click the Internal Notes tab at the top.
You can view all notes attached to the task, or you can add your own note in the Enter note field. Clicking Add note attaches this internal note to the task.
You can use this procedure to cancel an authorization task and update the status because your organization obtained the authorization.
Note:
- You can only change the status of an authorization task yourself if you are canceling the authorization due to gaining the authorization yourself.
- If you have information from obtaining the authorization yourself, you can have the athenaOne system store it by entering it in the More Actions -> Cancel Authorization -> Practice Obtained Authorization.
- This does not change the Authorization Management service otherwise; we will still obtain your prior authorizations unless you Cancel-Practice Obtain Authorization.
- Display the Authorization Tracker page: On the Main Menu, click Patients > (Care Coordination) Authorization Tracker.
- View and update the task:
Click Open on the row you wish to see. The authorization task appears over the tracker with the authorization status displayed at the top.
- In the More actions menu click Cancel authorization. The Action: Cancel authorization window appears.
Reason-Required — Select a reason from the list of options.
- (Optional) Enter any additional information in Notes field.
- Click Submit to confirm your canceling the authorization.
If you are in the process of gaining authorization yourself, you can set relevant statuses once you select Practice will obtain authorization.
- Display the Authorization Tracker page: On the Main Menu, click Patients > (Care Coordination) Authorization Tracker.
- View and update the task:
Click Openon the row you wish to see. The authorization task appears over the tracker with the authorization status displayed at the top.
- In the More actions menu click Cancel authorization.
The Action: Cancel authorization window appears.- Reason-Required — Select Practice will obtain authorization reason from the list of options.
Additional fields appear:- Reason for Practice Obtained Authorization — (Optional) Select the reason for obtaining the authorization yourself.
Notes — (Optional) Enter any additional information.
Update Primary status to — (Optional) Set the status of the task cancellation (due to obtaining authorization yourself). Your options are:
- Approved — When you set this status, additional fields appear, so you can inform the athenaOne system of the information related to the authorization, such as: Authorization number, Effective dates, Certification length, Case number, Call Reference number
- Not Required — When you set this status, one additional fields appears: Call Reference number
- Denied — When you set this status, no additional fields appear.
- Reason for Practice Obtained Authorization — (Optional) Select the reason for obtaining the authorization yourself.
- Reason-Required — Select Practice will obtain authorization reason from the list of options.
Click Submit to confirm you are canceling the authorization.
You can select multiple authorization tasks in the filtered results list and mark them all as Hidden or Visible.
Note: When a task is marked Hidden, it no longer appears in the Authorization Tracker results list unless you select the Hidden option in the Filter panel section under Basic Filters.
- Display the Authorization Tracker page: On the Main Menu, click Patients > (Care Coordination) Authorization Tracker.
Your currently selected filters appear at the top of the page. -
Filter the tasks if needed. (For details, see To filter in the side panel.) The table of authorization tasks displays the filtered results.
- Select the tasks in the list that you want to mark as Hidden or Visible
Note: To select all the tasks in the list, select the box at the top of the list.
- Click Bulk Actions under the task statuses bar and select an action:
- To mark all the selected tasks hidden, select Mark as hidden. All selected tasks are marked as Hidden. When you filter the Authorization Tracker in the future, the tasks are hidden by default.
- To marked all the selected tasks visible, select Mark as visible. All selected tasks are marked as visible.
-
Display an authorization task via the patient chart, Clinical Inbox, or on the Main Menu > Patients > (CARE COORDINATION) > Authorization Tracker.
-
Place of Service — Ensure the task has a POS.
-
(Optional) Enter a new POS.
-
Select the Default POS for this Clinical Provider option. When selected, athenahealth will not send requests for POS confirmation for this clinical provider.
-
Fill in or edit other fields of the authorization task as needed per your usual workflow.
-
Click Submit.
If the payer requires the ordering provider to match the PCP and the authorization has a PCP mismatch, the authorization is put on hold with the Waiting to start status for your practice to resolve.
- Display the Authorization Tracker page: On the Main Menu, click Patients > (Care Coordination) Authorization Tracker.
- In the Authorization Tracker, open the referral authorization. The task window appears over the tracker with the authorization status displayed at the top.
-
Follow your practice's usual workflows for resolving PCP mismatch.
-
You can resolve the mismatch or choose to proceed anyway. If you click Proceed anyway, the referral process starts.
Authorization tasks are assigned a status. Following is a list of authorization statuses with examples of when these statuses apply (not all reasons are shown).
- Needs practice attention: Waiting to start — athenahealth has not started authorization work on this task. The authorization task is on hold and requires action on your part, for example, if a task is missing a clinical provider, requested date of service, requested service length, or requested procedure codes, or if the order has not been signed.
- Needs practice attention: Action required — athenahealth started authorization work on this task, but you need to take additional actions, for example, obtaining a referral from the PCP or adding an insurance plan. The authorization task is on hold and requires action on your part.
- Needs practice attention: Denied — The authorization task is denied and requires your review.
- In progress with athenahealth — athenahealth is working on this authorization task. No action is needed from you at this time.
- Approved — The payer approved the authorization task and the patient is ready to have the procedure.
- Not required — Authorization (precertification or referral) is not required as determined by the payer guidelines established for this procedure, diagnosis, and service length.
- Not supported by athenahealth — The provider, insurance, or facility is ineligible for athenaOne Authorization Management, or your organization excluded the provider, insurance, or facility from Authorization Management.
- Canceled — The procedure was canceled and no further action is required.
Note: Tasks with the status "Needs practice attention: Action required" that are 60 days past their date of service are automatically cancelled. - Denial reviewed by practice — The authorization for the procedure was denied; your practice has reviewed the denial. The authorization is still marked as Not complete so that you can take action on the denial.
Alerts appear on the Authorization Tracker when tasks may (but do not necessarily) need review.
Note: The alerts automatically disappear after one week past the Date of Service (DOS).
The following alerts appear on the Authorization Tracker under unique scenarios:
-
Approved but DOS falls outside of effective dates
Criteria — Task is in approved with effective dates status but DOS is not included in Date Range.
Note: If there are no effective dates, this alert does not appear. -
Patient insurance changed
Criteria — Insurance on the authorization order does not match the current Active Insurance in the patient Quickview.
Note: The task must be prior to or less than two weeks past DOS. -
Urgently needs practice attention
Criteria — The task is in Needs Practice Attention status (which includes Waiting to Start), the DOS is within two days, and the Date of Service was provided (not estimated).
An alert is placed on the task given the outlined criteria in the overview section of this topic.
When the Authorization Tracker loads and a task has a flag:
- An alert icon replaces the status color indicator in the Status column.
- Each alert has a specific message that explains the potential issue.
- Approved but DOS falls outside of effective dates — "Authorization approved but date of service is outside effective date window. Please review."
- Patient insurance changed — "Patient insurance may have changed since initiation. Please review."
- Urgently needs practice attention — Date of service is approaching.
- You can filter for these three scenarios in the filters panel under the list of options called Flagged authorizations. You can click one of the options, any combination of them, or all three.
-
If no authorization tasks are found when using this filter, the Authorization Tracker does not return any results.
Note: This feature will never modify the status of the Authorization. It will highlight select tasks in their existing status.
You can view a patient's primary insurance eligibility status when initiating an authorization.
-
Integrates Eligibility checking into Authorization Management
-
Prevents users from initiating authorizations for patients with ineligible insurances
-
Provides more robust information about the patient’s eligibility status
When you enter an authorization, Authorization Management reviews the most recent eligibility check from within the last 10 days.
athenaOne automatically checks each patient's primary insurance eligibility 3 days before scheduled appointments, so this should apply to nearly all orders created from encounters.
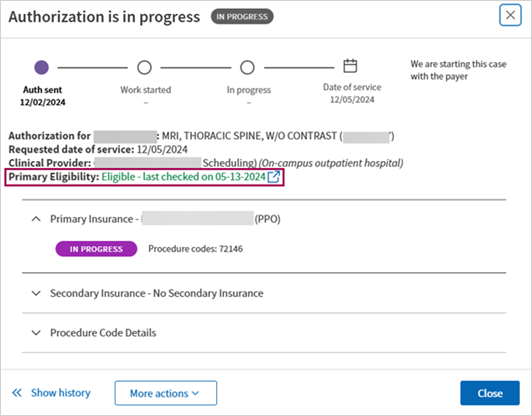
After it completes the check, athenaOne will display the status of that check in the new Primary Eligibility field on the Authorization screen. It also includes the date of the eligibility check and a link to the patient Quickview.
Member is Eligible
If the member is eligible, you will see that Eligible status and the authorization will proceed with standard workflows.
Member is Ineligible
If the member is ineligible, you will see that Ineligible status and the authorization will have the status Waiting to Start for Eligibility until your practice reviews the patient's eligibility.
If there was no recent eligibility check, athenaOne will not hold the authorization.
The system checks 10 days from the authorization creation date, not from date of service.
The system looks for a recent eligibility check in the last 10 days. It does not run a new eligibility check.
Authorization information can flow to appointments and claim workflows.
When the Authorization Management: Store Not Required Authorizations in Quickview setting is enabled:
- Authorization Management tasks that are marked Not Required appear in the patient's Quickview in the Authorization section.
- These authorizations can also be selected in the Authorization field of Charge Entry and the Appointment.
To enable this feature for your organization, contact the CSC, your CSM, or your Onboarding project team. On the Main Menu, click Support > Success Community > Contact Client Support Center.
You can check if a referral authorization is required from the Quickview and incoming Admin-Referral Documents (which can be found in the Find section of the Patient Chart).
-
This feature allows specialist providers to know if their inbound patients require referrals to be seen.
-
If a referral is not required, practices can schedule patients without delay.
-
If Authorization Management finds that a referral is required, athenaOne informs your practice and you can proceed in accordance with your practice workflows.
You can see referral requirements on:
-
The Quickview under the Authorization Section
-
An admin-referral document
The referral requirements will appear saying 1 of 2 things:
-
Referrals may be required
-
Referrals not required
Note: The info icon next to the referral requirement displays a message about how athenaOne makes the determination.
This feature helps prevent duplicate authorizations, which can lead to duplicate efforts and payer denials.
When you enter an authorization order, the athenaOne system automatically checks for potential duplicate authorizations based on the following criteria (all have to match):
-
Patient
-
Patient Insurance
-
Ordering Provider
-
Clinical Provider
-
Date of Service
-
Procedure Code
-
Clinical Order Type Name
-
Facility Place of Service
-
Diagnosis Code
-
Other task is not Canceled or Denied
athenaOne places potential duplicates in a pre-work hold for you to review.
You can review them in the Authorization Tracker and decide which action to take:
-
Proceed with both authorizations
-
Cancel this authorization and proceed with the other
-
Cancel other authorization and proceed with this one
See To review potential duplicate authorizations for more information.
Authorization Management checks for payer requirements for Ordering Provider to match the PCP. When an authorization is created for a referral order, the system automatically checks if the requested payer requires the ordering provider to match the PCP on their file.
The table below capture the requirements details.
| Scenario | When payer requires PCP Match | When payer doesn't require PCP Match | When payer requirement is unknown |
|---|---|---|---|
| Ordering Provider matches PCP in Eligibility | Follow standard workflows | Follow standard workflows | Follow standard workflows |
|
Ordering Provider does not match PCP in Eligibility |
The authorization is put on hold with the Waiting to start status. |
Follow standard workflows | Follow standard workflows |
|
PCP Unknown
|
athenaOne initiates the referral but provides a warning about a potential mismatch: "Referral must be submitted by the PCP on file with this payer." |
Follow standard workflows | Follow standard workflows |
If the payer has this requirement, then the system checks if the ordering provider is the listed PCP via a recent Eligibility check. The system places the authorization in a Waiting to start status if they do not match.
You can track all authorization orders from the Authorization Tracker, but you have the option to send reassigned orders to the Clinical Inbox.
- The authorization order shows if a task was reassigned to a different user.
- A reassigned authorization order is visible in the Clinical Inbox of the assignee.
- The Authorization Tracker shows to whom an authorization order is assigned.
You can save time and manual effort by setting the Place of Service (POS) of an authorization task as the default POS for that provider when editing authorization tasks:
-
The default you set is used every time you order from this Clinical Provider
-
You can override this default by changing the POS. The default does not change unless you select Use as the default place of service.
-
(For details, see To save POS as default for provider when editing authorization tasks.)
To make your authorization work easier to accomplish, you can set up rules and conditions on these administrative pages:
- Authorization Management Admin — Auto-mark Complete in Authorization Tracker — Use this page to create rules that automatically mark as "complete" the authorization tasks that you specify. These rules hide low-value authorization tasks to help you quickly find your most important tasks on the Authorization Tracker.
- Authorization Management Admin — Hold Authorization for Review — Use this page to manage when athenaOne starts work on authorization tasks for certain providers and order types. You can set your specified authorization tasks to "hold for review" by default.
- Authorization Management Admin — Local CPT Mapping — Use this page to create custom (local) mappings between order types and procedure codes for authorization tasks. You can create custom mappings for specific providers or departments or for the practice as a whole. The procedure codes that you map to order types on this page become the default CPT codes for the order types.
The Authorization Management - Tasks athenahealth Processes report lists the authorization management tasks that athenahealth processes for your organization.
You can find this report in the Report Library on the Other tab.
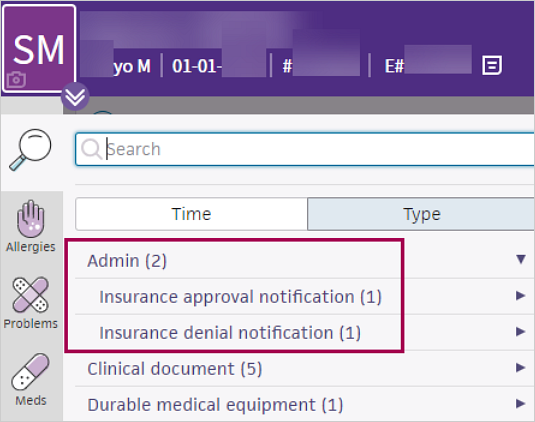
You can view prior authorization approvals and denials from payers on the patient chart under the Find tab  > Type. Prior authorization approvals and denials appear under Admin.
For organizations with both athenaClinicals and athenaOne for Hospitals & Health Systems, the authorization management workflow is as follows:
- If authorization is required for a referral order, the task is routed to athenahealth. athenahealth handles all authorization-related interactions with payers, including submitting necessary documentation and following up on authorization status.
- athenaOne creates an authorization task immediately after a provider signs an order, even if no clinical provider is listed in the Clinical Provider field on the order. To create an authorization task for an order the provider hasn't signed, click Save in the document view of each order.
Note: athenahealth will not begin authorization work on tasks without a clinical provider or a signature.
Ambulatory Clinical (Sender)
- The clinic physician selects the surgery, procedure, or imaging order in athenaOne, ensuring that a diagnosis and receiver are selected. (Supervised midlevel providers can place referral orders as long as the supervising provider is the patient's primary care physician.) If the selected clinical provider is configured as a receiving hospital department, athenaOne electronically sends the order to that hospital department. The physician submits the order and signs off on clinical documentation.
- After the order is submitted, an authorization task is sent to athenaOne Authorization Management. Information about the progress and status of the authorization is accessible from the order.
Note: If missing information on the task prevents athenahealth from processing the task, athenaOne moves the task to Needs practice attention: Waiting to start status.
Hospital (Receiver)
Scheduling/Registration
- On the Orders to Schedule worklist, the scheduler can filter and sort the list of orders sent over from the clinic. The scheduler can use the authorization filter to view only orders with approved authorizations, or can choose to view orders in other stages of the authorization process. The scheduler works down the list of orders, calling each patient to schedule his or her care.
- If a patient walks in with an unscheduled diagnostic test or procedure, the registration staff creates a walk-in visit via the New Hospital Visit workflow. At this time, orders that will be performed in this visit (such as an MRI) may be selected from a list of available orders. Orders from the hospital's in-house clinic may also be associated with a visit from within the Orders/Authorizations tab of the visit.
Imaging/Surgical Orders
- After your PACS or RIS returns the imaging result to athenaOne, imaging results are added to the patient chart (either via interface or manually), and athenaOne performs charge capture for billing.
- Surgery, procedure, and imaging results appear in the patient chart in both the clinic and hospital departments.
| Filter fields | |
|---|---|
| Status filters |
Select one or more statuses to display only authorization tasks with those statuses. For descriptions of the task statuses, see Authorization statuses. |
| Task creation date | Enter date range. |
| Date of service |
By default, the Date of service filter is set to the last 120 days. You can change this date range (the date range you specify is saved and appears the next time you open the Authorization Tracker). Note: To display all historical results, clear the date range and click Filter. A blank value for the Date of service field is not saved. |
| Include auths without a date of service |
To include tasks with no date of service in your search results, select this option. To exclude tasks without a date of service from your search results, deselect this option. |
| Auths marked |
By default, authorization tasks with a status of Hidden do not appear in the search results. To include hidden tasks in the results, select the Hidden option. Note: To include only hidden tasks in the results, select the Hidden option and deselect the Visible option. |
| Order type |
Type into the field or select from the list of options. |
| Ordering provider |
Type into the field or select from the list of options. |
| Clinical provider |
Type into the field or select from the list of options. |
| Department |
Type into the field or select from the list of options. Note: An authorization task is associated with the department in which the order that triggered the authorization task was created. |
| Insurance Reporting Category | Type into the field or select from the list of options. |
| Flagged Authorizations | Type into the field or select from the list of options. |
| Column headings | |
| Patient |
Patient for whom the authorization task was created. |
| DOS | Date of service for the test, procedure, surgery, or consult documented in the authorization task. |
| Created | Date of when the authorization task was created. |
| Order | Order for which the authorization task was created. |
| Ordering Provider | Provider that ordered the test, procedure, surgery, or consult documented in the authorization task. |
| Clinical Provider | Provider that will perform the test, procedure, surgery, or consult documented in the authorization task. |
| Status | Status of the authorization task. For descriptions of the task statuses, see Authorization statuses. |
| Insurance | Patient's insurance policies and statuses |
| Details | Additional information about the authorization task. If the view note link appears, you can click the link to display more detailed information. |

