 Flowsheets
Flowsheets provide a view of patient information over time and are available from the patient chart on the Problems, Meds, Vitals, and Results tabs. To view a flowsheet, click the flowsheet icon ![]() for a problem, medication, test result, or for vitals.
for a problem, medication, test result, or for vitals.
Note: You can access flowsheets for screening questionnaires from the Vitals tab of the patient chart.
You can edit flowsheet data that was entered into the flowsheet manually. To edit flowsheet vitals that were populated from vitals recorded during an encounter, you must have the Clinicals: Edit All Vitals Flowsheet Entries role. You cannot edit flowsheet lab analytes that were populated automatically from a lab result document.
For some common problems, athenaClinicals provides predefined flowsheet "starter sets." A flowsheet starter set displays relevant vitals, result analytes, and medications, and tracks care related to a problem. For more information, see Flowsheet starter sets.
- In the patient chart, click the Problems chart tab.
- Add a problem that is supported by a flowsheet starter set, for example, diabetes mellitus, hypertensive disorder, or cardiac arrhythmia.
For some problems, you are prompted to enter the onset date. - Enter the Onset date and click Add.
The flowsheet for that problem appears in the patient briefing. By default, the table view of the flowsheet is displayed when you click the flowsheet icon next to the problem.
A flowsheet starter set is available for anticoagulation medications such as warfarin. For more information about available flowsheet starter sets, see Flowsheet starter sets.
- In the patient chart, click the Medications tab.
- Click the plus icon
 to add a medication.
 - Enter an anticoagulant medication (for example, warfarin).
The Coumadin management flowsheet appears at the top of the search results.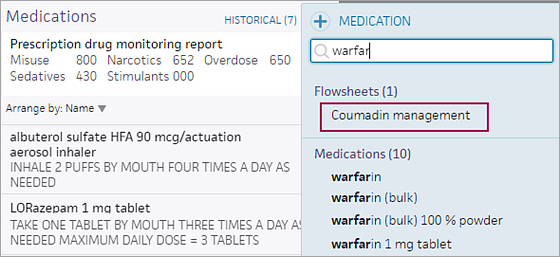
- Click Coumadin management to add the medication to the top of the Medications list.
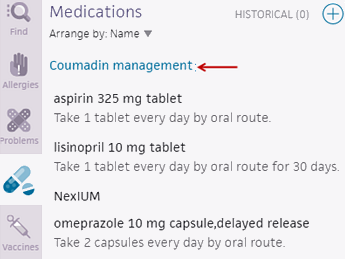
- Alternatively, you can add the anticoagulant medication (for example, warfarin). athenaOne automatically adds the Coumadin Management flowsheet to the top of the Medications list.
- In the patient chart, click the Medications tab, and then click Coumadin management.
A new window appears.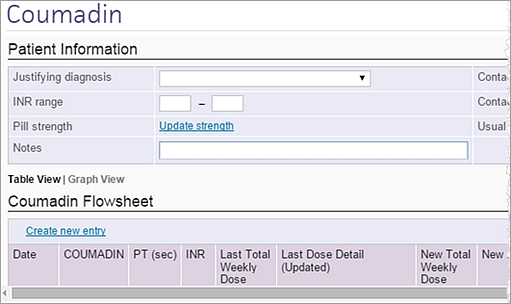
- Edit the flowsheet as you normally would.
- You must click the Save button to save your changes to the flowsheet.
- Click outside the window to close the flowsheet.
- To remove the flowsheet from the Medications list, hover over Coumadin management and click the X icon
 .
.
Note: You cannot remove the flowsheet if a relevant medication is on the Medications list. Removing the relevant medication from the Medications list does not automatically remove the Coumadin management link. - If you remove the flowsheet and then add it again to the Medications list, the flowsheet retains all the previously entered data.
You can edit flowsheet data that was entered into the flowsheet manually. To edit flowsheet vitals that were populated from vitals recorded during an encounter, you must have the Clinicals: Edit All Vitals Flowsheet Entries role. You cannot edit flowsheet lab analytes that were populated automatically from a lab result document.
- In the patient chart, click the Problems chart tab, and then scroll down to the Care Episodes & Tracking section.
- Click the plus icon
 and select cardiovascular risk.
athenaOne adds the flowsheet to the Care Episodes & Tracking section. - Hover the cursor over "cardiovascular risk" and click the flowsheet icon
 to open the flowsheet.
 - Review the available header fields (Exercise level, Smoking Status, etc.) and add any relevant information. If information already appears in a field, you can hover over it and click the header section to expand the field and edit values.
- The Table view contains a list of relevant measures and analytes. Click a date to update or edit the values.
Note: You cannot edit values that were entered during an encounter.
| Header Fields for Cardiovascular Risk | |
|---|---|
| Antihyperlipidemics |
From Medications section. |
| Antihypertensives | From Medications section. |
| Antithrombotics |
From Medications section. |
| Family history of heart disease | Social History question. |
| Exercise level | Social History question. |
| Alcohol intake | Social History question. |
| Smoking Status |
Social History question. |
| Smoking — How much? |
Social History question. |
| Tobacco — years of use |
Social History question. |
| Stress Test | Free text. |
| Target Goals | Free text, to outline patient goals for cholesterol levels. |
| Notes |
Free text. |
| Table Fields for Cardiovascular Risk | |
| BP |
Blood pressure, from Vitals section. |
| Wt |
Weight, from Vitals section. |
| BMI |
Body Mass Index, from Vitals section. |
| Waist |
Waist circumference, from Vitals section. Note: Waist circumference appears if you select this field on the Configure Vitals page. |
| Total Chol |
Total Cholesterol, Numerical Lab result. |
| Trig | Triglycerides, Numerical Lab result. |
| LDL |
Low-density lipoprotein, Numerical Lab result. |
| HDL |
High-density lipoprotein, Numerical Lab result. |
| hsCRP |
High-sensitivity C-reactive protein, Numerical Lab result. |
| CPK |
Creatine phosphokinase, Numerical Lab result. |
| Fasting Glucose |
Numerical lab result. |
| Serum Glucose |
Numerical lab result. Captures lab results with generic names that don't indicate fasting. |
| A1C | Hemoglobin A1C, Numerical Lab result. |
A problem flowsheet includes any medications and lab EDI results for that problem. You can add other medications, other discrete test results, and any vital to a problem flowsheet to customize the flowsheet for your patients. For example, if you add a vital, such as pain scale, to a flowsheet for a specific problem, the pain scale vital appears automatically in the flowsheet when you select that problem for other patients.
Note: If a patient has no data for a flowsheet element, athenaOne hides the element in the flowsheet.
athenaOne automatically saves your individual view of a flowsheet. In this way, each user can view a customized flowsheet for a specific patient or problem. For example, you can create a flowsheet for all patients with asthma, which will appear for your patients only.
Note: During an encounter, the flowsheet customized by the rendering provider appears. Any changes you make to flowsheets outside an encounter are tied to your username.
- In the Problems section of the patient chart, click the flowsheet icon
 for the problem.
 - Click the Vitals chart tab to display the list of vitals.
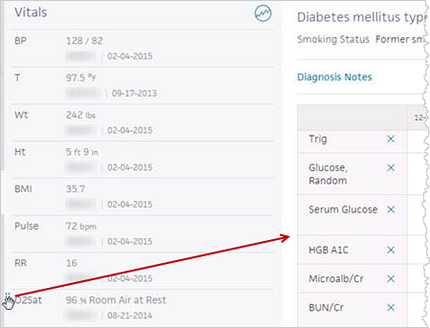
- Move your cursor over the name of the vital that you want to add to the flowsheet.
- When your cursor changes to a hand
 shape, press and hold the left mouse button to drag and drop the vital onto the flowsheet.
- In the Problems section of the patient chart, click the flowsheet icon
 for the problem.
 - Click the Meds chart tab to display the medications list.
- Move your cursor over the medication that you want to add to the flowsheet.
- When your cursor changes to a hand
 shape, press and hold the left mouse button to drag and drop the medication onto the flowsheet.
- In the Problems section of the patient chart, click the flowsheet icon
 for the problem.
 - Click the Results chart tab to display the Lab Results list.
To display the Imaging Results list, click IMAGING RESULTS at the top right of the list. - Click a lab or imaging result in the list to display discrete results for the test.
- Move your cursor over the lab or imaging result that you want to add to the flowsheet.
- When your cursor changes to a hand
 shape, press and hold the left mouse button to drag and drop the result onto the flowsheet.
You can edit flowsheet data that was entered into the flowsheet manually. To edit flowsheet vitals that were populated from vitals recorded during an encounter, you must have the Clinicals: Edit All Vitals Flowsheet Entries role. You cannot edit flowsheet lab analytes that were populated automatically from a lab result document.
- In the Problems section of the patient chart, click the flowsheet icon
 for the problem.
The header view may contain questions that are specific to a particular condition, such as Last Eye Exam for Diabetes. - Click the header section to edit any of these questions.
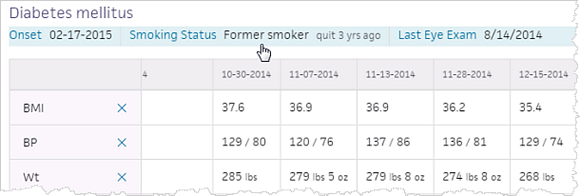
- Update header elements as you care for the patient. For example, if you give a diabetic patient an eye exam, update this information in the flowsheet header.
Tip: Click outside the text box to save your answers. - If available, click Diagnosis Notes to review previous diagnosis notes.
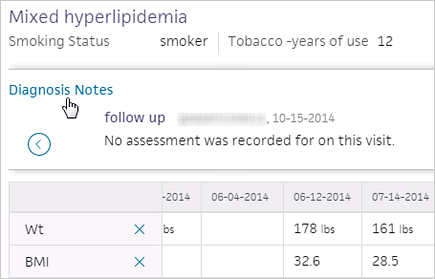
Note: Diagnosis Notes appear only if they exist for the problem you selected. - Use the left
 and right
  arrows to display the previous and next notes in chronological order.
 - In the table view, click a column header to edit any values.
- Click the plus icon
 to add values for a date that does not appear.
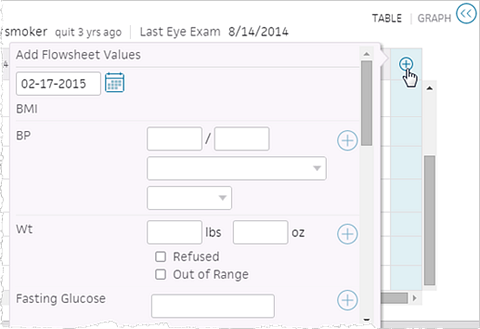
If you need to enter multiple values, click the plus icon next to the individual value. This feature can be useful, for example, to document patient-reported values such as blood pressure.
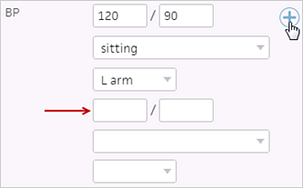
Note: You cannot edit values from encounters or lab results. - You can add other elements to the patient's flowsheet by dragging an element from a chart section and dropping it into the flowsheet.
You can edit flowsheet data that was entered into the flowsheet manually. To edit flowsheet vitals that were populated from vitals recorded during an encounter, you must have the Clinicals: Edit All Vitals Flowsheet Entries role. You cannot edit flowsheet lab analytes that were populated automatically from a lab result document.
Note: Vitals recorded directly in the flowsheet do not appear in the Intake checklist or in the Review step of the Exam stage.
- In the patient chart, click the Vitals tab.
- Click the flowsheet icon
 .
.
The flowsheet displays the graph view by default, but you can change the default view on the User Preferences page.
Note: For pediatric patients (under 21 years), the flowsheet displays the growth chart view by default. - Click TABLE to display the table view.

Note: If you open a vitals flowsheet that has no data, the flowsheet defaults to the table view and displays blank entries for all available vitals. Click the plus icon to add data for applicable vitals. When you click outside the Add Flowsheet Values window, the table view is updated to include only the applicable vitals.
 - Click a column header to edit a value.
- Click the plus icon
 to add new historical data.
 - Enter a date.

- Select the units for Height (Height/Length for patients 0—2 years old), Weight, Head circumference, and Temperature.
- Enter the vitals data.
Printed flowsheets include a patient header on each page.
- In the patient chart, click the Problems, Vitals, or Results tab.
- Locate the problem, vital, or result that you need and click the flowsheet icon
 .
.
The flowsheet opens. - Click TABLE at the top of the flowsheet to display the table view.
- Click the print icon
 at the top of the flowsheet.
A print version of the flowsheet opens in a new window. - Select the printer and any other print options and then click Print.
Note: All information on the flowsheet is included in the printed copy.
Flowsheets provide a view of patient data over time and are available from the patient chart.
- Vitals, medication, and lab/imaging result flowsheets are available on the Vitals, Meds, and Results tabs of the patient chart. These flowsheets provide static, longitudinal views of patient information in the chart.
Note: You can access flowsheets for screening questionnaires from the Vitals tab of the patient chart. - Customizable problem-based flowsheets are available on the Problems tab of the patient chart. These flowsheets provide a centralized location in the chart to track information about a specific patient problem.
The vitals flowsheet displays information in table or graph form for the set of vitals that are configured on the Configure Vitals page.
You can use the Vitals flowsheet in the patient chart to record and track patient vitals data. In the table view, you can click a column header to display the Edit Flowsheet Values box and record or update vitals values (see To edit vitals values in a flowsheet).
Note: To edit flowsheet vitals that were populated from vitals recorded during an encounter, you must have the Clinicals: Edit All Vitals Flowsheet Entries role.
The Screening section of the Vitals tab shows previous screening questionnaires administered and related scores. You can click the flowsheet icon ![]() to see a table or graph of the patient's responses to the questionnaires over time.
to see a table or graph of the patient's responses to the questionnaires over time.
Note: For more information about flowsheets, see Flowsheets.
- In the patient chart, click the Vitals chart tab at the left side of the page and scroll down to the Screening section.
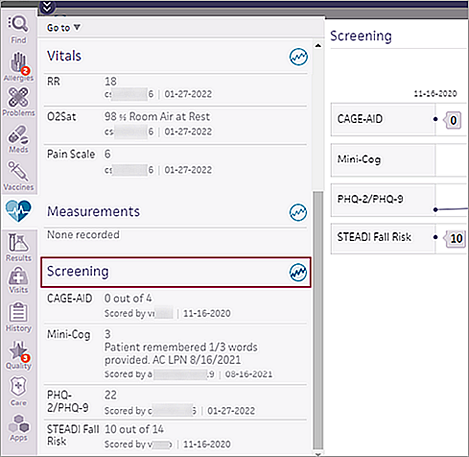
- In the Screening section, click the flowsheet icon
 .
. -
The flowsheet displays the graph view by default with individual scores indicated by dots.

-
Hover over a screening score dot to view the score and the date the screening questionnaire was scored. If a screener is score-only or competed via self check-in, this is indicated in the tooltip.
Examples:
12 (score-only) 11-28-2021
12 (self check-in) 11-28-2021 -
Click a screening score to open a read-only version of the screening questionnaire below the flowsheet.
The selected data point is indicated by a ring around the dot.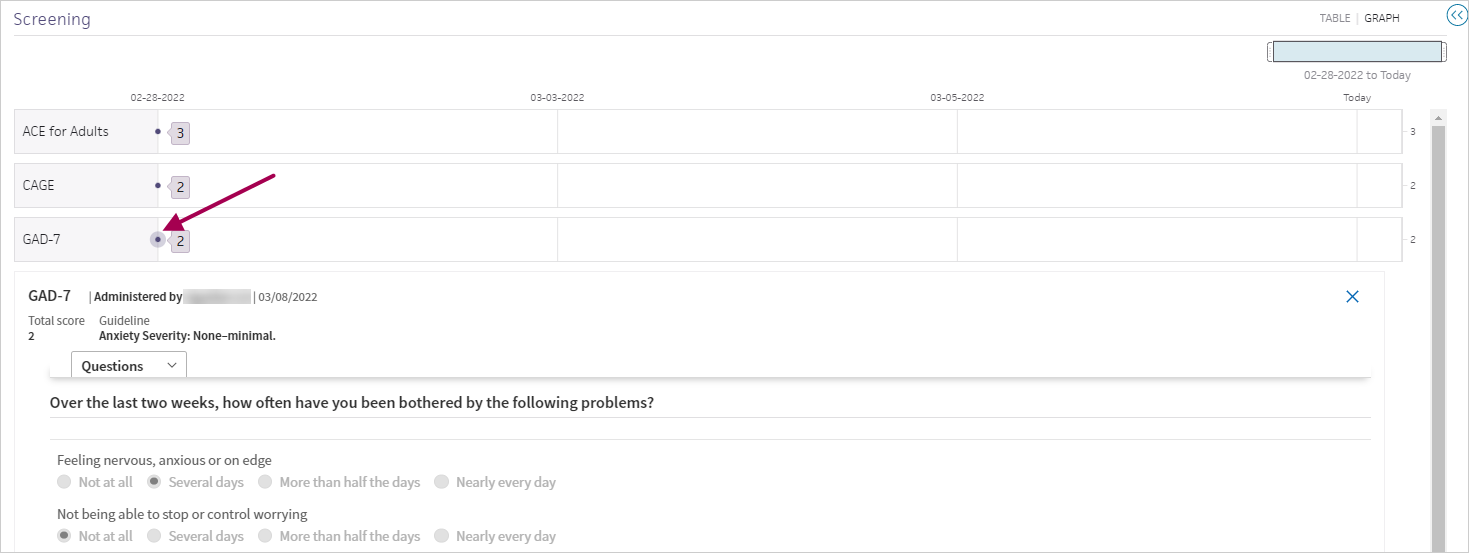
If a screener is score-only or competed via self check-in, this is indicated at the top of the read-only screener.
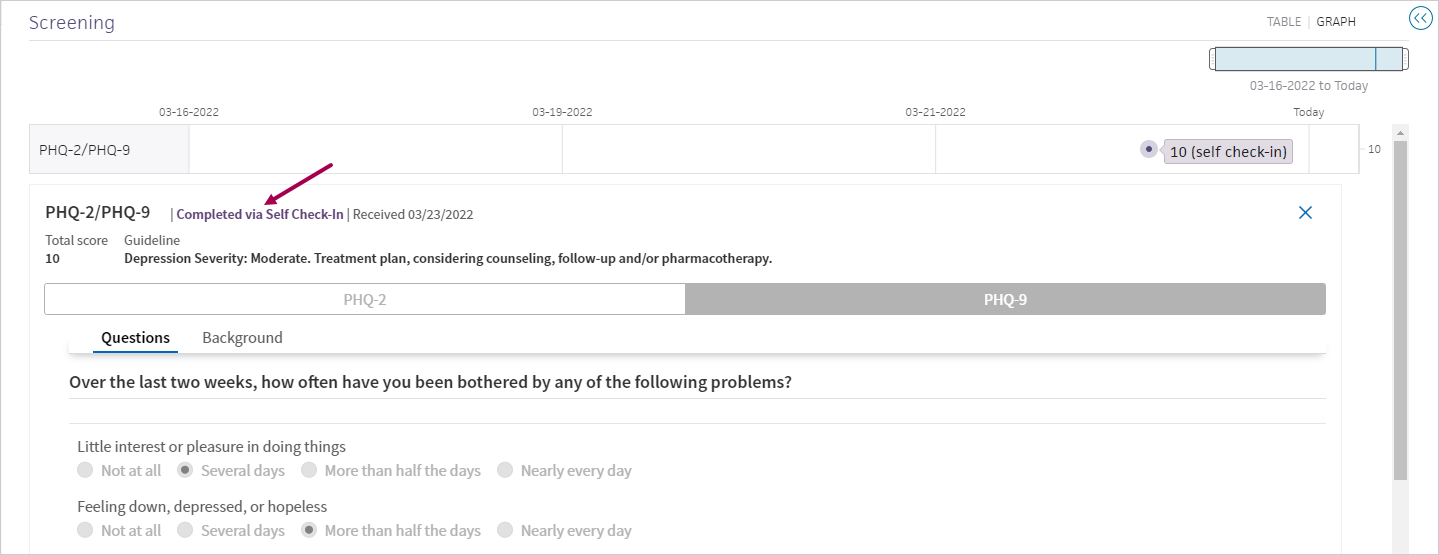
Note: The Completed via Self Check-In Received date reflects when the screening questionnaire was received, not the date of the appointment. -
Click the X in the upper right to close the screening questionnaire.
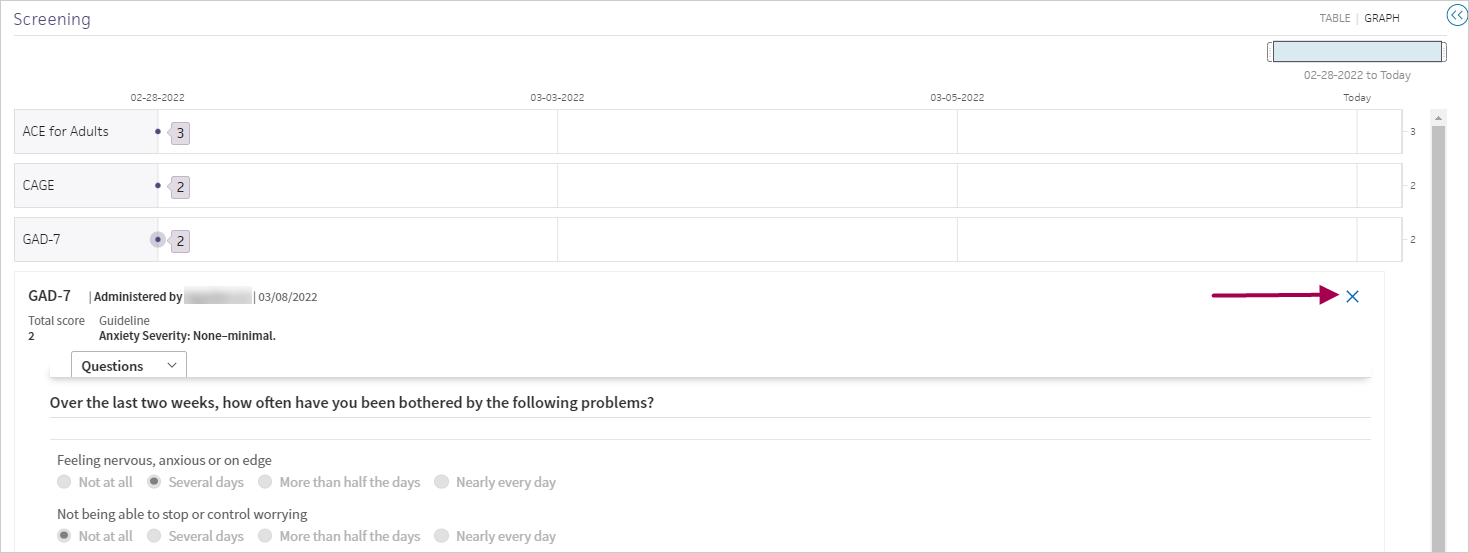
- Click table or graph in the top right to change your view of the flowsheet.
The medications flowsheet is available for active and historical medications and shows the complete history of each medication.
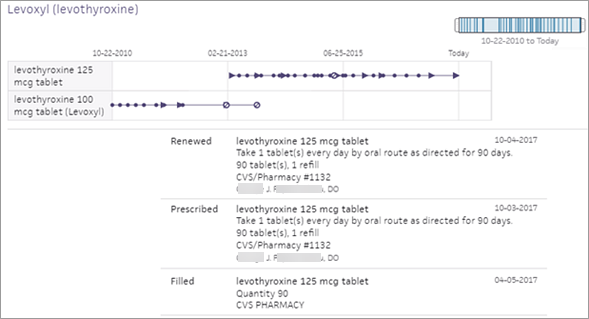
You access medication flowsheets from the Meds tab by clicking the flowsheet icon ![]() next to a medication.
next to a medication.
- Zoom the timeline in and out using the blue slider at the top right of the flowsheet.
- Hover over a dot in the medication timeline to display information about the event that the dot represents, including the type, dosage, associated sig (if any), and date. The event in the graph and the associated event in the list below are both highlighted.
Graph view
Each dosage of the medication has its own graph line in the flowsheet; the most recent prescription dosage graph is at the top. The following icons differentiate events in the graph view.
-
 (change event icon) — Indicates a major event that changes a patient's medication profile, such as a new prescription, prescription renewal, first time that the medication is dispensed or administered, or a new medication added to the patient chart (even if the start date for the medication is unknown).
 -
 (stop event icon) — Indicates that a medication was stopped or denied for a reason such as prescription drug denial, medication end date, or hiding a medication in the Meds section of the patient chart.
 -
 (event icon) — Indicates all other events, including prescription fill dates and subsequent medication dispensed and administered dates.
Note: If more than one event occurs on the same day, athenaOne shows the most recent medication profile change event (![]() ) or stop event (
) or stop event (![]() ) in the graph view. If neither of these event types occurred on that day, the event icon (
) in the graph view. If neither of these event types occurred on that day, the event icon (![]() ) appears.
) appears.
List view
The list below the graph lines provides details about each event in the graph lines, including the event type (for example, a prescription renewal), the event date, dosage, and reason for stopping a medication.
Note: For fill events, athenaOne displays the prescriber (provider name), pharmacy, quantity, and sig as this information was received from Surescripts and pharmacy benefit managers.
Click an event in the list view to see documents associated with fills, renewals, and prescriptions, as well as any additional information associated with the event.
Note: You can drag medications to a problem-based flowsheet. A medication timeline is added to the problem-based flowsheet, but the list view for the medication is not available from a problem-based flowsheet.
When a patient is discharged from a hospital that uses athenaOne for Hospitals & Health Systems, the attending clinical provider performs medication reconciliation on the patient's home medications and active inpatient medications to continue or discontinue the medications. The patient flowsheet in athenaClinicals displays these medications as having been continued or discontinued on the date medication reconciliation was performed in the hospital.
Note: Medications that are documented or prescribed by the hospital clinical provider after the patient is discharged do not appear in the patient's home medications list in the chart (this information must be reconciled manually). If a hospital stay overlaps an encounter in the clinic, make sure that discharge is complete in the hospital stay before opening an encounter in the clinic.
You access lab and imaging result flowsheets from the Results tab of the patient chart by clicking the flowsheet icon ![]() next to a result.
next to a result.
Lab result flowsheets
A lab result flowsheet provides a table and graph view of the analytes associated with the lab result (the flowsheet opens to the last view you selected).

The document view displays the most recent document for the lab result.
You can drag lab results to a problem-based flowsheet. The name of the lab result appears in the graph and table view on the observation date of the result.
Imaging result flowsheets
Imaging result flowsheets are available for imaging results that are associated with a clinical order type and can be identified by the flowsheet icon ![]() . To display the imaging result document, click the name of the result in the table view of the flowsheet.
. To display the imaging result document, click the name of the result in the table view of the flowsheet.
You can drag imaging results to a problem-based flowsheet. The name of the imaging result appears in the table view on the observation date of the result and is linked to the imaging result document.
A problem flowsheet includes any medications and lab EDI results for that problem. You can customize problem flowsheets by dragging in vitals, medications, lab result analytes, and imaging results. In the table view of the flowsheet, you can:
- Remove an element by clicking the delete icon
 next to the clinical element name.
 - Move an element to a different location in the table by clicking the element and dragging it using the handle (
 ).
).
The flowsheet attached to a problem in a patient chart can contain data that you configured and data from a starter set flowsheet configured by athenahealth. You can enter and edit data for the elements in a problem flowsheet, including elements that were included in a starter set or migrated flowsheet. For more information, see "To review and update a problem flowsheet."
When you customize a flowsheet for one patient, the changes appear on that flowsheet for all your patients. For example, if you delete the BP measure in a diabetes flowsheet for one patient, the BP measure is deleted from the diabetes flowsheet for all your patients.
Note: If you order a medication, lab, or imaging test under a diagnosis during a patient encounter, the medication, lab result analytes, or imaging result may appear on the patient's problem-based flowsheet. These medications and results are specific to that patient and will not automatically appear on flowsheets for other patients with the same problem.
Creating flowsheets for problems without starter sets
Many problems do not have a flowsheet starter set. For these problems, athenaOne provides an empty flowsheet that prompts you to supply content. For example, if you select "Chest injury" as a problem for a patient, you see a prompt to drag lab results, vitals, and medications into the flowsheet.

athenaOne will use the same Chest injury flowsheet that you create for this patient for all your patients with a chest injury problem. Therefore, if you include only medications in the Chest injury flowsheet when you create it, only medications are included by default in chest injury flowsheets for other patients. If you later add vitals to the chest injury flowsheet for any of your patients, vitals will be added to the chest injury flowsheet for all your patients.
For some common problems, athenaClinicals provides predefined flowsheet "starter sets." A flowsheet starter set displays relevant vitals, result analytes, and medications, and tracks care related to a problem. For example, with the predefined Diabetes flowsheet, you can view the date of the last foot or eye exam for a patient with diabetes.
The flowsheet attached to a problem in a patient chart can contain data that you configured and data from a starter set flowsheet configured by athenahealth. For a problem such as diabetes or hypertension, the flowsheet starter set automatically adds relevant, previously ordered medications for you. For example, if you ordered Advil for a headache, the flowsheet automatically adds the Advil medication to the flowsheet. These additional items in a flowsheet are specific to the patient and do not appear in the flowsheet of every patient with the same problem.
The header view may contain questions that are specific to a particular condition, such as Last Eye Exam for Diabetes, as well as diagnosis notes. You can also add elements to problem flowsheet starter sets.
Note: If your practice had Classic athenaClinicals global flowsheets enabled for patients, all the existing data from these flowsheets is retained and any missing starter set elements are added automatically.
Flowsheet starter sets are included automatically when you add a related problem to the patient's chart. athenaOne provides the following flowsheet starter sets:
- ADHD
- Aneurysm
- Angina
- Aortic valve problem
- Arrhythmia
- Asthma
- Atherosclerosis
- Cardiomyopathy
- Cardiovascular risk
- Cervical cancer screening
- Congenital heart defect
- Congestive heart failure
- Coumadin
- Diabetes (type 1 and 2)
- Heart block
- Hyperlipidemia
- Hypertension
- Joint problem
- Mitral valve problem
- Thyroid (hypothyroidism and hyperthyroidism)
- Venous disease
The starter sets are tied to the appropriate SNOMED terms (for example, "diabetes mellitus" is a SNOMED term tied to the diabetes flowsheet). When you add a problem to a patient chart corresponding to one of these flowsheet starter sets, the problem flowsheet automatically appears with data prepopulated from the patient's chart.
Note: Elements within the flowsheet appear only if a patient has data for a particular element.
When you add vitals, medications, lab result analytes, or imaging results to a problem flowsheet for one patient and arrange those elements in a specific order, athenaOne maintains that ordering of elements when the problem flowsheet is displayed for any of your other patients with the same problem.
Note: Within an encounter, the problem flowsheet displays the rendering provider's preferences so that clinical staff see the same version of the flowsheet.
After you configure a problem flowsheet to display elements in your preferred order, elements added later — for example, updates to the global starter set or orders added under a diagnosis in the Assessment/Plan section — are placed at the bottom of the flowsheet.
If you add another element to a patient's problem flowsheet (for example, by dragging a medication from the Medication tab to the flowsheet) or if you change the order of elements in the flowsheet, your changes appear in that problem flowsheet for all your patients with that problem.
If you do not customize the order of elements in a problem flowsheet, athenaOne displays elements in the following order for all patients with the same problem.
- Global starter set elements appear first and are ordered as defined in the starter set.
- Orders created for the patient in the Assessment/Plan section of an encounter appear last in the flowsheet and are ordered as they were entered in the Assessment/Plan.