 Vitals Section
This section allows the MA or provider to record the vital signs obtained from the patient during the clinical encounter. When the provider signs the encounter, the patient chart is automatically updated with the information recorded in this section.
Note: Some features of the patient chart are available only in the ambulatory (athenaClinicals) view, and some are available only in the hospital view. Only the ambulatory (athenaClinicals) view includes the Problems chart tab, the Vitals chart tab, and the Visits chart tab. Only the hospital view includes the Diagnoses chart tab, the Flowsheets chart tab, and the Notes tab.
In the patient chart, click the Vitals chart tab at the left side of the page.
You can edit flowsheet data that was entered into the flowsheet manually. To edit flowsheet vitals that were populated from vitals recorded during an encounter, you must have the Clinicals: Edit All Vitals Flowsheet Entries role. You cannot edit flowsheet lab analytes that were populated automatically from a lab result document.
Note: Vitals recorded directly in the flowsheet do not appear in the Intake checklist or in the Review step of the Exam stage.
- In the patient chart, click the Vitals tab.
- Click the flowsheet icon
 .
.
The flowsheet displays the graph view by default, but you can change the default view on the User Preferences page.
Note: For pediatric patients (under 21 years), the flowsheet displays the growth chart view by default. - Click TABLE to display the table view.

Note: If you open a vitals flowsheet that has no data, the flowsheet defaults to the table view and displays blank entries for all available vitals. Click the plus icon to add data for applicable vitals. When you click outside the Add Flowsheet Values window, the table view is updated to include only the applicable vitals.
 - Click a column header to edit a value.
- Click the plus icon
 to add new historical data.
 - Enter a date.

- Select the units for Height (Height/Length for patients 0—2 years old), Weight, Head circumference, and Temperature.
- Enter the vitals data.
To support clinical quality reporting requirements, you can indicate that measurement of the height, weight, or blood pressure vital was not performed, along with the reason why (these reasons are backed by SNOMED codes). This feature is available in the Intake checklist, the Exam stage, and in the Vitals flowsheet of the patient chart.
Documentation that a vital measurement was not taken appears in all locations where vitals are documented, including the Vitals tab of the patient chart, the Vitals flowsheet, the full encounter summary, and patient letters.
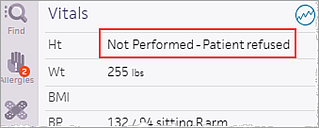
Note: If a vital is recorded as Not Performed, no data appears in the table or graph views of the Vitals flowsheet because no value was recorded for that time point.
- In the Intake stage of the patient encounter, click Vitals in the Intake checklist.
Note: You can also document vitals in the Review section of the Exam stage. - Select the Ht (height), Wt (weight), or BP (blood pressure) vital.
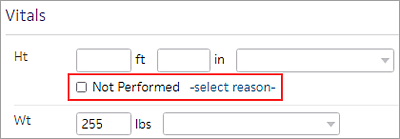
- Select the Not Performed option.
The list of reasons appears.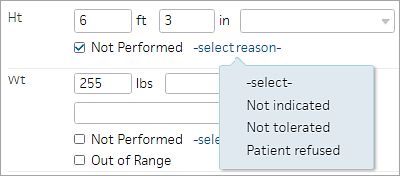
Important: When you select Not Performed, any vital measurements you already entered in that row are cleared (for example, you cannot document a weight of 150 lbs and mark the weight as Not Performed). - Select a reason from the menu.
- Not indicated — Select this option when, for example, a patient returns for a follow‑up visit shortly after a previous visit.
- Not tolerated — Select this option when, for example, a patient comes in for a quick nurse visit and becomes angry or agitated when asked to have vitals taken.
- Patient refused — Select this option when, for example, a patient comes in for a quick nurse visit and refuses to have vitals taken because she's in a hurry.
Note: The Not indicated and Not tolerated reasons are considered medical reasons for not measuring the height, weight, and BP vitals and, therefore, satisfy quality data reporting requirements. The Patient refused reason is not considered a medical reason and does not satisfy reporting requirements.
To enter notes in the Vitals section, you must select the Other / Notes option on the Configure Vitals page.
You can enter notes about vitals measurements to document factors that influence the measuring of the patient's vitals, such as a wheelchair that prevents the weighing of a patient or a child who is crying or upset.
- During Intake, select Vitals in the checklist.
- At the bottom of the section, click the add note
 icon.
icon. - Enter a note.
- Click outside the text field to save it.
- Click in the Vitals section of the Review encounter step during an exam.
- Update any vitals as necessary.
- Notes appear at the bottom of the section. You can edit notes.
- If a note does not already exist, click the add note
 icon and enter a note.
- In the patient chart, click the Vitals tab to review all vitals notes.
- Vitals notes appear with the date that they were entered.

The vitals note appears in context with the relevant vital measurements as follows:
- A vitals note that was entered more recently than any of the displayed vitals appears in the chart.
- Otherwise, if one or more of the vitals displayed was entered in an encounter with a vitals note, the most recent corresponding vitals note appears.
- A vitals note entered prior to any of the most recent vitals displayed does not appear in this view.
- To review all past vitals notes, click the flowsheet icon
 to display the Vitals flowsheet. If any notes are available for the patient, a timeline labeled Note appears at the bottom of the flowsheet. Hover over the dot to see the contents of any note.
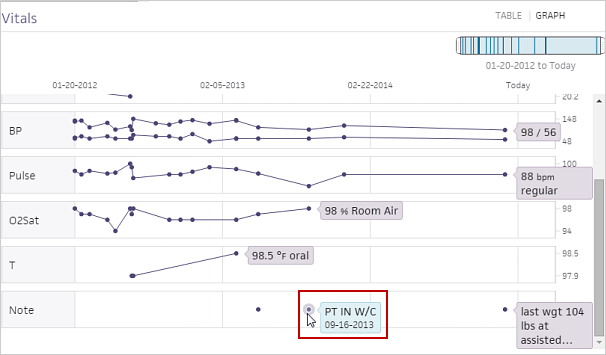
Note: If the vitals note is long, only a portion of it appears. To review the note in full, toggle to the table view of the flowsheet.
All vital measurements documented in athenaClinicals — such as Height, Weight, Blood Pressure, BMI, BMI Percentile per Age and Sex, and Pulse Rate — are backed by LOINC, a standard code set.
For patients over 18 years of age, the height vital in the Intake stage and Exam stage is prepopulated from the most recent (previous) encounter if the previously measured height was taken within the past 12 months. The date that the height was recorded appears to the right of the field.
For patients 18 years and younger, athenaOne does not prepopulate the height vital in the Intake stage and Exam stage of the encounter.
You can use the Configure Vitals page to configure vitals for this section.
You can document more than one measurement of the height and weight vitals using different measurement types. Selecting the type of height or weight is optional.
Note: If you do not select a type of height or weight, athenaOne uses the normal height or weight measurement vital by default: Body height for height and Body weight for weight.
athenaOne supports these options for the Height vital:
- Body height (selected by default when the field is blank)
- Stated
- Lying
- Standing
- Preoperative
athenaOne supports these options for the Weight vital:
- Body weight (selected by default when the field is blank)
- Stated
- Dry
- Preoperative
- With clothes
- Without clothes
- First
BMI calculation
BMI calculation requires at least one height and one weight value. If you document multiple values for height, weight, or both, the most recently entered value is used to calculate the patient's BMI.
Note: BMI Percentile per Age and Sex is calculated using the value of the Legal sex field on the Quickview. The BMI Percentile appears only for vitals that were recorded when the patient was younger than 21 years old.
To document an alternative type of height or weight:
- Click the field to the right of the Ht or Wt vital to display the list of measurement types and select an option from the menu.
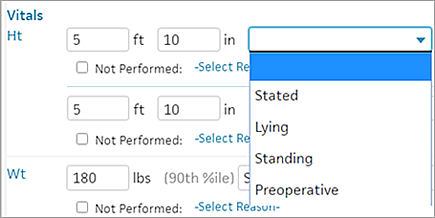
- To document another type of height or weight measurement, add a row by clicking the plus icon
 to the right of the Ht or Wt vital.
- Enter the new height or weight value and select the measurement type from the menu.
A Growth Chart link appears at the upper right of the vitals flowsheet for any patient who is 20 years of age or younger. This link allows you to graph growth information for that patient's encounter against the eight standard growth curves published by the CDC.
Note: For patients under 2 years old, percentiles in the Vitals section are calculated based on the World Health Organization (WHO) growth charts. For patients 2 years and older, percentiles are calculated based on the Centers for Disease Control (CDC) growth charts.
Special vital signs are designed for pediatric practices:
- Head Circumference: This vital is used to measure the head circumference of infants.
- Weight (lbs/oz.): This vital provides two input fields to record weight in pounds and ounces.
- Height/Length: This vital can be used to record height or recumbent length in inches.
- Body Surface Area: When you enter a patient's height and weight and then click Save, the patient's body surface area is automatically calculated and displayed. The Body Surface Area field uses this formula:
BSA (m²) = ([Height (cm) x Weight (kg)]/3600)^½
Two options are available for measuring height and weight. The practice should select only one option in the local vitals table.
- Height or Height/Length (inches)
- Weight or Weight (lbs. oz)
On the vitals summary section of the encounter, weight is also displayed in kg to assist with pediatric drug doses.
Blood pressure
The percentile of blood pressure for patients under the age of 21 appears in parentheses next to the recorded measurement in the Vitals section of the patient chart during the Intake and Exam stage of an encounter. Blood pressure percentiles are based on age, height, and gender (see Clinical Practice Guideline for Screening and Management of High Blood Pressure in Children and Adolescents).
athenaOne calculates these percentiles after you enter the patient's height and blood pressure measurements.
- In the graph view, the percentile appears next to the blood pressure value above the date for each data point.
- In the table view, the percentile appears next to the blood pressure value.
You can use the Configure Vitals page to add birth weight and birth length vitals to the Vitals section, and then record this data in the Vitals chart tab using the Vitals flowsheet (click the flowsheet icon ![]() in the Vitals section).
in the Vitals section).
Because this information can also be recorded with the existing height and length vitals, we recommend using birth weight and birth length only if your practice frequently consults these values and would, therefore, like to increase their visibility in the chart.
Note: athenahealth recommends that you not record birth weight and length data during an encounter, because the values will appear for the date of the encounter, instead of for the patient's birth date.
You can enable the "with/without correction" vital for visual acuity on the Configure Vitals page. This vital allows non-ophthalmology practices, such as internal medicine and pediatric practices, to indicate whether visual acuity is with or without refractive correction as part of a wellness exam.
Note: If your practice uses eye care-specific workflows, as would be the case for an ophthalmology practice, your practice does not need to have this vital enabled. Opthalmology practices shoudl use the workflows outlined on the Eye Care Encounter Workflow page.
You must enable the "with/without correction" vital on the Configure Vitals page before you use this feature.
Tip: To make it easier to enter visual acuity data, we recommend keeping the "with/without correction" vital near the visual acuity OD, visual acuity OS, and visual acuity OU vitals by using your mouse to drag and drop these vitals in the order you prefer on the Configure Vitals page.
- Display Vitals:
- In the Intake stage, click the Vitals item in the Intake checklist.
- In the Exam stage, click Review in the Exam navigation bar at the top of the page, and then click the Vitals section to expand it.
- Record visual acuity measurements in the V OD, V OS, and V OU fields.
- SC/CC — Select an option to indicate whether visual acuity measurements are with or without correction:
- SC — Without correction
- CC — With correction
- In the patient's chart, click the Vitals tab.
- In the Vitals section, review the last recorded visual acuity reading, which may be noted in V OS, V OD, V OU, and SC/CC.
- SC — Indicates a measurement without correction.
- CC — Indicates a measurement with correction.
- To review additional historical readings, click the flowsheet icon
 to view a graph or table of the patient's historical readings.
You cannot enter the wrong type of data or save values that are physiologically impossible for the following vitals:
- Blood Pressure
- Temperature
- Pulse/HR
- Respiration Rate
- Oxygen Saturation
Example
If you enter a vital that's physiologically impossible, a red border appears around the field to warn you that the entry is invalid, and the entry is not saved.

| Vital | Min | Max | Unit |
|---|---|---|---|
| Systolic blood pressure | 0 | 400 | mm Hg |
| Diastolic blood pressure | 0 | 400 | mm Hg |
| Temperature | 60 | 120 | °F |
| Heart rate | 0 | 600 | bpm |
| Pulse | 0 | 600 | bpm |
| Respiratory rate | 0 | 150 | bpm |
| Oxygen saturation | 0 | 100 | % |
| Height* | 0 | 9'24" | ft in |
| 0 | 132 | in | |
| 0 | 335 | cm | |
| Weight | 0 | 1510 | lb |
| 0 | 1500 &160 | lb & oz | |
| 0 | 24,160 | oz | |
| 0 | 684,924 | g | |
| 0 | 684 | kg |
If your practice has configured what values are considered normal for vitals based on age, athenaOne alerts you when a patient's vitals are outside this range. You then see Abnormal indicators next to all current and historical vitals that are out of range for the following vitals:
- Blood Pressure
- Temperature
- Pulse/HR
- Respiration Rate
- Oxygen Saturation
Note: Abnormal indicators do not appear for other out-of-range vitals.
To learn how to enable Abnormal indicators for vitals, see the Configure Vitals Reference Ranges help topic.
Examples
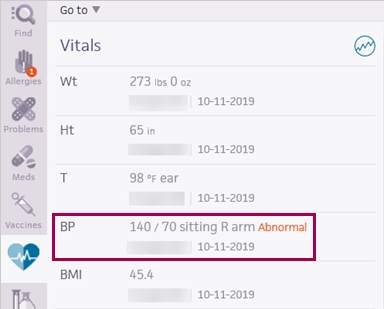
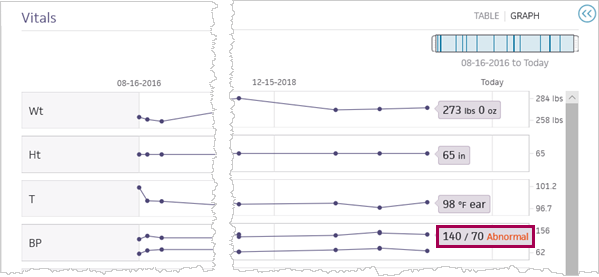
Current vs. historical readings
athenaOne distinguishes current vs. historical abnormal vitals readings as follows:
-
Abnormal (in red) — Indicates a reading from the current encounter
-
Abnormal (in gray) — Indicates a reading from a previous encounter

This helps keep your attention focused on current abnormal readings while making it easy to see how this data compares to past readings for the patient.
Where Abnormal indicators appear
If a vitals reading is outside the normal range for the patient's age, athenaOne displays an Abnormal indicator next to the vital in the:
- Intake stage of an encounter
- Exam stage of an encounter
- Patient briefing
- Patient Chart
More specifically, athenaOne displays Abnormal indicators in:
- Vitals item of Intake check list
- Intake documentation
- Review step of encounter
- Vitals tab of patient chart
- Vitals flowsheet — in both the table and graph views
- Problem-based flowsheets
- Exam documentation
- Intake section of patient briefing
Where Abnormal indicators do not appear
athenaOne does not display Abnormal indicators in:
- Encounter summary
- OB episode
- PT episodes
- Quality tab
- Chart export
- Care plan
- CCDA
- Report Builder
- External APIs
Yes. After a practice manager configures what values are considered normal for vitals based on age, you will see Abnormal indicators for out-of-range vitals in both athenaOne and the athenaOne app.
The Screening section of the Vitals tab shows previous screening questionnaires administered and related scores. You can click the flowsheet icon ![]() to see a table or graph of the patient's responses to the questionnaires over time.
to see a table or graph of the patient's responses to the questionnaires over time.
If your practice uses athenaClinicals with the athenaCommunicator Patient Portal, you can display vitals graphs on the Patient Portal. Contact the CSC to enable vitals graphs for the Patient Portal.
Vitals graphs available on the My Health / Vitals page of the Patient Portal include:
- Weight
- BMI
- Blood pressure
- Cholesterol
- Diabetes A1C
- Coumadin INR
Analyte data from lab results appears on the Patient Portal only when the provider moves the result document into SUBMITTED or CLOSED status. In this way, the provider can review the analyte data attached to labs before the information is made available to the patient.
Analyte data that you enter manually in a patient chart or in a flowsheet appears on the Patient Portal when it is saved.
You can use vitals devices from Midmark and Welch Allyn to automatically populate vitals measurements in the Vitals section of an encounter. This feature eliminates manual data entry, increasing accuracy and saving you time.
Note: You must have Clinicals Admin permission to configure vitals devices. If you can access an encounter, you can use configured vitals devices in the Vitals encounter section.
Supported vitals measurements vary by device, but they can include blood pressure, temperature, oxygen saturation, pulse, height, weight, pain scale, and respiration rate. Devices can be connected using either a USB cable or Bluetooth connectivity, if supported by both the device and the practice computer.
Midmark devices
Both versions of the Midmark IQvitals device can be connected to athenaOne, including the touchscreen and non-touchscreen PC versions.
Welch Allyn devices
Integration is supported with the following Welch Allyn (Baxter) devices:
- Connex Integrated Wall System
- Connex Spot Monitor (CSM)
- Connex Vital Signs Monitor 6000 Series (CVSM)
- Spot Vital Signs LXi
Before you can use an integrated Midmark or Welch Allyn device to populate vitals measurements, you must:
- Install and configure the athenaOne Device Manager.
- Add the Midmark IQvitals or Welch Allyn Vitals device on the Device Management page.
Note: You may be required to restart each computer after installing the device software.
For more information about how to configure devices in athenaOne, see the Device Management page.
Note: The athenaOne Device Manager is available for the Chrome and Microsoft Edge browsers. You must use the Device Management page to add the Midmark IQvitals or Welch Allyn Vitals device.
- Collect the vitals measurements using the device (either before or after connecting the device to the computer).
- Connect the vitals device to the computer using the USB cable or Bluetooth connection before loading the encounter.
- Display the Vitals encounter section in the Intake or Exam stage of a patient encounter.
- Click Import Vitals. This button appears only if a device is connected.
- For Midmark IQvitals devices, a new window displays the Midmark control panel and the measurements collected from the device.
Click Save in the Midmark control panel. - Vitals measurements are transferred directly into the Vitals encounter section. Measurements added using a connected device display "(via device)" next to the username and timestamp.
Note: If any of the fields already contain data, a new entry appears for the incoming data, with the exception of the height field. If a height value is imported, an alert appears for you to either overwrite the existing data or discard the incoming data. - Click Save.
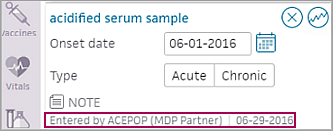
When a Marketplace partner makes a change to a patient's Medications, Problems, Vaccines, or Vitals, you can see the name of that partner within the encounter.
