Assessment & Plan (A/P) Section

Providers can use this section to record an assessment, select diagnoses, and create orders for a patient encounter.
In the Exam stage of the patient encounter, click A/P in the navigation bar
The note fields in orders (Note to provider and Internal Note) do not support macros containing HTML or athenaML.
If you try to use a macro in a note field that contains line breaks or HTML formatting, you may see HTML tags in your note. This issue is especially likely with these applications:
- Dragon Medical One dictation in Chrome
- M*Modal dictation
Notes that contain HTML or athenaML do not render properly when you save them.
- In the Exam stage of the patient encounter, click A/P in the navigation bar.
- You can enter an assessment in the assessment note field. When you begin to enter text, the star icon
 appears at the right. You can click the star icon to save your text as a macro for future use.
Note: Macros created in this field cannot exceed 4000 characters.
If the note needs to be hidden from patients and family members or caretakers who have access to their health information, click to mark the note confidential. See User Guide — Lock Patient Data for more information.
 - Click the plus icon
 next to Diagnoses & Orders.
Diagnoses and orders you select are added to the D&O cart. - Search for and select the point-of-care test.
- Click the new point-of-care test order to open the form and expand the details.
- If the in-house facility needs additional information to perform the test, ask-on-order entry (AOE) questions appear. Enter responses to the AOE questions. If view more appears at the bottom of the expanded view of the order, click View More to answer additional AOE questions. (See also: AOE Question Management)
Important: If you later reopen the point-of-care test order, modify the answer to an AOE question, and then reapprove the order, a new order will be created. - Enter the results of the test in the point-of-care test template, or sign the order to create a Clinical task. (You can also enter test results on the Results tab of the patient chart.)
Note: If the point-of-care test template is marked as "Discussed with patient," the order is automatically closed and the result is tied to the order when it is signed.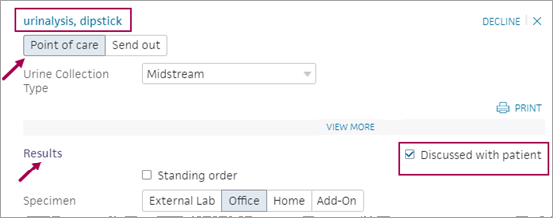
- In the Exam stage of the patient encounter, click A/P in the navigation bar.
- Scroll down to the Follow Up section and click
 .
.
Additional fields appear. - When — Select a time for the follow-up appointment, or accept the default value, today/ASAP.
- Provider — Select the desired provider for the follow-up appointment.
- Appointment — Select the type of follow-up appointment.
- Department — Select the department for the follow-up appointment.
- Alarm — If you want to set a reminder alarm for scheduling the follow-up appointment, select a time frame for scheduling the appointment. If an alarm is set, a Return to Office document (RTO document) is created along with the appointment tickler.
Note: RTO documents are created in a SUBMITTED status and assigned to no one. If the number of alarm days elapses, RTO documents are moved to FOLLOW UP status and assigned to a provider. - Note — Add a scheduling note about the follow-up appointment.
You can record the onset date of a patient's symptoms when you add a diagnosis to the Assessment & Plan.
-
In the Exam stage of the patient encounter, click A/P in the navigation bar.
-
Click the plus icon
 next to DIAGNOSES & ORDERS.
 -
Use the search tool to locate and add a diagnosis, or select it from the frequently used list of diagnoses.
-
In the Assessment & Plan, click the diagnosis to expand it and reveal the Onset field.
-
Onset — Enter or select the onset date of the patient's symptoms.
Note: If you add a diagnosis to the patient's Problems list, the onset date carries over.
For instructions on using EPCS for controlled substance prescriptions, see To sign and send controlled substance prescriptions electronically.
- In the Exam stage of the patient encounter, click A/P in the navigation bar.
- You can enter an assessment in the assessment note field. When you begin to enter text, the star icon
 icon appears at the right. You can click the star icon to save your text as a macro for future use.
Note: Macros created in this field cannot exceed 4000 characters.
If the note needs to be hidden from patients and family members or caretakers who have access to their health information, click to mark the note confidential. See User Guide — Lock Patient Data for more information.
 - Click the plus icon
 next to Diagnoses & Orders.
The diagnoses and orders you select are added to the D&O cart. - Search for and select the medication.
- Click the new medication order to open the form and display the details.
The Prescribe tab is displayed by default. - Sig — Enter instructions for the patient on how to take the medication, including the correct dosing.
- Quantity — Specify the quantity and number of refills (if any).
Note: When you create an electronic prescription, athenaOne may convert the medication unit and quantity to a First Databank (FDB) standard quantity. For example, if you select "1 bottle of 150" from the Quantity menu, athenaOne converts this value to the FDB standard quantity of "150 tablets" when it sends the electronic prescription to the pharmacy. The converted quantity appears in parentheses after the selected quantity at the point of order, in the order details view, and in the full encounter summary.
Note: When you change the dispense unit for a prescription, the Quantity field automatically clears. This functionality is intentional and promotes patient safety. After changing the dispense unit, enter a quantity appropriate for the unit you select. - DAW — Select the dispense as written (DAW) option if needed.
- Send to — If the patient's preferred pharmacy does not appear in this field or if you need to select a different pharmacy, click the plus icon
 and search for the pharmacy.
 - Note to pharmacy — (Optional) If you want the order to be filled on a future date (specified using he Earliest fill date field), you can enter a note in this field that instructs the pharmacy to fill the order after the date you specify.
Note: If multiple orders have the same note, athenaOne marks the order as a duplicate and rejects it. Entering a unique note on each order ensures that the pharmacy successfully receives all electronic orders. - Earliest fill date — (Optional) If you want the order to be filled on a future date, enter the earliest date that the patient should receive the prescription (this field applies to both controlled and non-controlled substances and also appears in medication flowsheets). When you sign the order, the prescription is sent immediately to the pharmacy via Surescripts, but the pharmacy does not make the prescription available for the patient until the Earliest fill date (also known as the effective date).
Example: If multiple orders are needed for a patient over a given period of time and the drug name, Sig, and quantity are the same, you can use this field to indicate when the pharmacy should fill each order. - Click Sign orders.
Required: The medication must have been previously prescribed, manually entered, or have a start date entered by a provider in your practice.
In the Exam stage of an in-person or telehealth visit, access the patient's Medications list.
Note: You can also accelerate a medication from Order Groups. To access,click the Menu icon in the upper right and select Order Groups.
To preview the information that will be copied into a new order prior to accelerating or to access supporting information, hover your mouse over the accelerator button
 in the upper right corner of a medication.
A window appears, detailing the information that will be added to the order. It also lists supporting information to help you determine whether a prescription refill is necessary.
Tip: Use order sets with preconfigured information to further accelerate medication ordering. See Order Sets and Manage My Order Sets for details.Click the accelerator arrow
 in the upper right to copy the medication details into a new order.
Note: Previewing information is available for any medication that can be copied, and remains available after acceleration.
Example of details
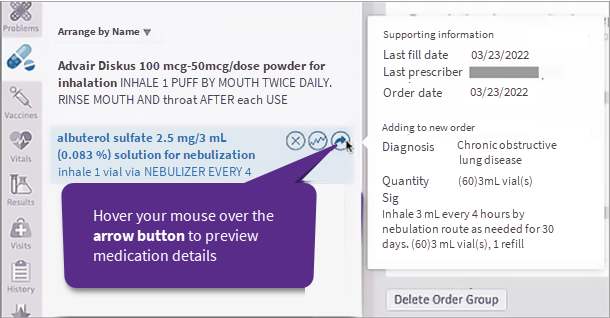
The preview shows these sections and all available details:
Supporting information
This section assists you in determining whether a prescription refill is needed.
- Last fill date
- Name of the Last prescriber
- Order date
Adding to new order
This section lets you review medication information before copying it into a new order. The details to be copied include:
- Diagnosis
- Quantity
- Sig
- Strength
- Base unit
- Route
- Refills
- DAW
- Note to pharmacy
- Note to patient
- Internal note
If a medication was manually entered or started and is not yet prescribed, it can still be accelerated into a new order. However, the term 'UNAVAILABLE' appears in some fields.
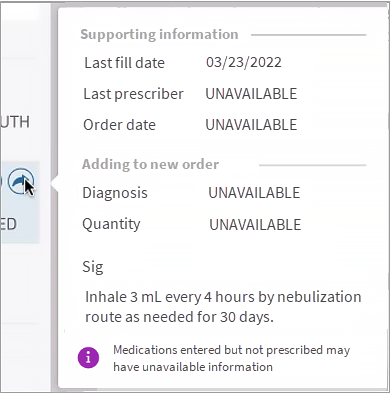
After the clinical provider accelerates the medication details into a new order, they will need to manually enter any missing data prior to signing. This information will be available within the medication the next time a member of clinical staff accelerates it.
The accelerator arrow ![]() in the upper right corner of a medication is active only if a clinical provider in your organization has previously prescribed a medication at least once, has manually entered the medication, or has entered a start date for the medication. Otherwise, the medication cannot be copied into a new order and the accelerator arrow is inactive
in the upper right corner of a medication is active only if a clinical provider in your organization has previously prescribed a medication at least once, has manually entered the medication, or has entered a start date for the medication. Otherwise, the medication cannot be copied into a new order and the accelerator arrow is inactive ![]() .
.
Solution
Create a new prescription for the medication. Once prescribed, you can use the accelerator feature for subsequent prescriptions.
Note: Beginning November 16-18, 2022, you cannot accelerate medications that have only fill histories because:
- Fill histories contain unstructured Sigs.
- They cannot be used to auto calculate quantity.
- They may differ from the original Sig and may include undesired inclusions or omissions from the pharmacy.
- They may include deprecated quantity units.
This change was in response to customer requests that we limit this feature to medications with at least one prescribing event, or that have been manually entered or started.
When you create a medication order, you may see the estimated price that the patient can expect to pay at the pharmacy. This price is based on the patient's insurance information and preferred pharmacy. (This feature is sometimes called real-time benefit check or RTBC.)
The estimated price displayed in athenaOne may differ from the actual price that the patient pays at the pharmacy, based on additional factors determined by the patient's insurance. The prescription price is returned from the pharmacy benefit manager (PBM) and the preferred pharmacy selected on the order.
Note: athenaOne displays prices from PBMs, including Humana, UnitedHealthGroup/OptumRx, Abarca, MedImpact, Navitus, CVS Caremark, DST Pharmacy Solutions, Express Scripts, Gemini Health, and Prime Therapeutics. athenahealth continues to add more vendors to increase price availability and market coverage.
You may also see the cash price (without insurance) and the price at an alternate pharmacy (the alternate pharmacy can be mail order). athenaOne displays these prices when they are available from the pharmacy benefit manager or vendor.
To see the price that a patient can expect to pay for a medication before sending the order to the pharmacy:
- In the Exam stage of an encounter, locate the Assessment & Plan section.
Note: You can also create an order from an order group or from the Orders and Results section of the Intake stage of an encounter. - Click the plus icon
 next to Diagnoses & Orders.
 - Search for and select the medication.
Note: Real-time prescription price estimates are available for structured medication orders only (all Sig and Quantity fields must be filled in).
- Click the order to open it and expand the details.
Estimated pricing information appears at the bottom of the order.
Note: You may see a notification that the medication you are prescribing requires a prior authorization. You can create an electronic prior authorization request after you sign the order (see Electronic Prior Authorization (ePA) for Prescriptions). - Price estimate — Review the prescription cost with the patient.
- If more alternatives appears below the price estimate, you can click the link to display alternatives to the prescribed medication. (If no information is available, two dashes (--) appear in the column.)

- Medication — Shows the medication on order in gray and alternative medications in blue.
- Insurance — Shows the price the patient would pay with insurance.
- Cash — Shows the price the patient would pay without insurance.
Note: athenaOne displays a cash price only if it is available from the vendor or pharmacy benefit manager. - Alt. Pharmacy — Shows the price the patient would pay at an alternate or mail order pharmacy. Hover the cursor over a price to see the name of the alternate pharmacy and the medication quantity.
Note: The Alt. Pharmacy price can be for the same quantity ordered or for a maintenance supply of 3x the ordered quantity. - To change the medication and pharmacy on the order, click the price in the Alt. Pharmacy column.
- After you and the patient agree on the medication and the price, complete the order and sign it.
- To create an electronic prior authorization request for the order, see Electronic Prior Authorization (ePA) for Prescriptions.
For more information about coupons, see Medication Coupons.
When you create a medication order, you may see a coupon for the medication you are prescribing. You can review information about the coupon with the patient and print the coupon.
Note: The option to review and print medication coupons is also available when the patient checks out.
- In the Exam stage of an encounter, locate the Assessment & Plan section.
- Click the plus icon
 next to Diagnoses & Orders.
 - Search for and select the medication.
- Click the order to open it and expand the details.
- Scroll down to the Price estimate section.
Notifications for available coupons appear below the price estimates.
If a medication coupon is available, athenaOne verifies that the coupon has enough data to be actionable by the pharmacy and electronically sends the coupon with the prescription to the pharmacy. - If a medication coupon cannot be sent to the pharmacy directly, the provider can print the coupon from the order by clicking View and Print. If multiple coupons are available, they are included in a single printable PDF file.
Note: Other staff members can print the coupon for the patient during checkout. - After you and the patient agree on the medication and the price, complete the order and sign it.
- To create an electronic prior authorization request for the order, see Electronic Prior Authorization (ePA) for Prescriptions.
You can use a weight-based calculator tool to order medications. This tool can be used when prescribing for patients under a certain weight.
Note: For more information, see Weight-based dosing.
- In the Diagnosis and Order Details section of the Assessment & Plan section, click the Calculator icon
 .
.
The weight-based dosing calculator tool appears. - Dose — Enter the amount of mg/kg per day or dose.
- Weight — Enter the patient's weight in kg.
- Frequency — Select how often the patient should take the medication.
- Dosage unit — Select the dosage unit.
Based on the information in these fields, the total amount of medication per day or per dose appears at the bottom of the calculator.
If the value is not in the correct dosage range for the patient's weight, a warning also appears at the bottom. - Click Apply to sig to add the calculation to the medication order.
Note: The calculator resets once closed.
Note: For more information, see Weight-based dosing.
- In the Assessment / Plan section of a patient's encounter, click the plus icon
 next to Diagnoses & Orders.
 - Select a combination medication (for example, Bactrim 400 mg-80 mg tablet).
- Click the order name to expand the order details.
- Click the Calculator icon
 .
.
The weight-based dosing calculator tool appears. - Dose — Enter the mg/kg and select the component.
- Select Day or Dose to indicate whether the patient should receive the amount per day or per dose.
Note: This field defaults to Day. - Weight — Enter the patient's weight in kg.
The last recorded weight appears in gray text next to the Weight field. The date of the observation also appears. If you recorded the last weight today, the weight is also populated in kilograms (kg) in the calculator. - Frequency — Select the frequency with which the patient should take the medication.
- Dosage unit — Select the dosage unit.
Selecting an option in this field triggers an auto-calculation of the sig. - Review the calculated sig and click Apply to sig.
Note: Dosage range checking is applied to the calculated sig. Any dosage range warnings appear in the calculator for you to review before applying the sig to the order details.
The newly calculated sig is now applied to the medication order details.
Note: For combination medications, the sig unit is restricted to the dosage form of the medication. For example, for the Bactrim 400 mg-80 mg tablet, "tablet" is the only available sig unit.
As with lab and imaging orders, you can first search for a clinical provider for a consult/referral order and then select an order provided by the selected clinical provider.
- In the Exam stage of an encounter, locate the Assessment & Plan section.
Note: You can also create a consult/referral order from an order group. - Click the plus icon
 next to Diagnoses & Orders.
 - If a clinical provider (for a lab, imaging, or consult provider) is not already selected for the patient, click Search options.

Note: If a clinical provider is already selected for the patient but you want to select a different clinical provider, click the name of the facility or provider to change it.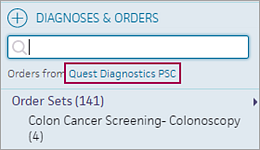
- In the Search Options window, scroll down to Consult Orders (or Referral Orders).
Note: To search the global consult compendium, do not select a consult provider before you click Global Orders List. - To select an order from a specific clinical provider, click Selected Provider.
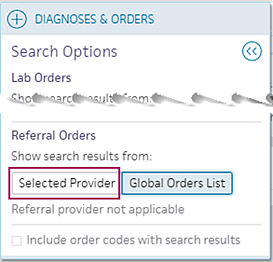
-
Click SEARCH to find a consult/referral provider.
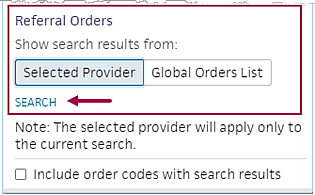
- Select a consult/referral provider.
The name appears under "Show search results from".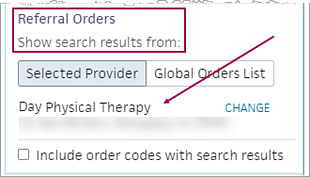
- To select a different provider, click CHANGE.
Note: athenaOne clears the selected provider and reverts the selected button to Global Orders List when you select a consult order in the DIAGNOSES & ORDERS list or when you navigate to a different encounter or patient. - Click the back icon
 .
.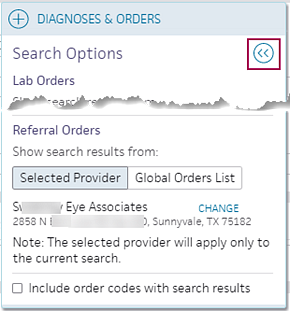
The consult/referral orders offered by the selected provider or receiving facility appear below the provider's name.
Note: To display the facility's electronic order codes, select the Include order codes with search results option. - Search for and select the consult/referral order for the selected clinical provider.
Note: The consult order appears with any receiver-specific order codes and customized AOE questions only when you submit the order by athenaFax or on paper. - To add chart attachments to the consult/referral order, click the add attachments icon
 and select the documents to attach to the order in the selection window.
For information about the documents you can attach to a consult/referral order, see Chart attachments for consult orders. The maximum number of attachments supported on an order is 200.
Facilities that receive consult orders from the athenahealth network of healthcare providers can:
- Customize the consults that providers can order, including the name of the consult order and any facility-specific order codes to associate with the order. (This feature applies only to orders that your facility offers.)
- Configure Ask at Order Entry (AOE) questions that appear and the order in which they appear.
Important: The consult order must be submitted to your facility by athenaFax or on paper.
To update your compendium of consult orders, create a support case from athenaOne > Support > Success Community > Contact Client Support Center and provide one of the following pieces of information about the clinical provider, or facility, that will receive referrals:
- Provider ID number
- Full name, address, phone, and fax number
With this information, athenahealth can identify where to load the compendium.
You can use the Authorization and Insurance Referrals section of an order to attach prior authorization and insurance information to the following order types:
- Consult
- Imaging
- Procedure
- Surgery
The Authorization and Insurance Referrals section appears when you create the order during an encounter (Intake stage and Exam A/P section) or as an order group. You can also add and edit this information in the document view of the order.
Note: If your organization uses the athenaOne® Authorization Management service, athenahealth completes the authorization (see Authorization Tracker). Therefore, you need to enter only the place of service and the date of service (for consult orders, you also enter the number of requested visits).
- In the Exam stage of an encounter, locate the Assessment & Plan section.
Note: You can also create an order from an order group or from the Orders and Results section of the Intake stage of an encounter. - Add a consult, imaging, procedure, or surgery order, then scroll down to the Authorization and Insurance Referrals section.
Note: The following figure shows a consult order.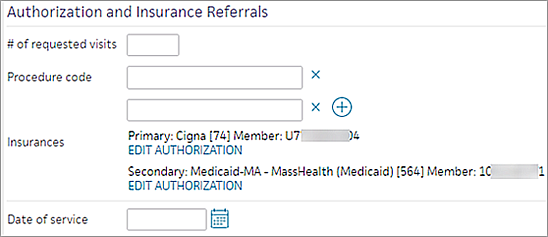
- Place of service — If you are creating a procedure or surgery order, select the type of facility where the procedure or surgery will be performed.
Note: If you use an order set that specifies the place of service, that POS appears in the field (you can edit the place of service). - # of requested visits — If you are creating a consult order, enter the number of visits that the patient should have with the provider.
Note: If you use an order set that specifies the number of visits, that number appears in the field (you can edit the number). - Procedure code — Enter the CPT codes for the consult, imaging, procedure, or surgery order. Start typing a keyword or code to view a list of matching codes and descriptions sorted by the code number. You can add as many CPT codes as needed.
athenaOne validates the CPT codes you enter. If a code is invalid, you receive a message. You must fix the error before you can sign or change the status of the order.
Insurance information
Note: If you completed the prior authorization, you can enter the information in the order now. If you have not yet completed the prior authorization, you can add the authorization information later in the document view of the order.
- Insurances — This field displays the patient's insurance policies as documented on the Quickview. To add authorization details for an insurance policy, click EDIT AUTHORIZATION.
Note: If you see the option to ADD ANOTHER INSURANCE, you can click it to select a different insurance policy for the patient. - Authorization is — Click Not required, Approved, or Denied.
- Authorization # — Enter the authorization number.
- Effective dates — Select the date range during which the authorization is valid.
- Additional information — You can enter any additional information about the order or the prior authorization if you choose.
Note: If you change the insurance policy after you enter authorization information for it, any information you entered in these fields is cleared.
- Select a date for the consult, imaging, procedure, or surgery order. The field name depends on the type of order:
- Date of service for a consult order
- Date of imaging for an imaging order
- Date of procedure for a procedure order
- Date of surgery for a surgery order
Important: You can copy prior authorization information from the order to the Quickview only once. If you change the authorization information after you select and save the Add auth to Quickview one time option, you must make the change on both the order and on the authorization in the Quickview.
- Open the order in document view.
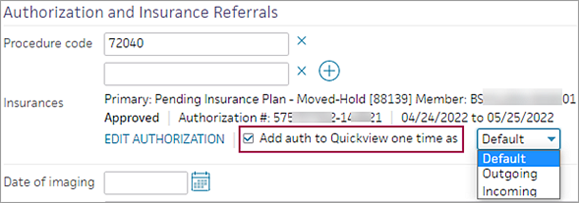
- Add auth to Quickview one time as — Select this option to copy the prior authorization information from this order to the Quickview, then specify the type of authorization to create from the order:
- Default — The authorization type depends on the provider. When the clinical provider is outside your practice, athenaOne creates an outgoing authorization. When the clinical provider is in your practice, athenaOne creates an incoming authorization.
- Outgoing — The authorization is always outgoing, regardless of which practice the clinical provider works in.
- Incoming — The authorization is always incoming, regardless of which practice the clinical provider works in.
- Save the order.
athenaOne creates an authorization on the patient's Quickview that contains the information you entered on the order. You can attach this authorization to upcoming appointments or claims. - You can see the newly created authorization in the patient's Quickview by clicking the view in quickview link in the document view.

Note: From the Quickview, you can click a link to the order.
When you administer a vaccine during an encounter, you must select at least one vaccine information statement (VIS) to give to the patient before you can administer the vaccine. Each vaccine information statement given to a patient is sent to the state vaccine registry and is recorded in the athenaOne patient chart.
Vaccine information statements are documents produced by the CDC that explain the benefits and risks of a vaccine. Federal law requires that the person who administers the vaccine provide a VIS to adult vaccine recipients and to the parents or legal representatives of vaccine recipients who are minors.
Note: For more information about VISs, see the CDC Vaccine Information Statements (VISs) site.
athenaOne supports English and Spanish versions of vaccine information statements. The English version of the VIS is selected by default. The Spanish version is selected if Spanish is recorded as the patient's preferred language in the Quickview (not all VISs have a Spanish version).
Note: The CDC uses a third party to provide translations of vaccine information statements; not all VISs have up-to-date translations. For this reason, the CDC recommends that the current English version of the VIS be distributed at the same time as the translation.
- In the Exam stage of the patient encounter, click A/P in the navigation bar.
- You can enter an assessment in the assessment note field. When you begin to enter text, the star icon
 icon appears at the right. You can click the star icon to save your text as a macro for future use.
Note: Macros created in this field cannot exceed 4000 characters. - Click the plus icon
 next to Diagnoses & Orders.
The diagnoses and orders you select are added to the D&O cart. - Search for and select the vaccine.
- Click the new vaccine order to open the form and expand the details.
- Click Administer if the vaccine is to be administered during the encounter.
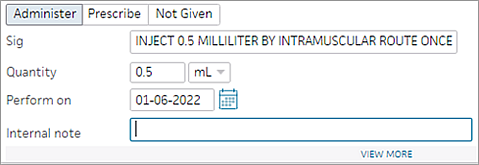
Note: athenaOne automatically displays the NDC number in the NDC field when you administer a vaccine (you can change the displayed number, if needed).
Click Prescribe to create an order for the vaccine to be sent to a receiver.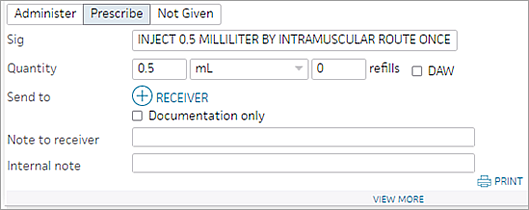
- To display the Details section, click view more.
Details section
You can scan the vaccine barcode to populate the NDC, Lot #, Manufacturer, and Expiry fields in the order (see Scan Vaccine Barcodes for more information).
- NDC — athenaOne automatically displays the NDC number in the NDC field when you administer a vaccine (you can change the displayed number, if needed).
- Lot # — Enter the lot number of the vaccine.
- Manufacturer — Select the name of the vaccine manufacturer from the menu. To select a manufacturer that is not in the list, select Other (not listed).
- Expiry — Enter the vaccine expiration date.
- Site — Select the site where the vaccine was administered, for example, Arm, Left Upper; Oral; or Thigh, Right.
- Route — Select the route (how the vaccine was administered), for example, Buccal, Subcutaneous, or Intramuscular.
Note: Certain vaccines were previously mapped to the route Injection, but regulatory requirements now require more specific information. You must specify the route as Intramuscular (the default value) or Subcutaneous.
VIS section
The VIS section displays links to any CDC vaccine information statements (VISs). You must select at least one vaccine information statement (VIS) to give to the patient before you can administer the vaccine. You can scan the VIS barcode to verify that you're providing the correct VIS (that is, the VIS matches the vaccine administered and is the current version of the statement) and to send barcode meta data with vaccine information to immunization registries. (See To scan a vaccine information statement (VIS).)
- Select the CDC vaccine information statements (VISs) that you are giving the patient. You can also click the links to display a VIS and print it for the patient.
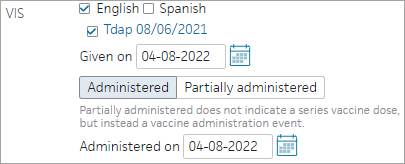
Note: Until you select a VIS, the Given on field is unavailable (grayed out). - Given on — This field defaults to today's date, but you can enter a different date that you gave the VIS to the patient.
- After the required fields are complete, you can click the Administered or Partially administered button.
- Click the Administered button after you administer the vaccine. The date and time appear to the right of the field.
- Click the Partially administered button if you were unable to administer the full intended dose of the vaccine.
Important: Partial administration of a vaccine does not apply to vaccines that require multiple doses. Partial administration of a vaccine refers only to cases where the full, intended dose of a vaccine is not successfully administered (see Partially administered vaccines).
- When you click the Administered or Partially administered button, the Administered on field appears with today's date displayed. If you are documenting a vaccine that was administered on an earlier date, replace today's date with the administration date.
- Complete other fields in the vaccine order.
Note: If the patient declines the vaccine or if the vaccine cannot be administered for another reason, click Not Given, specify the Not Given Reason and the Not Given Date, and sign the order as usual (see To record that a vaccine was not given).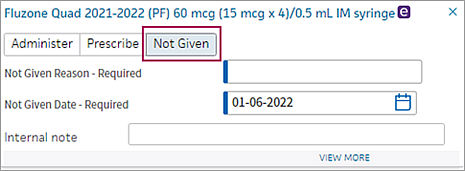
athenaOne automatically closes the declined vaccine order.
For more information about documenting vaccines that are not administered, see Declined (not given) vaccines.
- In the Exam stage of the patient encounter, click A/P in the navigation bar.
- Click the plus icon
 next to Diagnoses & Orders.
 - Search for and select the vaccine.
- Click the new vaccine order to open the form and expand the details.
- Click the Not Given tab.

- Not Given Reason - Required — Select the reason that the vaccine is not being administered.
Reasons are categorized as PATIENT DECLINED or PROVIDER DEFERRED.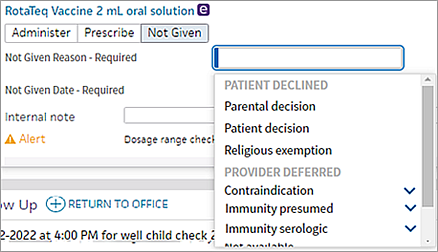
Note: You can also start typing the reason in the Not Given Reason - Required field and select the reason from the matching list. - If you select one of the reasons under the PROVIDER DEFERRED heading — for example, Contraindication, Immunity serologic, or Reaction — a list of more specific reasons opens. Select the specific reason from the list.
- If you select a contraindication reason under the PROVIDER DEFERRED heading, such as Contraindication > Allergy - eggs, two optional fields appear.
- Contraindication Effective Date — Enter the effective date, if you know it.
- Contraindication Expiration Date — Enter the expiration date, if you know it.
- Not Given Date - Required — This field displays today's date by default, but you can enter an earlier date.
Note: You cannot enter a future date in this field. - Internal note — You can enter a note in this field, if you choose.
- Sign the order.
athenaOne automatically closes the order for the vaccine that was not administered.
Note: Before you sign the order, you can also indicate that a vaccine was not given in the document view of the vaccine order by selecting the Not Given option and then selecting the reason and the date.
Note: You can also scan a vaccine barcode in the document view of the order for vaccines that were ordered earlier in the encounter or in a different encounter.
- In the Exam stage of the patient encounter, click A/P in the navigation bar.
- Click the plus icon
 next to Diagnoses & Orders.
 - Search for and select the vaccine.
- Click the new vaccine order to expand the details.
- Click the Administer tab and then click VIEW MORE at the bottom of the order details.
- Click Scan Barcode.
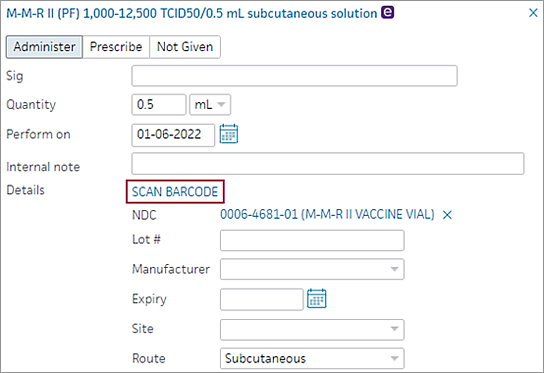
- When you see the message "Ready to Scan," scan the barcode on the vaccine vial with your hand-help scanner.
The NDC, Lot #, Manufacturer, and Expiry fields are populated automatically (if the corresponding data is available). You can edit these fields if necessary.
Note: If you scan a new barcode, the NDC, Lot #, Manufacturer, and Expiry fields are overwritten. - Review the information that appears in the Lot #, Manufacturer, and Exp Date fields.
Note: You receive an error message if you:
- Scan a vaccine that does not match the order
- Scan the wrong barcode type
- Scan an expired vaccine
- Overwrite existing data
You can scan the VIS barcode to verify that you're providing the correct VIS (that is, the VIS matches the vaccine administered and is the current version of the statement) and to send barcode meta data with vaccine information to immunization registries.
- In the Exam stage of the patient encounter, click A/P in the navigation bar.
- Click the plus icon
 next to Diagnoses & Orders.
 - Search for and select the vaccine.
- Click the new vaccine order to expand the details.
- In the VIS section, click SCAN BARCODE.
- When the application indicates that it’s ready, scan the 2D barcode in the VIS. The barcode typically appears in the footer of the last page in the statement.

If the VIS scanned matches the vaccine administered and is current:- The VIS document box appears checked.
- A “scanned” indicator appears to the right of the statement name.
- The Given on date automatically updates to reflect the current date.

- Repeat for each statement given to the patient.
Each scanned document is cross-checked against the order. You are alerted if the statement is not the latest version or does not match the vaccine given.

-
Barcode Mismatch: If a Barcode Mismatch occurs, verify that the document scanned is for the correct vaccine. Close the error message and scan the barcode for the VIS that matches the vaccine to correct.
-
Outdated VIS: Visit https://www.cdc.gov/vaccines/hcp/vis/current-vis.html to download the latest VISs. Close the error message and scan the barcode for the latest version of the VIS. Provide the updated VIS to the patient.
If the error message cannot be resolved, manually select the VIS given to the patient.
- In the Exam stage of the patient encounter, click A/P in the Exam stage navigation bar.
- Click the plus icon
 next to Diagnoses & Orders.
 - The diagnosis and relevant care instructions appear.
Note: If care instructions do not appear automatically, enter the name of the care instructions or select the instructions if they appear in the list of Educational Information. - If you want to add the diagnosis to the patient's problem list, select the diagnosis and click the add-to arrow
 .
. - Order Entry — Search for and select orders. If given a verbal order, a nurse can search for and select orders.
Tip: To order referrals, search for "referrals" and include summaries of care. You can search for "after your visit" to locate patient education orders.
Note: Some order types may require a diagnosis. - Click VIEW MORE.
- Click Additional Patient Education Information.
A list of topics appears in a new tab. - Hover over a topic to see the beginning of the overview.
- Click English or Spanish to open a topic.
- Discuss the educational information with the patient.
- Check the Discussed with patient box to document that you provided patient education and to satisfy quality measures.
- Click Print.
- Select the athenaOne tab to return to the A/P Section.
- Click Sign Orders.
- In the Exam stage of the patient encounter, click A/P in the navigation bar.
- Click the plus icon
 next to Diagnoses & Orders.
Diagnoses and orders you select are added to the D&O cart. - Search for and select the patient information handout.
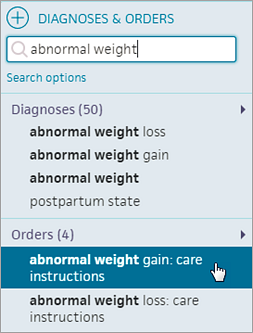
- Click outside the selector to close it.
- Click the patient information order to display the details and click View Handout to open the handout.
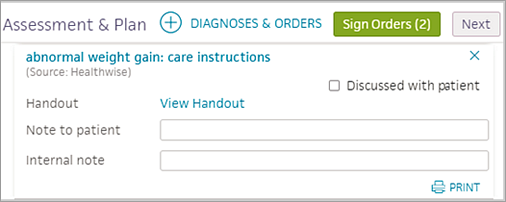
- To print the handout, click the Print button. Click Back to return the A/P section.
- Click Sign Orders.
After you sign a patient information order, the order moves to Close status.
Note: From the Patient tab of the Checkout stage, you can view information orders and whether they were already printed, and you can print the order from the Patient tab.
To support clinical quality reporting requirements, you can document in the Assessment & Plan section that you discussed a topic with the patient. All topics of discussion are backed by SNOMED codes.
- In the Exam stage of the patient encounter, click A/P in the navigation bar.
- Scroll down to the Discussion Notes section and click the plus icon
 next to TOPIC OF DISCUSSION.
The list of discussion topics appears. You can use the search bar to locate one of the topics. - Search for and select a topic to display it below the TOPIC OF DISCUSSION selector.
- If you attempt to discuss smoking cessation with a patient who declines to discuss the topic, you can select an option that indicates why the patient declined tobacco cessation intervention.
Note: Selecting an option may be required for the Preventive Care and Screening: Tobacco Use: Screening and Cessation Intervention clinical quality measure. - Smoking Cessation Education — not discussed, not indicated
- Smoking Cessation Education — not discussed, not tolerated
- Smoking Cessation Education — not discussed, patient refused
- Smoking Cessation Therapy — not discussed, not indicated
- Smoking Cessation Therapy — not discussed, not tolerated
- Smoking Cessation Therapy — not discussed, patient refused
- To delete a discussion topic, click the X next to the topic.

Note: The not indicated and not tolerated reasons are considered medical reasons for not providing tobacco cessation intervention and, therefore, satisfy quality reporting requirements. The patient refused reason is not considered a medical reason and does not satisfy reporting requirements.
You can record the reason why a patient declined an order in the Assessment / Plan section and in the document view of the order document. The patient would be excluded from the order if the order was declined. The reasons for declining an order support clinical quality measure (CQM) documentation and are backed by SNOMED codes.
You can mark the following types of orders as declined:
- Imaging
- Lab
- Patient information
- Prescription
- Referral (consult)
- Surgery
Orders marked as declined are listed in the encounter summary and full encounter summary, but do not appear in the Medications section or on the Patient Portal (the medications list for a patient represents only those medications that the patient accepted).
- In the Assessment & Plan section of the encounter, click the order name to display the order details.
- Click the DECLINE option at the top right of the order.

- In the pop-up menu, select the reason that the patient declined the order from the menu. The reasons available depend on the type of order (see Reasons for declining orders). The reason you select populates automatically in the Declined reason field.
Important: You must select a decline reason from the menu or you will not be able to sign the order. - If the patient decides, instead, to accept the order, click the RETURN option to complete the order before you sign it.
You can select the following reasons for declining an order, depending on the type of order the patient is declining.
The declined reasons menu for imaging orders includes these reasons:
- Contraindicated
- Not indicated
- Not tolerated
- Patient refused
- Treatment changed
The declined reasons menu for lab orders includes these reasons:
- Contraindicated
- Not indicated
- Not tolerated
- Patient refused
- Religious exemption
The declined reasons menu for Patient Information orders includes these reasons:
- Not indicated
- Not tolerated
- Patient refused
- Religious exemption
The declined reasons menu for prescription orders includes these reasons:
- Contraindicated
- Financial problem
- Medical complication
- Not available
- Not tolerated
- Patient refused
- Treatment changed
The declined reasons menu for referral/consult orders includes these reasons:
- Contraindicated
- Not indicated
- Not tolerated
- Patient refused
The declined reasons menu for surgery orders includes these reasons:
- Contraindicated
- Not indicated
- Not tolerated
- Patient refused
- Treatment changed
The declined reasons menu for vaccine orders includes these reasons:
- Contraindicated
- Financial problem
- Medical complication
- Not available
- Not indicated
- Not tolerated
- Parent refused
- Patient refused
- Religious exemption
- Treatment changed
Care goals with findings do not appear in the summary of patient care goals.
Note: You can use the Report Builder to report on patient goals recorded in the Assessment / Plan section. The Patient Goals report category appears in these report types: Clinicals, Clinicals - Encounters, and Clinicals - Encounter Activity.
- In the Patient Goals section of the Assessment & Plan, click the plus icon
 .
.
The Patient Goals window appears.
- Add Goal — Enter at least two characters to search for available goals, and then select the goal from the list.
Note: If you cannot find the goal you need, you can add it as an unstructured goal in the Other Goals field.
When you select a goal, options appear for the selected goal: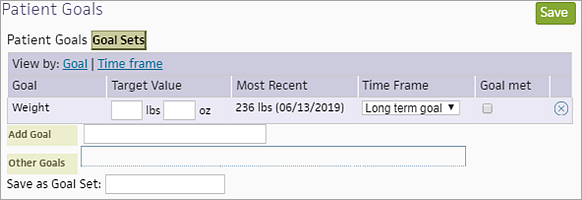
- Target Value — Select or enter the target value.
For goals with findings, this field displays all related findings and the option to [Manually enter a target] to enter another target value. - Most Recent — If the goal is based on a vital, lab analyte, social history question, or finding that has a value recorded for the patient in the encounter, lab results, flowsheet, or template, the most recent value appears with a link to the source document.
- Time Frame — Select a time frame for the goal.
Note: You can add the same goal multiple times with different time frames.
- Target Value — Select or enter the target value.
- Save as Goal Set — If you added more than one goal for this patient, you can save these goals as a goal set by entering a name for the goal set in this field.
The goal set is saved as a local goal set under your username in the Goal Sets list. - Click Save at the upper right.
Note: Patient care goal sets are administered using the Care Plan Goal Sets page.
- In the Patient Goals section of the Assessment & Plan, click the plus icon
 .
.
The Patient Goals window appear.
- Click the Goal Sets button.
A list of goal sets appears. You can select one of these goal sets and add other goals to it. - When you select a goal set from the list, the associated goals are displayed.
- You can delete a goal by clicking the X arrow
 to the right of the goal.
 - You can add other goals to the goal set for this patient by searching for a goal in the Add Goal field (enter at least two characters to search for available goals).
Note: If you cannot find the goal you need, you can add it as an unstructured goal in the Other Goals field. - Save as Goal Set — If you want to rename the goal set, enter the goal set name in this field.
The goal set is saved as a local goal set under your username in the Goal Sets list. - Click Save.
Goals now appear in the Patient Goals section summary with the exception of goals that you create from findings. To see findings goals, click Click to add/view findings goals.
If you modify a global goal set by adding or deleting goals, the goal set is saved as a local goal set under your username in the Goal Sets list.

When you begin to type in the Patient Instructions field or in the Discussion Notes field, the star icon ![]() icon appears at the right.
icon appears at the right.
You can create a text macro at the point of care in any macro-enabled field.
Tip: You can use the Encounter Plans page to add saved findings and text macros to an encounter plan.
- In a macro-enabled field, enter the text that you want to save as a text macro.
- Click the star
 icon.
icon.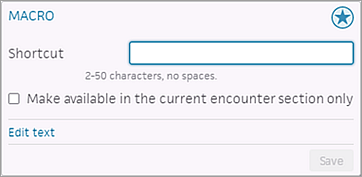
- Shortcut — Enter a name for the new macro (2-50 characters with no spaces). This name will appear in the list of macros available for use.
- Make available in the current section only — Select this option to limit the macro's availability to this encounter section.
- Click Edit text to review and edit the full text.
- Click Save.
When you add two or more lab orders to a diagnosis, you can edit multiple lab orders at once. The EDIT LABS (#) link is available in the A/P order details.
Tip: Add all required lab orders to the diagnosis before you click the EDIT LABS (#) link.
- After you add two or more lab orders to a diagnosis, hover the cursor over one of the orders or click an order to display the details.
The EDIT LABS (#) link appears. - Click EDIT LABS (#) to display and update fields in the lab orders (the number in parentheses indicates the number of lab orders).
-
By default, edits apply to all lab orders in the group. To edit some — but not all — of the lab orders, remove the checkmark for any labs that you do not want to change.

Note: To close the Edit Labs view without making changes, click CANCEL.
- Make the edits that you want to apply to multiple orders. For example, to send all the orders to the same receiver, click the plus icon
 and select a clinical provider.
Note: If you enter new text in the Note to lab field, that text overwrites any existing text in the Note to lab field in all selected lab orders. - Click Apply.
Your edits are applied to all the selected lab orders.
You can send special instructions to lab receivers to bill individual tests to the patient, the patient's insurance, or the practice. athenaOne sets the Billing type field based on patient information. However, when you create an order, you can override the default billing type.
This option is useful if a patient chooses to pay for a test, even if they have insurance, or if a practice has special arrangements with a lab receiver, as permitted by state law, and chooses to be billed directly for a test.
If Billing type appears for a lab order, these options appear:
- Insurance — Default option when a patient's record includes insurance and that insurance was used for today's encounter. When this option is selected, the lab should bill the patient's insurance, then bill the patient if insurance does not pay.
- Patient — Default option when a patient does not have insurance or the patient's insurance package is not used for today's encounter. The lab should bill the patient directly.
- Practice — The lab should bill the practice directly. athenaOne never defaults to billing the practice unless you contact athenahealth to change the default value.
If your practice would like to change the default value of the Billing type field to Practice or Patient, contact the CSC from athenaOne > Support > Success Community > Contact Client Support Center.
Note: Any lab orders created before you asked the CSC to change the default option for the Billing type field are not updated.
Note: The OB feature must be enabled for your department.
- In the Assessment & Plan section, click the add-to arrow
 .
.
The Problems option is automatically selected, and the diagnosis is added to the Problems section of the patient's chart. - To add the diagnosis to the OB episode, check the Pregnancy Problems box.
This action adds the diagnosis to the active OB episode on the patient chart. - Click outside the ADD TO box to save.
- In the Assessment & Plan section of the encounter, click the plus icon
 next to Diagnosis & Orders.
 - Add a diagnosis.
- Search for and select an order—medication, lab, imaging, surgery, or other type of order.
athenaOne adds the order to the Assessment & Plan. - Click the same order in the selector.
athenaOne adds a second order to the Assessment & Plan. The order count is listed to the left of the order name in the selector.
Note: Your practice must have the Cancer Case feature enabled to create and view cancer cases.
- In an encounter or new order group, locate the Assessment & Plan section.
- Search for and select the cancer diagnosis and ICD code.
athenaOne automatically creates a cancer case in the problem list. This message appears below the diagnosis: "Go to the problem list to view the cancer case." - To access cancer cases, click the Problems tab in the chart.
- Pause your cursor next to the Cancer cases heading

and click the view more icon to view the cancer case details.
 - Review the details and update if needed.
- Click Save.
- Click outside the Cancer Cases box to close it.
See also: Cancer Cases Feature.
When you create an order, you can indicate that you want the performing facility to send a copy of the results to a list of providers. The CC results field is available in the A/P order details for lab, imaging, procedure, consult, and other orders.
Note: athenaOne sends the names and fax numbers to the performing facility with the order so that the facility can send a copy of the results to the providers. athenahealth does not send the results on your behalf.
- In the Assessment & Plan section of the encounter, click the order name to display the order details.
- CC results — To request a copy of the test results for other providers, click
 .
. - In the Name or Fax field, start typing the recipient's name or fax number.
Matching names or fax numbers appear. - Select the recipient from the list.
The recipient's name, address, phone number, and fax number are displayed in the order. - To add additional recipients, click
 again.
 - To remove a recipient, click the X icon next to the recipient.
You can open order documents from within orders in the Assessment & Plan section, allowing you to take actions on the document itself, such as reassigning the order to another user for review or adding an action note to the order history.
Note: For information about the actions you can take on documents, see Document View.
In the order details in the Assessment & Plan section, you can click these links:
- View Document — in orders and in test results that contain patient-supplied results
- View Interpretation Document — in point of care tests that contain interpretation documents
- View Results Document — in point of care tests
Note: You can also locate order documents from the Clinical Inbox or by using the Find tab  in the patient chart.
- In the Exam stage of an encounter, locate the Assessment & Plan section.
Note: You can also access the Assessment & Plan section from an order group or from the Orders and Results section of the Intake stage of an encounter. - Click the order to expand it, and then click VIEW MORE to display links to documents.
Note: In some cases, you may see the View Document link instead of the VIEW MORE link. - Scroll down to the bottom of the order and click View Document, View Results Document, or View Interpretation Document.
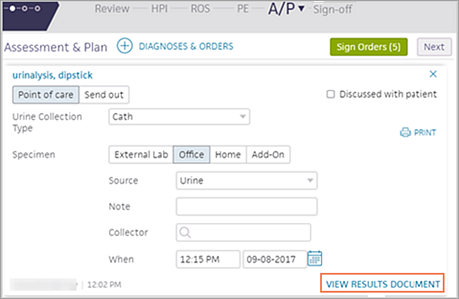
- After you edit the document, you can click the X icon to close the document and return to the order in the Assessment & Plan section.
- In the Exam stage of an encounter, locate the Assessment & Plan section.
Note: You can also access the Assessment & Plan section from an order group or from the Orders and Results section of the Intake stage of an encounter. - Click the order to expand it.
- Click REOPEN at the upper right.
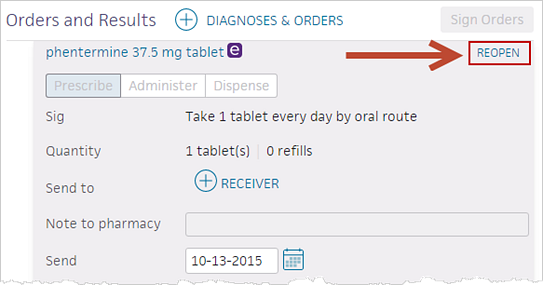
If there is a possibility that the order has already been submitted, administered, or dispensed, a warning appears that you may need to take additional action (for example contacting the intended recipient). You can either cancel or reopen the order.
You can update or delete the order. If you update it, you must sign it again, as you would a new order.
If you need to document an order in a patient chart that was not placed using athenaOne, you can use the Documentation only option. The Documentation only option indicates that athenaOne should not send the order. This option appears only for orders that would otherwise go through the submission workflow.
The Documentation only option should not be used as a replacement for signing and printing an order, or to enter prescriptions from another EHR. Providers should always use the patient's medication list to document medications.
Note: When the Documentation only option is selected for medications, it does not satisfy the numerator of the Electronic Prescribing (eRx) measure.
- In the Assessment & Plan step of an encounter, click the plus icon
 next to Diagnoses & Orders.
 - Search for and select a diagnosis.
- Click the order to expand the order details.
- Enter the order details in the fields provided.
- Below the Send to field, select the Documentation only option. This option prevents the order from being submitted.
Note: The Documentation only option appears only for orders that would otherwise go through the submission workflow. Select the Documentation only option only if this order was placed by a system outside athenaOne (such as a facilities RIS or LIS). - Sign the order.
athenaOne sets the order status to CLOSED with this action note: "Order Submitted — Documentation Only."
Enter the assessment in the text field at the top, and then click ![]() to add diagnoses. The search tool displays suggestions for order sets, diagnoses, and orders, based on your preferences and most frequently used options.
to add diagnoses. The search tool displays suggestions for order sets, diagnoses, and orders, based on your preferences and most frequently used options.
Note: If a selected diagnosis was included in the previous encounter, any assessment notes from that previous encounter are added to the current encounter.
You can enter a few letters to search and browse the supported content types displayed in the search box, including order sets, individual diagnoses, and individual orders. Select an item to add it to the Assessment & Plan.
Tip: You can use the Encounter Plans page to add saved findings and text macros to an encounter plan.
The athenahealth network is used to create a personalized list of ordering options for each provider. For all searches, the results returned are specific to the provider who is placing the order. For orders placed in the context of a diagnosis, the search functions the same way, based on the orders placed for that diagnosis. Additionally, orders are filtered based on patient age and gender.
Note: The order search logic works at the order type level, not at the order details level.
The search evaluates the following items — in order — to display "frequently used" recommendations. If no information is available for Level 1, the search evaluates the items in Level 2, and if no information is available for Level 1 or Level 2, the search evaluates the items in Level 3.
Level 1 — Provider level
Usage data from the ordering provider.
Level 2 — Practice level
Usage data from other providers in the same specialty at that practice.
Usage data from all providers at that practice.
Level 3 — Network level
Usage data from all athenahealth providers in that specialty.
Usage data from all athenahealth providers.
Note: Practice usage data is updated on a daily basis, and global usage data is updated on a weekly basis.
To see the Add new provider link, you must have the Clinicals Admin or Practice Set-Up: Referring Providers/ Numbers permission.
Note: There is no visual indicator next to providers who accept electronic prescriptions in the clinical provider selector. athenaOne sends prescriptions by interface when available.
- In the Send to field for orders, click the
 option to open the clinical provider selector.
 - Click the Add new provider link to create a new receiving practice, provider, facility, lab, or pharmacy.
When you search for an order in the Assessment / Plan section or using the Diagnoses & Orders cart, the following facilities are searched by default:
- The patient's preferred lab or imaging facility.
- The order route set up for a lab or imaging facility order type, if no preferred lab or facility is configured for the patient.
If no preferred lab, preferred facility, or order route is available, you can search for a facility to view and select orders from that facility, or you can view and select orders from the athenahealth global orders list.
Note: Special characters (such as asterisks or punctuation marks) are valid search terms in the Diagnoses & Orders cart. For example, when creating order sets, your practice might include an asterisk (*) prefix in the name to denote approved order sets. When you search by asterisk in the Diagnoses & Orders cart, you can narrow the results to only those order sets with the asterisk prefix.
- In the Diagnosis and Orders section, click the plus icon
 next to DIAGNOSES & ORDERS and use the search field.
 - If a preferred lab or imaging facility is configured for the patient, order information for those facilities is displayed by default (the facility names appear at the top of the search results).
Note: Only the orders offered by that facility, as well as that facility's name for the order, appear in the search results. - If no preferred lab or imaging facility is configured for the patient, the order information for the facility identified in the order route set up for a lab or imaging order type is displayed by default.
- If no preferred lab, preferred facility, or order route is available, the Set a preferred facility link appears at the top of the list. See "To search for an order (no preferred facilities or order routes configured)."
To search for orders in a different lab or imaging facility
- If you want to specify a different lab or imaging facility, click Edit preferences.
- Next to the selected facility name, click Change.
- Search for and select a facility.
Note: To view the facility's electronic order codes, click the Include order codes with search results option. - Click the back button to return to the search.
The orders available from the selected facility are displayed in the search list.
To search for orders in the athenaOne global orders list
- If you want to search for orders in the global orders list, click Edit preferences.
- Deselect the option to show orders from a preferred facility or provider.
- Click the back button to return to the search.
- In the Diagnosis and Orders section, click the plus icon
 next to DIAGNOSES & ORDERS and use the search field.
If no preferred lab, preferred facility, or order route is available, the Search options link appears at the top of the list.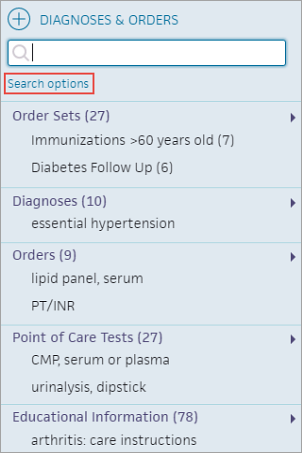
To search for orders in a specific lab or imaging facility
- If you want to add an order for a lab or imaging facility, click Search options.
The Search Options box opens. - In the Search Options box, click Selected Facility.
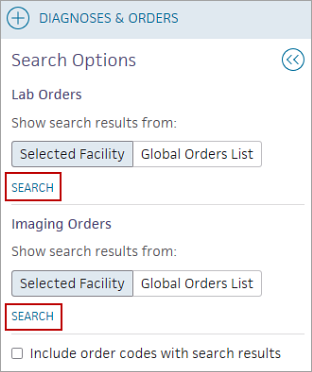
- Click Search.
The Select a clinical provider window opens. - Search for and select a facility.
The new facility appears in the Search Options box.
Note: To view the facility's electronic order codes, click the Include order codes with search results option. - Click the view less icon
 in the Search Options box to return to the search results.
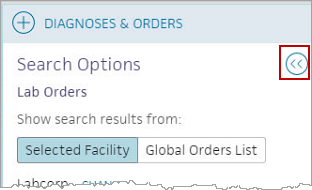
The orders available from the selected facility are displayed in the search list.
When you select an order, the Send to field displays a clinical provider according to the following hierarchy, in order. For example, if the order type is not associated with a patient-preferred clinical provider, athenaOne looks for an order route, and so on.
- Patient-preferred clinical provider (pharmacy, lab, or imaging facility), configured in the patient chart or in the Quickview.
- Clinical provider specified for the order type on the Order Routes page (order specified in Order type field is mapped to a clinical paper form and a default clinical provider).
- Clinical provider specified for the order type group on the Order Routes page (order specified in Order type field is not mapped to a clinical provider, but the Order type group that includes the order type is mapped to a clinical paper form and a default clinical provider).
- Clinical provider used in the most recently added order with the same order type for this patient.
- Clinical provider used in the most recently added order of the same order type group in this encounter.
If you select a specific facility, the default clinical provider is that facility.
When you create an electronic prescription, athenaOne may convert the medication unit and quantity to a First Databank (FDB) standard quantity. For example, if you select "1 bottle of 150" from the Quantity menu, athenaOne converts this value to the First Databank standard quantity of "150 tablets" when it sends the electronic prescription to the pharmacy.
The converted quantity appears in parentheses after the selected quantity at the point of order, in the order details view, and in the full encounter summary. In this way, you can see both the quantity that you selected and the quantity that appears in the electronic order sent to the pharmacy.
When ordering prescriptions in athenaOne:
- Use the Sig field to give instructions to the patient on how to take the medication.
The Sig field is intended to provide the patient with complete, unambiguous instructions for the use of the prescribed medication, including the correct dosing. - Use the Notes field to include information related to, but not part of, the prescription; do not include instructions to the patient in the Notes field.
The Notes field is intended for special instructions for the pharmacy staff for which no designated field is available. An appropriate use of the Notes field is for comments such as: "Please have the patient call the office when he has finished taking this prescription."
Best practices
Do not enter the drug name, strength, or quantity in the Notes field; instead use the defined fields in athenaOne for these items.
Important: If the drug name, strength, or quantity does not appear in the field where pharmacy personnel are trained to look for it, critical information may be missed.
The directions for use of the medication should not be split between the Sig and Notes fields. If you include directions for use in the Notes field, pharmacy staff may miss critical information that needs to be transmitted to the patient.
The information in the Sig field should not conflict with information in the Notes field. Conflicting information will require pharmacists to contact the prescribers to clarify their intent, thereby negating the efficiencies of e‑prescribing.
DME orders and the Sig field
Surescripts requires that the Sig field be populated. If the Sig field in an order for durable medical equipment (DME) does not contain data from previous orders or other sources, athenaOne automatically sets the field to "Use as directed" (athenaOne does not overwrite existing information). You can edit the Sig field, if needed.
Medications you order may display the following alerts:
- Dosage range checking
- Inactive ingredient drug warnings (confirmed conflict, potential conflict, or insufficient data), based on researched medication ingredient information from Epocrates or First Databank (FDB)
- Allergy interaction
Note: Allergy interaction and dosage range warnings also appear in the document view (including prescription renewals) and on the Order Sign-Off page for batch sign-off of prescriptions.
When you order a medication, you may see an informational notice related to the medication. To display the notice, hover your cursor over the information icon (i).
![]()
The icon and medication notification appear at the bottom of the order, under the Price estimate heading.
Note: These notices are for educational and information purposes only; they do not prevent a provider from prescribing any medication.
A medication informational notice is of one of these types:
- Quantity unit of measure notice — A quantity unit of measure notice may appear, for example, if the Quantity field is not consistent with the recommended quantity for the associated diagnosis. This discrepancy could result in a confirmation request from the pharmacy, delaying patient treatment and creating more work for practice staff.
- Medication awareness information notice — A medication awareness information notice lets you know about new scenarios that may reduce the pill or injection count for your patient. Higher dose products can be released months to years after the original medication is first approved. The medication awareness information notice brings these higher dose products to your attention.
- National Drug Code (NDC) update notice — An NDC update notice lets you know if you're prescribing a medication that will be discontinued. This type of notice also suggests a replacement medication, so that you can begin transitioning your patient to the new medication before the original medication is withdrawn from the market.
Note: You can still order the medication. The purpose of this notice is to let you know that the medication will be discontinued in the future, giving you and the patient time to prepare.
When you order a medication, athenaOne automatically performs weight-based dosage checks for patients one month or older, if the patient's weight was recently recorded. "Recently recorded" means:
- From one month old to less than 12 months old — A weight recorded within the past week.
- From one year to less than 18 years old — A weight recorded within the past month.
- 18 years of age or older — A weight recorded within the past year.
If the patient's weight was not recorded recently, the following message appears:
"Dosage Range Checking cannot be performed for this drug and patient without a patient weight."
To perform a weight-based dosage range check manually, using a weight not considered recent, use the calculator tool in the Assessment / Plan section.
You can access a real-time prescription drug monitoring report in athenaOne to review a patient's controlled substance prescription information. Prescription drug monitoring program (PDMP) reports are available in the patient chart and in the ordering workflow.
Note: You must be a clinical provider to view or download the PDMP report (see Providers who can access PDMP reports).
If a prescription drug monitoring report is available for a patient, clinical providers see a link to the report in the patient chart and in the ordering workflow. The link to the PDMP report appears in these locations:
- Medications tab in the patient chart
- Intake stage of the encounter
- Exam stage of the encounter (Assessment & Plan section)
- Diagnoses & Orders cart
For more information, see Prescription Drug Monitoring Program (PDMP) Reports.
Electronic Prescribing of Controlled Substances (EPCS) is a technology solution that helps address the problem of prescription drug abuse by removing paper prescriptions from the prescribing process. EPCS regulations permit pharmacies to receive, dispense, and archive these electronic prescriptions.
With the athenaClinicals EPCS enrollment feature, enrolled prescribers can send controlled substance prescription orders electronically. The EPCS feature also creates an electronic accountability trail to ensure that only authorized practitioners are prescribing controlled substances.
To comply with DEA requirements for electronically prescribing controlled substances, prescribers must complete an enrollment process, including verifying their identity and activating a two-factor authentication credential. Your practice designates a "trusted individual" and two "approvers" (one a prescriber, one a non-prescriber). Prescribers are then enrolled in EPCS.
For complete information about EPCS, see EPCS Enrollment. For instructions on sending controlled substance prescriptions, see To sign and send controlled substance prescriptions electronically.
Days supply field for prescription orders in Ohio and Nevada
If you practice in the state of Ohio or Nevada, new prescription orders for controlled substances and gabapentin include the Days supply field, which indicates the number of days for which a prescription should be dispensed.

Five refills limit for Schedule III and IV drugs
To comply with Drug Enforcement Administration regulations, athenaOne warns you that you are limited to five refills when prescribing Schedule III or Schedule IV drugs. Schedule III or IV prescriptions with an inappropriate number of refills are rejected by the pharmacy.
If you order a Schedule III or Schedule IV drug with more than five refills, the refills field turns red. The refill quantity is cleared when you click outside the field. If you place an order for a Schedule IV drug with more than five refills on a mobile device, the message, "Please enter valid refills" appears.
Assigning prescription tasks for controlled substances
You can create a task assignment override for the action "Controlled substance — Reroute via Paper." You can use this TAO to route all signed controlled substance tasks to a specific user in your practice for submission or printing. The task assignment override can be applied to both inbound renewal requests and outbound new prescription document classes (see Task Assignment Overrides).
For vaccine and medication orders, you can document the National Drug Code (NDC) in:
- Assessment and Plan during a patient exam
- Document view of the order for vaccines and medications that were ordered earlier in the encounter or in a different encounter
- Vaccines section of the patient chart at administration time
Note: You cannot add NDC information in the document view if the order was entered as a prescription.
For vaccines only, athenaOne automatically displays the NDC number in the NDC field when you administer a vaccine (you can change the displayed number, if needed). In addition, you can scan the vaccine barcode to populate the NDC, Lot #, Manufacturer, and Expiry fields in the order (see Scan Vaccine Barcodes for more information).
To add the NDC number to a medication or vaccine order, click the order to expand its details and then click the plus icon in the NDC field.
- If the ordering provider specified the NDC in the order, that NDC appears in the NDC field.
- If the ordering provider did not specify the NDC in the order, you can select one of the NDCs that appear for the vaccine or medication order, or you can search for a different NDC (with or without hyphens) and then select it from the list.
Important: When selecting NDC numbers, use the NDC on the vaccine or medication itself, not the NDC listed on the package.
The suggested NDCs that appear in the NDC field are based on a feed that athenahealth receives from First Databank, Inc., (FDB) and are determined by the type of vaccine or medication and the dispense form selected in the order.
For more information about patient risk adjustment and the Patient Risk dashboard, see
Providers and clinical staff can use the Patient Risk dashboard (accessible from the Problems tab of the patient chart) to review and capture diagnosis gaps.
The Patient Risk dashboard displays a patient's:
- Potential (or clinically verified) diagnoses, including diagnoses from the patient’s history, diagnoses suggested by members of the billing staff based on chart audits (if applicable), and diagnoses shared via third parties.
- Suspected (or clinically inferred) diagnoses shared via third parties.
The Patient Risk dashboard includes an overall risk score according to a patient's claim data in athenaOne. Each potential diagnosis includes information that supports where the suggestion originated from.
Providers can use the Patient Risk dashboard to identify potential risk-weighted diagnoses that have not been recorded in the current year and to view the overall risk of the patient and the potential gap RAF score. On the risk dashboard, providers can either accept the potential diagnosis to add it to the Assessment / Plan section or dismiss the potential diagnosis to remove it from the dashboard.
The risk dashboard supports rules and workflows to ensure proper documentation of buddy codes. Buddy codes are secondary billing codes that are required for certain ICD-10 codes to fully justify the associated HCC.
For more details on addressing and dismissing diagnosis gaps during an encounter, see User Guide — Patient Risk Adjustment and the Diagnosis Gaps Dashboard.
Practices often need to send forms, orders, results, and other chart documents when sending an order to a facility.
You can add chart attachments to orders and select documents within the patient chart. You can attachments to several order types, including:
- Consult (referral) orders
- Imaging and lab orders
- Procedure orders
- Surgery orders
Note: You cannot add attachments to durable medical equipment (DME), medication, and vaccine orders.
Upon submission of an order, athenaOne sends a consolidated fax including the order and chart attachments to the receiving provider.
Note: Your staff can view, but not add, chart attachments from the Checkout page.
Documents tied to an encounter
The following document types are not available as individual attachment options after they are tied to an encounter. These document types can be attached to a an order only in conjunction with the encounter that they are associated with.
- Encounter Document – Image Documentation
- Encounter Document – Procedure Documentation
- Encounter Document – Progress Note
- Encounter Document – Health History Questionnaire
If a recipient can't receive attachments
Some facilities may be unable to accept attachments with orders sent by interface. If you add a recipient that can't currently receive attachments, a warning message appears in the order document:

In these cases, you could instead send the attached documents via fax.
If you send an order to a facility that can't receive attachments, athenaOne notes, in the audit history of the document task, that the attachments were not sent with the order:

- In the Assessment / Plan section of the encounter, create an order.
- In the order, click the add attachments icon
 .
.
The attachment selection window appears. - In the attachment selection window, select the documents to attach to the order.
- To select documents in a specific date range, select an option from the Date Range menu, or enter dates in the Start date and End date menus.
- To view a document before selecting it, click the view link to the right of the document name. To close the document, click outside the view box.
- To delete a document that was added in error, hover the cursor over the document in the Selected Attachments list; the delete icon
 appears. Click the icon to remove the document from the Selected Attachments list.
 - After you attach all documents to the order, click Save.
The attached documents are listed in the order and are included when you print or send the order.
Note: If you add a recipient that can't currently receive attachments, a warning message appears in the order document:
In these cases, you could instead send the attached documents via fax.
The selected documents are listed under Selected Attachments on the right side of the attachment selection window.
The maximum number of attachments supported on an order is 200.
With the Medical Necessity Utilization Check feature enabled, athenaOne automatically alerts you when Medicare may not pay for the lab test or procedure that you ordered. With this feature, you can print and present an Advanced Beneficiary Notice to notify your patient in advance that Medicare is unlikely to cover a lab order, and therefore, that the patient will incur out-of-pocket costs for the lab test or procedure. athenaOne performs both a procedure utilization check and a medical necessity check for lab orders for your Medicare patients.
If you place a lab order and the combination of diagnosis (ICD) code and order type fails the procedure utilization check for the patient, a note appears explaining why Medicare may not pay for the procedure.
In the note, click one of the ABN links to print an Advanced Beneficiary Notice (ABN) form in either English or Spanish for the patient to review and sign. The form notifies the patient that Medicare is unlikely to cover the service, so the patient can acknowledge this information before the service is performed.
You can also select a different diagnosis and order combination to run the medical necessity check again.
If you place a lab order, and the combination of diagnosis (ICD) and order (CPT) codes fails the medical necessity check, a note appears with the option to click one of the ABN links to print an Advanced Beneficiary Notice (ABN) form in English or Spanish for the patient to review and sign. The form notifies the patient that Medicare is unlikely to cover the service, so the patient can acknowledge this information before the service is performed.
If you place a lab order, and the combination of diagnosis (ICD) and order (CPT) codes passes the procedure utilization check for the patient but fails the medical necessity check, a note appears, offering two options:
- Click one of the ABN links to print an Advanced Beneficiary Notice (ABN) form in either English or Spanish for the patient to review and sign. The form notifies the patient that Medicare is unlikely to cover the service, so the patient can acknowledge this information before the service is performed.
- Change the diagnosis to one that passes medical necessity for the selected order:
- Click the linked ICD code to see a list of all ICD codes that pass medical necessity checking for the order's CPT code.
- Click select to update your order with that ICD code.
Some states require a supervising provider to be indicated on prescriptions submitted by midlevel providers, such as nurse practitioners and physician assistants.
To comply with these state regulations, authorized providers can select a supervising provider in the Assessment / Plan section.
The Clinicals: Requires Encounter Supervising Provider permission should be granted to midlevel providers who require a supervising provider on prescriptions, or who cannot prescribe and need to specify a supervising provider as the prescriber on their prescription orders.
The Supervising Provider menu appears in encounters and order groups when the rendering provider has the Clinicals: Requires Encounter Supervising Provider permission.
Note: This field has no relation to the Default supervising provider field configured on the Providers page.
- Locate the Assessment / Plan section in the encounter.
- Supervising Provider — Select the supervising provider from the menu.

Note: By default, the menu displays the last supervising provider that you selected. - Create and sign the order.
The supervising provider is included in the order and attached to this encounter.
To change the supervising provider for an individual order (independently of the other orders in the encounter), you can select the supervising provider in the task/document view.
Note: The order task must be in REVIEW status.
In the task view, for providers with the Clinicals: Requires Supervising Provider permission, but without the Clinicals: Order/Prescription Sign-off permission, the Prescriber field defaults to the supervising provider selected in the encounter. Use the Prescriber menu to select the desired supervising provider.
Important: The Clinicals: Order/Prescription Sign-off permission allows users to sign and submit medication prescriptions to pharmacies. The person at your practice who grants this permission is responsible for verifying that the users assigned this permission are authorized to prescribe medications in your state.
(missing or bad snippet)If a provider with the permission Clinicals: Requires Encounter Supervising Provider is selected as the Prescriber in the document view, a Supervising Prescriber menu appears, so that you can select the appropriate supervising provider.
When an athenaClinicals provider sends an order to an athenaCoordinator receiver who also uses athenaClinicals, athenaOne electronically transmits the order and appointment request to the receiver. The sending athenaClinicals provider can also choose to send a summary of care record to the athenaCoordinator receiver.
The appointment request appears in the Clinical Inbox of the receiving practice and includes the original order and any chart attachments selected by the sender as a .pdf document.
If you use an athenahealth Marketplace clinical decision support (CDS) solution, the CDS solution can be integrated into athenaOne to send relevant clinical guidance for orders in the Assessment / Plan section of the encounter. To turn on or turn off a subscription for any CDS vendor, your practice can submit a case to athenahealth to update your CDS vendor subscriptions: On the Main Menu, click Support > Success Community > Contact Client Support Center.
With this integration in place, athenaOne consults the CDS vendor as you add or modify orders within the Assessment / Plan section of the encounter. Relevant guidance appears in the clinical decision support pane on the right side of the A&P section. To follow the guidance, click the action button within the notification card.

For details on how integrated CDS solutions display relevant clinical guidance within athenaOne, see User Guide — Clinical Decision Support (CDS) Hooks Integration.
For information about CDS vendors that can work with athenaOne, please visit the athenahealth Marketplace and search for "clinical decision support."