 Problems Section
This section lists the patient's active and historical problems.
- In the patient chart, click the Problems tab on the left side of the page.
- Click a problem name to view it and add an onset date and notes.
- Click the flowsheet icon
 to view the flowsheet and related diagnosis notes.
 - Click HISTORICAL to view historical problems. You can toggle between HISTORICAL and ACTIVE.
- In the patient chart, click the Problems tab on the left side of the page.
- Click the plus icon
 .
. - Begin typing the problem into the search field and select the problem from the search results.
- If you select a problem with refine > next to it, it is too general, and you are guided to select additional modifiers to get to a more specific problem. Once you have selected a specific problem, the problem name, all mapped ICD-10 codes, and the RAF score (if applicable) display at the bottom of the search window.
- Click Next to continue.
- Status — Select Active or Historical to add this problem to the current list or to the Historical Problems list.
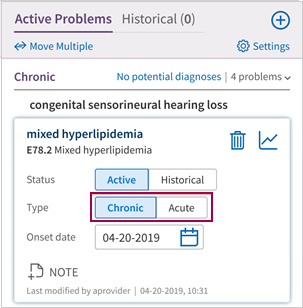
- Type — Select Acute or Chronic.
- Laterality — Select the laterality: Left, Right, or Bilateral.
This field appears only when you select a procedure that requires laterality. - Onset date — The default value is today's date, but you can edit the onset date.
- Last occurrence — Select the last occurrence date.
Note: This field appears for historical problems only. - Removal reason — Enter the reason the problem can be removed from the patient chart.
Note: This field appears for historical problems only. - To add a note about the problem, click the note icon
 , then enter the note.
 - Click Add.
- In the patient chart, click the Problems tab.
- Click the problem you want to move.
- Click Historical.
- Last occurrence — Today's date appears by default, but you can enter a different date in this field.
The date must be between the onset date and today's date. - Removal reason — Enter the reason for stopping the problem.
Note: If you are deleting a problem that was added in error, select the Delete (added in error) option.
The problem is moved to the Historical Problems list.
- In the patient chart, click the Problems tab on the left side of the page.
- Review and familiarize yourself with the patient's current problem list.
- Click the name of the problem that you want to stop or delete.
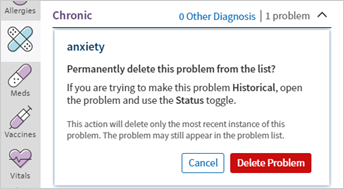
- Click the delete icon
 .
. - Click Delete Problem.
Tip: Administrators can set this preference at the practice level so the same preference is applied to all users. See To update practice-wide user preferences.
- Display the User Preferences page: On the Main Menu, click Settings
 > User Preferences.
 - Select the Automatically accelerate A&P diagnoses to Problem List option.
- Click Submit.
The Care Episodes & Tracking section of the Problems tab provides access to the cardiovascular risk and pap smear flowsheets (if you used the pap smear flowsheet in the Classic version of athenaClinicals). If your practice uses the Physical Therapy episode feature, these episodes are also available in the Care Episodes & Tracking section of the Problems tab.
- In the patient chart, click the Problems tab, and then scroll down to the Care Episodes & Tracking section.
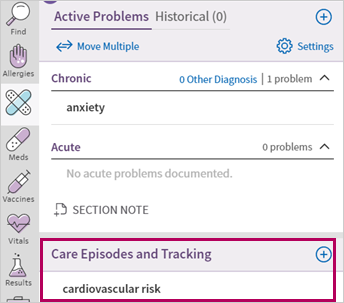
Open episodes are listed under the Care Episodes & Tracking heading. - To view and edit an existing care episode, click the flowsheet icon
 to open the flowsheet.
- Review the available header fields (for example, Smoking Status) and add any relevant information. If information already appears in the field, you can hover over it and click the header section to expand it and edit values.
- The Table view contains a list of relevant measures and analytes. Click a date to update or edit the values.
Note: You cannot edit values that were entered during an encounter. - To add a care episode, click the plus icon
 and select cardiovascular risk.
athenaOne adds the flowsheet to the Care Episodes & Tracking section.
Note: If the pap smear or physical therapy option appears when you click the plus icon , you can add these items to the Care Episodes & Tracking section.
- In the patient chart, click the Problems tab on the left side of the page.
- Click the problem that you want to add to the Pregnancy Problem List section to display the details.
- Select the Add to pregnancy problem list option.
The problem is now listed in the Problems section and the Pregnancy Problems section of the Problems tab, as well as in the Pregnancy Problem List section of the OB episode.
Updates to the problem are applied to all lists automatically.
Note: You can check the box in the Hide column of the Pregnancy Problem List section of the OB episode to hide the problem on the Pregnancy Problem List.
- Open the OB episode.
- Check the box in the Add to Patient Problem List column and click Save.
"Added" now appears in the Add to Patient Problem List column. The problem appears in the Pregnancy Problems section of the patient chart and is automatically synchronized with the OB episode.
In the patient chart, click the Problems tab on the left side of the page. The Patient Risk score or x Diagnosis Gaps appears at the top of the list. Click this link to view the Diagnosis Gaps dashboard.
Tip: Administrators can set this preference at the practice level so the same preference is applied to all users. See To update practice-wide user preferences.
- Display the User Preferences page: On the Main Menu, click Settings
 > User Preferences.
 - Select the Show patient risk score instead of potential diagnosis count in Problem List option.
- Click Submit.
By default, ICD‑10 codes are displayed in the Problems list.
- In the patient chart, click the Problems tab on the left side of the page.
- Click
 Settings and select Hide ICD‑10 Codes.
athenaOne displays the ICD‑10 codes associated with each diagnosis from the most recent closed encounter or signed order group. To see all ICD‑10 codes that providers in your practice have selected for a problem in the patient chart — not only the codes from the most recent encounter or order group — open the problem flowsheet.
- In the patient chart, click the Problems tab on the left side of the page.
- Click the flowsheet icon
 next to a problem to view the flowsheet and related diagnosis notes.
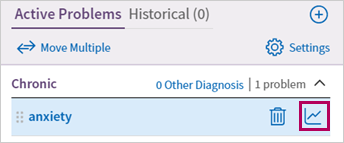
- On the flowsheet, click Diagnosis History (X Visits) (X stands for the number of visits for this problem).
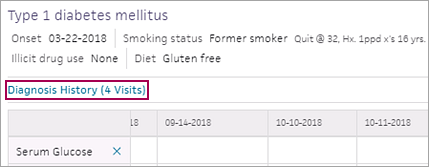
The three most recent visits appear with any ICD‑10 codes selected for the visits.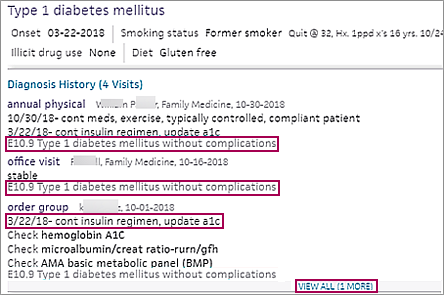
- If more than three visits are available on the flowsheet, click View all (x More) to display the earlier visits.
By default, the Problems list is organized in clinical categories that are tailored to your specialty, and the categories are sorted by relevance to your specialty.
- In the patient chart, click the Problems tab.
- In the upper right of the Problems list, click
 Settings
 -
Select Clinical Categories, Chronic/Acute, or No Groups.
If the Problems list is organized by Chronic/Acute, you can change the type or drag and drop a problem to move it.
- In the patient chart, click the Problems tab.
- Use one of the following methods to move the problem:
- Click the problem you want to move and click the category you want to move it to (Chronic or Acute).
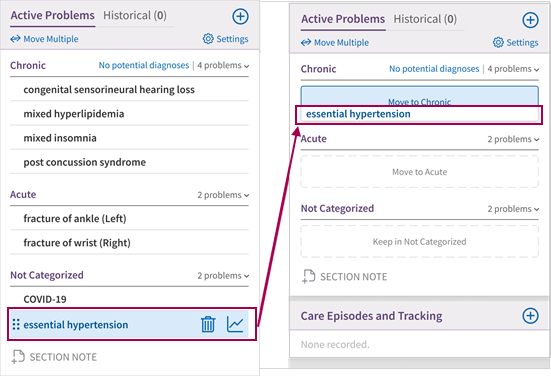
- Drag and drop the problem to the category you want to move it to.
- Click the problem you want to move and click the category you want to move it to (Chronic or Acute).
- In the patient chart, click the Problems tab.
- Click
 Move Multiple.
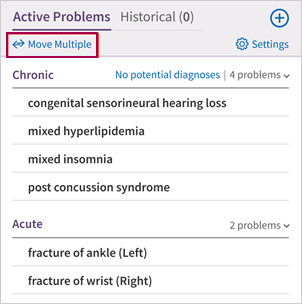
- Select the check boxes next to the problems you want to move.
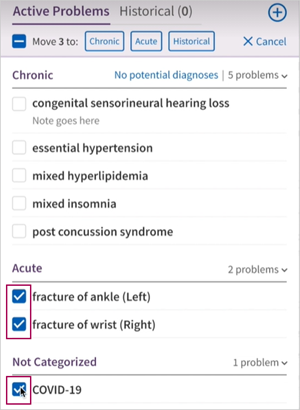
Tip: To select all problems in the list, select the check box to the left of “Move x to.”
- At the top of the Problems list, select the category to move the problems to (Chronic, Acute, or Historical).
athenaOne automatically saves your individual view of a patient's Problems list. During an encounter, the Problems list customized by the rendering provider appears. Any changes you make to the Problems section outside an encounter apply only to your username.
You can specify a problem as Chronic or Acute when you add or edit a problem, or you can drag and drop problems between the categories if your list is grouped by Chronic/Acute. Marking problems as Chronic or Acute via APIs is also supported. This categorization can help you identify a patient’s most relevant problems.
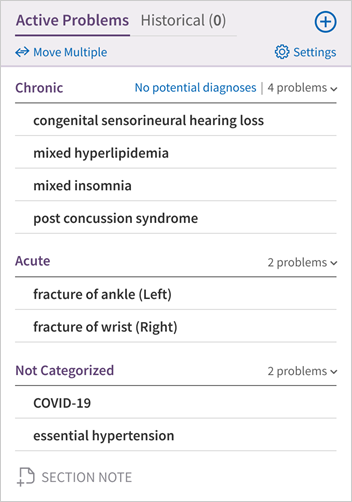
Yes, when a problem is categorized for a patient, the problem is saved under that category for all users that view that patient chart.
Yes, if you change grouping within a patient chart, it applies to all patients in that context. However, it only applies to your view of that patient chart and does not impact other users. Your user settings for grouping and showing ICD-10 codes are different in each context.
The Past Medical History portion of the History section is intended for documentation and review of the patient's medical history at the time of transfer of care into the practice or when patients update this information on the Patient Portal. You should document all active and historical medical problems in the Problems section.
Health concerns (referred to previously as "reasons for care") documented in the care plan are problems, barriers to care, or social determinants of health that patients should focus on with guidance and assistance from the patient's care team. You use the care plan to document goals and tasks for patients enrolled in care management (see athenaClinicals Care Plan or, for Population Health, User Guide: Care Plan).
Health concerns on the Care tab are associated with the patient. Not all problems documented on the Problems tab need to be addressed in the care plan as health concerns.
At the top of the Problems list, a link displays the number of potential diagnoses (x potential diagnoses) or No potential diagnoses by default. Click this link to view the Patient Risk dashboard.
Note: You can change your user preferences to set the patient risk score to show instead of the number of potential diagnoses at the top of the Problems list.
You can change your user preferences to have diagnoses automatically added to the Active Problems List when you add them to the Assessment and Plan section of an encounter. When diagnoses are automatically added to the Problems list, they are added under Not Categorized and are marked with a gray arrow ![]() .
.
Note: Diagnoses are automatically added to the Problems List only when an ICD-10 code is added to the diagnosis. Also, some diagnoses/ICD-10 codes that aren’t considered problems (such as “well child visit”) are not automatically added to the Problems List.
You can manually add an A&P diagnosis to the Problems list. Click the add-to arrow ![]() next to a diagnosis after you added it to the Assessment and Plan section to also add it to the Problem list.
next to a diagnosis after you added it to the Assessment and Plan section to also add it to the Problem list.
The Problems section of the patient chart displays the current ICD‑10 codes associated with each diagnosis from the patient's most recent encounter or order group when:
- The diagnoses were added on or after June 19, 2018.
- The associated encounter is closed or the associated order group has orders for the diagnoses and is signed.
Note: All ICD‑10 codes used in the most recent encounter or order group appear in the Problems section. If an ICD‑10 code is added outside an encounter or order group (for example, using the Add Document workflow), the code does not appear in the Problems list.
Diagnoses in the Historical Problems list include the ICD‑10 codes as long as the diagnoses were used in signed order groups or closed encounters on or after June 19, 2018.
Adding a problem from the Problems list to an open encounter or order group
If you add a problem from the Problems section of the chart to an open encounter or order group (by clicking the add to D&O icon ![]() ), the ICD‑10 codes shown in the Problems list are copied to the current encounter's Diagnosis and Orders cart. You should review the codes that were copied and edit them as needed.
), the ICD‑10 codes shown in the Problems list are copied to the current encounter's Diagnosis and Orders cart. You should review the codes that were copied and edit them as needed.
Changing an ICD‑10 code in an order document that is signed and closed
If you reopen an order that was already signed and closed, you can change the ICD-10 codes.
- If the ICD‑10 code was used in only one order, the code is removed from the Problems list. If you then select a different ICD‑10 code and sign the order, the updated code appears in the Problems list.
- If the ICD‑10 code was used in more than one order, the code is removed from the Problems list for a diagnosis only if all orders under the diagnosis are unapproved. If you then select different ICD‑10 codes and sign the orders, the updated codes appear in the Problems list.
Changing an ICD‑10 code in a closed encounter
To change the ICD‑10 code in a closed encounter, you must amend the encounter and update the code associated with a diagnosis. The corrected code appears in the Problems list after you save the amendment.
In some cases, the encounter cannot be amended because it has become free text. In such cases, the ICD‑10 code in the Problems list cannot be updated until a newer code used in a newer encounter or order group replaces it. For more information, see To amend a closed encounter.
The Care Episodes & Tracking section of the Problems tab provides access to a number of flowsheets, including the cardiovascular risk and pap smear flowsheets (if you used the pap smear flowsheet in the Classic version of athenaClinicals).
If your practice uses the Physical Therapy episode feature, these episodes are also available in the Care Episodes & Tracking section of the Problems tab.
For more information, see Flowsheets — Cardiovascular Risk, Flowsheets — Pap Smear, and Physical Therapy Episode Feature.
Pap smear flowsheets
If your practice formerly used athenaClinicals Classic, the pap smear flowsheet is available in the Care Episodes & Tracking section. Providers have direct access to pap smear results and data recorded in athenaClinicals Classic. Data recorded in the pap smear flowsheet appears in problem-based flowsheets for problems related to abnormal pap smears. All new or existing lab results received electronically via interface or fax also appear in the Results tab of the patient chart.
Imaging results appear in the graph view of the flowsheet in the Problems section for the associated problem. For example, if you order a mammogram for a malignant neoplasm of breast diagnosis, the order automatically appears in the flowsheet for the malignant neoplasm of breast problem listed in the patient chart. You can also drag imaging results that are tied to certain clinical order types (for example, echocardiograms) from the Results chart tab to a flowsheet.
Note: If you use a global flowsheet that is configured to recognize any imaging result type (X-ray, CT, MRI, etc.), a result may appear even if the associated order does not include a diagnosis tied to that imaging result type.
If you previously used the Classic version of athenaClinicals, you may have entered notes in the header of a global flowsheet. You can no longer edit this information, but you can click the field to copy the information into another section of the chart, such as the problem's Note field, where the information can be edited, or you can delete the information permanently.
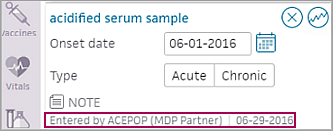
When a Marketplace partner makes a change to a patient's Medications, Problems, Vaccines, or Vitals, you can see the name of that partner within the encounter.
athenaOne performs drug interaction checking for disease. This functionality uses Epocrates or First Databank (FDB) data to check prescribed medications against the diagnoses listed in the patient's Problems section.
Warnings appear when a drug has a potential interaction with a patient's diagnosis or with a diagnosis that FDB deems related to a problem listed in the patient's Problems section. Warnings can appear when you select a medication to order within the encounter or new order group, or when you select a medication to add to a patient's Medications section. Drug-to-drug interaction warnings also appear in multiple document views as you add medications that aren't already listed in the patient's Medications section.
-
 yellow warning denotes a "moderate" interaction.
 -
 orange warning denotes a "serious" interaction.
 -
 red warning denotes a "severe" interaction.
Note: athenaOne ignores the vaccine administered dates when displaying drug-drug interactions for vaccines. Drug-drug interactions are displayed for review regardless of the timing of the last administered date.