 Quick Reference — Patient Portal (What Patients See)
This page describes the features available for your patients on the Patient Portal. Patients can access all features from the Patient Portal home page.
Note: Depending on your Patient Portal configuration, some features may not be available.
For the latest view of the Patient Portal, you can log in to the Patient Portal as a patient. From the patient Quickview, click Log in to Portal as Patient from the Communicator drop-down menu. The following message appears: "You are logging into the portal as the patient. The portal is now read-only. Any changes you make will not be saved." Click OK.
The Patient Portal home page displays the most important information for your patients.
The home page includes the following sections.
- Test Results — Any new test results appear at the very top of the home page.
Patients can click Open results to view test results. - Appointments — Upcoming appointments appear near the top of the home page.
Patients can click Manage appointment to go to the Appointments page, where they can check in for the appointment, fill out forms, and reschedule or cancel any upcoming appointments.
Note: The address and phone number shown in the Appointments section are live links to launch Google maps or make a phone call to your practice. - Messages — Any new messages from your practice appear in the Messages section.
Patients can click Go to Inbox to display the Messages page, where they can view messages from your practice and compose and send messages to your practice. - Billing Summary — Any outstanding balances appear on the home page in the Billing Summary section.
Patients can click Make a payment to display the Billing / Bill Pay page and pay any outstanding balances. - Health Reminders — Any health reminders appear at the bottom of the home page. Health reminders include outstanding orders and procedures that the patient should schedule.
Patients can click See health reminders to display the My Health / Health Reminders page to review outstanding orders.
All pages on the Patient Portal display links to other pages in the left pane and at the top of the page.
Each of these options — Appointments, Billing & Payments, Messages, My Health, Test Results — is briefly described in the following sections.
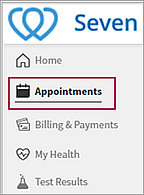
To access appointment information, click Appointments on the left side of the Patient Portal home page.
The Appointment page appears.
Note: Click the Home link in the left pane to return to the Patient Portal home page.
- The Upcoming Appointments section lists any upcoming appointments and includes links to reschedule and cancel the appointments.
Note: If your practice did not enable rescheduling and cancellation of appointments on the Patient Portal, patients see a message to contact the practice when they click the Reschedule or Cancel link. (Your practice phone number appears in these messages if the Surface phone number on appointments page option is set to Shown on the Portal Settings page.) - The Recommended Appointments section lists any recommended appointments. Appointments are recommended based on appointment ticklers, population health campaigns, and automated wellness outreach campaigns. If the patient received an email from an automated wellness outreach (AWO) or population health campaign within the last 30 days, the relevant appointment is listed on this tab.
Note: The display of AWO recommended appointments on the Recommended tab is configured on the Care Gaps Settings page.
For more information about scheduling a new appointment from the Patient Portal, see User Guide — Web Scheduling for Patients.
To access billing and payment information, click Billing & Payments on the left side of the Patient Portal.
The top of the Billing & Payments page displays the amount currently due (or $0.00, if there is no payment due). Patients can click Make a Payment from this section to enter the online payment workflow.
The following sections appear on the Billing & Payments page:
| Section name | Description |
| Payment Methods |
Displays any saved credit card information and allows patients to add a credit card. Note: Until a prospective patient physically checks in at your organization, the patient does not see the Payment Methods tab. |
| Insurance | Displays insurance information on file, and allows patients to manage their insurance information, including the ability to add new insurance information. |
| Billing History |
Displays a complete history of credit card payments made to your practice for healthcare visits, with links to view each receipt. Billing history is divided into three tabs: Past Payments, Closed Bills, and Statements. Patients and family members with access to the patient account on the Patient Portal can view the payment history, print the page, and view and print receipts of the credit card payments. |
To access messages, click the Messages on the left side of the Patient Portal.
The Messages page appears.
At the top right of the page, patients can click Start New Message.
The following sections appear on the Messages page:
| Tab | Description |
| Recent | Lists all messages from your practice in the last 30 days. The patient can display an individual message and send a reply. |
| Older | Displays previous message threads, sortable by All or Archived. |
To access health information, click My Health on the left side of the Patient Portal.
The tabs on the My Health page include the following information.
| Tab | Description |
| Health Summary |
The Health Summary shows an overview of the health information in their chart(s). This includes information from all charts that are associated with the communicator brand. Users can see the most recent activity at-a-glance beneath each category. Note: If you disable all categories on this page, the Health Summary does not show on the Patient Portal.
|
| Visit Notes |
When your practice has this feature enabled, we automatically publish your patients’ visit-related documents to Visit Notes.
Refer to this article for more information on Visit Notes. |
| Vitals | Displays the patient's most recent vitals. The patient can click a specific vital and display a table view for each vital. |
| Health Records | Allows patients to view, download, and transmit their medical record in a file that can be shared with providers. |
| Tobacco History | Displays the patient's history of tobacco use. The patient can click Edit to update his smoking status, frequency and quantity of tobacco use, and years of tobacco use. |
| Forms and Documents | Lists signed letters from the patient's providers (for example, return to work or school letters) that the patient can view and print. Lists online medical forms that the patient can complete and submit online, as well as printable forms that the patient can complete by hand or by electronic signature. |
| Learning Materials | Displays a list of health information provided to the patient by your practice. The patient can click a title to print the information. |
| Health Reminders | Displays the patient's health reminders. |
To access your test results, click Test Results on the left side of the Patient Portal.
The Test Results page appears. Patients can print and download results.
Each test result is clearly defined in its own row and is categorized under Your Latest Results or Past Results. Test results under the Your Latest Results heading stay under this heading until a new batch of test results becomes available in the Patient Portal.
Each result includes a read/unread indicator, represented by the dot to the left of the test name. Currently, a result is considered read if the patient logs in to their Portal account and navigates to their test results page from My Health.
A test result is considered read when the patient clicks into the specific result. After a result is clicked and read, the unread indicator dot does not appear.
For results that include a reference range, a tag of either Normal or Out of Range appears. Patients can identify areas of concern without needing to click in to the specific test result.
At the bottom of the Test Results page, patients are instructed to go to the Health Records page if they need to download their CCD.
Note: The language toggle doesn't translate anything unique to the specific test results or to the practice. The language toggle applies to any text standard to the Patient Portal (for example, the main menu items or any of the page names).
Viewing an individual test result
From the main Test Results page, patients can click a specific result for more information.
This example shows a Complete Blood Count (CBC) result:
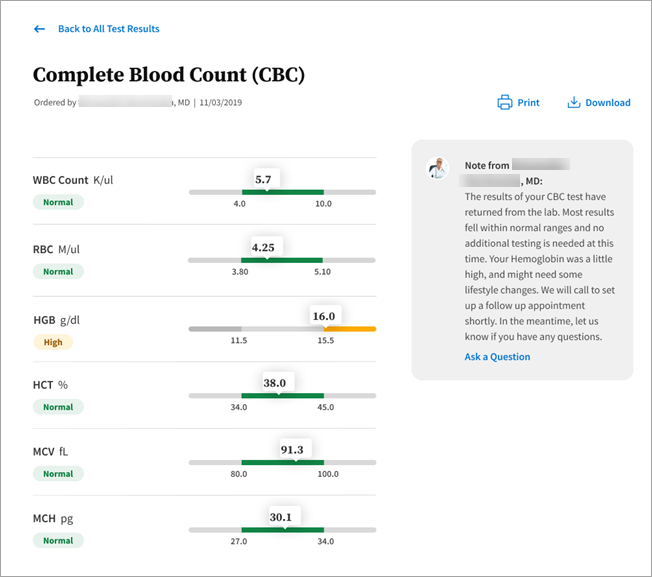
Patients see a visual representation of the test range, as well as where their result appears in that range. This provides patients with context for their result.
Patients can view notes from their provider right from this results page. This note is dictated by the Note to Patient field on the lab results document.
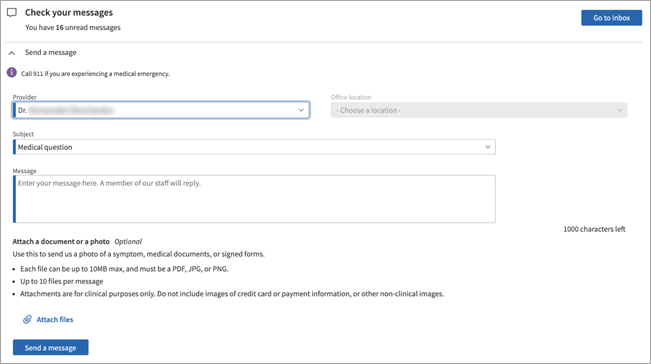
Patients can click Ask a Question in the provider note box to open the secure messaging workflow. After clicking Ask a Question, patients are directed to a prepopulated messaging form, shown here:
Clicking Back to All Test Results brings patients to the results page they were on previously. This means that, even if a patient is several pages deep into their past test results list, they will be brought back to the exact location they were just viewing.
To access patient profile information, click the arrow next to your name at the top of the Patient Portal and select My profile from the menu.
The My Profile page appears with the Contact information tab displayed.

The tabs on the My Profile page include the following information.
| Tab | Description |
| Contact Information |
Displays the patient's legal name, address, first name used, date of birth, billing information, and contact information. The patient's gender identity, sexual orientation, assigned sex at birth, and pronouns are also displayed (these attributes are specified on the Patient Registration page in athenaOne). Note: The Sex field is configurable. It is on by default. You must contact the CSC to turn this field off. On the Main Menu, click Support > Success Community > Contact Client Support Center. |
| Security Settings | Allows Patient Portal users to edit their athenahealth profile settings (password, recovery phone number, and so on) by clicking the athenahealth Profile button on this page. |
| Notification Settings | Allows patients to change their phone and text message notification preferences. These notifications apply to automated messages from your practice. Patients can also choose to enable electronic statements, which stops the mailing of paper statements. |
| Family Notifications |
Allows Patient Portal users to enable and disable automated email notifications from your practice about family members whose Patient Portal accounts the patient has access to. |
| Insurance | Allows Patient Portal users to view and manage their insurance information. |
| Family Access |
Displays a list of family members whose Patient Portal accounts can be accessed by this patient. Also, displays a list of family members and others who can access this patient's Patient Portal account; the patient can change or remove access for those people and invite family members to access that patient's information. Note: Patients who do not have access to other patients' Patient Portal accounts do not see the Family access settings menu option. |
For information about configuring athenaOne for Web scheduling, see Web Scheduling for Patients.
![]() Demo video — Workflow Change - Schedule Appointments on the Patient Portal
Demo video — Workflow Change - Schedule Appointments on the Patient Portal
- Log in to your Patient Portal account.
- Click the Appointments option on the left side of the Patient Portal window.
The scheduling window appears. - Click Find Appointments.

The Search page appears.
- Specialty — Select a specialty from the menu (that is, only specialties associated with providers who have web scheduling configured).
- Reason for visit — Select the reason for your visit.
Tip: For more information about the reasons you can select, click What reason should I choose?. - Select the date of your visit. Today's date is shown in a dark blue circle. You can select any date after today's date.
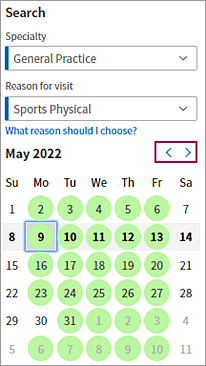
You can click a date in the current month, or you can click the right and left arrows to display the next month or the previous month. - Appointment method — If your practice uses athenaTelehealth, you can select the Online option for a telehealth appointment (otherwise, select the In Person option).
- Provider — Select the provider that you want to see from the menu.
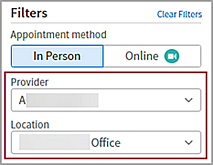
- Location — For office (in-person) visits, select the location for your appointment.
Appointments based on your search criteria appear to the right of the search fields.
Note: If no available appointments match your search criteria, a message tells you to try a different date, change the appointment method, or phone the office to make an appointment. - Select a time for your appointment.
The Review Appointment page appears. - Verify the information on this page, including the date and time of the appointment, the selected provider and location, and your insurance information.
Note: To edit information that you entered, click Back. - Additional notes — Enter details about the reason for your visit (you can enter up to 500 characters).
- When you're ready to book the appointment, click Schedule Appointment.
athenaOne sends a confirmation message to the email address on file for you. The Appointment Scheduled page appears. - On the Appointment Scheduled page, you can click Add to calendar to add the appointment to your calendar.