Patient Registration
athenaOne for Hospitals & Health Systems
This page allows you to register a new patient in a department in your practice, view and update registration information for an existing patient, and view the registration audit history for a patient.
Important: Guarantor information is now read-only on Patient Registration. You can manage Guarantor information on Quickview and Check-in. For more information, see Review and Update Guarantor on Check-in or Quickview.
Note: A loading icon appears when you click:
-
Save
-
Save and Schedule
-
Save and Add Insurance
On the Patient Actions Bar, click Registration, and then click Full Registration
On the Patient Actions Bar, click Registration, and select Register Family Member
On the Main Menu, click Patients. Under PATIENT REGISTRATION, the following options appear:
-
New Hospital Visit
-
Hospital Patients to Register
-
Manage Prospective Patients
Note: For practices that include both Hospital and Ambulatory departments, Ambulatory departments see the following options:
-
New Clinic Patient
-
New Hospital Visit
-
Manage Prospective Patients
Click New Hospital Visit and either search for an existing patient or click Create visit for a new patient.
To access this page, you must have the EDITDEMOGRAPHICS role or permission.
For more information about the fields on the Patient Registration page, see the Field Reference.
- Display the Patient Registration page: On the Main Menu, click Patients. Under PATIENT REGISTRATION, click New Patient Registration.
Identification
- Legal last name — Enter the patient's legal last name.
- Legal first name — Enter the patient's legal first name.
- First name used — Enter the patient's preferred first name or nickname, if any. This name appears in the patient banner (along with the legal first name); on the patient schedule; in athenaCommunicator messages (email, SMS, and phone); and on the Patient Portal.
Note: The name in the First name used field can reflect the patient's gender identity. For more information about the patient banner for transgender and nonbinary people, see Transgender and Nonbinary Patient Care. - Middle name, suffix — Enter the patient's middle name and name suffix (for example, Jr.), if any.
- Previous name (last, first) — Enter the patient's previous first and last names (if applicable): last name in the left-most field and first name in the right-most field.
- Legal sex — Enter the patient's legal sex (male or female) on legal documents such as the insurance card or driver's license.
- DOB — Enter the patient's date of birth.
- SSN — Enter the patient's Social Security number.
Note: You can enter SSNs when you first register a patient or when you add an SSN to an existing patient registration. To see the full 9 digits of already-entered SSNs, you must have the "Display Full SSN" role. - Mother's maiden name — Enter the maiden name of the patient's mother.
Note: This information is used only as an additional means of determining identity, especially if information is received from non-athenahealth systems. - Preferred name (discontinued) — The Preferred name field has been replaced by the First name used field. For more information about moving existing information in this field, see the Field Reference.
Contact
- Address — Enter the patient's address. For apartments, use this format: 1199 Whitney Ave #310.
Note: You can click the Check address option (to the right of the ZIP code field) to validate the address that you entered (you must first enter the address and either the ZIP code or the city and state). - Address (ctd) — Enter additional address information, if needed.
- ZIP code — Enter the patient's 5-digit ZIP code (the City and State fields are automatically filled in).
- City — Enter the patient's city.
- State — Enter the patient's state.
- Country — If the Country field appears, select the patient's country.
athenaOne automatically formats foreign mailing addresses according to the country's specifications for all claims, bills, statements, and other correspondence.
Note: If you select a country other than the United States, select the country from the menu, and then enter the two-letter postal abbreviation for the country in the State field. - ID Number Override — If your practice generates its own numeric patient IDs (rather than using athenaOne auto-generated patient IDs), enter the number. If you leave this blank, athenaOne automatically assigns the patient an ID number. This field appears only at the time of initial patient registration.
- Home phone — Enter the patient's home phone number.
- Mobile phone — Enter the patient's mobile phone number.
- If the mobile phone is the same as the patient's home phone, click the Copy from home link.
- If the patient does not have a mobile phone or declines to provide the number, select the None option.
- Consent to call — The Consent to call field helps you comply with the Telephone Consumer Protection Act. This field indicates whether you obtained "express consent" from the patient to receive automated calls from your practice to the patient's mobile phone. Automated calls include ReminderCall, GroupCall, ResultsCall, and Self-Pay calls.
- Consent to text — This field indicates whether you obtained "express consent" from the patient to send automated text messages from your practice to the patient's mobile phone. Automated text messages are used by the ReminderCall, GroupCall, ResultsCall, and Self-Pay services. If the patient consents to receive text messages, athenaOne automatically enables the Text Message options in the Communicator Automated Messaging Preferences section of the Privacy Information page for that patient. Patients are charged standard message and data rates for text messages from your practice. Note: If a phone number is provided in the Mobile phone field, you must set the Consent to text option to Yes or No to save changes on the Check-in, Patient Registration, or Quickview page.
- Work phone — Enter the patient's work phone number.
- Patient email — Enter the patient's valid email address. This field is required on the Patient Registration and Check-in pages for practices using athenaCollector and athenaCommunicator.
Selecting the No email option clears any email address or other notation present in the Patient email field.
If the No email option is already selected, the patient has already informed another staff member at your practice that he or she does not have an email address or does not wish to provide one. - Portal access — This field displays the Patient Portal status of the patient and the patient's family members. You can invite a patient or family member to register for the Patient Portal (or the Patient Information Center), and you can view Patient Portal access for the patient and the patient's family members. For more information, see "Portal access section."
- Contact preference — Select the contact method preferred by the patient.
Note: The contact preference that you select on this page has no effect on the athenaCommunicator messaging preferences configured on the Privacy Information page.
Demographics
- Language — Select the patient's preferred language from the menu. By default, a short list of the values that you most commonly select appears. To select a different value, enter the first few letters of the desired language and select it from the list.
Note: If the patient does not provide a language, select the Patient Declined option. - Race — Select the patient's racial affiliation from the menu. By default, a short list of the values that you most commonly select appears. To select a different value, enter the first few letters of the desired language and select it from the list. To select more than one race, click the plus icon
 .
.
Note: If the patient does not provide a race, select the Patient Declined option. - Ethnicity — Select the patient's ethnic affiliation. By default, a short list of the values that you most commonly select appears. To select a different value, enter the first few letters of the desired option and select it from the list. To select more than one ethnicity, click the plus icon
 .
.
Note: If the patient does not provide an ethnicity, select the Patient Declined option. - Marital status — Select the patient's marital status from the menu.
- Sexual orientation — Select the patient's sexual or romantic preference from the menu.
Note: The options in the Sexual orientation field are based on 2015 edition certification requirements. If you see patients with additional sexual orientations, select the Something else, please describe option and enter the patient information in the free-text field. - Gender identity — Select the patient's internal sense of self as male, female, both male and female, or neither gender. A patient may identify as transgender or nonbinary if their gender identity is different than their assigned sex at birth.
Note: The options in the Gender identity field are based on 2015 edition certification requirements. If you see patients with additional gender identities, select the Additional gender category / other, please specify option and enter the patient information in the free-text field. - Assigned sex at birth — Select the patient's assigned sex at birth. The patient's sex assigned at birth is generally determined by their physical anatomy at birth. This may be the same or different than the patient's gender identity and legal sex.
- Pronouns — Select the personal pronouns that reflect the patient's gender identity (the pronouns may not be tied to the patient's gender identity).
- Homebound? — Select Yes or No to indicate whether the patient is homebound.
Additional Information
- How did you hear about us? — Select the route by which the patient heard about your practice.
The contents of this menu are administered on the Referral Sources page. - Specify (if Other, above) — If you select Other in the How did you hear about us? field, you can enter a free-text source here.
- Patient care summary and patient letter delivery preference — Select Portal or Paper to indicate whether the patient prefers to receive provider-signed letters and the Patient Care Summary on the Patient Portal or on paper.
Note: In an ambulatory department that uses athenaClinicals but not athenaCommunicator, your patients can access their electronic Patient Care Summary online using the Patient Information Center, a slimmed-down version of the athenaCommunicator Patient Portal.
Provider/Registration Dates
- Usual provider — Select the patient's primary provider.
Note: By default, the name of the rendering provider is printed at the top of patient statements. If you prefer to print the name of the usual provider at the top of patient statements, please contact the CSC from athenaOne > Support > Success Community > Contact Client Support Center. - Registration department — Select the department in which the patient was initially registered.
- Primary department — Select the patient's current active department, typically the department in which the patient chart is kept. The primary department may differ from the department of registration if the patient was transferred from one department to another.
- Chart home — Select the department where the patient's chart is normally kept.
- Registration date — Enter the date that the patient was registered in the athenaOne system. For new patients, the default value is the current date.
- Deceased date — If the patient is deceased, enter the date of death. When a date is entered in this field, the field is displayed on the patient Quickview page with the date in red.
Privacy
- Notices on file — Select the relevant options to indicate that the patient
received the notices.
Note: If you select the Privacy Notice option in the Notices on file field, athenaOne automatically sets the Medication History Authority field to Yes (if you have not yet selected Yes or No for this field). - CIIS Consent — Appears if your practice uses an immunization registry interface with athenaClinicals.
Note: This field appears only after the initial patient registration information has been saved. - Medication History Authority — Select Yes to indicate that the patient has signed a consent form allowing your practice to download his or her medication history. You should first consult your practice's HIPAA compliance committee to verify that your current privacy consent forms cover medication history downloads.
Note: If you select the Privacy Notice option in the Notices on file field, athenaOne automatically sets the Medication History Authority field to Yes (if you have not yet selected Yes or No for this field). - Patient notes — Enter any internal notes about the patient in this field. The notes you enter here also appear in the Patient notes field on the patient Quickview page and on the Check-in page. The notes are not printed on any form. If the patient has a guarantor other than self, athenahealth recommends that you enter the name and phone number of the guarantor in this field for your billing staff's convenience.
Emergency Contact
- Name — Enter the name of the emergency contact for the patient. This is for reference only and is not used anywhere else.
- Relationship — Enter the relationship of the contact to the patient.
- Home phone — Enter the emergency contact's phone number.
- Mobile phone — Enter the emergency contact's mobile phone number.
Next of Kin
- Name — Enter the full name of the patient's next of kin.
- Relationship — Select the next of kin's relationship to the patient.
- Phone — Enter the next of kin's phone number.
Employment
- Employer name — Click choose to access the tool and select the name of the patient's employer. If the patient's relationship to insured is SELF when adding an insurance policy, the Employer name field on the patient's Add Update Policy Details page defaults to the value in this field.
- Employer phone — Enter the phone number of the patient's employer. This field is for reference only.
- Usual occupation — Enter the first few characters of the patient's current or most recent occupation and select it from the matching list. If the occupation is not found, enter it as free text.
- Usual industry — Enter the first few characters of the patient's occupational industry and select it from the matching list. If the industry is not found, enter it as free text.
Guardian
- Last name — If the patient is under the care of a guardian who is not the same person as the guarantor (for example, in the case of separated parents), enter the last name of the patient's legal guardian. This is for reference only and is not used anywhere else in the system.
- First name — First name of the patient's legal guardian.
- Middle name, suffix — Middle name and name suffix of the patient's legal guardian.
Guarantor Information (now read-only on Patient Registration)
The guarantor is the person who appears as the addressee on patient statements. If Patient's relationship to guarantor is set to Self, the patient's address is used as the address for patient statements.
A best practice for family billing is to designate one (and only one) family member as the guarantor for the entire family. Once selected, this guarantor receives patient statements for "patient's responsibility" balances incurred by any family member.
You can manage Guarantor Information on Quickview and Check-in. For more information, see Review and Update Guarantor on Check-in or Quickview.
Billing
- Statements delivered online only — Select this option if the patient wants to have statements delivered online only via the Patient Portal. This option appears if your practice has the Allow Online Statements feature enabled and the patient uses the athenaCommunicator Patient Portal.
- Statement note — Enter a note that will be printed on statements for this patient (75 characters max). The note appears on the patient statement above the dunning message.
- Statement note effective date — By default, the effective date for the statement note you enter is from today's date until one year later, but you can edit these dates.
- You can save the information as follows:
- Click Save to save the information and go to the patient Quickview page without adding an insurance policy.
- Click Save and Add Insurance to proceed to the Add Policy page. To check in a patient for an appointment, you must select a primary insurance policy for the patient or select the self-pay option.
- Click Save and Schedule to proceed to the Schedule Appointment page.
Note: If yours is an athenaEnterprise organization and the Practice Setting for CPI Synchronization is enabled, the selected set of fields, when updated, will propagate through the athenaEnterprise. See also: Common Patient Index.
If you accessed this page using the Register Family Member option in the Patient Actions Bar, you can also register a family member using the pre-filled fields from the related patient.
Note: This option requires the Family Billing feature.
- Display the patient Quickview page for the head of the family.
- On the Patient Actions Bar, click Registration, and select Register Family Member.
- Verify or edit the pre-filled information.
- Complete the registration fields.
Add insurance information (recommended)
- To copy the insurance policy information from the other family member, select the Copy insurance policy information from patient name option (at the bottom of the page).
- To add a different insurance policy, click Save and Add Insurance to display the Add Policy page. (To check in a patient for an appointment, you must select a primary insurance policy for the patient or select the self-pay option.)
Save or save and schedule an appointment
- Click Save to save the information and go to the patient Quickview page without adding an insurance policy.
- Click Save and Schedule to proceed to the Schedule Appointment page.
Note: This option requires the Family Billing feature.
- Display the patient Quickview page for the head of the family.
- On the Patient Actions Bar, click Registration, and then click Full Registration.
- Click the add patient to this family link to access the Family Member Lookup tool.
- Select the family member that you want to add.
- Click Save.
The Patient Registration page appears with the family information pre-filled. - Verify or edit the pre-filled information.
- Complete the registration fields.
Save or save and schedule an appointment
- Click Save to save the information and display the patient Quickview page without adding an insurance policy.
- Click Save and Schedule to display the Schedule Appointment page.
- Display the Patient Registration page: On the Main Menu, click Patients. Under PATIENT REGISTRATION, click New Patient Registration.
- Scroll down and locate the Family Members (share the same guarantor) heading on the lower right side of the page.
- Click show family structure. The Show Family Structure window opens, showing a tree-like diagram of the family structure.
Important: If you update certain fields on the Patient Registration page, make sure to reconcile the new information with the information on the Update Policy Details page (see "Registration field edits that affect insurance policies").
- Display the Patient Registration page: On the Patient Actions Bar, click Registration, and then click Full Registration.
- Update fields as needed.
- You now have two options:
- Click Save to display the patient Quickview page.
- Click Save
and Schedule to display the Schedule
Appointment page.
When you update the name, address, SSN, DOB, or legal sex on the Patient Registration, Quickview, or Check-in page, the new information must be reconciled with information on the Update Policy Details page.
Address, SSN, DOB, and Legal sex fields
If you update the Address, ZIP code, City, State, SSN, DOB, or Legal sex field on the Patient Registration, Quickview, or Check-in page, athenaOne automatically updates all insurance policies (where the Patient's relationship to policy holder is Self on the Update Policy Details page) with the new information.
Name fields for the guarantor (policy holder)
Some payers require that the name of the policy holder on a claim exactly match the name in the payer's system. Therefore, if you make a change to the patient's name on the Patient Registration, Quickview, or Check-in page (Legal last name, Legal first name, or Middle name, suffix), a warning message may appear:
"There are insurance policies for this patient that may need to be updated. Click "update this policy" from the patient Quickview page to make changes."
If this warning message appears, click OK, then make sure that the information in the insurance policy is correct and make changes if necessary.
Note: When you update gender identity fields on the Quickview, Patient Registration, or Check-in page, athenaOne automatically synchronizes the information with the patient banner and the Social History chart section.
- On the Quickview, Patient Registration, or Check-in page, scroll down to the Demographics section.
- Sexual orientation — Select the patient's sexual orientation from the menu.
- Lesbian, gay or homosexual
- Straight or heterosexual
- Bisexual
- Something else, please describe
- Don't know
- Choose not to disclose
- If you select the Something else, please describe option, a free-text field appears. Enter the patient information in this field.
- Gender identity — Select the patient's gender identity from the menu.
- Identifies as Male
- Identifies as Female
- Transgender Male/Female-to-Male (FTM)
- Transgender Female/Male-to-Female (MTF)
- Gender non-conforming (neither exclusively male nor female)
- Additional gender category / other, please specify
- Choose not to disclose
- If you select the Additional gender category / other, please specify option, a free-text field appears. Enter the patient information in this field.
- Assigned sex at birth — Select the patient's assigned sex at birth. The patient's sex assigned at birth is generally determined by their physical anatomy at birth. This may be the same or different than the patient's gender identity and legal sex.
- Male
- Female
- Choose not to disclose
- Unknown
- Pronouns — Select the personal pronouns that reflect the patient's gender identity.
- he/him
- she/her
- they/them
- Click Save.
The information appears in the patient banner.
Note: To protect patient privacy, the data in the Sexual orientation, Gender identity, and Assigned sex at birth fields is masked on the Quickview, Patient Registration, and Check-In pages. To edit these fields, click Edit.
You can create custom messages that print on statements for an individual patient. For example, you can create a patient note to notify the patient about a new, customized payment plan, or to remind a patient of a billing-related agreement policy.
Note: The simplified patient statements used with the Online Statement-based Experience (formerly QuickPay Portal) do not display custom statement notes. For information about simplified and standard patient statements, see Patient Statement Samples.
To enter a patient statement note, display the Patient Registration page: On the Patient Actions Bar, click Registration, and then click Full Registration. Enter the text of the note in the Statement note field. This field is limited to 75 characters.
Tip: You can create custom messages that are printed on statements for your entire practice using the Practice Statement Note page. These messages are printed for all patients on a statement run for your practice. You can use this function as a communication tool. For example, you can create a practice statement note to notify patients that a new doctor has joined the practice or when the flu clinic is scheduled for the upcoming year.
- Display the Patient Registration page for the head of the family: On the Patient Actions Bar, click Registration, and then click Full Registration.
- Scroll to the bottom of the page.
- Click the show history link. The registration audit history is displayed at the bottom of the page.
Note: If you requested that athenahealth import patients from another system on your behalf, the audit history shows that the patient was created by a username structured as follows: [username].[importID].
You can register patients and their family members for the Patient Portal or the Patient Information Center while the patient is in the office from the Quickview, Check-in, Checkout, and Patient Registration pages.
Note: The starting point for the registration workflow is slightly different on the Checkout and Patient Registration pages. The instructions on this page begin on the Quickview or Check-in page.
Note: Non-patient users, such as family members, can register for the Patient Portal without being at your practice. These non-patient users can then access the Patient Portal on behalf of patients. The most common use case for your patients would be a parent registering to gain access to their child's full Patient Portal account. Refer to this user guide for a full description of the non-patient Portal self-registration feature.
Important: To comply with the Children's Online Privacy Protection Act (COPPA), patients under the age of 13 cannot create self-registered Patient Portal accounts, and you cannot register or invite new Patient Portal users under the age of 13.
Practice users (including clinical providers) can register a patient or family member as follows:
- From a practice computer.
- From a kiosk (a desktop, laptop, or tablet computer set up for this task).
- Using the patient's smartphone (iPhone or Android device).
Note: The smartphone option is not available when registering a patient for the Patient Information Center. - By sending an invitation email to the patient's registered email address in athenaOne.
Practice users can register patients for the Patient Portal at any stage of the patient encounter. A dedicated practice user can also help patients register for the Patient Portal before check-in.
Important: Register your patients (or their family members) in the office to increase the likelihood that you will meet quality program measures.
E‑statement notifications, message notifications, and test result notifications are all sent to the patient via email. Patients will not know that they have a message waiting for them on the Patient Portal if they do not have an email account. The use of email helps ensure that the patient or family member receives proper notification from the practice.
Important: To comply with the Children's Online Privacy Protection Act (COPPA), patients under the age of 13 cannot create self-registered Patient Portal accounts, and you cannot register or invite new Patient Portal users under the age of 13.
Note: Non-patient users, such as family members, can register for the Patient Portal without being at your practice. These non-patient users can then access the Patient Portal on behalf of patients. The most common use case for your patients would be a parent registering to gain access to their child's full Patient Portal account. Refer to this user guide for a full description of the non-patient Portal self-registration feature.
You can use the Quick Registration functionality to allow patients and their family members to sign up for the Patient Portal from athenaOne.
Important: If a patient's family member is creating a Patient Portal account (for example, the parent of a young child), do not enter the family member's email address in the Portal email field for the patient. If the patient does not have an email address, select the No email option.
To start the Quick Registration process:
- On the Quickview or Check-in page, scroll down to the Contact List & People with Portal Access section and click
 Add Contact Person and Grant Portal Access.
The Add contact window opens. - Click The Patient or Not the Patient to indicate whether the Patient Portal account owner is the patient or another person (a family member or caregiver, for example). If the patient already has a Patient Portal account, these options do not appear; the new contact that you are creating is assumed to be "not the patient."
Note: If your practice does not use family access, the Not the Patient option does not appear. - You can click Pre-fill fields using the chart contact details to fill in fields — such as address and phone number fields — that exist already in the patient chart. This option is especially useful for parents and guardians of minor children.
- Contact person is the patient's — Specify the relationship of the new contact to the patient by selecting an option from the menu, for example, Mother, Spouse, Child, Grandparent, or Caretaker.
- Email — Enter the email address for the patient or contact. You must enter an email address to create a Patient Portal account.
- Legal first name — Enter the legal first name of the patient or contact.
- Legal last name — Enter the legal last name of the patient or contact.
- Contact type — Select Portal Access or NO portal Access.
- The following field appears when you select Portal Access:
Portal & messaging access level — Select Full Access or Billing Only.- Full Access — Patient Portal user has full access to a patient record that is not his own. Full access is used in a family access scenario, such as when a mother has a Patient Portal account and accesses her child's patient record. (The Patient Portal user does not need to be a patient at your practice.)
- Billing Only — Patient Portal user has billing-only access to a patient record that is not her own. A Patient Portal user with billing-only access can see only billing information, not health information. An example of this type of access is when a parent is the Patient Portal user with billing-only access to the patient record of a 20-year-old child.
- Mobile phone — Enter the mobile phone number of the patient or contact, or select the No mobile phone option.
- Home phone — If you entered a mobile phone number, this field defaults to Same as mobile, but you can enter a different home phone number in this field.
Note: If you selected the No mobile phone option in the Mobile phone field, you must enter a phone number in the Home phone field. - Work phone — You can enter a work phone number in this field, if you choose.
- Address line 1 — Enter the first line of the contact's address. If you need a second line, use the Address line 2 field.
- Zip — Enter the contact's 5-digit ZIP code. The ZIP code populates the City and State fields from the athenahealth ZIP code database. (If you find an error, please contact the CSC from athenaOne > Support > Success Community > Contact Client Support Center.)
- City — Enter the contact's city.
- State — Enter the contact's state.
Note: You can click the Verify address option below the State field to validate the address that you entered (you must first enter the address and either the ZIP code or the city and state). - After you enter all required contact information, click Save and Go To Portal Registration.
The Choose Portal Registration Method window opens. - Click Register With This Computer.
A message appears about your responsibility for verifying the patient's or family member's identity. - Click Continue.
- You are logged out of athenaOne, and the Create new password page appears.
- Allow the patient or family member to use the device that the practice user was using.
- The patient or family member confirms the email address and types in a Patient Portal password on the Create new password page. This password must be 8-20 characters long and must have at least one uppercase letter, one lowercase letter, and one number or symbol.
- The patient or family member checks the box to accept the Terms and Conditions and the Privacy Policy and then clicks Create account.
The Patient Portal home page appears. - When the patient or family member signs out of the Patient Portal, the athenaOne login page appears.
- You log back in to athenaOne and are returned to the Check-in workflow.
You can set up a computer (desktop, laptop, or tablet) in your office to allow patients and family members to register for the Patient Portal or Patient Information Center while the patient is at the practice. From the Quickview or Check-in page, practice staff generate temporary passwords, which they give to the patient or family member; the patient enters this password on the login page set up on the kiosk computer to register for the Patient Portal or Patient Information Center. (These temporary passwords are case sensitive.)
Note: Generate temporary passwords while the patient is in the office, not over the phone.
To enhance the security of the kiosk workflow, athenahealth provides you with a unique URL, which enables an automatic timeout of a Patient Portal or Patient Information Center login after 3 minutes. Also, a large Signout button is displayed on the kiosk screen so that your patients and their family members can easily sign out after they register for the Patient Portal or Patient Information Center and explore it.
To use the kiosk registration feature, you must set up a kiosk (desktop, laptop, or tablet computer) in your office and then call the CSC to enable this feature. After the CSC enables the feature for you:
- Open a Web browser, such as Chrome or Safari, on the kiosk device, and enter one of the following URLs:
- If your practice does not use the Communicator Brands feature, enter "https://CONTEXTID.portal.athenahealth.com/?section=kiosk", where CONTEXTID = your practice ID.
- If your practice uses the Communicator Brands feature, enter
"https://CONTEXTID-BRANDID.portal.athenahealth.com/?section=kiosk", where CONTEXTID = your practice ID and BRANDID = your brand ID.
Note: To find your brand ID, display the Communicator Brands page: On the Main Menu, click Settings >Communicator. In the left menu,under Practice Links — Communicator, click Brands.
- Bookmark this URL, and make it the home page of the browser on the device.
- Make sure that you turn the device on and open the browser every morning.
Important: When you start the kiosk registration process, advise patients that they must complete their registration and create a new password within 2 hours or the password will expire.
- On your computer (not the kiosk device) display the Quickview or Check-in page for the patient.
- On the Quickview or Check-in page, scroll down to the Contact Details & People with Portal Access section and click
 Add Contact Person and Grant Portal Access.
The Add contact window opens. - Click The Patient or Not the Patient to indicate whether the Patient Portal or PIC account owner is the patient or another person (a family member or caregiver, for example). If the patient already has a Patient Portal account, these options do not appear; the new contact that you are creating is assumed to be "not the patient."
Note: If your practice does not use family access, the Not the Patient option does not appear. - You can click Pre-fill fields using the chart contact details to fill in fields — such as address and phone number fields — that exist already in the patient chart. This option is especially useful for parents and guardians of minor children.
- After you enter all required contact information, click Save and Go To Portal Registration.
The Choose Portal Registration Method window opens. - Click Register With Kiosk.
athenaOne generates a temporary password on your computer screen. - Write down this password and give it to the patient or family member (this password is case sensitive).
Note: The temporary password that you generate for kiosk registration is valid for 2 hours.
- Go to the kiosk that's set up for Patient Portal or Patient Information Center registration.
- On the landing page, tap
 .
. - Enter your email address and the temporary password given to you by the practice staff and then tap Log In.
- On the Security update page, tap Continue.
The Choose your security option page appears.
Note: For detailed instructions about creating your account, see To create a new Patient Portal account from a notification email. The steps are summarized here. - Select your security option and then verify access to your patient record.
- Create a permanent Patient Portal or Patient Information Center password.
- Enter the temporary password in the Current password field.
- Enter your permanent password in the New password fields.
This password must be 8-20 characters long and must have at least one uppercase letter, one lowercase letter, and one number or symbol. - On the All set page, tap Continue.
The Patient Portal or Patient Information Center home page appears. You are now registered.
Important: To comply with the Children's Online Privacy Protection Act (COPPA), patients under the age of 13 cannot create self-registered Patient Portal accounts, and you cannot register or invite new Patient Portal users under the age of 13.
Patients and family members can sign up for the Patient Portal as part of the check-in process, as long as they have an email address and a smartphone (iPhone or Android device).
Note: This option is available only when registering for the Patient Portal; you cannot use a patient's smartphone to register for the Patient Information Center.
Important: When you start the mobile registration process, advise patients that they must complete their registration and create a new password within 6 hours or the temporary password will expire.
- On the Quickview or Check-in page, scroll down to the Contact Details & People with Portal Access section and click
 Add Contact Person and Grant Portal Access.
The Add contact window opens. - Click The Patient or Not the Patient to indicate whether the Patient Portal or PIC account owner is the patient or another person (a family member or caregiver, for example). If the patient already has a Patient Portal account, these options do not appear; the new contact that you are creating is assumed to be "not the patient."
Note: If your practice does not use family access, the Not the Patient option does not appear. - You can click Pre-fill fields using the chart contact details to fill in fields — such as address and phone number fields — that exist already in the patient chart. This option is especially useful for parents and guardians of minor children.
- After you enter all required contact information, click Save and Go To Portal Registration.
The Choose Portal Registration Method window opens. - Click Register With Smartphone.
After you click this button, athenaOne:- Sends a text message to the mobile phone number with a secure link to access the Patient Portal.
- Generates a temporary password on your computer.
- Write down the temporary password and give it to the patient or family member.
Note: The temporary password that you generate for smartphone registration is valid for 6 hours.
- When you receive the text message, open it and then tap the link to the Patient Portal in the text message.
- On the Patient Portal page, tap
 .
. - Enter your email address and the temporary password given to you by the practice staff and then tap Log In.
- On the Security update page, tap Continue.
The Choose your security option page appears.
Note: For detailed instructions about creating your Patient Portal account, see To create a new Patient Portal account from a notification email. The steps are summarized here. - Select your security option and then verify access to your patient record.
- Create a permanent Patient Portal password. Enter the temporary password in the Current password field and then enter your permanent password in the New password fields.
This password must be 8-20 characters long and must have at least one uppercase letter, one lowercase letter, and one number or symbol. - On the All set page, tap Continue.
The mobile Patient Portal home page appears. You are now registered for the Patient Portal.
During a patient encounter, you can send an email invitation for the Patient Portal or Patient Information Center on the Intake and Exam tabs.
- In the banner at the top of the Intake and Exam page, click Manage Portal Account.
The Register Patient or Register Family Member page appears. - Confirm or enter the email address, home phone number, and mobile phone number for the patient.
- Click Send Email Invitation.
The patient will receive an email containing the Patient Portal or Patient Information Center registration link at the email address given during registration.
Note: You must have permissions to view clinical documents and register new patients to perform these steps.
- Open a CCDA file in HOLD status.
- Click register new patient at the top of the page.
Some demographic fields are populated automatically. - Complete the patient registration.
- Click Save to return to the document.
athenaOne uses the following duplicate checking to determine whether a patient is already registered in your practice or in your common patient index (CPI):
- First name + Last name — This check ignores non-alphanumeric characters (hyphens, apostrophes, etc.) when checking for duplicates. For example, "Mc-Briant" matches "McBriant."
- Home phone
- SSN — A Social Security number entered as any series of nine digits that are exactly the same (e.g., 999999999, 111111111, or 222-22-2222, etc.) will not trigger the duplicate patient prompt even though another patient may have this same false SSN. athenahealth recommends that you enter the patient's correct SSN, if available.
- Last name + First name + DOB
With the Family Billing feature, you can collect payments for any family member at any point during the workflow, using the Collect Payment page. The family guarantor receives a single patient statement for the entire family, itemized by patient, with details for each transaction.
From the Patient Registration page, you can add new and existing patients as family members and remove family members from a family using the remove link next to the patient's name (located under the Guarantor fields on the right side of the page). Or you can remove the current patient from the family by clicking remove this patient from family.
Note: When you remove a patient from a family billing relationship, athenaOne does not delete the guarantor data in the patient's account. You can update or delete this data manually on the Patient Registration page. If the patient is billed under a guarantor in multiple departments, you must remove the patient from the guarantor in each department before you can update the Patient's relationship to guarantor field to Self.
athenahealth will send a patient statement to the family guarantor only when the total family outstanding charges, minus the total family unapplied, exceeds the total family balance, and the total family balance exceeds the "Minimum Statement Balance" amount set for your practice.
The total family balance includes any unapplied amount in the guarantor's account. When there is an unapplied balance in the guarantor's account, your practice must apply those funds to other family members' outstanding charges manually.
Note: When unapplied funds in the guarantor's account exceed the total outstanding charges for the family, no statement is sent to the guarantor, even if individual family members have outstanding charges.
A best practice for Family Billing is to designate one (and only one) family member as the guarantor for the entire family. Once selected, this guarantor receives patient statements for "patient's responsibility" balances incurred by any family member.
It's easy to spot patients in multi-guarantor families. A message in red text appears just under the Guarantor Information heading, warning you that the family includes more than one guarantor.
If you see this message in red text, you should resolve the issue.
Go to Quickview or Check-in to manage guarantor information.
For more information, see Review and Update Guarantor on Check-in or Quickview.
Go to Quickview or Check-in to manage guarantor information.
For more information, see Review and Update Guarantor on Check-in or Quickview.
Your practice may have custom demographic fields that are not in the Field Reference. Your practice must have the Demographic Custom Fields practice setting enabled in order to use this feature. For more information, refer to Demographic Custom Fields.
After you learn that a patient is deceased, you should cancel all future appointments in one action.
Appointment cancellation reasons are specific to your practice. You can add cancellation reasons using the Appointment Cancellation Reasons page.
Note: Marking a patient as deceased or inactive does not prevent statements from going out. To prevent a statement from going out to a patient, the statement must be held.
- Display the Patient Registration page: On the Patient Actions Bar, click Registration, and then click Full Registration.
- Deceased date — Enter the date of death, or click the calendar icon and select the date.
- Click Save.
If future appointments are scheduled for this patient, the Cancel Existing Appointments window appears. By default, all appointments are selected for cancellation.
Note: If you mistakenly entered a Deceased date for a patient or if you do not wish to cancel future appointments, click Cancel to close the window. You must return to the Patient Registration page to remove an invalid Deceased date. - Reason — In the Cancel Existing Appointments window, select a cancellation reason, and then click OK.
The patient Quickview appears.
To hold statements for deceased patients
- Display the Patient Registration page: On the Patient Actions Bar, click Registration, and then click Full Registration.
- Scroll to the Billing section at the bottom of the Patient Registration page.
- Hold statements — Select Patient is deceased as the hold statement reason. This option also allows for more accurate reporting in Report Builder on active statement holds.
- Click Save.
The Portal access section on the Checkout and Patient Registration pages displays the Patient Portal status of the patient and the patient's family members. From this section, you can:
- Invite a patient or family member to register for the Patient Portal (or the Patient Information Center).
- View and manage Patient Portal access for this patient, including access by family members.
The Portal access section displays the names of all Patient Portal users who have access to this patient record. You can also:
- Click a Patient Portal user name to view the date that the user last logged in and the relationship of the user to the patient.
- If the Patient Portal user has successfully completed registration, you can send a password reset email if necessary.
- If the user has not registered, you can register the user in the office by clicking the Register now link. The invitation menu opens for you to register the user via one of several methods.
Note: For instructions on how to register a user for the Patient Portal, see To register a patient for the Patient Portal or Patient Information Center in the office.
- Confirm that the patient record is the same as the Patient Portal user name to verify that the patient has access to his own Patient Portal.
Note: Any other names that appear are Patient Portal users who have full access or billing-only access to the patient record.
The athenahealth account for Patient Portal users creates a clear distinction between:
- Patient's or caregiver's athenahealth account (email and password).
- Patient's or caregiver's access to your organization's Patient Portal.
Note: Patient Portal users do not need to be patients at your practice.
The athenahealth account exists separate from your organization.
- A patient or caregiver can use the athenahealth account to log on to any Patient Portal powered by athenahealth, as well as to other applications.
Note: Patients and caregivers can manage their athenahealth account from the My profile page of any Patient Portal they use.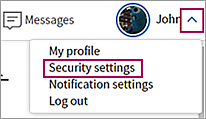
- Your organization manages a patient's access to your Patient Portal through the patient Quickview in athenaOne.
When you send a patient an email invitation to your Patient Portal, you grant permission for that patient to access your Patient Portal using their athenahealth account. If the patient or caregiver does not have an athenahealth account at that email address, they can create an athenahealth account using the invitation email you sent them.
When you delete a patient's Patient Portal account, you revoke that patient's access to your organization's Patient Portal; you are not deleting the patient's athenahealth account.
Patient Portal users can have different levels of access to patient records, as follows:
- Self — Patient Portal user is accessing her own patient record.
- Full access — Patient Portal user has full access to a patient record that is not his own. Full access is used in a family access scenario, such as when a mother has a Patient Portal account and accesses her child's patient record. (The Patient Portal user does not need to be a patient at your practice.)
- Billing-only access — Patient Portal user has billing-only access to a patient record that is not her own. A Patient Portal user with billing-only access can see only billing information, not health information. An example of this type of access is when a parent is the Patient Portal user with billing-only access to the patient record of a 20-year-old child.
Patient Portal users can access multiple records using the same login credentials (email address and password), for example, when a parent accesses her own patient record and the records of her children and elderly father.
Age of majority
The age of majority is governed by state law (in most states, the age of majority is 18). On the child's age of majority birthday, athenaOne automatically changes the access level for all family members who have full access to this patient record from full access to billing-only access. The practice or the patient can subsequently change the family member's access level or remove access at any time. If you are unsure of the age of majority in your state, check online. You can also contact the CSC to verify the age of majority in your state and control these settings.
When patients register for a Patient Portal account to access their own records, athenaOne identifies the Patient Portal user as a registered patient of the practice using the following matching logic.
- The following items entered on the Patient Portal registration page must match the corresponding items in athenaOne:
- First name
- Last name
- Date of birth
- Gender
- In addition, one of the following items must also match:
- Phone number, OR
- Email address
The best way to register patients for the Patient Portal is to register them in your office or to send them an email invitation. These methods are preferred because athenaOne knows who the patient is, who the provider is, and what department the patient is registered in; there's no need to ask the patient to enter any demographic information.
For example, when the patient receives an email invitation, opens it, and clicks Register Now:
- The first factor of authentication is the email itself.
- The second factor is the call or text message that the patient receives to confirm her identity.
Your practice has the patient's email address and phone number, and the patient's identity is confirmed when she responds to a message that the Patient Portal sends to the corresponding device.
When patients register for the Patient Portal on their own
When one of your patients searches the Internet for your practice, finds your website, and decides to register for the Patient Portal on their own (without an email invitation from your practice), no electronic link exists between the patient and your practice. The Patient Portal collects some initial information:
- Is this a patient or a patient's family member?
- Basic demographic information about the patient: first name, last name, gender, DOB, phone number, and email address.
The Patient Portal attempts to match this demographic information to existing patients at your practice by checking the first name, last name, gender, DOB, and either the phone number or email address. Even if this information matches one of your patients in athenaOne, the information constitutes only one factor of authentication, so the Patient Portal cannot tell the user whether it has confirmed that she is a patient at your practice.
Someone could fraudulently enter another person's first name, last name, gender, DOB, and phone number on the Patient Portal in an attempt to "phish" for PHI. The Patient Portal cannot reveal anything, including whether the named person is a patient at the practice, until there is a second factor of authentication, such as confirming the person's identity via phone or text message.
For this reason, the Patient Portal then asks the user to confirm his identity via phone or text message. After the user confirms his identity, the Patient Portal can safely indicate the user's next steps:
- If the user is an existing patient at your practice and enters the correct demographic information, the Patient Portal matches the user to a patient at your practice. This user sets a password and completes the Patient Portal registration without any issues.
- If the user is an existing patient at your practice but enters demographic information that does not match a patient record for your practice in athenaOne, a warning message instructs the user to call your office to resolve the problem. This user should not continue the Patient Portal registration process.
- If the user is a brand new patient, the demographic information she enters will not match any patient record for your practice in athenaOne. The Patient Portal prompts the user to select a provider and location, and then create a password. After the user does this, she is registered as a new patient at your practice, with the correct provider, department, and provider group; the user is also registered for the Patient Portal.
Note: New patients who register for your practice on the Patient Portal appear on the Manage Prospective Patients page.
From any patient-specific page that includes the Patient Actions Bar — such as the Appointment, Quickview, Check-in, and Patient Registration pages — you can view an audit history of all Patient Portal transactions for that patient, for example, who granted or deleted access to a Patient Portal user and the date of the transaction.
To display the Portal Access Audit History page: On the Patient Actions Bar, click Communicator, and then click Portal Access Audit History.
If you do not use the athenaCommunicator service, display the Portal Access Audit History page as follows: On the Patient Actions Bar, click Clinicals, and then click Portal Access Audit History.
Some patient records may have invalid or unreachable mobile phone numbers, which reduces the effectiveness of automated messaging communications.
These mobile numbers are not usable in the following scenarios:
-
Mobile phone numbers that are no longer effective with any mobile networks or unable to receive text messaging.
-
Invalid format in the Mobile phone field that renders them unusable for automated messaging.
-
Landline numbers in the Mobile phone field, which get sent (but do not receive) automated messaging.
To improve the accuracy and data hygiene of mobile phone numbers, we're introducing the following functionality:
-
Real-time automated messaging validation — athenaOne partners with phone validation vendors to determine in real-time if a mobile number can receive automated text messages. This applies to:
-
Existing mobile numbers
-
New mobile numbers (for example, after staff enters a new number on the add or edit contact window)
Important: We do not message the patient to ask them to verify the status of their mobile phone numbers. All notifications shown are based on data provided by our phone validation vendors.
-
-
Format validation — All mobile numbers, except international, need to have a 10 digit format. No alphanumeric characters are allowed.
-
Consistency of mobile phone management across various pages and workflows:
-
Capture of mobile phone will be required on Patient Registration, Quickview, and Check-in.
-
International phone numbers can be recorded on the Quickview and Check-in pages, in addition to the Patient Registration page (which already supported these numbers).
-
With this feature, you'll see the following changes:
-
Practice staff will see alerts about the validity and text delivery status of mobile phone numbers.
-
Using this information, practice staff can then have conversations with patients and the primary contacts to verify and update the mobile phone number. You can now better ensure that mobile phone numbers on file are valid and usable for patient outreach.
Note:
-
The alerts appear in the Phone field on the Patient Registration page and the Contact List section of the Quickview and Check-in pages.
-
The alerts appear on the Mobile Phone field of the patient, Chart Contact Details, and Primary contact.
If your practice tests features and trains your staff in support environments, you can test this feature with these numbers:
-
Valid "test" mobile numbers: 201-201-5544, 201-201-5053, 201-201-4041
-
Invalid format "test" mobile number: 201-201-6182
-
Unable to receive SMS "test" mobile number: 983-758-3455, 984-502-7828, 345-435-3452
Mobile phone is now a required field on the following pages:
-
Patient Registration (sometimes referred to as Full Registration)
-
Quickview
-
Check-in
We are making this requirement to prompt more collection of mobile phone numbers (if available). This will help you notify patients in a timely manner about various actions that are important for patient care and have revenue impact to your practice.
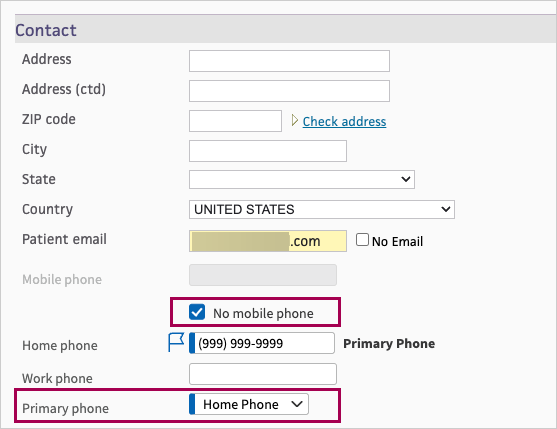
Important: Mobile phone cannot be made a non-required field. If the patient (or their primary contact) does not want to provide a mobile number, check the No mobile phone box to proceed.
Mobile phone is a required field, it cannot be made a non-required field.
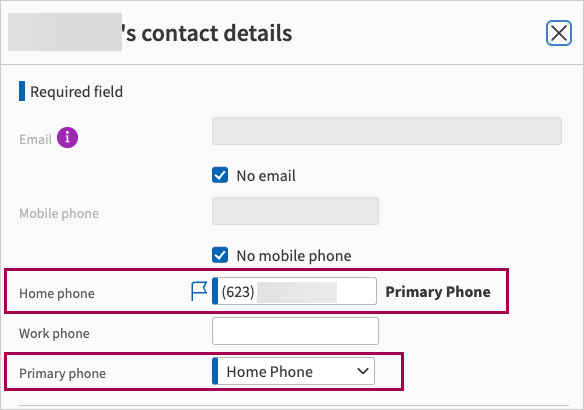
However, if the patient (or their primary contact) does not have a mobile number or does not want to provide a mobile number, check the No mobile phone box to confirm there is no mobile phone for the patient (or contact person).
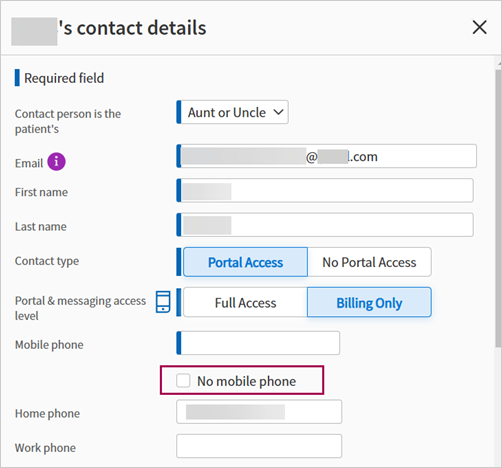
After you check the No mobile phone box, the:
-
Mobile phone field grays-out and becomes inaccessible.
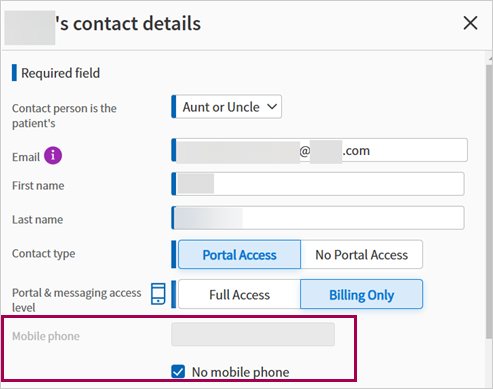
-
Primary phone becomes the Home phone, enter a home phone number to proceed.
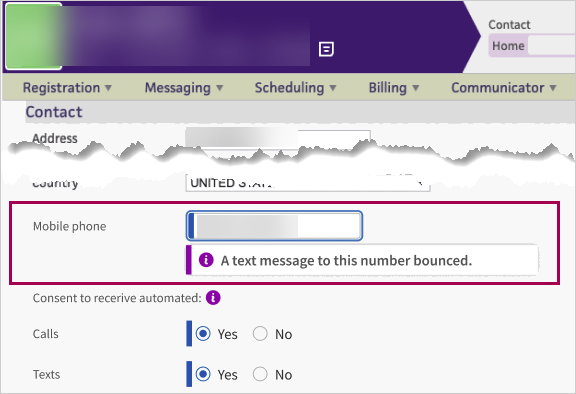
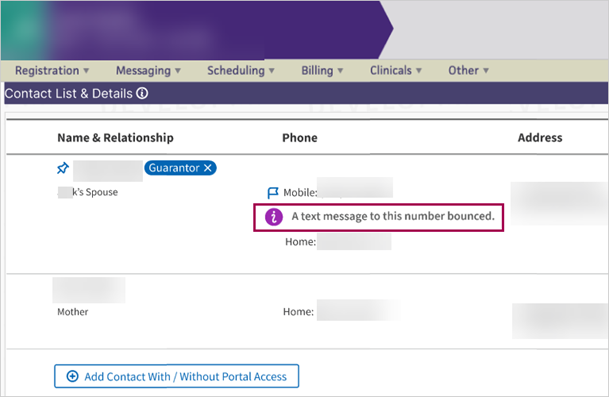
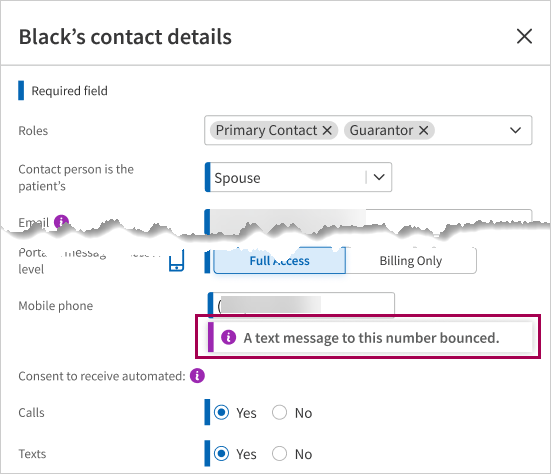
For patient records with a mobile phone number that recently failed automated text, athenaOne shows you that a text message sent to the mobile number bounced (meaning it wasn't successfully delivered). When you're shown that a text message bounced, ask the patient to provide a different mobile phone number.
The following images are examples of a bounced text message alert in the:
-
Main view of the Contact List.
-
Edit window of a contact.
When the patient's mobile number has missing consents or when you enter a completely new mobile number on the patient record, athenaOne searches in its database to determine if it has:
-
Any existing information on this number
-
Its text delivery status
-
Its validity (e.g., whether it is a US-based mobile number)
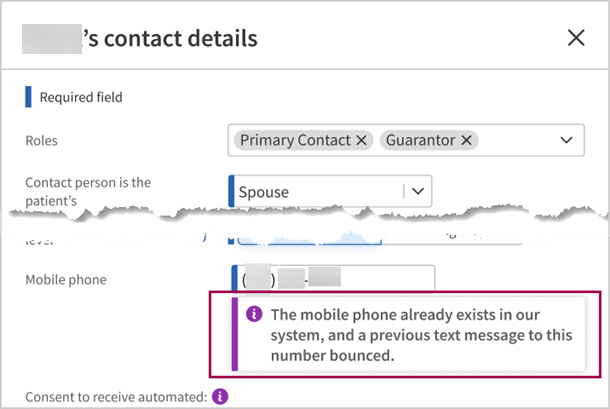
You will see different variations of the notifications depending on validation results. Here is an image example of:
-
The number already being used by another patient in athenaOne and a text failing to send.
-
athenaOne recognizing that a mobile number cannot receive text messages.
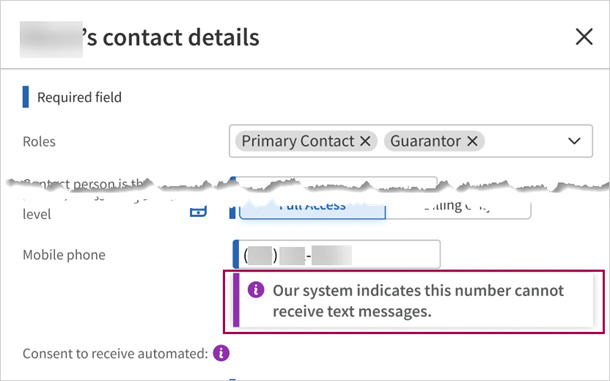
You will see notifications on invalid format when the mobile number has the following issues:
-
Alphanumeric characters

-
Over 10 digits

-
Repetition indicating an invalid number or typo

Important:
-
You are prevented from completing new patient registration or checking in a patient until they have a valid mobile number format.
-
For new patient registration, if the patient (or their primary contact) does not have a mobile number or want to provide a mobile number, check the No mobile phone box to proceed. Once you check this box, the Primary phone field will be changed to Home phone.
-
If your practice has the Home phone field set as a required field, we will not validate the format.
-
We do this to ensure you have flexibility to enter what is needed to complete patient registration.
You can record an international phone number for the patient and their primary contact on Patient Registration, Quickview and Check-in pages.
Consents to call and consents to text will not be collected for international phone numbers as we do not have the capability to contact them.

If your practice is a federally qualified health center (FQHC), you can use the following fields on the Quickview, Patient Registration, or Check-in page to collect data and calculate the federal poverty level of patients. This information also improves data collection for UDS reporting.
Note: The School-based health center patient and Public housing patient fields are not used in UDS reporting. However, you can designate a department as a school-based site or as a public housing service delivery site for UDS reporting. See To configure a department for UDS reporting.
- Family size
- Income
- Income level
- Agricultural worker
- Homeless status
- School-based health center patient
- Veteran status
- Public housing patient
Note: The data in the Family size, Income, and Income level fields is masked to protect patient privacy and avoid disclosure of sensitive demographic information. To edit these fields, click Edit or View.
Note: The UDS Financials section appears on Quickview and Check-In.
You can collect Federal Poverty Level data for UDS reporting and review a patient's UDS Federal Poverty Level history in a Federal Poverty Level — Calculation section.
-
Better collect household size and income on Quickview and Check-in.
-
Accurately see the Federal Poverty Level for the patient based on household size and income using guidelines in effect at the time of collection (while viewing history).
-
Quickly see the reporting expiration date for the collected information.
-
Easily see a patient's UDS Table 4 reporting history for 2023 and beyond.
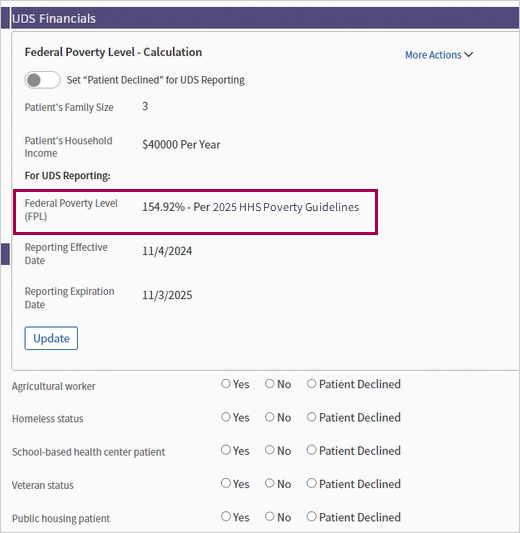
You collect household size and income information in the Federal Poverty Level — Calculation box of the UDS Financials section.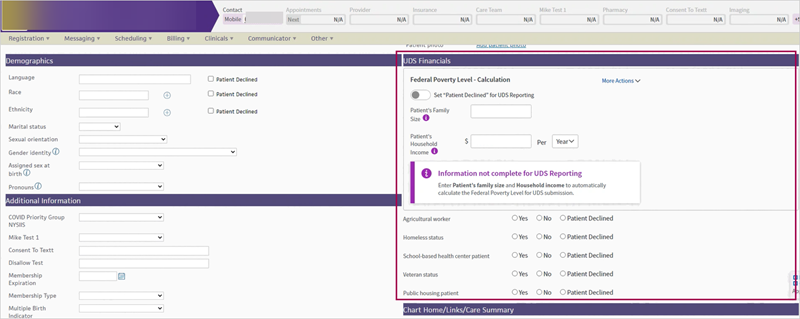
In the Federal Poverty Level — Calculation box, you can enter Patient's Family Size and Patient's Household Income for athenaOne to automatically calculate the Federal Poverty Level for UDS submission.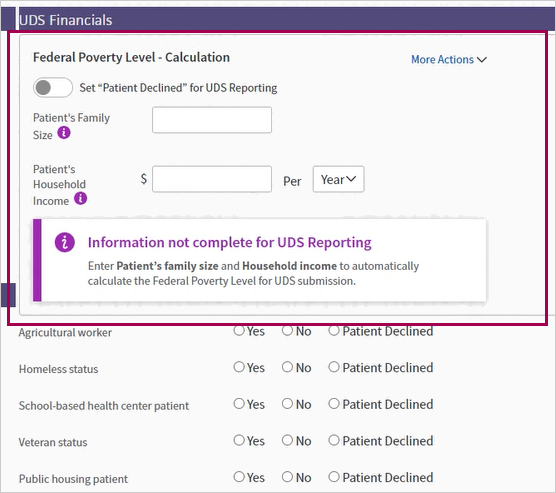
Note: The Health Resources and Services Administration (HRSA) requires that patient Federal Poverty Level data be collected within 12 months of the last calendar year visit or else be reported as "unknown" on UDS Table 4.
Does your practice use data differently than other practices and require a manual experience more similar to the legacy Financial section?
If your practice wants to manually calculate the range of the Federal Poverty Level (FPL), and then only enter that range, you can request the range version of this feature.
See Manually enter FPL range— setting required for more information.
This feature provides the following benefits:
-
Provides more accurate accounting of patients whose incomes are not collected
-
Provides more accurate UDS reporting
-
Reduces time entering income data
-
Increases satisfaction with UDS Federal Poverty Level data collection workflow
After completing the Patient's Family Size and Patient's Household Income fields:
-
athenaOne calculates the patient's Federal Poverty Level. For more information completing the fields in the Federal Poverty Level — Calculation box, see the Complete Federal Poverty Level — Calculation workflow section of this release note.
-
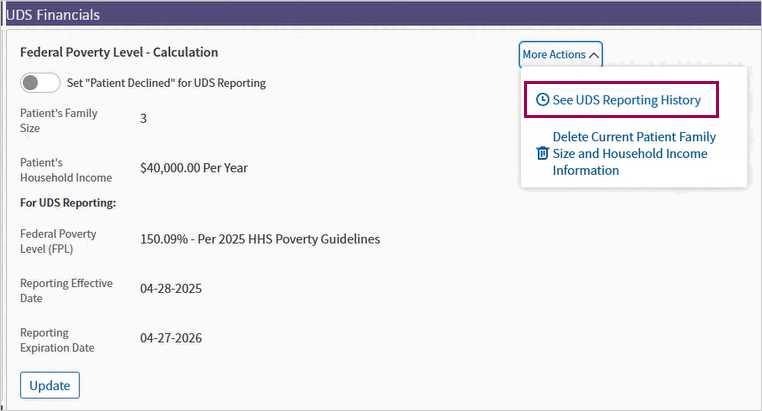
You can review a patient's Federal Poverty Level history, under More actions. For more information, see the Complete More Actions section of this release note.
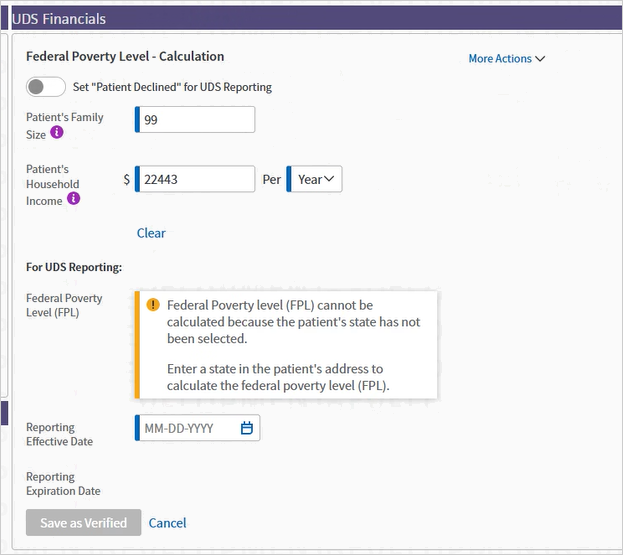
A patient must have an address with state specified on file to calculate Federal Poverty Level; if there is no state entered an alert appears informing you to enter address information.
In UDS Financials section, you can:
- Collect household size and income on Quickview and Check-in
- See the reporting effective and expiration date for the collected information
- See a patient's UDS Table 4 reporting history for 2023 and beyond.
- See an historical view of the patient's Federal Poverty Level and which UDS guidelines were in effect at the time of collection.
- Delete previously entered income
You can click the Set "Patient Declined" for UDS Reporting option in the Federal Poverty Level — Calculation box.
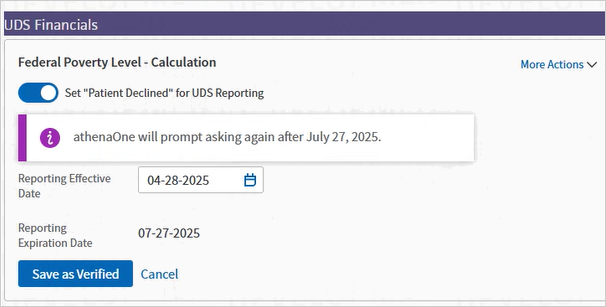
Note: When the patient declines UDS reporting, athenaOne tells you when you will be prompted to collect patient financials again. The reminder occurs three months from the date that the patient declined UDS reporting. If you would like to change the length of time, contact athenahealth Support or your Onboarding project team.
The prompt can be customized to appear any amount of time less than a year and can be set to a number of days, weeks, or months depending on when you want practice staff to ask again.
If you enter a 0 in the income field, the same alert appears.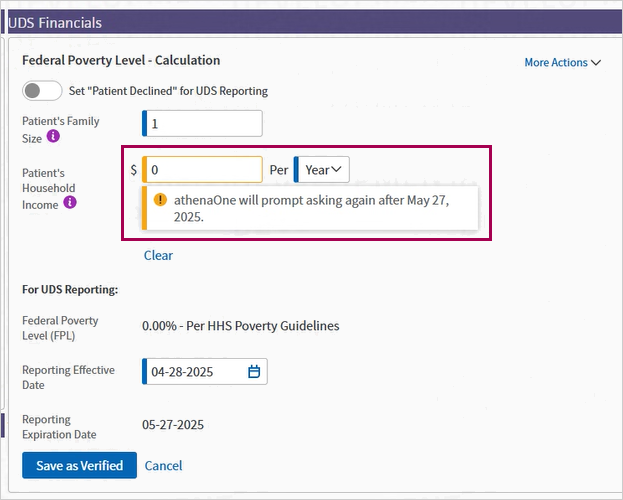
-
The history component of the app will only show one row per program year, rather than every update to patient Federal Poverty Level data. However, users can still see an audit history of all updates in the Patient Registration audit.
-
The legacy Federal Poverty Level fields on the Full Registration page will become read-only
-
The ability to upload documentation, editing the previous year's data, and leaving notes within the audit history will be available soon.
To access the Quickview, you must have the Quickview (or Quickview no financials) role or permission.
The reminder to collect this information again occurs three months from the date that the patient declined UDS reporting. If you would like to change the length of time, contact athenahealth Support or your Onboarding project team.
Your practice can request the range version of this feature by requesting that the Population Demographics - Federal Poverty Level Fields setting be enabled. Contact athenahealth Support or your Onboarding project team.
From the Federal Poverty Level — Calculation box in the UDS Financials section:
Federal Poverty Level — Calculation
-
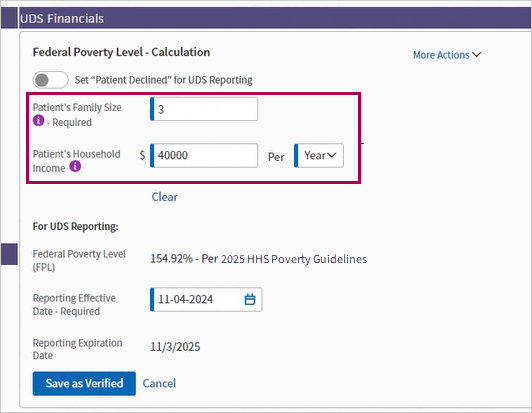
Patient's Family Size — Enter the size of the patient's household.
-
Patient's Household Income — Enter the income of the patient's household.
-
Per — Choose the rate at which the household receives the income. You can select:
-
Year
-
Month
-
2 Weeks
-
Week
-
For UDS Reporting
-
Federal Poverty Level (FPL) — athenaOne automatically fills this field based on the information you added in the Patient's Family Size, Patient's Household Income, and Per fields. Once you complete those fields, the Federal Poverty Level value appears automatically.
-
Reporting Effective Date — Enter a date or choose one using the calendar icon.
-
Reporting Expiration Date — The expiration date automatically fills in as one year from the effective date.
-
Click Save as Verified.
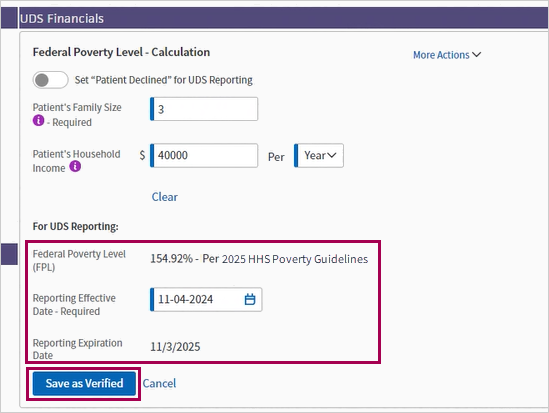
Once you click Save as Verified, the Federal Poverty Level — Calculation box reloads and is then read-only. Click Update to edit the information.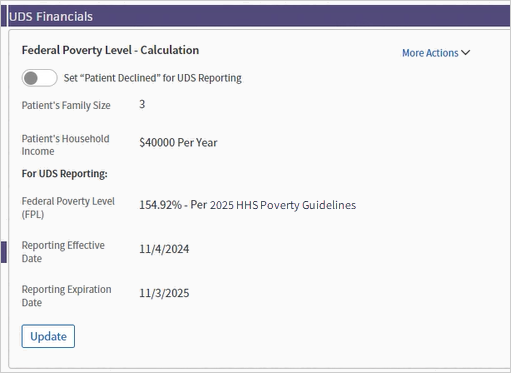
Whenever you return to the Federal Poverty Level — Calculation box, you can see the reporting effective and expiration dates right with the other Federal Poverty Level information.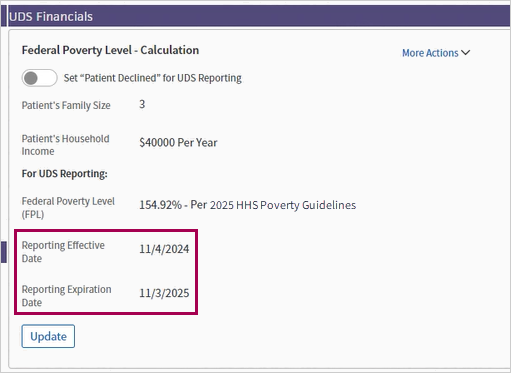
Under More Actions, you can click See UDS Reporting History to review a patient's UDS Table 4 reporting history for 2023 and beyond.
The UDS Financial Reporting History window appears over the Quickview or Check-in pages where you can easily see the Federal Poverty Level for the patient based on household size and income using guidelines in effect at the time of collection.
From the UDS Reporting History window, in the Poverty Level Guideline Used column, you can see the guidelines used for calculating the patient's Federal Poverty Level represented as the yearly version used at the time of collection (for example the year 2024).
The user, be it a practice user or an athenahealth user, appears in the Last Saved By column.

To delete previously entered income:
- Click More Actions.
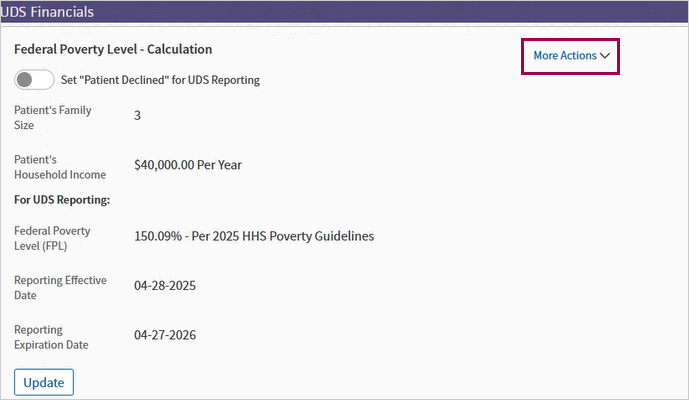
- click Delete Current Patient Family Size and Household Income Information. A pop-up window appears where you're asked if you want to proceed.
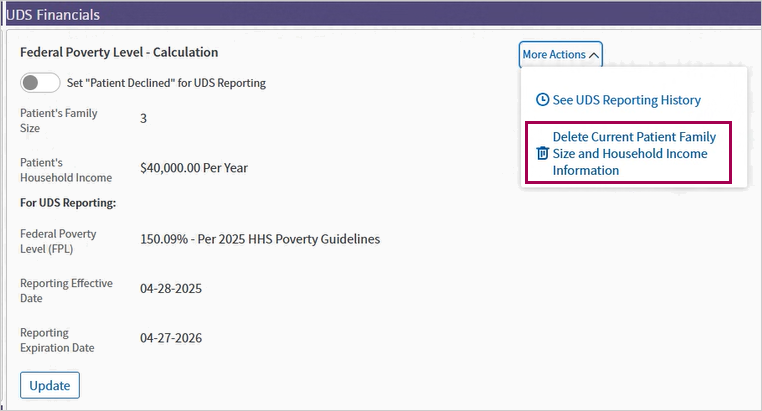
-
Click OK to delete previously entered information.

-
View the alert that appears informing you that information for UDS reporting is not complete.
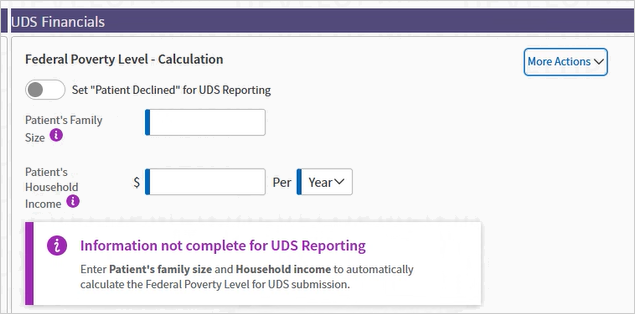
Your practice may use data differently than other practices. If your practice wants to manually calculate the range of the Federal Poverty Level (FPL) and then only enter that range.
Your practice can request the range version of this feature by requesting that the Population Demographics - Federal Poverty Level Fields setting be enabled.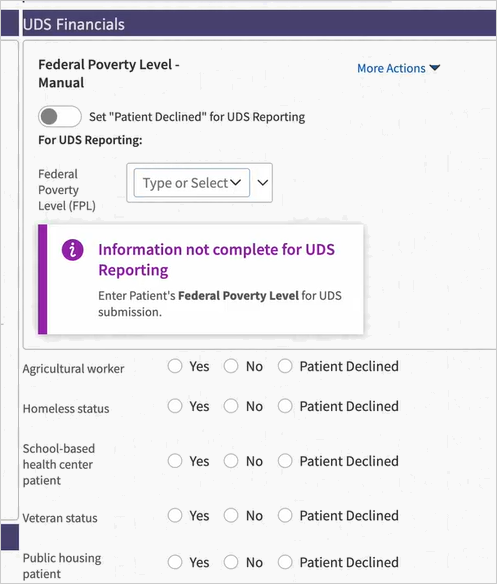
- Federal Poverty Level (FPL) — You can enter a date manually or click the calendar date icon to select a date.
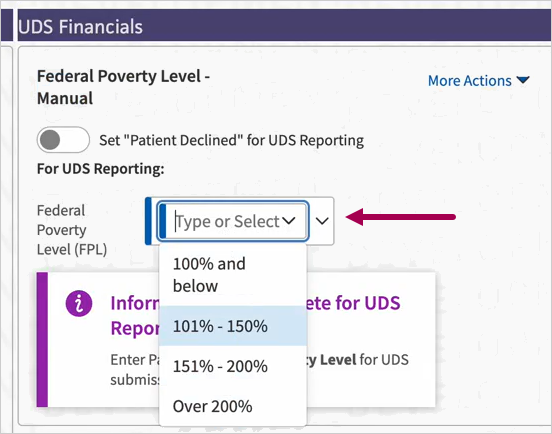
-
Reporting Effective Date — You can:
-
Enter a date manually
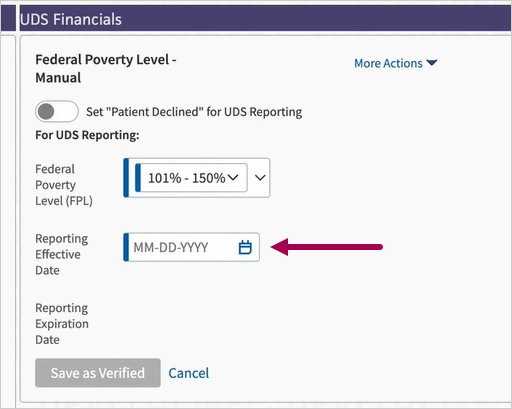
-
Click the calendar icon to select a date
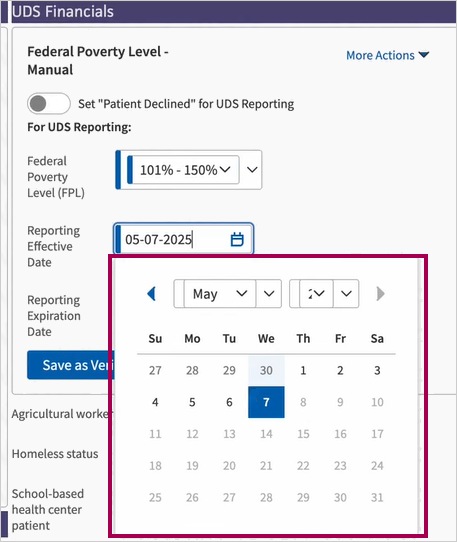
-
-
Reporting Expiration Date — athenaOne fills this field automatically as one year from the Reporting Effective Date.
-
Click Save as Verified.
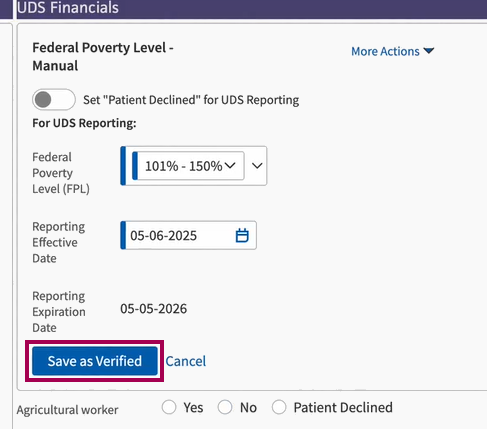
The UDS Financials section is read-only once you click Save as Verified. Click Update to edit the fields.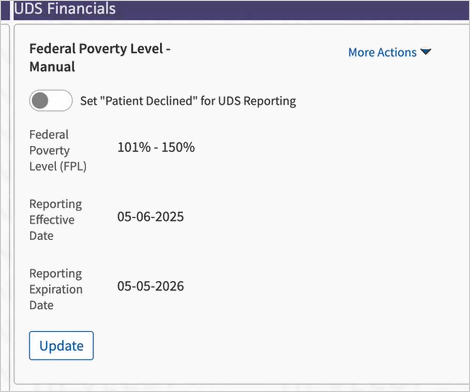
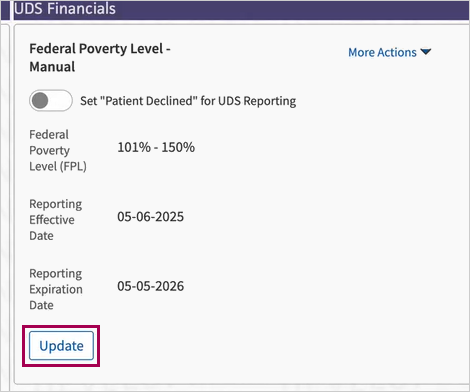
To update the FPL range, click Update.
You can edit the Federal Poverty Level (FPL) and Reporting Expiration Date fields. athenaOne fills the Reporting Expiration Date field automatically as one year from the Reporting Effective Date.
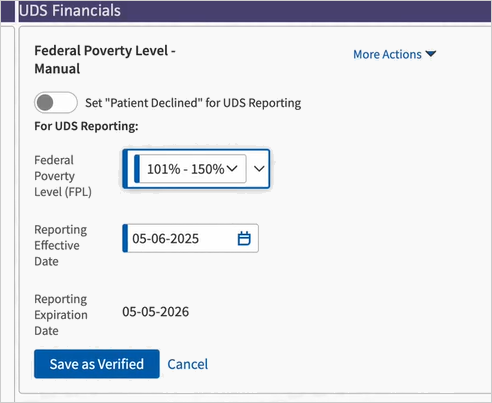
Click Save as Verified to submit the update.
Click More Actions to:
-
See UDS reporting history
-
Delete Patient Family Size and Household Income Information
-
Click More Actions.
-
Click See UDS reporting history.
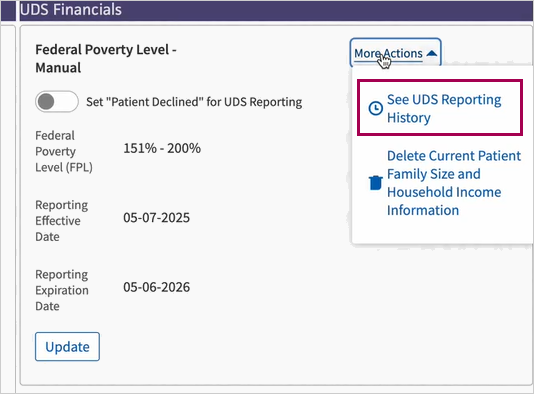
-
View the UDS reporting history.

-
Click More Actions.
-
Click Delete Patient Family Size and Household Income Information.
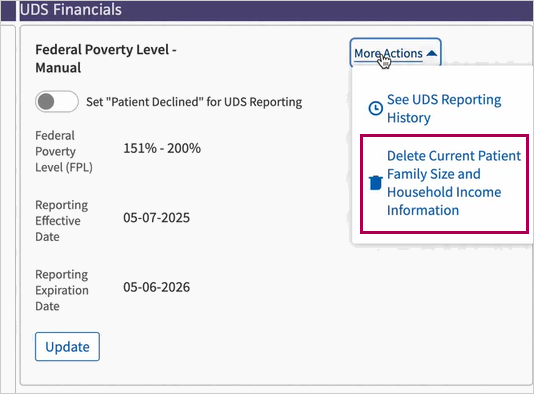
-
Confirm the UDS Financials section only displays the empty Federal Poverty Level (FPL) field.
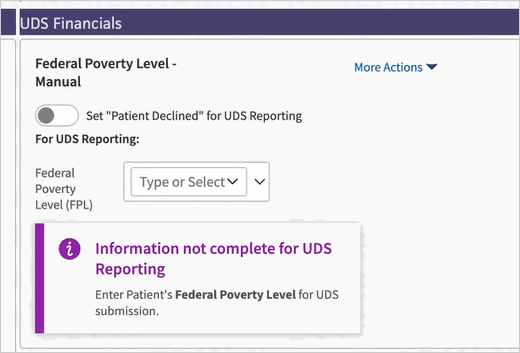
You can click the Set "Patient Declined" for UDS Reporting option in the Federal Poverty Level — Calculation box.

Note: When the patient declines UDS reporting, athenaOne tells you when you will be prompted to collect patient financials again. The reminder occurs three months from the date that the patient declined UDS reporting. If you would like to change the length of time, contact athenahealth Support or your Onboarding project team.
The prompt can be customized to appear any amount of time less than a year and can be set to a number of days, weeks, or months depending on when you want practice staff to ask again.
The Health Resources and Services Administration (HRSA) Uniform Data System (UDS) report requires community health centers with 330g and 330h grants to provide specific values for homeless and agricultural worker status. You can require more specific values for the Agricultural worker and Homeless status fields and you can make these fields required during check-in.
Note: To set the level of specificity for these fields or to make them required during check-in, please contact the CSC from athenaOne > Support > Success Community > Contact Client Support Center.
In the total homeless count for UDS Table 4, athenaOne includes all patients whose homeless status is Yes (you can edit a patient's homeless status on the Quickview, Patient Registration, and Check-in pages). athenaOne includes patients in the total homeless count using their first recorded year of homeless status, even if their status changes later. For example, if a patient is homeless on January 1, 2021, and receives housing by the time they visit on February 1, 2021, the patient is still included in the yearly total homeless count.
The Patient Demographics report type in the Report Builder provides the following display columns and filters (in the Patient category). You can use these display columns and filters to create your own reports instead of requesting custom reports or running a full UDS Table 4 report for this information.
- Agricultural Worker
- Agricultural Worker Type
- Family Size
- Homeless Status
- Homeless Type
- Income
- Income Level
- Patient Gender Identity
- Patient Sexual Orientation
- Public Housing Patient
- School-Based Health Center Patient
- Veteran Status
For information about creating a poverty-based sliding fee plan for a patient, see the Poverty-Based Sliding Fee Plans or the Quickview page.
| Available to Select as Common Patient Index (CPI) Shared Patient Fields | CPI Shared Patient Field Group | ||
| Identification | |||
| Legal last name |
The patient's legal last name. |
CPI Req |
|
|---|---|---|---|
| Legal first name |
The legal first name (given name) of the patient. Note: Do not enter only a punctuation mark (, . ; ? !) or symbol (@, #, %, ^, &, *, (, ), _, etc.) with no letters in this field. |
CPI Req | |
| First name used |
The patient's preferred first name or nickname. The name in the First name used field is the name that the patient goes by instead of the legal first name. This name appears in the patient banner (along with the legal first name); on the patient schedule; in athenaCommunicator messages (email, SMS, and phone); and on the Patient Portal. Note: Do not enter only a punctuation mark (, . ; ? !) or symbol (@, #, %, ^, &, *, (, ), _, etc.) with no letters in this field.
The name in the First name used field can reflect the patient's gender identity (for example, if a patient has the legal name "Nicholas" but goes by the name "Nicole"). For more information about the patient banner for transgender and nonbinary patients, see Transgender and Nonbinary Patient Care. Note: The patient's First name used is not transmitted on electronic forms.
You can use the Find patient tool to search for a name in the First name used field the same way you search for a legal first name. |
CPI Opt | |
| Middle name, suffix | The patient's middle name and name suffix (for example, Jr.), if any. | CPI Opt | |
| Previous name (last, first) |
Enter the patient's previous first and last names (if applicable): last name in the left-most field and first name in the right-most field. |
CPI Opt | |
| Legal sex |
The patient's legal sex (male or female) on legal documents such as the insurance card or driver's license. Read here to understand how this data impacts measure enrollment in Quality Reporting programs. Note: Exam templates — such as the History of Present Illness Templates, Review of Systems Templates, and Physical Exam Templates — can be configured for male or female patients only. If your practice does not require the patient's gender/sex to be specified as part of patient registration or the check-in process, some of your exam templates may not be available when you see patients in an expedited encounter. |
CPI Opt | |
| DOB | The patient's date of birth. | CPI Req | |
| SSN |
The patient's Social Security number. Note: You can enter SSNs when you first register a patient or when you add the SSN to an existing patient registration. To see the full 9 digits of already-entered SSNs, you must have the "Display Full SSN" role. |
CPI Opt | |
| Mother's maiden name |
The maiden name of the patient's mother. This information is used only as an additional means of determining identity, especially if information is received from non-athenahealth systems. |
CPI Opt | |
| Preferred name (discontinued) |
The Preferred name field has been replaced by the First name used field.
|
CPI Opt | |
| Contact | |||
| Address |
The first line of the patient's address. For apartments, use this format: 1199 Whitney Ave #310. Note: You can click the Check address option (to the right of the ZIP code field) to validate the address that you entered (you must first enter the address and either the ZIP code or the city and state).
See also: Address Management |
CPI Opt | |
| Address (ctd) |
The second line of the patient's address. Note: You can click the Check address option (to the right of the ZIP code field) to validate the address that you entered (you must first enter the address and either the ZIP code or the city and state). |
CPI Opt | |
| ZIP code |
The patient's 5-digit ZIP code. The ZIP code autopopulates the City and State fields from the athenahealth ZIP code database. (If you find an error, please contact the CSC from athenaOne > Support > Success Community > Contact Client Support Center.) Note: You can click the Check address option (to the right of the ZIP code field) to validate the address that you entered (you must first enter the address and either the ZIP code or the city and state). |
CPI Opt | |
| City |
The patient's city. This field is autopopulated based on the ZIP code, but you can override it. Note: You can click the Check address option (to the right of the ZIP code field) to validate the address that you entered (you must first enter the address and either the ZIP code or the city and state). |
CPI Opt | |
| State |
The patient's state. This field is autopopulated based on the ZIP code, but you can override it. Note: You can click the Check address option (to the right of the ZIP code field) to validate the address that you entered (you must first enter the address and either the ZIP code or the city and state). |
CPI Opt | |
| Country |
The patient's country. This field is displayed only if the "Foreign Patient Addresses" feature is enabled for your practice. If you need the Country field, contact the CSC from athenaOne > Support > Success Community > Contact Client Support Center to request it. Some countries have an address format that differs from the U.S. default of address, city, state, and ZIP code. athenaOne automatically formats foreign mailing addresses according to the country's specifications for all claims, bills, statements, and other correspondence. Note: If the Country field is enabled for your practice and the country is not the United States, select the country from the menu, and then enter the two-letter postal abbreviation for the country in the State field. |
CPI Opt | |
| ID Number Override | If your practice generates its own numeric patient IDs (rather than using athenaOne auto-generated patient IDs), enter the number. If you leave this field blank, athenaOne automatically assigns the patient an ID number. This field appears only at the time of initial patient registration. | ||
| Home phone |
The patient's home phone number. |
CPI Opt | |
| Mobile phone |
The patient's mobile phone number; format: (999) 999-9999. If the mobile phone is the same as the patient's home phone, click the Copy from home link. On the Check-in and Patient Registration pages, you must fill in this field. If the patient does not have a mobile phone or declines to provide the number, select the No mobile phone option. |
CPI Opt | |
| Consent to call |
The Consent to call field helps you comply with the Telephone Consumer Protection Act. This field indicates whether you obtained "express consent" from the patient to receive automated calls from your practice to the patient's mobile phone. Automated calls include ReminderCall, GroupCall, ResultsCall, and Self-Pay calls. |
||
| Consent to text |
This field indicates whether you obtained "express consent" from the patient to send automated text messages from your practice to the patient's mobile phone. Automated text messages are used by the ReminderCall, GroupCall, ResultsCall, and Self-Pay services. If the patient consents to receive text messages, athenaOne automatically enables the Text Message options in the Communicator Automated Messaging Preferences section of the Privacy Information page for that patient. Patients are charged standard message and data rates for text messages from your practice. Note: If a phone number is provided in the Mobile phone field, you must set the Consent to text option to Yes or No to save changes on the Check-in, Patient Registration, or Quickview page. |
||
| Work phone | The patient's business phone number; format: (999) 999-9999 | CPI Opt | |
| Patient email |
The patient's email address. This field is required on the Patient Registration and Check-in pages for practices using athenaCollector and athenaCommunicator. Selecting the No email option clears any email address or other notation present in the Patient email field. If the No email option is already selected, the patient has already informed another staff member at your practice that he or she does not have an email address or does not wish to provide one.
Note: athenaCommunicator identifies email addresses that result in a hard bounce and prevents subsequent attempts to send emails to those addresses. Email delivery is attempted to these emails after a one-month time interval to help re-validate if the email address has been updated or is still invalid. |
CPI Opt | |
| Patient email | The patient's direct email (if available). | ||
| Portal access |
The Portal access section displays the Patient Portal status of the patient and the patient's family members. From this section, you can:
The Portal access section displays the names of all Patient Portal users who have access to this patient record.
For more information, see "Portal access section." |
||
| Contact preference |
Select the contact method preferred by the patient. Note: The contact preference that you select on this page has no effect on the athenaCommunicator messaging preferences configured on the Privacy Information page. |
||
| Demographics | |||
| Language |
Select the patient's preferred language from the menu. If the patient does not provide a language, check the Patient Declined box. By default, a short list of the values that you most commonly select appears. To select a different value, enter the first few letters of the desired language and select it from the list. Note: athenaOne uses the Library of Congress ISO 639 standard with codes in the ISO 639-2 column to populate the language list.
Patient Declined checkbox — This checkbox is used to populate the value "61^Patient Declined" for language in outbound interfaces. |
CPI Opt | |
| Race |
The patient's racial affiliation. To select more than one race, click the plus icon Note: athenaOne uses the CDC Race and Ethnicity Code Set Version 1.0 for races and ethnicities.
Patient Declined checkbox — This checkbox is used to populate the value "61^Patient Declined" for race in outbound interfaces. |
CPI Opt | |
| Ethnicity |
The patient's ethnic affiliation. To select more than one ethnicity, click the plus icon Note: athenaOne uses the CDC Race and Ethnicity Code Set Version 1.0 for races and ethnicities.
Patient Declined checkbox — This checkbox is used to populate the value "61^Patient Declined" for ethnicity in outbound interfaces. |
CPI Opt | |
| Marital status | The patient's marital status. | CPI Opt | |
| Sexual orientation |
The patient's sexual or romantic preference:
The options in the Sexual orientation field are based on 2015 edition certification requirements. If you see patients with additional sexual orientations, you can capture this information by selecting the Something else, please describe option and then entering the patient information in the free-text field.
Note: To protect patient privacy, the data in the Sexual orientation, Gender identity, and Assigned sex at birth fields is masked on the Quickview, Patient Registration, and Check-In pages. To edit these fields, click Edit. |
CPI Req | SOGI |
| Gender identity |
The patient's internal sense of self as male, female, both male and female, or neither gender. A patient may identify as transgender or nonbinary if their gender identity is different than their assigned sex at birth.
The options in the Gender identity field are based on 2015 edition certification requirements. If you see patients with additional gender identities, you can capture this information by selecting the Additional gender category / other, please specify option and then entering the patient information in the free-text field.
Note: To protect patient privacy, the data in the Sexual orientation, Gender identity, and Assigned sex at birth fields is masked on the Quickview, Patient Registration, and Check-In pages. To edit these fields, click Edit. |
CPI Req | SOGI |
| Assigned sex at birth |
The patient's sex assigned at birth is generally determined by their physical anatomy at birth. This may be the same or different than the patient's gender identity and legal sex.
Read here to understand how this data impacts measure enrollment in Quality Reporting programs. Note: To protect patient privacy, the data in the Sexual orientation, Gender identity, and Assigned sex at birth fields is masked on the Quickview, Patient Registration, and Check-In pages. To edit these fields, click Edit. |
CPI Req | SOGI |
| Pronouns |
The personal pronouns that reflect the patient's gender identity (the pronouns may not be tied to the patient's gender identity).
|
CPI Req | SOGI |
| Homebound? | Indicates whether the patient is homebound. | CPI Opt | |
| Fields for FQHCs | |||
| Family size | CPI Opt | ||
| Income (per Pay Period) | CPI Opt | ||
| Pay Period | CPI Opt | ||
| Income level | CPI Opt | ||
| Agricultural worker | CPI Opt | ||
| Homeless status | CPI Opt | ||
| School-based health center patient | CPI Opt | ||
| Veteran status | CPI Opt | ||
| Public housing patient | CPI Opt | ||
| Additional Information | |||
| How did you hear about us? | This field is a list of ways that patients heard about your practice. The contents of this menu are administered on the Referral Sources page. | CPI Opt | |
| Specify (if Other, above) | If you select Other in the How did you hear about us? field, you can enter a free-text source here. | CPI Opt | |
| Patient care summary and letter delivery preference |
Indicates whether a patient prefers to receive provider-signed letters and the Patient Care Summary on the Patient Portal or on paper. This preference persists from appointment to appointment. You can set it on the Quickview, Check-in, Checkout, or Patient Registration page. Note: For ambulatory departments that use athenaClinicals without athenaCommunicator, your patients can access their electronic Patient Care Summary online using the Patient Information Center, a slimmed-down version of the athenaCommunicator Patient Portal. |
||
| Provider/Registration Dates | |||
| Usual provider |
The patient's primary provider at this practice. By default, the name of the rendering provider is printed at the top of patient statements. If you prefer to print the name of the usual provider at the top of patient statements, please contact the CSC from athenaOne > Support > Success Community > Contact Client Support Center. |
||
| Registration department | The department in which the patient was initially registered in the system. | ||
| Primary department |
The patient's current active department. This is typically the department at which the chart is kept. It may differ from the department of registration if the patient has been transferred from one department to another. |
||
| Chart home |
The department where the patient's chart is normally kept. |
||
| Registration date | The date that the patient was registered in the athenaOne system. For new patients, the default is the current date. | ||
| Deceased date |
Used to record the patient's date of death if the patient dies. When a date is entered in this field, the field is displayed on the patient Quickview page with the date in red. Note: If a patient dies, you can also mark the account as inactive using the Status menu on the patient Quickview page. |
CPI Opt | |
| Privacy | |||
| Notices on file |
The number of checkboxes that appear for this field depends on your practice settings and other athenahealth service options. Checked boxes indicate that the patient has received/signed the privacy form or notice. Note: If you select the Privacy Notice option in the Notices on file field, athenaOne automatically sets the Medication History Authority field to Yes (if you have not yet selected Yes or No for this field).
If the patient has any privacy notes and requests, they appear below the checkboxes. These items are administered using the Privacy Information page (click the Manage Privacy link to display this page). Note: If a patient turned 18 since her last visit, a message appears at the top of the Quickview and Check-in pages to inform you that the patient has turned 18 and may need to re-sign your HIPAA consent forms. |
||
| CIIS Consent |
Appears if your practice uses an immunization registry interface with athenaClinicals.
If your immunization registry requires patient consent (an opt-in requirement), athenaClinicals will send immunization information only for those patients for whom you have selected Yes for CIIS Consent (CAIR for California).
If your immunization registry does not require consent (an opt-out requirement), athenaClinicals will send immunization information for all patients, except for those for whom you have selected No for CIIS Consent. In this situation, no selection is the same as a Yes selection.
Some registries have different consent requirements for children than adults, so you may see different options after a patient turns 19. Please consult your local registry to make sure that you understand the local requirements.
Note: This field appears only after the initial patient registration information has been saved. |
||
| IMMTRAC Consent |
This option appears if you practice in Texas and you have an interface with the Texas Immunization Registry (ImmTrac2). Select Yes or No to indicate whether the patient (or parent) gives explicit consent to share immunization information with ImmTrac2. Important: The Texas Immunization Registry rejects a patient's vaccine information unless the patient explicitly consents for the practice or hospital to share the information with the registry. For more information, see Immunization Registry Interfaces. |
||
| Medication History Authority |
Select Yes or No to indicate whether the patient has signed a consent form allowing your practice to download his or her medication history from Surescripts. Note: If you select the Privacy Notice option in the Notices on file field, athenaOne automatically sets the Medication History Authority field to Yes (if you have not yet selected Yes or No for this field). See Medication History Download for more information. |
||
| Patient notes | The notes you enter here also appear in the Patient notes field on the Quickview and Check-in pages. The notes are not printed on any form. | CPI Opt | |
| Emergency Contact | |||
| Name | Enter the name of the emergency contact for the patient. This information is for reference only. | CPI Opt | |
| Relationship | Select the relationship of the contact to the patient from the menu. | CPI Opt | |
| Home phone | Enter the emergency contact's home phone number. | CPI Opt | |
| Mobile phone | Enter the emergency contact's mobile phone number. | ||
| Next of Kin | |||
| Name |
The patient's next of kin, which may be different from the patient's guardian, guarantor, or emergency contact. Note: All three Next of Kin fields are available for use in Report Builder and as magic words for Billing Slips and Forms and Documents. |
||
| Relationship | How the next of kin is related to the patient. Select an option from the list, or leave this field blank. | ||
| Phone | The phone number for the patient's next of kin. | ||
| Employment | |||
| Employer name |
The name of the patient's employer. If the patient's relationship to insured is SELF when adding a policy, the Employer name field on the patient's Add Policy page will default to the value in this field. Click the choose link to populate this field. This information appears in field 11B on the CMS-1500 form. The list of available employers is administered via the Employers page. |
CPI Opt | |
| Employer phone | The employer's phone number. This field is for reference only. | CPI Opt | |
| Usual occupation (current or most recent) |
The patient's usual or most recent occupation. Enter the first few characters of the occupation and select from the matching list. If the occupation is not found, enter it as free text.
Includes the Occupation ONETSOC Detail (ODH) value set.
Note: If your (ambulatory) practice reports patient industry and occupation data to cancer registries, you must select an occupation and industry from the lists on the Patient Registration page to comply with ONC reporting requirements. The lists are provided by the Office of the National Coordinator for Health Information Technology (ONC) and contain 272 industry and 540 occupation concept codes and descriptors. If your (ambulatory) practice does not report patient industry and occupation data to cancer registries, the ONC does not require that you use the ONC list to report occupation and industry. |
CPI Opt | |
| Usual industry |
The patient's usual or most recent occupational industry. Enter the first few characters of the industry and select from the matching list. If the industry is not found, enter it as free text.
Includes the Industry NAICS Detail (ODH) value set.
Note: If your (ambulatory) practice reports patient industry and occupation data to cancer registries, you must select an occupation and industry from the lists on the Patient Registration page to comply with ONC reporting requirements. The lists are provided by the Office of the National Coordinator for Health Information Technology (ONC) and contain 272 industry and 540 occupation concept codes and descriptors. If your (ambulatory) practice does not report patient industry and occupation data to cancer registries, the ONC does not require that you use the ONC list to report occupation and industry. |
CPI Opt | |
| Guardian | |||
| Last name | The last name of the patient's legal guardian, in case it is not the same person as the guarantor (for example, in the case of separated parents). This information is for reference only and is not used anywhere else in the system. | CPI Opt | |
| First name | The first name of the patient's legal guardian. | CPI Opt | |
| Middle name, suffix | The middle name and name suffix of the patient's legal guardian. | CPI Opt | |
| Guarantor (now read-only on Patient Registration) | |||
| Patient's relationship to guarantor |
Select who the patient is, in relation to the guarantor. The guarantor is the person who appears as the addressee on patient statements.
Patients who are minors If a new patient is a minor, you must select a guarantor relationship. However, if the Specialty type field on the Departments page is set to "Pediatric Medicine," this field defaults to "Child." This field also defaults to "Child" at the provider group level if the Group specialty field on the Provider Groups page is set to "Pediatric Medicine."
Note: When you remove a patient from a family billing relationship, athenaOne does not delete the guarantor data in the patient's account. You can update or delete this data manually on the Patient Registration page. If the patient is billed under a guarantor in multiple departments, you must remove the patient from the guarantor in each department before you can update the Patient's relationship to guarantor field to Self. |
CPI Opt | Guarantor |
| Guarantor (name to whom statements are sent (now read-only on Patient Registration)) | |||
| Last name | Last name of guarantor. | CPI Opt | Guarantor |
| First name |
First name of guarantor. The guarantor is the person who appears as the addressee on patient statements.
Note: Guarantor is used for the Family Billing feature. After one family member is registered, additional family members can be linked to the same guarantor. |
CPI Opt | Guarantor |
| Middle name, suffix | Middle initial and suffix (for example, Sr., Jr., etc.) of guarantor. | CPI Opt | Guarantor |
| DOB | Enter the guarantor's date of birth. | CPI Opt | Guarantor |
| Mailing Address | |||
| Same as patient's address | Select this option if the guarantor's address is the same as the patient's address. | ||
| Address |
The guarantor address (if different from the patient's). Used as the send-to address for patient statements. If this field is blank, the patient's address is used as the address for patient statements. For apartments, use the format [Street] #[Apt. Number]: for example, 1199 Whitney Ave #310. Note: You can click the Check address option (to the right of the ZIP code field) to validate the address that you entered (you must first enter the address and either the ZIP code or the city and state). |
CPI Opt | Guarantor |
| Address (ctd) |
The optional second line of the guarantor address (if different from the patient's). Used as the send-to address for patient statements. If this field is blank, the patient's address is used as the address for patient statements. Note: You can click the Check address option (to the right of the ZIP code field) to validate the address that you entered (you must first enter the address and either the ZIP code or the city and state). |
CPI Opt | Guarantor |
| ZIP code |
The guarantor's ZIP code. The ZIP code autopopulates the City and State fields from the athenahealth ZIP code database. If you find an error, please contact the CSC from athenaOne > Support > Success Community > Contact Client Support Center.) Note: You can click the Check address option (to the right of the ZIP code field) to validate the address that you entered (you must first enter the address and either the ZIP code or the city and state). |
CPI Opt | Guarantor |
| City |
The guarantor's city. Note: You can click the Check address option (to the right of the ZIP code field) to validate the address that you entered (you must first enter the address and either the ZIP code or the city and state). |
CPI Opt | Guarantor |
| State |
The guarantor's state. Note: You can click the Check address option (to the right of the ZIP code field) to validate the address that you entered (you must first enter the address and either the ZIP code or the city and state). |
CPI Opt | Guarantor |
| Country |
Select the guarantor's country. This menu appears if your practice uses the country of address feature. |
CPI Opt | Guarantor |
| Optional Information | |||
| SSN |
The guarantor's Social Security number (optional).
This field synchronizes with the patient's own information
if the Patient's relationship to guarantor
field is set to Self. For new patients, this synchronization takes place
as you register the new patient on the Patient
Registration page. For existing patients, this synchronization takes
place when you open the Patient
Registration page. |
CPI Opt | Guarantor |
| Phone |
The guarantor's phone number (optional).
This field synchronizes with the patient's own information, if the Patient's Patient's relationship to guarantor field is set to Self. For new patients, this synchronization takes place as you register the new patient on the Patient Registration page. For existing patients, this synchronization takes place when you open the Patient Registration page. |
CPI Opt | Guarantor |
|
The guarantor's email address. Select the No Guarantor Email option if the guarantor has no email address or declines to provide it. |
CPI Opt | Guarantor | |
| Employer |
The guarantor's employer.
This field synchronizes with the patient's own information, if the Patient's relationship to guarantor field is set to Self. For new patients, this synchronization takes place as you register the new patient on the Patient Registration page. For existing patients, this synchronization takes place when you open the Patient Registration page. |
CPI Opt | Guarantor |
| Family Members (share the same guarantor) |
You can click:
|
||
| Billing | |||
| Hold statements | To hold patient statements, select a reason from this menu. You can clear hold reasons using this menu by selecting the (do not hold statements) option. | ||
| Apply hold statement to all copies of this patient's record | If your practice uses provider groups, this option appears below the Hold statements menu. To apply the same hold status to statements from all provider groups where this patient is registered, select this option. | ||
| Clear all family members with the same current status | When you select (do not hold statements) from the Hold statements menu, this option appears. Select this option to clear the hold statement status from all family members. | ||
| Statements delivered online only |
Select this option if the patient wants to have statements delivered online only via the Patient Portal.
This option appears if your practice has the Allow Online Statements feature enabled and the patient uses the athenaCommunicator Patient Portal. |
||
| Statement note | Any note entered here will print on statements sent to this patient (75 characters max). The note appears on the patient statement above the dunning message. | CPI Opt | |
| Statement note effective date | By default, the effective date for the statement note you enter is from today's date until one year later, but you can edit these dates. | ||