 User Guide — Web Scheduling for Patients
You can enable your patients to schedule new appointments and reschedule existing appointments on the Patient Portal, through practice marketing channels, or using a third-party athenahealth Marketplace partner. You can also enable patients to schedule appointments on the Patient Portal in response to emails sent by automated wellness outreach (AWO) and population health campaigns.
For more information about External Scheduling rules, refer to this article.
Your practice must have the Patient Portal feature enabled, and you must have the Communicator Admin permission to manage the Web scheduling feature.
You must have the Communicator Admin permission to access the following pages in athenaOne:
- Manage Prospective Patient page
- Appointment Settings page
Appointments scheduled (or rescheduled) by patients are displayed in athenaOne along with appointments scheduled by staff. The appointment Notes indicate that the patient scheduled the appointment (with the date and time) and display any notes from the patient regarding the appointment.
You can review all appointments scheduled by patients and live operators using the Appointments Scheduled via Communicator page and the External Scheduling Analysis report. You can also see the method the patient used to schedule each appointment using the Patient Communication Activity report and the Patient Communication History report.
On the Appointment Settings page, you can:
- Manage settings for each provider for patient appointment reasons mappings, Web scheduling, and appointment confirmation emails, or set defaults for your practice and each department.
Note: To configure reminder emails, see ReminderCall Settings. - Set an amount of time, in days and hours, that patients are allowed to schedule an appointment before the given appointment slot.
Note: Web scheduling may be set to show 90 days of availability, but the schedule template is set to never expire with 30 days of availability. In this case, the availability online is limited to 30 days. The template creates the slots and is only creating the next 30 days worth. - Apply these settings to an individual provider or to multiple providers in different departments using the bulk edit functionality.
You can also enable automatic creation of a patient case for every appointment scheduled by an existing patient, in addition to the current new patient registration patient case, which is routed based on your Task Assignment Overrides.
Note: For more information on URLs related to Patient Self-Scheduling, see Guide to Patient Self-Scheduling URLs on the Success Community.
- Patient Appointment Reasons (PARs) that are set for Population Health ONLY are not tied to Population Health and automated wellness outreach campaigns any longer.
- Only existing patients can now schedule a Population Health PAR without needing to receive the Population Health and automated wellness outreach campaign first.
- This does not impact the workflow for new patients.
On the appointment settings page, in the Consumer Scheduling section:
-
Check the Enable Consumer Scheduling box
-
Click Save.
To enable Patient Self-Scheduling, you must download booking links as a CSV file.
On the appointment settings page, in the Consumer Scheduling section:
Click Download Links.
Important: Notice the message that appears below the Download Links button:
"Links will only work if consumer scheduling is enabled."
Note: We made the providers NPI number readily available for reference in the CSV file in case your practice may need it. However, you do not need to take any action with the NPI number to embed the URLs on your practice website and use Patient Self-Scheduling.
For patients to schedule an appointment using the Patient Self-Scheduling Web application:
On your practice website or your marketing channels, link to the Patient Self-Scheduling Web application in a location that is easily visible and that patients or people (i.e., prospective patients) notice on both mobile and desktop browsers.
Note: When the patient (or prospective patient) clicks the link, the Web application appears in either of the following ways:
- In a new browser tab.
- Embedded in the same page via iframe.
- Your organization must have the Prospective Patient workflow enabled.
Tip: To enable this feature, submit a case to the CSC. On the Main Menu, click Support > Success Community > Contact Client Support Center. - You must have the Communicator Admin permission to access the Manage Prospective Patient page.
When patients schedule appointments using the Patient Portal or a third-party athenahealth Marketplace partner, they select a reason for their visit. Configuring these reasons controls which appointment slots are available for each provider and department for new and existing patients, and which reasons appear as options on the Patient Portal.
You can map the appropriate reasons to the best appointment type for each provider. Not every provider must use every reason, and each provider can use a different appointment type for the same reason. You can also map multiple reasons to the same appointment type for each provider.
For more information on setting additional Population Health appointment reasons to appear for patients to book with in Patient Self Scheduling feature, see the Patient Appointment Reasons Settings topic in O-help; once there, see the "To configure patient appointment reasons to appear for Existing, New, or All patients in Patient Self Scheduling feature" sub-section of the "Step-by-step instructions" section.
When patients schedule their own appointments, they select one of the patient appointment reasons you configured. Patients can also provide additional information about their upcoming appointments. The patient can also choose to see appointment slots in future weeks, up to the maximum number of days in the future that you configure on the Appointment Settings page.
Note: The configuration changes your practice makes on the Appointment Settings page now appear sooner for patients using the online Patient Self-Scheduling workflows. These updates now appear within a two to four hour window. Previously, these updates did not appear until the next morning.
After a patient selects and confirms an appointment slot, the slot is automatically filled in the provider's calendar, and the additional information that the patient provided is displayed in the appointment notes. If you enable confirmation emails, the patient receives a confirmation email immediately after scheduling an appointment.
This patient workflow is also available in Spanish.
With the Web scheduling feature, your patients can use a mobile device to schedule their own appointments on the Patient Portal.
Patients can access the Patient Portal using a mobile device compatible with iOS and Safari (iPhones, iPads, etc.) or using an Android device. The URL is the same one used for your practice's Patient Portal. Patients whose preferred language is Spanish can tap Esp in the upper right corner of the screen to display information on the Patient Portal in Spanish.
Note: The mobile version of the Patient Portal is not an app, but you can save the URL on the home screen of your smartphone.
When your patients receive an email sent by an automated wellness outreach (AWO) or population health campaign, they can request and schedule appointments on the Patient Portal. This feature is available to all clients with athenaCommunicator, athenaCollector, and athenaClinicals.
The ability to schedule and request appointments on the Patient Portal in response to AWO and population health campaigns provides these benefits to your practice:
- Patients are encouraged to register for the Patient Portal if they have not done so.
- Your practice can track the outcomes of AWO and population health campaigns by tracking the number of appointments scheduled on the Patient Portal.
- By reducing the time spent answering calls and scheduling appointments, practices can send out more population health campaigns, bring in more patients for appointments, and close identified gaps in care.
The actions that patients can take on the Patient Portal in response to AWO and population health campaign emails depend on the settings for your practice or brand.
Your practice must have the following configuration:
- Secure messaging is enabled for the practice.
- Web scheduling is configured for the campaign and for one or more providers in the patient's practice or brand.
Your practice must have the following configuration:
- Secure messaging is enabled for one or more providers.
- Web scheduling is not configured for the campaign or for any providers in the patient's practice or brand.
Your practice must have the following configuration:
- Secure messaging is disabled for the practice.
- Web scheduling is not configured for the campaign or for any providers in the patient's practice or brand.
Note: If your organization uses a third-party vendor for scheduling appointments, the instructions on your Patient Portal direct patients to visit your website for information about scheduling an appointment instead of calling your office.
If you do not enable Web scheduling of appointments, patients can request an appointment on the Patient Portal in response to email messages from automated wellness outreach and population health campaigns. Email messages from AWO and population health campaigns direct patients to use the Schedule Now button to log in to the Patient Portal and send an appointment request related to the campaign message that they received.
When patients log in to the Patient Portal from an automated wellness outreach or population health campaign email, the Compose Message page appears. They can use this page to send a secure message to your practice to request an appointment (the Subject and Message for the appointment request are already populated). Appointment requests are sent as secure messages and appear in your Clinical Inbox.
Note: When you send population health campaign messages with the default request appointment settings configured, make sure to monitor your Clinical Inbox and respond to appointment requests as they arrive. Automated wellness outreach emails are sent automatically; patient appointment requests also appear in the Clinical Inbox.
When Web scheduling is enabled
You can also enable patients to schedule appointments directly on the Patient Portal in response to email messages from automated wellness outreach and population health campaigns. Email messages from AWO and population health campaigns direct patients to use the Schedule Now button to log in to the Patient Portal and schedule the appointment related to the campaign message that they received.
Note: Web scheduling for population health campaigns works only with the standard population health campaigns available on the Campaign Builder page. Web scheduling cannot be used with custom campaigns or with the "Other Quality Management Measures" population health campaigns.
When a patient receives a message from an automated wellness outreach or population health campaign, reminders to schedule the recommended appointment appear on the Patient Portal when the patient logs in.
Note: You can see the message that patients see on the Recommended appointment tab of the Patient Portal on the Care Gaps Settings page.
After a patient receives a message from an automated wellness outreach or population health campaign, a notification to schedule an appointment related to the campaign appears on the Patient Portal home page for up to 30 days.
When a patient clicks the notification on the Patient Portal home page, he sees the Compose Message page, the schedule appointment page, or a "call practice" message, depending on the settings for your practice. If the patient schedules an appointment on the Patient Portal, the notification no longer appears on the home page of the Patient Portal.
Note: If your organization uses a third-party vendor for scheduling appointments, the instructions on your Patient Portal direct patients to visit your website for information about scheduling an appointment instead of calling your office.
The Recommended tab on the Patient Portal schedule appointment page displays recommended appointments based on automated wellness outreach and population health campaigns, with information about the specific campaign. These appointment notifications appear for up to 30 days after a patient receives an automated wellness outreach or population health campaign message.
When a patient clicks Schedule Now in the campaign email, she sees one of the following pages, depending on whether the practice uses the Patient Portal Web scheduling feature:
- Practice uses the Patient Portal Web scheduling feature — Patient sees the Recommended tab on the schedule appointment page, where she can search for and select an appointment. The appointment type and provider are already selected based on the campaign message.
- Practice does not use the Patient Portal Web scheduling feature — Patient sees the Compose Message page on the Patient Portal, where she can request an appointment and send the request to your practice.
Check your practice's appointment request settings to make sure that patients can send appointment requests by default. If your patients cannot make appointment requests on the Web, please contact the CSC. If you do not enable patients to send appointment requests, patients who log in to the Patient Portal receive a notification that they must call the practice to schedule an appointment.
Note: If your organization uses a third-party vendor for scheduling appointments, the instructions on your Patient Portal direct patients to visit your website for information about scheduling an appointment instead of calling your office.
To enable patients who receive emails from automated wellness outreach and population health campaign to schedule their own appointments on the Patient Portal, follow these steps:
- Configure your scheduling templates to support Web scheduling by making generic time slots available (see the Build and Apply Templates page).
- Configure appointment types at your practice to be Web schedulable (see the Appointment Types page).
- Configure patient appointment reasons for AWO and population health campaigns (see the Patient Appointment Reasons Settings page).
Note: Each AWO and population health campaign has a unique patient appointment reason (PAR) that is available for Web scheduling configuration. The Patient Appointment Reasons Settings page lists the PARs for these campaigns. - Configure appointment settings for AWO and population health campaigns (see the Appointment Settings page).
After these steps are completed, you can configure and run population health campaigns so that patients can schedule an appointment on the Patient Portal (see "To create a population health campaign" on the Campaign Builder page). Automated wellness outreach campaigns, which are sent out without your intervention, will also allow patients to schedule their own appointments on the Patient Portal.
Following are instructions for patients to create a new appointment after logging in to the Patient Portal.
![]() Demo video — Workflow Change - Schedule Appointments on the Patient Portal
Demo video — Workflow Change - Schedule Appointments on the Patient Portal
- Log in to your Patient Portal account.
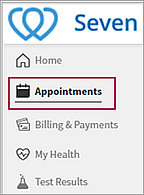
- Click the Appointments option on the left side of the Patient Portal window.
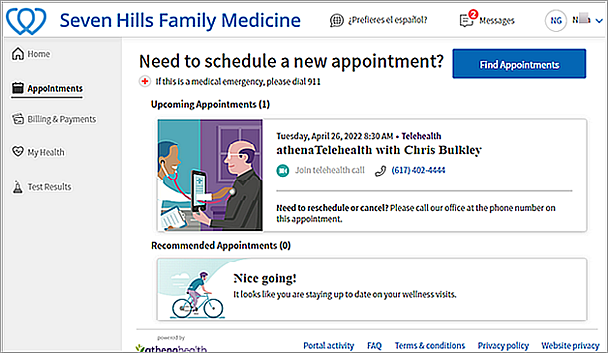
The scheduling window appears. - Click Find Appointments.
The Search page appears.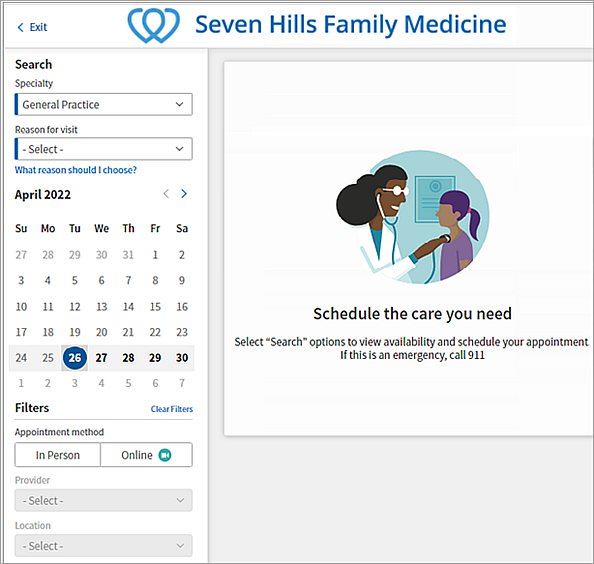
- Specialty — Select a specialty from the menu (that is, only specialties associated with providers who have web scheduling configured).
- Reason for visit — Select the reason for your visit.
Tip: For more information about the reasons you can select, click What reason should I choose?. - Select the date of your visit. Today's date is shown in a dark blue circle. You can select any date after today's date.
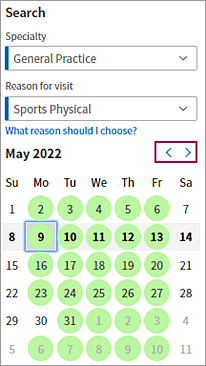
You can click a date in the current month, or you can click the right and left arrows to display the next month or the previous month. - Appointment method — If your practice uses athenaTelehealth, you can select the Online option for a telehealth appointment (otherwise, select the In Person option).
- Provider — Select the provider that you want to see from the menu.
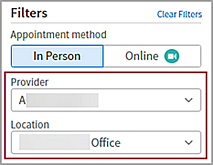
- Location — For office (in-person) visits, select the location for your appointment.
Appointments based on your search criteria appear to the right of the search fields.
Note: If no available appointments match your search criteria, a message tells you to try a different date, change the appointment method, or phone the office to make an appointment. - Select a time for your appointment.
The Review Appointment page appears. - Verify the information on this page, including the date and time of the appointment, the selected provider and location, and your insurance information.
Note: To edit information that you entered, click Back. - Additional notes — Enter details about the reason for your visit (you can enter up to 500 characters).
- When you're ready to book the appointment, click Schedule Appointment.
athenaOne sends a confirmation message to the email address on file for you. The Appointment Scheduled page appears. - On the Appointment Scheduled page, you can click Add to calendar to add the appointment to your calendar.
Patients can schedule appointments online, directly from practice marketing channels; which includes a practice website, email, social media, search engines, and other collateral (for example, other portals).
Patients and prospective patients complete the following workflow to self-schedule appointments.
Note: The options for Patient Type, Specialty, and Reason for Visit are configured in their respective athenaOne locations:
- Patient Type and Reason for Visit options are configured on the Appointment Settings page
- Specialty options are configured on the Billing page
To schedule a new appointment
After the patient or prospective patient clicks the link to the Patient Self-Scheduling Web application on your practice website, the Web application appears.
Important: What patients see depends on your practice’s configuration and settings.
- Click the schedule link on your practice's website to open the Patient Self-Scheduling Web application.
The Patient Self-Scheduling Web application appears.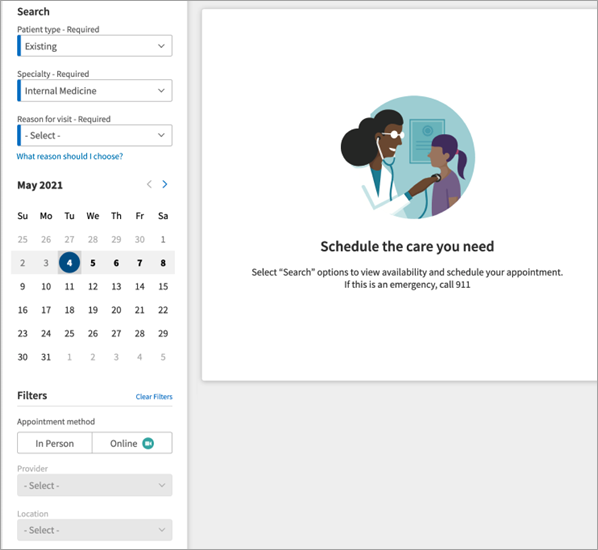
- Patient Type — Indicate whether you've been to the practice before. Click Existing or New.
- Specialty — Select the department in which you're scheduling an appointment.
- Reason for visit — Select the reason for your visit.
Tip: For more information about the reasons you can select, click What reason should I choose?. - Select the date of your visit. Today's date is shown in a dark blue circle. You can select any date after today's date.
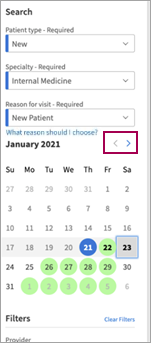
You can click a date in the current month, or you can click the right and left arrows to display the next month or the previous month. - Appointment method — If your practice uses athenaTelehealth, you can select the Online option for a telehealth appointment (otherwise, select the In Person option).
- Provider — Select the provider that you want to see from the menu.
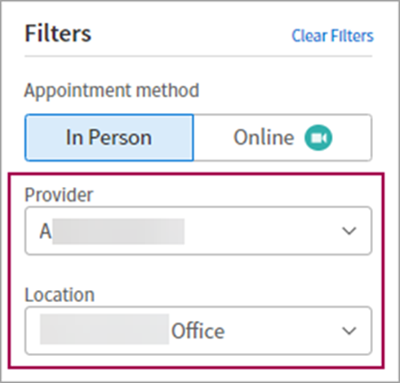
- Location — For office (in-person) visits, select the location for your appointment.
Appointments based on your search criteria appear to the right of the search fields.
Note: If no available appointments match your search criteria, a message tells you to try a different date, change the appointment method, or phone the office to make an appointment. - Select a time for your appointment.
Above the time, you see one of the following:- Name of provider — Appears if the practice has one location or if the patient arrived at this page from the location directory on the practice website.
- Name of department — Appears if the practice has one provider or if the patient arrived at this page from the provider directory on the practice website.
- Patient Information — Enter the following information:
- First name
- Last name
- Date of birth
Note: You must be 18 years of age or older to schedule an appointment online. If you are younger than 18, your parent or guardian must check the box to certify they're scheduling the appointment. - Legal sex
- Phone number
- Email address
- Insurance
Note: The insurance information appears in the appointment notes and the patient case. The insurance field is required for both new patients and established patients.
- Additional notes — Enter details about the reason for your visit (you can enter up to 500 characters).
Note: Enter any notes for the practice. These notes will appear in athenaOne as Appointment notes for the provider. You can enter up to 500 characters in this field. - Click Next.
- Review your patient information, insurance information, and appointment details.
- Check the I'm not a robot box.
A group of images appears. Select the correct images and then click VERIFY.
Note: This added step confirms that patients or prospective patients are real people who are scheduling appointments. - Review the Terms and Conditions and the Privacy Policy, then check the box to indicate that you agree with them.
- Click Schedule Appointment.
- athenaOne sends a confirmation to your email address.
The Appointment Scheduled page appears. - (Optional) Click Add to calendar to add the appointment to your calendar.
- (Optional) Click give feedback to participate in a brief survey about your scheduling experience.
Note: This feedback helps athenahealth improve the feature. - (Optional) Click Start over to schedule another appointment.
Before patients can schedule appointments on the Patient Portal, you must configure athenaOne as follows.
- Patient Appointment Reasons Settings page — Add or update the appointment reasons that patients can select on the Patient Portal. Select the reasons that will be available to existing patients, new patients, or all patients. You can customize the description that is displayed with each reason on the Patient Portal.
- Appointment Settings page — For each provider who allows patients to schedule their appointments on the Patient Portal, map one or more patient appointment reasons to the appointment type that the patient should schedule, and select the Allow web scheduling option for that mapping.
Note: You can make generic appointment slots, used in a schedule template, available to patients for any reason, or you can hide the slots from patients. You can also map reasons directly to generic appointments. - After you configure patient appointment reasons and map them to appointment settings, the Allow web scheduling option is automatically selected. Your patients can schedule an appointment by logging on to the Patient Portal and clicking the Appointments option. Patients can also use the Schedule Now link in email messages sent by AWO and population health campaigns to display the Patient Portal appointment scheduling page and schedule an appointment.
To create a patient case when a patient schedules an appointment, please contact the CSC from athenaOne > Support > Success Community > Contact Client Support Center to enable this setting.
When a patient schedules an appointment via the Patient Portal or an athenahealth Marketplace partner, the patient can include notes about the upcoming visit. These notes are displayed on the Appointment Information page and the Eligibility and Phone page, as well as in the Upcoming Appointments section of the patient's Quickview.
- Display the Eligibility and Phone page: On the Main Menu, click Calendar. Under APPOINTMENTS, click Eligibility and Phone List.
- Notes — Displays your practice's notes as well as the patient notes. Patient notes always include "Appointment Reason:," the selected patient appointment reason, any additional notes or comments, "Created by Patient On:," and the date and time that the patient created the note. Practice staff cannot edit patient notes.
Tip: You can copy patient notes into clinical encounters for additional context.
You can now see all patients that were created from both the:
- Patient Self-Scheduling application, and
- Any MDP partner that uses the “prospective patient” flag when creating a patient.
The Patient Self-Scheduling application now automatically sets every created patient to a “Prospective patient” status. Marketplace partners are also encouraged to use the Manage Prospective Patient page. Use this page to easily view new patients, merge duplicate patient entries with existing patients, and inform new patients of any tasks to be completed before the first appointment.
We're making this change to help minimize patient duplications which results in improved patient safety and less administrative overhead.
A new banner now appears in the Quickview of prospective patients for you to review for duplicate patient entries and merge records into one chart.
-
Display the Quickview page:
With athenaCollector:
- In the text box at the top right of the Main Menu, enter the first three letters of the patient's last name, followed by a comma, followed by the first three letters of the patient's first name. Click the search icon. On the Find a Patient page, click Quickview for the patient you need.
- On the Patient Actions Bar, click Registration, and then click Quickview.
With athenaClinicals:
-
In the patient chart, click the Menu icon and select Quickview
- In the message in the banner at the top of the Quickview, click Review.
The Merge Patient Record window appears - Click Create Merged Record.
A confirmation prompt appears.
Note: If this patient is not a duplicate, click Not a Duplicate. The reviewer’s name appears. - Click Merge to confirm the deletion of the duplicate patient.
The Quickview page reloads, then the merged patient Quickview appears
- Display the Manage Prospective Patients page:
- On the Main Menu, click Patients. Under PATIENT REGISTRATION, click Manage Prospective Patients.
- On the Main Menu, click the Settings icon
 . Under ADMIN, click Communicator. In the Task Bar, under PRACTICE LINKS — Communicator, click Manage Prospective Patients.
The Manage Prospective Patients page appears. - In the Patients table, click Possible Duplicate.
The Merge Patient Record window appears. - Click Create Merged Record.
A confirmation prompt appears.
Note: If this patient is not a duplicate, click Not a Duplicate. The reviewer’s name appears. - Click Merge to confirm the deletion of the duplicate patient.
Note: A message window appears confirming the successful patient record merge. Click Done to return to the Manage Prospective Patients page or click Go to Quickview to display the merged patient Quickview.