 User Guide — athenaCoordinator Core Receivers
Logging in to the athenaCoordinator Portal
Creating user accounts and assigning roles
Viewing and updating your incoming orders
Managing your order compendium
Managing your Ask at Order Entry questions
Tracking your facility's performance
Reporting for athenaCoordinator Core
Resources for lab reps, field agents, and account managers
To create an order route for athenaCoordinator orders
Logging in to the athenaCoordinator Portal
athenaCoordinator Core users log in to the Coordinator Portal at https://athenaOne.athenahealth.com.
Creating user accounts and assigning roles
For full access to the Users page, you must have the User Admin role.
Please refer to the Users page for additional information about user administration.
To create an athenaOne user account
- Display the Users page: On the Main Menu, click Settings
 >User. In the left menu,under Practice Links — Users, click Users.
 - Click Add user.
The Profile tab appears. - Last name — Enter the staff member's last name.
- First name — Enter the staff member's first name.
- Organization — Select the user's organization.
- Practice — Select the practice. This field defaults to your practice if you have access to one practice only.
- Training department — Click in the text box to display the list of departments in your practice. Select the user's department.
Note: If the user has access to multiple practices, the department names are preceded by the practice ID. - Department name — Enter the staff member's
department.
If this field was previously blank, it is automatically populated with the selected Training department. If this field was already populated, the information does not change. - Position — Select the user's position.
- Other (Specify) — This field appears only if you select Other (Please Specify) from the Position menu. Enter the user's position in this field.
- Portal display name — Select Display full name or select Display custom name. By default, your full name is displayed on the Patient Portal or Patient Information Center.
Note: If the role in the Position field is Provider, the Portal display name field does not appear. - Date of birth — Enter or select the user's date of birth.
- Other ID — You can enter additional identifying information in this field. athenahealth recommends that you not enter the user's social security number in this field, but instead enter the user's employee ID numbers or some other identifying number.
- Phone — Enter the staff member's phone number.
- Email — Enter the staff member's email address.
- Notes — Enter any notes about this user.
- Click Save.
A HIPAA confirmation message appears. - Click OK.
The Security tab appears with a system-generated username and password.
To assign a role to a user
- Display the Users page: On the Main Menu, click Settings >User. In the left menu,under Practice Links — Users, click Users.
- Enter search criteria to find the user.
- Click Search.
A list of usernames that match your search criteria appears below. - Click the update link for the user account that you want to update.
The user profile details appear in the fields at the top of the page. - Click the Roles tab.
- Click the Edit link.
- Select the appropriate roles.
Note: You can assign a local role to a user account just as you would any other role (see Local Roles). - Click Save.
Viewing and updating your incoming orders
You can see the list of your incoming orders in the Coordinator Inbox tab of the Coordinator Portal.
Your facility must use the athenaCoordinator Core service, and you must have the Coordinator user permissions to the Inbox.
If the patient or order you need does not appear initially in the Coordinator Inbox, you can expand the date range using the Start Date and End Date fields. The Start Date and End Date refer to the date received.
The Start Date defaults to the current date.
To search for a patient
- On the Main Menu, click Patients. Under Care Coordination, click Coordinator Inbox.
- Enter as much information as you have in the fields provided, and click Find. A list of possible matches appears.
- Click the name of the patient you need. When you do, the View Patient screen appears, listing all records pertaining to the patient.
- Review the Name, DOB, SSN and Sex to ensure you have selected the correct patient.
Managing your order compendium
You can use the Compendium Management page to view and manage the compendium of lab and imaging order types. Using this page, you can manage the list of tests available to the athenahealth network of healthcare providers, as well as how those tests are associated with the athenahealth global compendium.
On the Main Menu, click Settings ![]() >Coordinator. In the left menu,under Practice Links — Order Configuration, click Compendium Management.
>Coordinator. In the left menu,under Practice Links — Order Configuration, click Compendium Management.
To add or edit entries on this page, you must have the Clinicals Admin: Facility Edited Clinical Provider Order Type permission.
Please refer to the Compendium Management page for detailed instructions.
Managing your Ask at Order Entry questions
You can use the AOE Question Management page to add, edit, and delete "ask at order entry" (AOE) questions.
On the Main Menu, click Settings ![]() >Coordinator. In the left menu,under Practice Links — Order Configuration, click AOE Question Management.
>Coordinator. In the left menu,under Practice Links — Order Configuration, click AOE Question Management.
You can use this page in conjunction with the Compendium Management page to manage AOE questions and question lists for your athenaCoordinator or in-house facility.
To add a new AOE question
- Display the AOE Question Management page: On the Main Menu, click Settings >Coordinator. In the left menu,under Practice Links — Order Configuration, click AOE Question Management.
- Facility — Select the facility from the menu.
Note: If only one facility exists, it is automatically selected. - Click Add new (above the Question list).
The Add Clinical Provider AOE Questions view appears.
Note: Add new appears only if a facility is selected at the top of the page.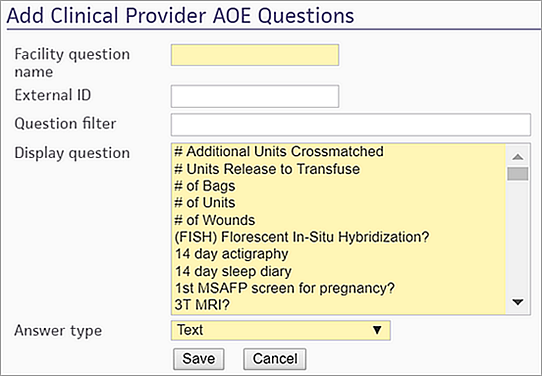
- Facility question name — Enter your facility's text for the question. The ordering provider in athenaClinicals does not see this text; however, this text can be useful to understand the relationship between the standard question and your phrasing. This field is required.
- External ID — Enter the code your facility can use for this AOE question. Not all facilities codify their questions; this field is optional.
- Question filter — Use this field to search the list of questions in the Display question field.
- Display question — This field displays the list of standard questions available from athenahealth. The ordering provider in athenaClinicals sees the question selected in this field. This field is required.
- Answer type — You can choose the type of answer for the display question. Select one of these options:
- Text — Formats the answer as a free-text field.
- Date — Formats the answer as a field requiring a date.
- Yes/No Dropdown — Formats the answer as a drop-down menu with YES and NO options. The field defaults to a blank value.
- Right/Left/Bilateral Dropdown — Formats the answer as a drop-down menu with RIGHT, LEFT, and BILATERAL options. The field defaults to a blank value.
- Custom Dropdown — Formats the answer as a drop-down menu with answer options that you enter. The field defaults to a blank value.
- Options — If you select the Custom Dropdown option from the Answer type menu, you must enter answer options in this field. The ordering provider in athenaClinicals sees these answer choices when ordering a test that uses this AOE question.
- Option — You must enter at least one drop-down option. This field is required.
- Value — You can enter the code expected for each answer option (analogous to External ID for the question). Not all facilities use codified answer values; this field is optional.
- Click Save.
To add more than one custom dropdown option, click the plus icon ![]() after you enter the first option.
after you enter the first option.
For instructions to add the AOE question to an order code, see the Compendium Management page.
Tracking your facility's performance
You can use the Performance Review page to access your monthly performance reviews.
On the Main Menu, click Patients. Under Care Coordination, click Coordinator Inbox, and then click the Performance Review tab.
To find the report you need, select the month and year of the report you want to view, and then click Filter.
You must have one of the following roles: Finance - Collector, Management - Collector, Non-Supervising Provider - Collector, Superuser - Collector, Supervising Provider - Collector, Coordinator Core Portal: Facility Staff, Enrollment: Dell Worker.
Care Coordination Performance Reviews provide statistics about the incoming orders that you received electronically from athenaClinicals providers (senders). You can use this information to:
- Increase the orders you receive from athenaCoordinator sending providers.
- Stay abreast of changes in referral patterns.
- Identify areas of opportunity to more efficiently manage your referrals business.
The Care Coordination Performance Review report includes this data:
- Order Volume
- Top Five Referring Providers
- Referring Providers with Reduced athenaClinicals Electronic Order Volumes
- New Referring Providers
- Top Five Receiving Facilities/Service Providers/Locations
Reporting for athenaCoordinator Core
Please refer to Reporting for athenaCoordinator Core Receivers.
Resources for lab reps, field agents, and account managers
To create an order route for athenaCoordinator orders
For more information about setting up order routes for order type groups, order genuses, and order types, see Best practice for configuring order routes.
- Display the Order Routes page: On the Main Menu, click Settings > Clinicals. In the left menu, under Practice Links — Order Configuration, click Order Routes.
- Click Add new.
Additional fields appear.
Specify one of the following options
- Order type group — Select the order type group from the menu, for example, LAB, IMAGING, or VACCINE.
- Genus name — Select the order genus.
- Order type — Enter the first few characters of the order (for example, the prescription, test, or procedure) and select the clinical order type from the matching list.
Specify order route details
- Department — To use this order route for specific departments only, click Selected and then select the departments from the list.
- Clinical provider — Click Search to search for and select an athenaCoordinator facility, identified with the olive branch
 icon (see Clinical Provider Selector).
Important: The clinical provider selected in this field is used only for the orders specified by the order route. This field does not cause the order route to be used for the specified clinical provider. - Alarm days — Most orders have a default alarm already set by athenahealth. This field allows you to select an alternate default alarm. Select the number of days or weeks to allow the order to be filled. If you select default, the orders use the athenaOne default follow‑up alarm interval for that order type.
- Priority — If you will have multiple order routes for the same groups of orders (Labs, Imaging, etc.), the order route with the lower priority number has priority. For example, if you have an order route for the "LAB" order type group, set the priority higher (2 or 3) than for a specific order route for the CBC Genus (1 or 2).
Specify an order form
- Clinical order form — Select the clinical paper form on which the orders will be printed. (These forms are administered using the Clinical Paper Forms page.) Select a DYMO label form if your practice has created specimen labels. If no clinical order form or specimen collection label is selected, the default athenaOne forms are used.
- Dymo label form — If you created specimen labels on the Clinical Paper Forms page, you can select one of these labels from the menu. Use this option to replace the default athenaOne specimen collection label with a label created by your practice.
Note: On the Clinical Paper Forms page, you must select the Specimen Label option in the Type of paper form field (see To create a custom lab specimen label").
Complete the order route
- Default route? — Select this option only if the new order route is for a specific department. For example, if you want all lab orders for Department A to route to Local Memorial Hospital — Lab, configure this new order route as the default route.
- Click Save.
The order route appears in the list of order routes at the bottom of the page.
To create an order set for athenaCoordinator orders
- Display the Manage My Order Sets page: On the Main Menu, click Settings > Order Sets.
- Click Add new. The input fields appear at the top of the page.
- Order Set Name — Enter a short, descriptive name for the new diagnosis order set.
- Ordering — Leave this field blank.
Select the diagnoses
- Under the Diagnoses heading, use the tabs or Search tool to select the diagnosis you want.
- In the Search tool, enter text to view a list of matching diagnoses.
- If a diagnosis contains refine> next to it, you can either click refine> to select a more specific diagnosis, or you can add the unrefined diagnosis.
- The diagnosis appears as a blue row in the Diagnoses and Orders Detail form.
- If the diagnosis you selected has not been mapped to an ICD-10 code, click the Select ICD-10 code (required) link and select the code.
Refine a diagnosis (optional)
- In the Diagnoses and Orders Detail form, diagnoses that need to be further refined are indicated by the suffix (refinable), and an option to refine the term (REFINE) appears next to the Edit icon
 . To refine the diagnosis, click REFINE and select additional modifiers to get to a more specific diagnosis.
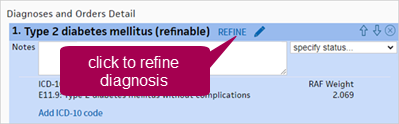
If you add an unrefined diagnosis, the diagnosis will need to be refined by the user when they add the order set in an encounter or order group.
Select orders for each diagnosis
- Under each blue diagnosis bar, use the Add Orders tabs to locate and select the orders that you want. You can select as many orders as you need. The orders that you select appear under the Diagnoses and Orders Detail heading below, in the tan box.
- Enter the order details in the fields provided. To expand a collapsed order item, click the gray heading bar for the order.
- For Imaging, Surgery/Px, and Referral orders, you can add CPT codes in the Procedure Code fields. When you add CPT codes to an order set, those procedure codes populate automatically when you select the order set in an encounter or order group.
Note: You can use the Perform Date field to create order sets that include orders to be fulfilled today and in the future. For example, an order set can include orders for an initial fracture visit (e.g., an order for a cast to be applied today, along with a prescription for pain medication to be filled today, and an X-ray order to be completed in four weeks).
- Click Add to save and add the diagnosis order set. You can now select the order set when adding a diagnosis or order for a patient.
To change the default task assignment for outbound orders
- Display the Task Assignment Overrides page: On the Main Menu, click Settings > Clinicals. In the left menu,under Practice Links — Other, click Task
Assignment Overrides.
- Click add new. The Add Task Assignment Override view appears.
- At the top of the page, click the Outbound orders option.
- Orders — Select the order subclass to which the override will apply.
- Status — Select the status to trigger your outbound order to be assigned to a particular role in the practice. REVIEW, PRESCRIBE, ADMINISTER, and SUBMIT are the most frequently used statuses for Outbound orders.
Note: SUBMIT TAOs select the submitter/notifier only when the order is first selected. If a user changes the submitter/notifier, the order is assigned in SUBMIT status to the new role/user. - Action (optional) — If Status isn't specific enough, you can use the Action menu to select a more specific route.
- Assignee — Select the role or person to whom the task should be routed.
- Department(s) — Select the departments in which this TAO will be applied.
Note: If the department was recently created (within the hour, approximately), it may take more time for the department to appear for selection in the TAO admin page. If you are attempting to create a TAO for a newly created department and the department does not appear, attempt again after at least an hour and the department should be available for selection. - Provider(s) — Select the providers to which this TAO will be applied.
- Order Type — If appropriate, enter an order type. You can enter the first few characters and select from the matching list.
- Order Genus — If appropriate, specify the order genus.
- Ordering — Indicate the ordering for this TAO relative to other TAOs of the same order subclass. This ordering determines which TAO has priority in the event of a conflict.
For example, if you create one TAO that applies to All Prescription orders, and then you create another TAO with a different assignee that applies to a Prescription order with a particular order type or order genus, you want the second TAO to have a lower ordering number in the list, because athenaOne applies the rules from lowest to highest ordering in the list. As a general rule, the more specific the TAO, the lower the ordering should be (within an order subclass). - Click Save. A confirmation message appears, indicating that your new TAO has been saved.
Tip: Make a note of the TAO ID in case you need to find it in the list at the bottom of the page.