Quick Reference — To view the patient's online check-in status in athenaOne
For your patients to use self check-in, your practice must use these services and features:
- athenaCommunicator
- ReminderCall email messages
- Upcoming appointments enabled on the Portal Settings page
- Credit Card Plus (for patients to make payments during self check-in)
- Display the Eligibility and Phone page: On the Main Menu, click Calendar. Under APPOINTMENTS, click Today's Appointments, and then click Elig & phone.
- Locate the patient appointment in the list.
The Appointment Confirmation Result column displays information about self check-in, for example, "Self check-in not started" or "Self check-in completed."
Note: If your organization chose not to use the updated self check-in feature, the Appointment Confirmation Result column on the Eligibility and Phone page also displays the status of the patient's online check-in steps: Demographics, Health History Forms, Completed forms, and Incomplete forms. - When the patient arrives for the appointment, the online check-in status appears on the Check-in page.
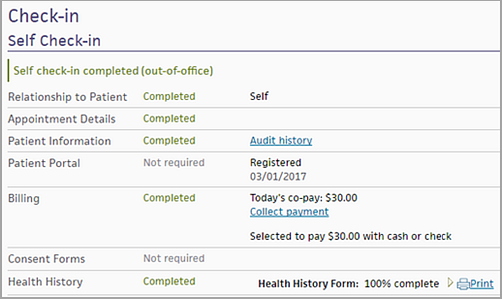
- Appointment Details row — If the patient sent a question to the provider during self check-in, "Secure message sent" appears in this row.
Note: The patient's question appears in the Patient reason field in the Appointment Information section of the Check-in page with other secure messages. The question also appears in the chart and in the Intake and Exam stages of the encounter (Reason for Visit section). - Patient Information row — If the patient updated any demographic information during self check-in, athenaOne automatically updates the patient's Quickview. To see what information the patient changed, click Audit history in the Patient Information row.
- Patient Portal row — If the patient already had a Patient Portal account or registered for one during self check-in, "Registered" appears in this row.
- Billing row — If the patient has an outstanding balance or a copay for this appointment, the Billing row shows the amount that the patient paid (if any) during self check-in. If the patient has an outstanding balance, the Collect payment link appears. You can also click Receipt to give the patient a receipt for the payment made during self check-in.
Note: You can see the copay associated with this appointment type on the Update Policy Details page. - Consent Forms row — This row shows which consent forms the patient signed during self check-in. You can use the print link to give the patient a copy of any forms that the patient signed electronically during self check-in (this copy shows the patient's electronic signature). You can also click print to print any unsigned forms for the patient to sign now.
Note: To review consent forms that the patient completed during self check-in, display the patient's Privacy Information page: On the Check-in page, click Manage Privacy (under the Privacy heading). - Health History row — This row shows whether the patient completed the health history form during self check-in and the percentage of each section that was completed. You can click
 Print to give the patient a copy of the form or to help you reconcile updated health history information (see Data Reconciliation).
Note: If the patient skipped the Health History step during self check-in, the health history forms appear at the bottom of the Check-in page under the Forms heading (Portal Health History Forms).
At the top of the Check-in page, the Self Check-in section displays the patient's progress through the self check-in process. The middle column indicates whether the patient completed that step of the self check-in process, or if that step was not required.