Eligibility and Phone
athenaOne for Hospitals & Health Systems
This page displays a list of patient appointments for a given day. You can use this list to:
- Call patients to verify appointments
- Obtain a snapshot of the eligibility status of all patients for the day
- Quickly identify ineligible patients (The Ineligible or Unverified status is displayed in red)
- Print forms and billing slips
- Manage Out-of-Network Patient Billing Consent (if applicable)
On the Main Menu, click Calendar. Under APPOINTMENTS, click Eligibility and Phone List
On the Main Menu, click Calendar. Under APPOINTMENTS, click Today's Appointments, and then click Elig & phone
When you open the Eligibility and Phone page, the default display includes the following:
- Today's appointments are displayed.
- Appointments for all providers in the department that you logged in to are displayed.
- Table is sorted by provider.
- Insurance, patient eligibility status, patient balance, and expected payment information is displayed.
You can display appointments for a different day, department, and provider using the filter fields at the top of the Eligibility and Phone page.
- Display the Eligibility and Phone page: On the Main Menu, click Calendar. Under APPOINTMENTS, click Eligibility and Phone List.

- Date — Select a different date to display appointments for that date and then click Refresh.
Tip: athenahealth recommends that you review the eligibility worklist daily to confirm eligibility, or insurance coverage, for patients who have appointments the next day. - Department — Select a different department from the menu.
- Provider — Select a different provider from the menu (you can select only one provider from the menu).
Note: By default, the page displays appointments only for providers who have scheduled appointments in the selected department on the selected date. - Sort by — Select a different sort option from the menu. For the list of options, see Sorting options.
-
View — The Insurance information option is selected by default.
- Forms — Select this option to print or download forms or billing slips..
- Out-of-Network Billing Consent — If the No Surprises Act Consent feature has been enabled for your practice, you'll see additional fields to manage patient consent to balance bill for out-of-network costs. For details, see To flag upcoming appointments that may be subject to Out-of-Network Billing Consent.
- Show disclosures, complaints, and other privacy requests. (Restrictions are always shown.) — To display patient disclosures, complaints, and other privacy requests, select this option.
Note: Patient restrictions are always displayed (for more information, see Privacy Information).
- Display the Eligibility and Phone page: On the Main Menu, click Calendar. Under APPOINTMENTS, click Eligibility and Phone List.
- Sort by — Select Confirmation Status from the menu.
- Scan the Appointment Confirmation Result column (rightmost column of the table) to see which patients have confirmed their appointments.
Note: For a description of the statuses in this column, see the Field Reference. - Locate any appointments that have the Reschedule status in the Appointment Confirmation Result column to identify patients who requested rescheduling.
The Reschedule status indicates that the patient answered the phone in response to a ReminderCall phone call and pressed 2 to transfer the call. However, the call was not transferred to the practice or to a live operator. Therefore, you may want to contact the patient to confirm or reschedule the appointment.
Tip: athenahealth offers an automated ReminderCall service.
athenahealth advises against printing billing slips ahead of time because the most accurate and up-to-date patient and insurance information may not appear on the billing slip if you print it before a patient checks in.
Note: To print the appointment schedule, use the View Appointments page or the Today's Appointments worklist.
- Display the Eligibility and Phone page: On the Main Menu, click Calendar. Under APPOINTMENTS, click Eligibility and Phone List.
- View — Select the Forms option (the Insurance information option is selected by default).
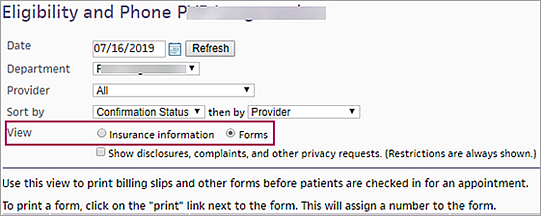
The Forms column appears in the table. - Locate the form or billing slip that you want to print.
- Click
 Print to open a new window that displays the form or billing slip. You can print or download the form from this window.
 - Click Preview to display a full-page image of the form or billing slip in the main workspace, then click
 Print to print the form or billing slip from the print window.
 - Close the print window by clicking the X at the upper right corner of the window.
To batch print forms and billing slips, your practice must have the Batch Print Billing Slips feature enabled.
Note: Because athenaOne cannot batch print .pdf documents, any form or billing slip that is a .pdf document is not selected.
- Display the Eligibility and Phone page: On the Main Menu, click Calendar. Under APPOINTMENTS, click Eligibility and Phone List.
- View — Select the Forms option (the Insurance information option is selected by default).
The Forms column appears in the table. - To print all forms and billing slips for all patients, select the Check
All option at the top of the Forms column.
All forms and billing slips are selected in the Forms column. - To print only certain types of forms or billing slips:
- Click the plus icon
 next to the Check All option
at the top of the Forms column to display the
list of forms and billing slips.
 - Select the types of forms and billing slips that you want to print for all patients.
- You can deselect individual forms or billing slips for patients by unchecking the box next to the form in the Forms column.
- Click Print Forms (at the top of the table) to batch print all the selected forms and billing slips.
All forms and billing slips of the selected types are indicated in the Forms column by a checkmark.
- Display the Eligibility and Phone page: On the Main Menu, click Calendar. Under APPOINTMENTS, click Eligibility and Phone List.
Appointments that require an authorization include the Add new authorization link in the Insurance column. - Click Add new authorization in the Insurance column.
The Insurance Authorization page appears.
- Notes — Enter any notes about the authorization.
- Patient insurance — The patient's insurance information appears in this field.
- Active authorizations — Other active authorizations appear in this field.
Clinical Order Information
- Referring provider — Click Choose/view to display the Referring Provider Lookup tool. In the tool, you can search for the referring provider by number, name, specialty, or NPI number. Enter your search information and click Find.
- Referred-to provider — Select the provider in your organization to whom the patient is being referred.
- Specialty — Select the specialty of the provider to whom the patient is being referred.
- Department — Select the department for the referral.
- Notes to provider — Enter any additional notes for the provider.
- Attachments — Click Add attachment.
Note: You can attach athenaClinicals documents, as well as other documents, to the authorization.
Authorization Information
- Type — Select Referral or Pre-Cert.
- Insurance authorization number — Enter the insurance authorization number.
Important: Select the Not required option if the authorization number is not required. - Effective date — Enter or select the effective dates for the authorization.
- Number of visits/units — Select Visits or Units from the menu, and then enter the number of approved units or visits in both fields. athenaOne automatically decrements the number of authorized visits or units.
- Diagnosis code — Enter or select the diagnosis codes associated with the authorization. You can type a period to access the Diagnosis Lookup tool in the ICD-9 or ICD-10 fields.
- Procedure code — Enter or select the
procedure codes associated with the authorization. You can type a period to
access the Procedure Code Lookup tool.
Note: The exact procedure code is required if you select Units from the Number of visits/units menu. The procedure is validated against your fee schedule. - Additional information — Enter any additional information that you want to record about this incoming authorization.
Associated Appointments
- Select an upcoming appointment, or select the Add new option.
- If you select an existing appointment, the authorization is associated with that appointment. (Click Save after you select the appointment.)
- If you select the Add new option, the Schedule appointment and Create appointment tickler options appear.
- To schedule an appointment for the patient:
- Select Schedule appointment.
- Click Save.
The Schedule Appointment page appears. - Schedule the appointment as usual.
The authorization is associated with the new appointment automatically.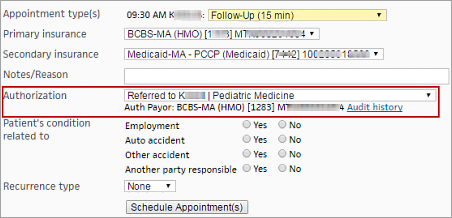
- To create an appointment tickler that includes the incoming authorization:
- Select Create appointment tickler.
- Click Save.
The Add Appointment Tickler page appears. - Enter the appointment tickler information as usual.
The authorization is automatically associated with the appointment that is created from the tickler.
An incoming authorization is complete after you enter the insurance authorization number (if required) and associate the authorization with an appointment. Otherwise, the authorization is in progress.
Note: You can see the status — Completed or In progress — in the Status field at the top of the Insurance Authorization page and on the Authorization Worklist page.
This functionality is available if the No Surprises Act Consent feature has been enabled for your practice. For reference, see the User Guide — athenaOne Support for Compliance with No Surprise Billing Legislation.
You can flag upcoming appointments that may allow for consent to balance bill (Out-of-Network Billing Consent), and manage the patient consent requirements from either of these pages:
- Eligibility and Phone page
- Appointment page
From either page, clicking Manage consent brings you to a new Out-of-Network Billing Consent pop-up window to manage the consent steps.
Best practice: If you intend to balance bill for applicable services, the No Surprises Act requires that you notify patients about a qualifying out-of-network provider within specified timeframes before their appointment and receive appropriate consent.
- Display the Eligibility and Phone page: On the Main Menu, click Calendar. Under APPOINTMENTS, click Eligibility and Phone List.
-
View — select Out-of-Network Billing Consent to display the new Filter fields.
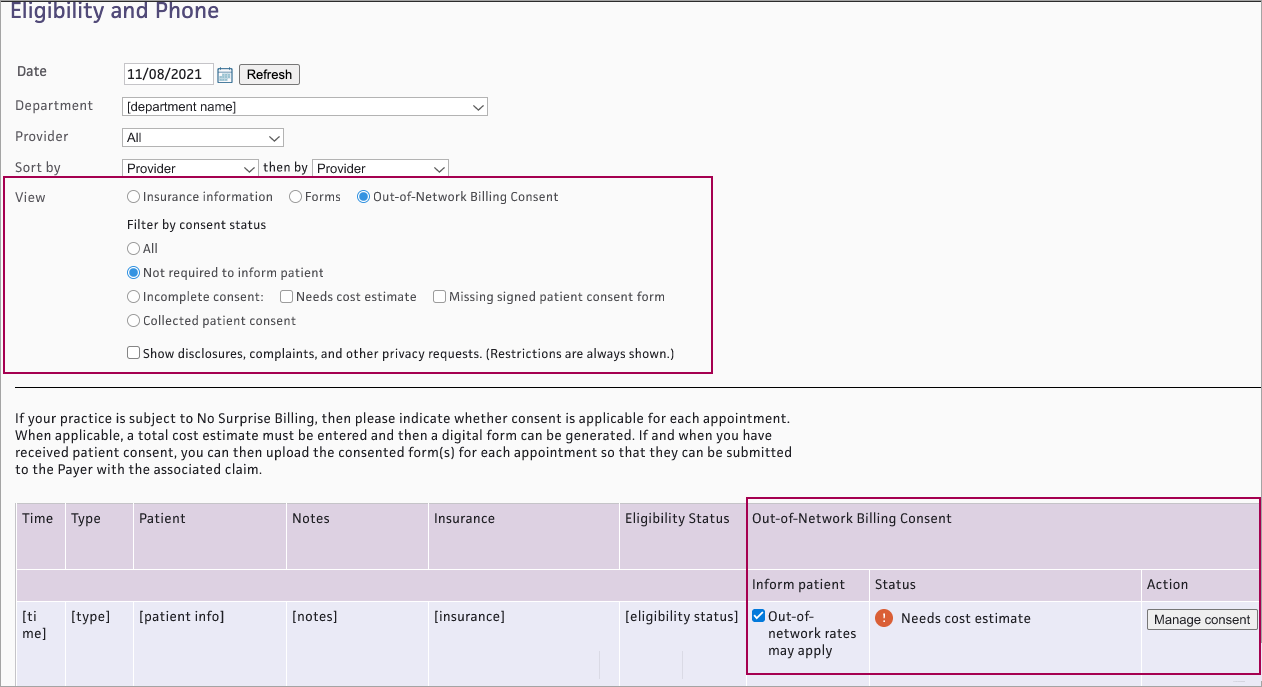
- Filter by consent status — Select a status:
- All — Shows appointments with any consent status
- Not required to inform patient — Shows appointments that have not been flagged as Out-of-network rates may apply, so patient consent is not available
- Incomplete consent — Shows appointments with incomplete consent. (If you select Incomplete consent, both Needs cost estimate and Missing signed patient consent form are automatically checked. You can also select either status independently.)
- Collected patient consent — Shows appointments with a signed patient consent form attached
- The list appears with the following new Out-of-Network Billing Consent columns for each appointment:
- Inform patient — Check the box Out-of-network rates may apply if applicable
- Status — Shows current Out-of-Network Billing Consent status for each appointment that has been flagged as Out-of-network rates may apply. See Out-of-Network Billing Consent Status for details.
- Action — Click Manage consent if needed to complete consent steps
- Display the Appointment page: On the Main Menu, click Calendar. Under APPOINTMENTS, click Today's Appointments.
- At the top of the Task Bar, select a specific Dept and Date, then click Go. The list of patients scheduled for that day appears below. Click a patient name in the schedule.
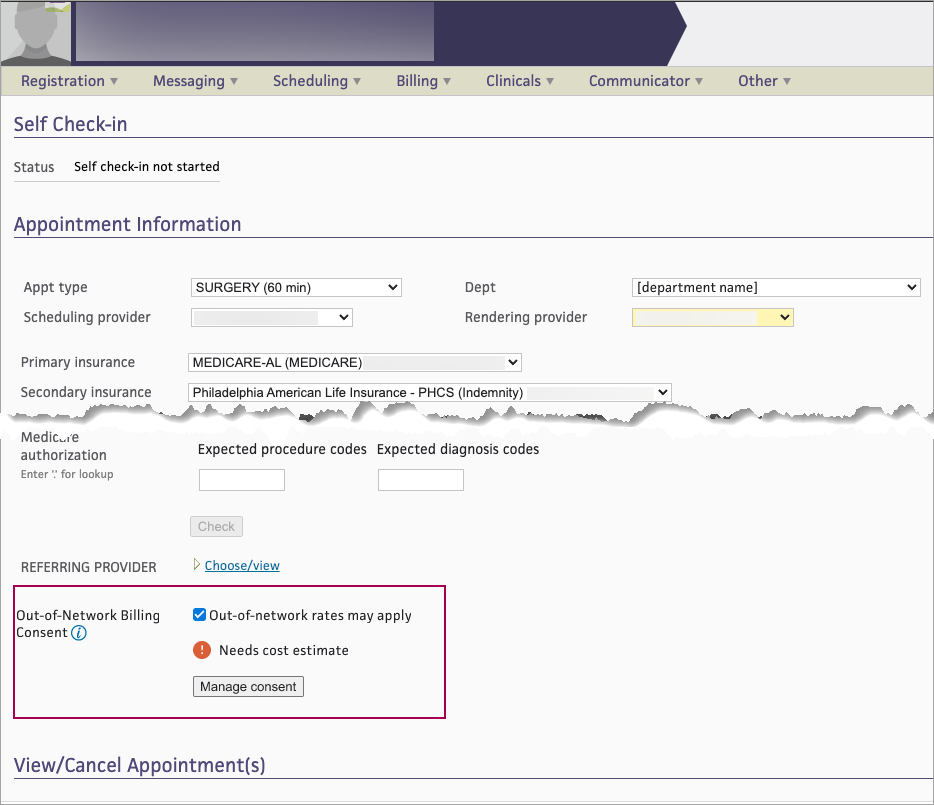
- Review the appointment information. If the appointment has an out-of-network provider: at the bottom of the Appointment Information section, select Out-of-Network rates may apply.
- The consent status and Manage consent button appear.
This functionality is available if the No Surprises Act Consent feature has been enabled for your practice. For reference, see the User Guide — athenaOne Support for Compliance with No Surprise Billing Legislation.
On either the Eligibility and Phone worklist or the Appointment page, you can see the current Out-of-Network Billing Consent status for each appointment that has been flagged as Out-of-network rates may apply. The status will change as the appointment moves through the steps in the patient consent process.
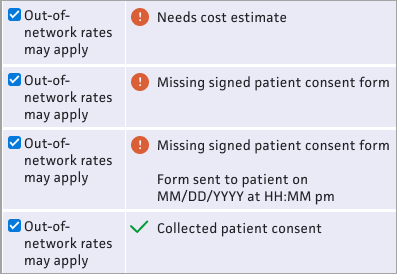
- Needs cost estimate — This status appears if the appointment has no cost estimate
- Missing signed patient consent form — This status appears if the appointment has a cost estimate but no signed consent form attached.
- Missing signed patient consent form / Form sent to patient on [MM/DD/YYYY at HH:MM pm] — This status appears if the appointment has a cost estimate, the consent form was sent to the patient, but no signed consent form is attached.
- Collected patient consent — This status appears if a signed consent form is attached to the appointment
This functionality is available if the No Surprises Act Consent feature has been enabled for your practice. For reference, see the User Guide — athenaOne Support for Compliance with No Surprise Billing Legislation.
On either the Eligibility and Phone worklist or the Appointment page, for each appointment that has been flagged as Out-of-network rates may apply, you can see the current Out-of-Network Billing Consent status and click Manage consent to complete the steps in the patient consent process.
- From either the Eligibility and Phone page or the Appointment page, click Manage consent.
-
The Out-of-Network Billing Consent window appears. The athenaOne system will use the information you enter here to populate the patient consent form.
Cost estimate
This estimate will include co-providers and/or co-facilities — When this box is checked, you are responsible for calculating and documenting the total cost estimate including costs for your practice and for each co-provider/co-facility.-
Enter the total cost estimate on the Total cost only tab.
- The consent form will include pages for you to write in the itemized services and subtotal for each provider and facility.
 Total cost only tab
Total cost only tab Field name Description Total cost estimate Enter the cost estimate Alternative in-network providers (Required for post-stabilization services) — Enter provider name(s) to be included on the HHS consent form 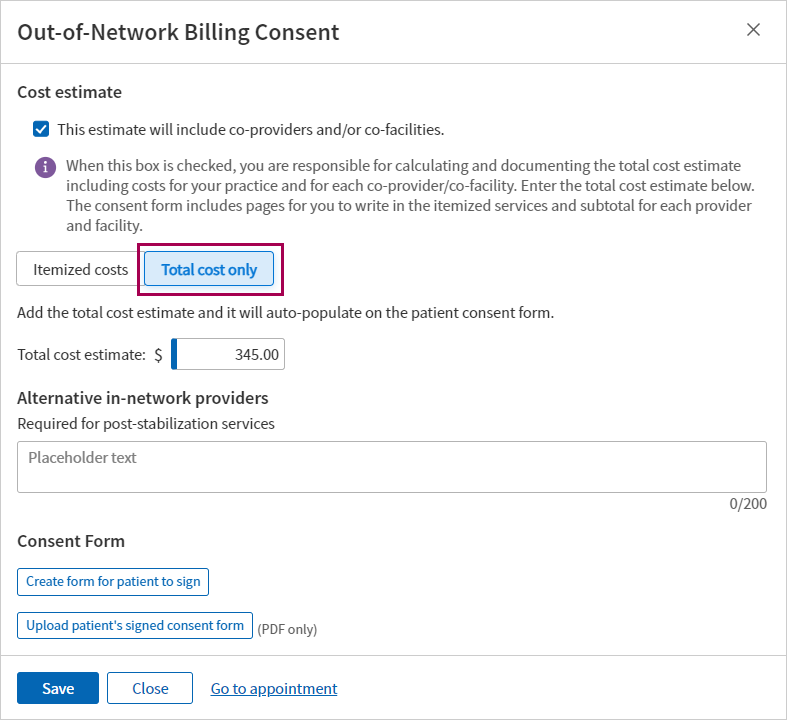
If the estimate will NOT include co-providers and/or co-facilities:
- Use the Itemized costs tab to enter up to ten specific procedure codes and estimated costs to populate the HHS consent form.
 Itemized costs tab
Itemized costs tab Field name Description Procedure code Enter a CPT code or type a period to use the lookup Cost Enter the estimated cost for the procedure Description Displays a description for the procedure code entered Total cost estimate Displays the total of the costs entered above Alternative in-network providers (Required for post-stabilization services) — Enter provider name(s) to be included on the HHS consent form 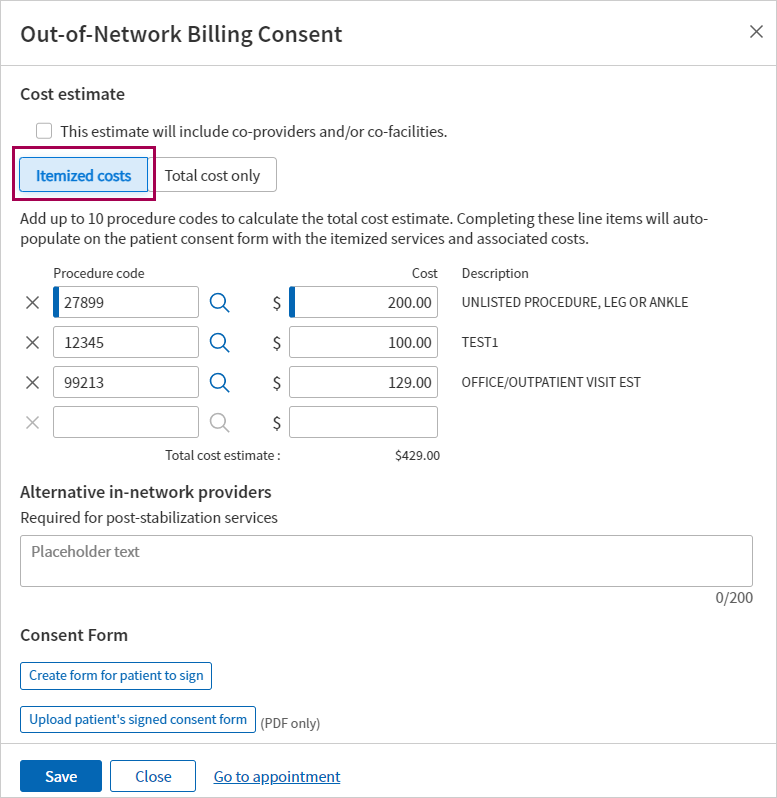
-
-
Click Save.
- If you’re ready to create and send the consent form to the patient, you can do that now. Otherwise, you can save now and return to the appointment later to send the form.
- From either the Eligibility and Phone page or the Appointment page, find appointments that have an Out-of-Network Billing Consent status: Missing a signed patient consent form (appointments in this status already have a cost estimate).
- Click Manage consent. The Out-of-Network Billing Consent window appears.
- Scroll to the bottom of the page and click Create form for patient to sign .
- A digitized version of the HHS Consent Form appears, populated with the patient’s appointment data, cost estimate, and any procedure code(s) and alternative in-network provider(s) entered.
Note: For details on what athenahealth populates in the form, see the athenahealth’s digitized version of the HHS Consent Form in the User Guide — athenaOne Support for Compliance with No Surprise Billing Legislation. -
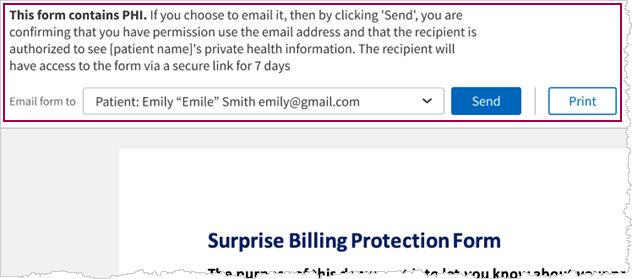
At the top of the form, you can choose to Send or Print the form.
Note: If you selected This estimate will include co-providers and/or co-facilities, the Send button is not available. You must Print the consent form and write in the itemized services and subtotal for each co-provider and co-facility.
-
If you select Send:
- Email form to — Select one of the following:
- Patient (default)
- Another recipient from the list of patient’s contacts on the patient registration record
- Other — Enter the email for a contact that is not listed
- Click Send
- The athenaOne system sends an email with the form.
Important: This form will only be available for 7 days and then will expire and need to be re-generated and resent to the patient
- You will need to have a PDF file of the patient’s signed consent form.
- Save the file to your system.
- From either the Eligibility and Phone page or the Appointment page, find appointments that have the Out-of-Network Billing Consent status: Missing a signed patient consent form.
- Click Manage consent. The Out-of-Network Billing Consent window appears.
- Scroll to the bottom of the window and click Upload patient’s signed consent form .
- Navigate to the location of the signed form on your system, select the file, then click Open.
- Click Save .
A message appears with details about who uploaded the file, along with a date/time stamp.
Important: If you reschedule an appointment, you must re-enter the consent information and re-attach the signed form. Be sure to have a copy of any signed consent forms before moving the appointment.
Note: If your organization uses the athenaEnterprise feature, your department-based user access means that this page shows data for the departments and providers associated with your username.
The Eligibility and Phone page displays the following information:
- Appointment start time
- Appointment type
- Patient name and phone numbers
- Appointment notes
- Patient insurance
- Insurance eligibility status
- Practice user who scheduled the appointment and the date that the appointment was scheduled
- Patient balance
- Family balance (this information appears only if your practice uses the Family Billing feature)
- Expected copay or other patient payment
- Appointment confirmation results (this column also includes the Patient Portal registration status of the patient and whether self check-in has been completed)
-
If the No Surprises Act Consent feature has been enabled for your practice, you'll see additional fields to manage patient consent to balance bill for out-of-network costs.
If you select the Forms option in the View field, the Forms column appears in the table (the insurance, patient eligibility status, patient balance, and expected payment information is hidden). You can print patient forms and billing slips from the Forms column.
Best practice
- Review the eligibility worklist daily to confirm eligibility, or insurance coverage, for patients who have appointments the next day.
- If you intend to balance bill for applicable services, the No Surprises Act requires that you notify patients about a qualifying out-of-network provider within specified timeframes before their appointment and receive appropriate consent. This functionality is available if the No Surprises Act Consent feature has been enabled for your practice. For reference, see the User Guide — athenaOne Support for Compliance with No Surprise Billing Legislation.
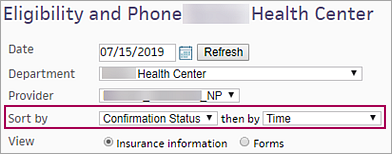
You can sort the list on the Eligibility and Phone page by:
- Provider
- Appointment time
- Patient ID
- Patient last name
- Insurance eligibility status
- Insurance package
- Appointment confirmation status
Use the then by menu of the Sort by field to further sort your list. For example, you can select Confirmation Status in the left menu to sort the list by confirmation status and then select Time in the right menu to sort appointments by time within Confirmation Status groups.
The athenahealth best practice is to resolve eligibility issues prior to the patient's arrival.
The Eligibility and Phone page provides a link to the patient Quickview page in the Patient column of the table. You can check for eligibility conflicts on the patient's Quickview page and then resolve these conflicts on the Payer-Provided Eligibility Details page. The conflicting information is displayed in red.
The Appointment Confirmation Result column on the Eligibility and Phone page displays the Patient Portal registration status of the patient (patient was invited, patient last logged in, patient declined, etc.).
If your organization uses the patient self check-in feature, this column also displays information about self check-in, for example, "Self check-in not started" or "Self check-in completed." (You can see the patient's progress through the self check-in process in the Self Check-in section at the top of the Check-in page.)
Note: If your organization chose not to use the updated self check-in feature, the Appointment Confirmation Result column on the Eligibility and Phone page also displays the status of the patient's online check-in steps: Demographics, Health History Forms, Completed forms, and Incomplete forms.
| Filter options | |
|---|---|
| Date | Today's data is displayed by default. You can select a different date using this field (click Refresh after you select the date). |
| Department | You can select a different department using this field. |
| Provider |
You can select a different provider using this field. Note: By default, the page displays appointments only for providers who have scheduled appointments in the selected department on the selected date. |
| Sort by | Select a primary sort option from the menu on the left. |
| then by | Select a secondary sort option from the menu on the right. |
| View |
The Insurance information option is selected by default.
|
| Show disclosures, complaints, and other privacy requests. (Restrictions are always shown.) |
To display patient disclosures, complaints, and other privacy requests in the Patient column, select this option. Note: Patient restrictions are always displayed (for more information, see Privacy Information). |
| Column Headings | |
| Time |
The start time of the appointment. |
| Type |
The appointment type (see Appointment Types). |
| Patient |
The patient name, ID, and phone numbers, with a link to the patient Quickview. Additional patient information appears in this column. Note: Approved confidential communication notes (created using the Privacy Information page) appear in red under the patient name. |
| Notes |
Notes that are attached to this appointment type or to this specific appointment. This column may include a link (Edit) to the Update Appointment Note page.
If the patient scheduled an appointment on the Patient Portal, this column includes the patient appointment reason (PAR) that the patient selected, as well as any message that the patient entered. If the patient scheduled the appointment in response to an automated wellness outreach message, the patient appointment reason is selected automatically on the Patient Portal, and this reason appears in the Notes column. |
| Insurance |
Patient insurance to be used for this appointment. This column includes links that allow you to add, update, or delete an image of the patient's insurance card. For appointments that require an authorization, this column includes an Add new authorization link; when you click this link, the Insurance Authorization page appears. |
| Eligibility Status |
The eligibility status of the patient for the primary and (if applicable) secondary insurance policies — Eligible, Ineligible, or Unverified — with a link to the Update Policy Details page for the patient's primary or secondary insurance policy.
Each insurance policy in this column includes the following information:
|
| Out-of-Network Billing Consent |
This functionality is available if the No Surprises Act Consent feature has been enabled for your practice. For reference, see the User Guide — athenaOne Support for Compliance with No Surprise Billing Legislation.
|
| User Actions |
The date that the appointment was scheduled and the username of the practice user who scheduled the appointment. Note: If the patient scheduled the appointment on the Patient Portal, this column displays "PORTAL" instead of the username of a practice user. |
| Patient Balance |
The patient's current outstanding balance. Note: Any patient balances in collections appear in red text. |
| Family Balance |
The combined outstanding balance for the patient's family. This column appears only if the patient has other family members registered in the practice and if your practice has the Family Billing feature enabled. Note: Any family balances in collections appear in red text followed by "(LARGE FAMILY BALANCE)." |
| Forms |
This column appears when you select the Forms option in the View field at the top of the page. A list of forms and billing slip templates is displayed for each patient. (For more information about billing slips, see Billing Slips.) |
| Expected Payment |
The expected copay or coinsurance amount due from the patient for the appointment. |
| Appointment Confirmation Result |
This column displays information about whether the appointment was confirmed, the patient's Patient Portal registration status, and the patient's online check-in status.
Appointment confirmation status This column displays the result returned by an automated appointment confirmation service, such as ReminderCall. ReminderCall statuses include the following:
Patient Portal registration status This column displays the Patient Portal registration status of the patient (patient was invited, patient last login date, patient declined, etc.).
Online Check-in If your practice uses the Patient Self Check-in feature, this column displays information about self check-in, for example, "Self check-in not started" or "Self check-in completed." (You can see the patient's progress through the self check-in process in the Self Check-in section at the top of the Check-in page.) Note: If your organization chose not to use the updated self check-in feature, the Appointment Confirmation Result column on the Eligibility and Phone page also displays the status of the patient's online check-in steps: Demographics, Health History Forms, Completed forms, and Incomplete forms. |