 User Guide — Inpatient Nursing
athenaOne for Hospitals & Health Systems
Table of Contents
Documentation tools for nurses
Nurse view of the Patient List
To locate a patient's hospital chart
Recording care and events during the patient's stay
To update the status of a nursing task
To acknowledge discontinued orders (from the Clinical Inbox)
To record that a medication dose was administered
To record that a medication dose was not given
To initiate the discharge process
To create or edit discharge orders
Introduction
Nurses and aides can use athenaOne to document a patient's condition and care during a patient's hospital stay. If given a verbal order by the ordering physician, nurses can:
- Enter diagnoses and orders
- Reconcile medications
- Print and review instructions and educational materials with patients
- Generate summaries for patients and other providers or facilities
- Initiate the discharge process
| Admission | Stay | Discharge |
|
Create an admission order.
Add admission notes.
Reconcile medications.
Create a nursing care plan. |
Complete nursing tasks.
Administer medications.
Monitor a patient's condition.
Document notable events.
Communicate updates to the care team.
Document your shift. |
Create a discharge order.
If the patient is going home, generate a Patient Care Summary.
If the patient is being transferred to another facility, generate a summary of care record. |
Documentation tools for nurses
| Tool | Description |
| Admission note |
Use the admission note to document:
|
|
Review and update the nursing care plan to keep the nursing team on track. Address and resolve issues with patient care:
|
|
| Task Lists |
Task lists are automatically generated from nursing orders. Review the task list to see what tasks you will need to complete for each patient during your shift:
|
|
Track medication orders and their administration, using either barcode scanners or manual entry.
|
|
|
Communicate brief updates to the entire care team, such as:
|
|
| Nursing flowsheets |
Flowsheets allow the entire care team to view multiple aspects of a patient's health over time, and spot trends at a glance.
Enter data that you want to track over the course of a stay to assess how a patient's condition is changing. Flowsheets reduce the need to research shift notes for critical data, reduce patient safety risk, and can improve continuity of care and patient outcomes. Nursing flowsheets track:
|
| Shift notes |
Use shift notes to document:
You can access templates for structured documentation, including:
|
| Discharge instructions |
Document:
|
Nurse view of the Patient List
To access the nurse view of the Patient List, you must have the Inpatient Clinicals: Nurse Task Sign-off permission.
In Inpatient Floor and Medical Surgical departments, you can use the patient list to quickly view and address critical tasks. (And by "you," we mean any nurse — or anyone with the Inpatient Clinicals: Nurse Task Sign-off permission — in the department, not just primary nurses.)
The patient list makes it easy for you to:
- See when there are new orders and results
- Cover for other nurses
- Simplify your workflow
- Complete tasks quickly
- Stay on top of any incoming tasks (such as critical results)
Staff in non-nursing roles also see important patient information in the patient list, including expanded patient details. Non-nursing staff with the appropriate permissions can also change a patient's attending physician or primary nurse.
If you're assigned to at least one patient's care team and are viewing the list by "Nursing Unit", you see My Patients at the top of the patient list.
Example: Respiratory therapists can see the My Patients section, which lists the patients assigned to them. In addition, if you're a charge nurse, or you're covering for the patient's primary nurse, you can assign yourself as the patient's associate nurse or current nurse, which then allows you to see a list of patients assigned to you in this section.
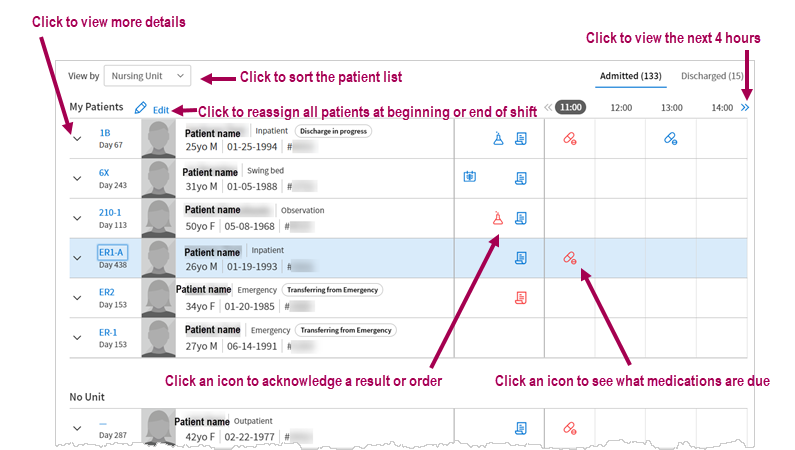
For each admitted patient, there are three main sections: patient information, tasks to acknowledge, and the medication administration schedule.
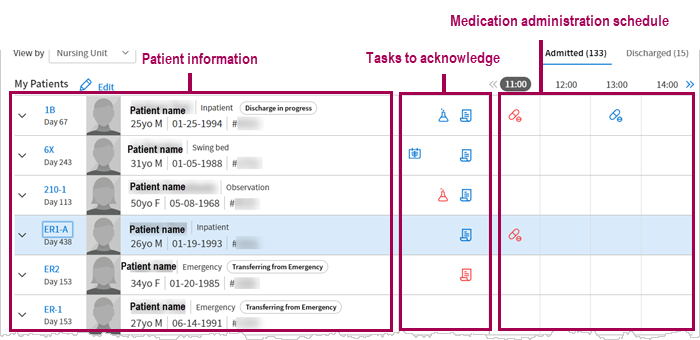
Note: You can see the medication administration schedule for 12 hours at any given time by clicking the view more icon  above the schedule.
If a patient has STAT or overdue medications that are less than two days overdue, the medication administration icon in the current hour column appears in red. The medication administration count includes:
-
All non-PRN medications and only the first instance of administration of PRN medications that have a priority of STAT, Now, or Scheduled
-
Intermittent IV and IV push medications
-
The start of a continuous IV
-
The discontinuation of a continuous IV
You can complete these actions if you have the Inpatient Clinicals: eMAR permission:
-
Click the medication administration icon in the current hour to view the Due section of the patient's Medication Administration Record (MAR).
-
Click the medication administration icon in a future hour to view upcoming medication administration in the All section of the Medication Administration Record (MAR).
-
When the current hour contains only a STAT, Now, or Scheduled administration of a PRN medication, click the medication administration icon to show the All section of the Medication Administration Record (MAR).
To add a nurse to the patient's care team
- Display the patient chart.
- In the patient banner, click the view more icon
 to display additional demographic information, and then click the plus icon
  next to Care team.
 - Click the appropriate nurse category.
A list of nurses in that category appears. - Click the nurse's name to add it to the care team.
To locate a patient's hospital chart
Use the Patient List to find patients in your current department
To access the Patient List, click the athenaOne logo
in the top left corner of the Main Menu.
The Patient List includes patients admitted for services in the department you are logged in to. You can filter the list by ADMITTED, DISCHARGED, and ALL.
Use the Search tool to find patients, visits, and claims in any department
The search tool
is located in the Main Menu, at the upper right.
You can enter an ID number to search for visits and claims by ID number.
You can also search for patients by patient name, insurance number, custom ID, or guarantor. The search results include patients from all departments.
Admission tasks
To add an admission order
- In the patient chart, click the arrow in the green workflow menu (at the upper right) and select Go To Admission Order. (The options available in the green workflow menu depend on your user role.)
Review (or update) the order details
- Admission date and time — Enter the time and date of admission.
Tip: You can enter "now" in the time field to input the current time and date, or you can enter "t" in the date field for the current date. - Department — Select the admitting or receiving department.
- Admitting physician — Select the admitting physician.
- Attending physician — Select the attending physician.
- Service — Select the service.
- Telemetry — Click Yes, No, or Remote.
- Level of care — Select the level of care.
- Primary diagnosis — You can click the plus icon to add a diagnosis, or click the X icon
 to delete a diagnosis.
 - Condition — Select the patient's condition.
- Precautions — You can click the plus icon to add a risk, or click the X icon to delete a risk.
- Expect patient to be discharged or transferred within 96 hours — Click Yes or No.
- Elective admissions — Click Yes or No.
- Enrolled in clinical trial — Click Yes or No.
- Click Enter Order.
Note: If you are a physician or authorized midlevel provider, this button says Sign Order.
Note: You can delete an admission order that was not entered by a provider, as long as it has not yet been signed by a provider. You can cancel an admission order (signed or unsigned) if a provider has not yet marked the patient as "Arrived" in the department. To delete or cancel admission orders, you must have the Inpatient Clinicals: Admission Sign-off permission.
To add an admission note
Use the admission note to document the patient's initial assessment, historical chart information, and the initial nursing care plan. There are four steps to complete an Admission Note: Assess, Hx, Plan and Sign-off.
- In the patient chart, click the arrow in the green workflow menu (at the upper right) and select Go To Admission Note. (The options available in the green workflow menu depend on your user role.)
You can click the steps in the navigation bar at the top of the screen to record admission notes in any order.
- Assess — Click Assess in the navigation bar, and then click the plus icon next to Nursing Assessments to select a template and conduct an initial overview of the patient.
Note: You can add additional information in the Note field at the bottom of the template. - Hx — Click Hx in the navigation bar, and then record current Problems, Surgical History, Home Medications, Allergies, Vaccines, Family History, and Social History. When the admission note is signed, information you enter in these sections automatically updates the related chart sections (for example, History, Allergies, Meds).
- Plan — Click Plan in the navigation bar, and then record notes in the Nursing Care Plan. These notes will automatically populate the Nursing Shift notes.
Note: To use a predefined nursing care plan, enter .ncp in the text field and select the plan you need from the search results.
To create a new nursing care plan, enter the text to use for the nursing care plan.
To save the new plan, click the star icon to the right of the field and enter a shortcut name for the plan beginning with NCP_.
To edit the text before you save it, click Edit text.
To designate this text macro as a nursing care plan only, check Make available in the current section only.
Click Save. - Sign-off — Click Sign-off in the navigation bar, and then review the information. The Sign-off section summarizes the admission note with information from the previous sections.
- Click Sign Note to complete the Admission Note.
Note: The admission note stays open until you sign it. (open) appears next to the note title in the patient's briefing and in the Notes tab of the chart until you close the note.
The timestamp appears just below the Sign Note button.
You can click the timestamp to update the date and time, provided that the date you enter is within 30 days of the current date. When you update a timestamp, the note is marked "Late entry."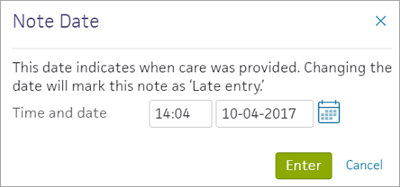
To reconcile home medications
On the patient briefing, the red vertical bar beside the medications icon indicates you must reconcile home medications. It also appears on any orders where medication reconciliation is required. Click on the medications icon to bring up two lists of Medications. If a patient has unreconciled home medications, click the Reconcile home medications link to open the Medication Reconciliation window.
The Medication Reconciliation window has columns for Home, Inpatient, and Reconciled Medications with a list of medications in each category, if any. Each listed medication includes the medication name and dose. A red vertical bar appears to the left if reconciliation is required for that medication. To reconcile, you click the send to icon or the delete icon.
To continue a home medication, click the send to icon to copy it to the Reconciled Medications list. If athenaOne finds a match, it adds the medication to the reconciled list. If multiple matches display, you must select a medication. Once you finish reconciliation, the red vertical bar disappears, the send to button is highlighted, and the medication is grayed out in the Home list.
If you want to select a different medication than athenaOne matches to, click the plus icon ![]() . You can search for a better match to the medication.
. You can search for a better match to the medication.
To add a Nursing Care Plan
As part of the admission process, you must create a nursing care plan for the patient. The plan includes nursing diagnoses. goal, interventions, and ideal outcomes. You should review and update the plan throughout the patient stay. The care plan helps keep the nursing team on track to address and resolve issues with patient care.
- In the patient chart, click the arrow in the green workflow menu (at the upper right) and select Go To Care Plans. (The options available in the green workflow menu depend on your user role.)
- Nursing Care Plan — To use a predefined nursing care plan, enter .ncp in the text field and select the plan you need from the search results.
To create a new nursing care plan, enter the text to use for the nursing care plan.
To save the new plan, click the star icon
To edit the text before you save it, click Edit text.
To designate this text macro as a nursing care plan only, check Make available in the current section only.
Click Save.- Click Done.
Recording care and events during the patient's stay
To add comments
You can add comments to document the well-being of a patient that is not directly connected to the care plan. For example, if a patient's care plan includes a special diet to prevent vomiting, and the patient was able to keep a meal down during your shift, you can note this in a comment.
- In the patient chart, click the arrow in the green workflow menu (at the upper right) and select Go to Comments. (The options available in the green workflow menu depend on your user role.)
- Enter a comment in the field provided.
- Click Add.
Managing nursing tasks
Nursing tasks are automatically generated from nursing orders, so you can see what tasks you'll need to complete for each patient during your shift. You should document the completion of these tasks.
Tasks include these categories: Scheduled tasks, Continuous tasks, and PRN tasks. In each category, tasks are ordered by clinical order type name and then the scheduled completion time. Tasks for the current date appear by default. You can view the list by:
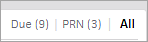
- Due — Current-day tasks that are overdue or due in the next half hour, and TBD (loosely scheduled) tasks
- PRN — Current-day PRN (as needed) tasks
- All — All tasks, both current and future tasks
Continuous nursing tasks are not included in the count at the top of the page.
You can mark tasks as Complete, not done, reschedule, or edit a task. When you mark a TBD task complete, athenaOne updates the number of instances remaining for the day.
To update the status of a nursing task
- In the patient chart, click the arrow in the green workflow menu (at the upper right) and select Go to Tasks. (The options available in the green workflow menu depend on your user role.)
- You can click a task on the left side to view task start and stop date.
- You can highlight tasks on the right side to mark a task COMPLETE, NOT DONE, or RESCHEDULE.
To acknowledge discontinued orders (from the Clinical Inbox)
-
Display your athenaOne home page: On the Main Menu, click the athenaOne logo.
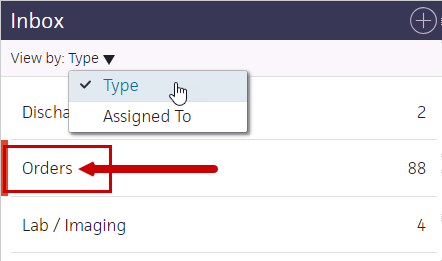
In the Clinical Inbox at the left
- View by: — Select Type to sort the Inbox by type.
- Click Orders.
- Click an acknowledge discontinued task in the Orders list to display the orders in the workspace at the right.
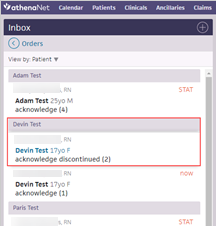
- Check the box for each order or click Select all.
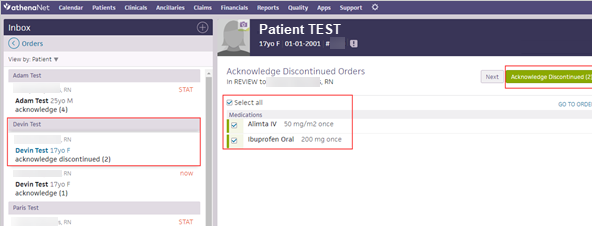
- Click Acknowledge Discontinued.
To acknowledge discontinued orders (from Order Entry)
- Display your athenaOne home page: On the Main Menu, click the athenaOne logo.
- In the Patient List, click the patient's name to display the patient's chart.
- In the patient's chart, click Go to Orders (at the upper right) to display the Order Entry page.
- Under Recent Changes, locate the discontinued order.
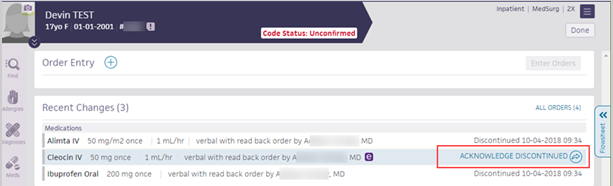
- Click ACKNOWLEDGE DISCONTINUED on the right.
Updating the MAR
The electronic Medication Administration Record (MAR) enables nurses to track medication orders and their administration using barcode scanners or manual entry. Medications appear in the MAR after they are entered by a nurse or physician and can be marked as administered before being signed by a physician or verified by a pharmacist.
To record that a medication dose was administered
- Display the patient's MAR: In the patient chart, click the arrow in the green workflow menu (at the upper right) and select Go to MAR. (The options available in the green workflow menu depend on your user role.)
- Verify that the correct patient is selected. The patient ID number is located in the patient banner, below the patient's name.
If you use a barcode scanner, click anywhere on the screen and then scan the patient's wristband ID. If the barcode matches, you can continue.
Administer the medication
- To the right of the medication name, hover over the time you are administering the medication and the dosage to be administered. Three options appear to the right of the medication.

- Click Administer. The input form opens with additional fields. The fields may vary with the medication.
- Administered — Enter the time and date.
Tip: You can enter "now" in the time field to input the current time and date, or you can enter "t" in the date field for the current date. - Note — Enter any notes concerning the this medication administration.
- Click Sign to complete the MAR documentation.
To record that a medication dose was not given
- Display the patient's MAR: In the patient chart, click the arrow in the green workflow menu (at the upper right) and select Go to MAR. (The options available in the green workflow menu depend on your user role.)
- Verify that the correct patient is selected. The patient ID number is located in the patient banner, below the patient's name.
If you use a barcode scanner, click anywhere on the screen and then scan the patient's wristband ID. If the barcode matches, you can continue.
Administer the medication
- To the right of the medication name, hover over the time the medication should be given. Three options appear to the right of the medication.

- Click Not Given. The input form opens.
- Reason — Select the reason the med was not given.
- Click Sign to complete the MAR documentation.
To reschedule a medication dose
- Display the patient's MAR: In the patient chart, click the arrow in the green workflow menu (at the upper right) and select Go to MAR. (The options available in the green workflow menu depend on your user role.)
- Verify that the correct patient is selected. The patient ID number is located in the patient banner, below the patient's name.
If you use a barcode scanner, click anywhere on the screen and then scan the patient's wristband ID. If the barcode matches, you can continue.
Administer the medication
- To the right of the medication name, hover over the time the medication should be given. Three options appear to the right of the medication.

- Click Reschedule. The input form opens.
- Rescheduled — Enter the new time and date for the medication dose.
Tip: You can enter "now" in the time field to input the current time and date, or you can enter "t" in the date field for the current date. - Reason — Select the reason that the dose was rescheduled.
- Click Sign to complete the MAR documentation.
This action also creates a new task for the rescheduled dose.
To acknowledge discontinued orders from the MAR
- In the patient chart, click the arrow in the green workflow menu (at the upper right) and select Go to MAR. (The options available in the green workflow menu depend on your user role.)
- Locate the discontinued order in the list of medication orders.
- Click ACKNOWLEDGE DISCONTINUED.

To print MAR information
- Display the patient's MAR: In the patient chart, click the arrow in the green workflow menu (at the upper right) and select Go to MAR. (The options available in the green workflow menu depend on your user role.)
- Verify that the correct patient is selected. The patient ID number is located in the patient banner, below the patient's name.
If you use a barcode scanner, click anywhere on the screen and then scan the patient's wristband ID. If the barcode matches, you can continue.
Important: It is your responsibility to review any release of protected health information (PHI) to ensure compliance with HIPAA, federal, and state regulations. Every document should be reviewed for PHI before printing and release.
To print a single day's medications
- Click the date to print (dates are listed horizontally across the top of the page).
- Click All (in the upper right corner) to display all medications for the selected date.
- Scroll down to the bottom of the page, and click the Print icon
 at the lower right.
The preview window appears. (Your browser must allow pop-ups to see the preview window.) - Use the print dialog to print.
To print MAR information for a date range
- In the patient chart, click the Menu icon
 and select Chart export.
 - In the Chart Export window, under Available Attachments, you can select the Medication Administration Record header to print the entire MAR.
You can also click the plus icon to expand the Medication Administration Record and double-click or use the arrows to select individual dates.
 - Click Export Chart Sections.
A review window appears. - Method — Select Paper print-out.
- Scroll down to the Actions section and select the Submit option.
- Click Save. The task appears in Submit status.
- Click
 Print in the upper right corner.
Your exported MAR appears.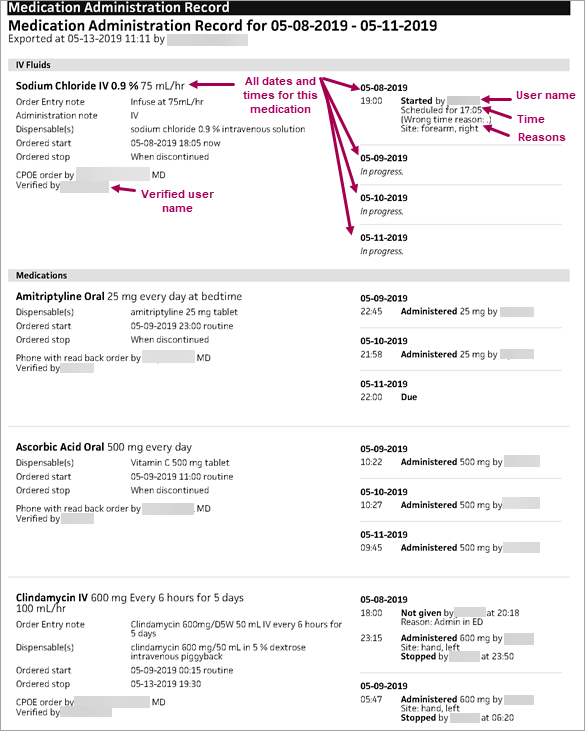
Nursing notes
Use nursing notes to communicate brief updates to the entire care team. These short, one-line notes provide a running commentary of important information that's highly visible to care team members when they open the patient chart.
To add nursing notes
- In the patient's chart, click the arrow in the green workflow menu (at the upper right) and select Go to Nursing Notes. (The options available in the green workflow menu depend on your user role.)
- Enter a comment in the Add note field.
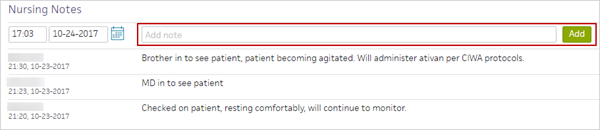
- Click Add. The note appears in the patient chart.
To add shift notes
You can add or open a shift note to document a patient's changes, progress, and notable events throughout your shift. For example, if a patient with a fractured hip was able to walk down the hall with help, as instructed in the nursing care plan, you would note the event in the shift note. You can access templates for structured documentation, including:
- Documenting your shift assessment
- Head-to-toe assessments
- Lines, tubes, and drains
- Screening questionnaires
- ADLs
Note: You must have a nursing role to add a shift note for a patient. Shift notes are labeled according to your provider type.
- In the patient's chart, click the arrow in the green workflow menu (at the upper right) and select Add Shift Note. (The options available in the green workflow menu depend on your user role.)
- Note/Assessment — You can click the plus icon to select an assessment template to document the patient assessment.
You can also enter a free-text shift note in the field provided to document the patient's status during the shift.
Tip: To save the note as a shift note template, click the star icon, enter a name for the new note, and click Save.
- To include the most recent vitals in the note summary, check Include vitals in summary.
- Click Next.
- Review the note Summary.
- Click Sign Note.
Note: The timestamp appears just below the Sign Note button.
You can click the timestamp to update the date and time, provided that the date you enter is within 30 days of the current date. When you update a timestamp, the note is marked "Late entry."
You can delete a note before you sign, but you cannot delete unsigned notes. 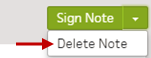
Discharge tasks
There are six parts to the discharge workflow: Discharge Planning, Patient Education, Post-Discharge Orders, Discharge Instructions, Documents, and Discharge Order. The care team can access and complete these parts in any order, over the course of the patient's stay. Some can be completed by a nurse, some require a physician.
To initiate the discharge process
- Display the patient's Discharge tab: In the patient chart, click the arrow in the green workflow menu (at the upper right) and select Go to Discharge. (The options available in the green workflow menu depend on your user role.)
Record discharge order information
- Click Discharge Order.
- Ordering physician — Select the ordering physician. (This field appears for nurses only.)
- Final diagnosis — Search for and enter a final diagnosis.
- Condition — Enter the patient's condition the time of discharge.
- Disposition — Select the disposition of the patient after discharge.
To create or edit discharge orders
As part of the discharge process, nurses can enter diagnoses and orders, and reconcile medications if given a verbal order to do so by the ordering physician. Only physicians can sign orders.
- Display the patient's Discharge tab: In the patient chart, click the arrow in the green workflow menu (at the upper right) and select Go to Discharge. (The options available in the green workflow menu depend on your user role.)
- Click Post-Discharge Orders.
- Order Entry — Search for and select orders. If given a verbal order, a nurse can search for and select orders.
Tip: To order referrals, search for "referrals" and include summaries of care. You can search for "after your visit" to locate patient education orders.
Note: Some order types may require a diagnosis. -
To mark an order as not given, click Not Given when, for example, the patient refused the order, or a medication wasn't available. This action ensures that quality measures are not affected negatively.
You must then select a reason for not giving the order.
You can also include a note to the patient and an internal note.
Orders marked as Not Given are listed in the Medications Not Given section of the Discharge Summary, but not in the medication list or the Patient Portal. This ensures that the patient does not accidentally view an order or take a medication that was explicitly refused.
Reconcile the medications list
- If the Reconcile medications for discharge link is visible, click this link to review the patient's home and inpatient medications.
The patient's home medications are listed on the left, inpatient medications are listed in the center, and the discharge medication list appears on the right. - For each medication on the list, use the arrow icon to indication continue
 or use the X icon
  to discontinue upon discharge. The list of home medications marked continue produces the Discharge Home Medications list.
 - Click Reconcile Medications to create the Discharge Home Medications list.
(All medications in the list must be acted upon before the button appears green.) - Discharge Home Medications — Review the list of medications to be continued upon discharge. Click a medication to view or edit the details, or to remove it from the list.
Note: In the patient's chart, the medications flowsheet will reflect the changes made when medications are reconciled.
To create or edit the discharge instructions
Note: Nurses can sign discharge instructions.
- Display the patient's Discharge tab: In the patient chart, click the arrow in the green workflow menu (at the upper right) and select Go to Discharge. (The options available in the green workflow menu depend on your user role.)
- Click Discharge Instructions.
- Nursing summary of care — Enter the nursing summary of care.
- Patient goals — Enter the patient goals.
- Patient instructions — Enter the patient instructions.
- Portal Registration — You can register the patient for the Patient Portal, if the patient consents.
Note: After discharge, patients registered for the Patient Portal can access their summary of care record on the My Health page of the Patient Portal. - Click Enter Instructions.
To create or edit the discharge summary
The patient discharge instructions and the discharge summary documents are created automatically using information recorded during the hospital stay.
You can generate letters to go home with the patient, to send to another care provider, or to print a comprehensive discharge summary.
- Display the patient's Discharge tab: In the patient chart, click the arrow in the green workflow menu (at the upper right) and select Go to Discharge Plan. (The options available in the green workflow menu depend on your user role.) Alternatively, in the patient chart, click the Discharge chart tab at the left side of the page.
- Click Summary in the navigation bar at the top of the page.
- Letters — Click the Letters plus icon to display the Add Letter form, complete the fields provided, and select a delivery option.
If the patient has Patient Portal access, you can select Close and Email Patient. athenaOne may close certain Patient Care Summaries when you sign and approve them, so they do not appear in the Clinical Inbox unnecessarily.
Note: athenaOne automatically generates and sends the Summary of Care Record (SCR) via DIRECT to the Primary Care Physician (PCP) and Receiver Facility on record when you complete discharge and click Discharge Complete. The patient can access the Summary of Care record on the My Health page of the Patient Portal. - Click Done to complete the Discharge Plan.
Note: The discharge plan stays open until all steps are signed.
After discharge, patients registered for the Patient Portal can access their summary of care record on the My Health page of the Patient Portal. - After the patient leaves the hospital, on the patient briefing, enter the date and time that the patient left, and click Discharge Complete to close the stay. This removes the patient from the Patient List (or Tracking Board).

Note: If the patient has Patient Portal access, athenaOne automatically moves signed Patient Information orders and Patient Care Summaries from Review status to Notify by Portal status, and to Close status for other patient correspondence.
If the patient does not have Patient Portal access and the Paper option is selected in the Patient care summary and patient letter delivery preference field (under the Registration Information heading) on the Quickview, you should select Close manually.