 User Guide — Outpatient IV Clinic Workflow
athenaOne for Hospitals & Health Systems
Table of Contents
To register and check in a patient for outpatient IV clinic services
To locate a patient's hospital chart
To verify orders in the Pharmacy Verification list
To complete a medication preparation order
To record administered medications in the MAR
User access and permissions
You must be logged in to a department that uses athenaOne for Hospitals & Health Systems, and that is configured to use outpatient services.
You must have the Inpatient Chart Edit user permission to close a stay.
You must have the Inpatient Clinicals: Pharmacy Verification role to access the Pharmacy Medication Preparation page and the Pharmacy Verification page.
See also: User Roles and Permissions.
To register and check in a patient for outpatient IV clinic services
- On the Main Menu, click Patients. Under Patient Registration, click New Hospital Visit.
Locate the patient record
- Use the search fields provided to search for the patient record.
- If the patient record is found, click the patient name and then click New Hospital Visit.
- If the patent record is not found, click Create visit for a new patient, and then click New Hospital Visit.
Enter patient demographic information
- Under Patient Information, record as much information as you can. (Yellow indicates a required field.)
- Verify information in any pre-populated fields. Edit as needed.
- Primary care provider — Click Add provider and select the primary care provider from the patient's care team.
If the provider is not listed, click Add new provider to search for and add the provider name. - Language — Select the patient's language.
- Race — You can click the plus icon
 to add options to the Race menu.
Enter check-in details
- Click Next at the bottom of the page, or click Check-in Details at the left.
- Level of Care — Select Outpatient.
- Department — Select the IV/infusion clinic.
- Check-in date — Enter the check-in date.
Tip: Enter "t" in any date field to enter today's date. - Check-in time — The check-in time is populated automatically when the patient is checked in.
- Admission source — Select the facility or clinic that referred the patient.
- Admission type — Select Elective.
- Referring provider — Click Select/view to select the referring provider.
- Chief complaint — Enter a brief description of the chief complaint.
- Attending provider — Leave this selection blank.
- Admitting provider — Select the admitting provider for this visit.
Note: athenahealth sets up this provider when creating the IV/Infusion Clinic department during implementation. - Admitting provider — Click Select/view to select the admitting provider.
Enter insurance information
- Click Next at the bottom of the page, or click Insurance at the left to display the Insurance fields.
- Complete as much insurance and billing information as possible.
- Click Next at the bottom of the page, or click Guarantor at the left to display the Guarantor fields.
Enter the guarantor's information
- Patient's relationship to guarantor — If the patient has no guarantor, select Self. Otherwise, select the patient's relationship to the guarantor.
- If the patient has a guarantor, record as much guarantor information as possible.
- Click Next at the bottom of the page, or click Payment at the left to display the payment fields.
- Click Done with Registration.
The Patient Access view appears.
- Click Check in Patient.
The Confirm Visit Details window appears. - Appointment type — Select the appointment type.
- Provider — Select a provider.
- Click Done with Check-in.
athenaOne automatically creates an outpatient stay (and for a new patient, creates a patient chart).
To locate a patient's hospital chart
Use the Patient List to find patients in your current department
To access the Patient List, click the athenaOne logo
in the top left corner of the Main Menu.
The Patient List includes patients admitted for services in the department you are logged in to. You can filter the list by ADMITTED, DISCHARGED, and ALL.
Use the Search tool to find patients, visits, and claims in any department
The search tool
is located in the Main Menu, at the upper right.
You can enter an ID number to search for visits and claims by ID number.
You can also search for patients by patient name, insurance number, custom ID, or guarantor. The search results include patients from all departments.
To enter an IV order
Orders that generate nursing tasks, such as physical therapy, respiratory therapy, and IV orders, appear in the Tasks list. The tasks that apply to your role appear at the top of the Task list. You can mark orders in the task list as Completed, Not done, or Reschedule from the Tasks list.
- Display the patient's Order Entry page: In the patient chart, click the arrow in the green workflow menu (at the upper right) and select Go to Orders. (The options available in the green workflow menu depend on your user role.)
- Click the plus icon next to Order Entry to display the search tool.
- Search for and select the type of IV medication to order. In the search results, IV medications appear with IV following the medication name.

- Click the new order form to expand the details.
- Ordering provider (appears for nurses only) — Select the ordering provider, and then use the menu to the right to select how the order was given (verbal, phone, written, etc.).
- Priority — Select the priority for this order.
- STAT: urgency to administer order.
- now: intended to be given within the next 30 minutes.
- routine: based on routine for that frequency in the facility, for example, twice a day.
- schedule - start first order by specific time. Enter a start time and date.
Enter the sig
Note: To enter a free-text sig instead of using the structured fields, uncheck the Structured checkbox at the far right of the Sig field.
- Sig — Enter quantity, select units, and select duration from the available options.
Note: Dosage in mg allows you to set a schedule for it (for example, 10 mg every 8 hours) versus mg/hr., which allows for a continuous rate until discontinued. - PRN — Select this option for orders that will be administered as needed.
Note: If PRN is selected, enter additional instructions in the Notes field.
Weight-based dosing calculator
- You can click the Calculator icon
 to access the weight-based dosing tool.
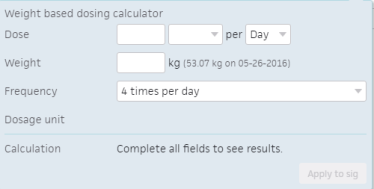
Specify IV fluid
- Infusion details — Select either Push, No Diluent, or Diluent and complete any additional fields as needed.
Note: In most settings, you are not required to specify infusion details during order entry. If you don't, this information will be provided by the pharmacist during order verification. -
First dose/Next dose — This field is calculated automatically, based on the Sig and Priority.
- If the Priority is STAT or now, this field is labeled Next dose.
- If the Priority is routine, this field is labeled First dose.
- If the Priority is scheduled, this field does not appear.
- Note — Enter a note (optional).
- Click the Sign Orders button.
Signing orders
Note: Orders can be entered by a nurse, but must be signed by a physician, according to hospital and legal guidelines.
- To sign all orders for this patient, scroll to the top of the page and check Select all.
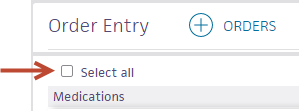
- To sign only selected orders, check the box for each order to sign.
- Click Sign Orders.
To verify IV orders in the Pharmacy Verification list
- Display the Pharmacy Verification page: On the Main Menu, click Ancillaries. Under Pharmacy, click Pharmacy Verification.
- Under Unverified Orders, click the IV order to verify.
- Ordered by — The person who ordered the medication.
- Schedule — Review the medication administration schedule information (Frequency, First dose, Last administered)
Notes:- Last administered only appears after the first dose has been administered.
- Pharmacists can edit the administration schedule for a medication order if necessary. See To edit the medication administration schedule for unverified orders for more information.
- Administration qty. — Typically, the default value is calculated automatically and validated based on the ordered dose amount, although it can be edited. If you enter a value different from the ordered dose amount, you receive a warning.
For some orders (for example, continuous IV orders) the field is empty, and a message appears next to it, stating that the field couldn't be checked. You should enter the estimated total volume of the IV to administer. - Dispensables / Dispensed as — Select the dispensable.
Verify the order details
- Infusion details — Verify that the correct option is selected (Push, No Dilution, Dilution).
Additional fields may appear, based on the selected option:
Push — No further action is necessary.
No Dilution — Verify or complete the Infusion rate field. If the ordering provider did not specify infusion details in the order, you must complete the Infusion details fields.
Dilution — Verify or select a diluent from the list. If there is one packaged drug in the formulary that maps to the premixed dispensable you selected, the package size is populated automatically.
Verify or complete the Concentration fields. The Infusion rate field populates automatically. - Diluent Dispensable — Verify or update the diluent dispensable.
- Administration Note — Describe how the medication is administered, for example, the site (arm, hand, etc.).
- Note — Enter any additional note about this order (optional).
- Check the checkbox to the left of the medication name. The left-hand bar turns green.
- Click Verify Orders. The order appears under the Verified Orders heading.
Both verified and unverified orders also appear in the Medications chart tab under Active Medications.
Note: When you verify a premix medication, the medication preparation task is closed automatically. - Click Print Labels to print the order label.
To complete a medication preparation order
All orders for IVs and compounded medications, including both verified and unverified orders, appear on the Pharmacy Medication Preparation page.
- Display the Pharmacy Medication Preparation page: On the Main Menu, click Ancillaries. Under Pharmacy, click Medication Preparation.
- Click the medication order to expand the details.
- Products — Select the packaged drug from the menu.
- In the box to the right of the Products menu, enter the quantity of the drug that was used to fulfill the order. In the menu to the right of the quantity box, select the appropriate unit of measure.
- To add products to the preparation, you can click the plus icon next to PRODUCT, below the packaged drug menu.
- Click COMPLETE in the bottom right corner to indicate that you prepared the order.
To record administering simple medications in the MAR
- Display the MAR: In the patient chart, click the arrow in the green workflow menu (at the upper right) and select Go to MAR. (The options available in the green workflow menu depend on your user role.)
- Verify that the correct patient is selected. The patient ID number is located in the patient banner, below the patient's name.
If you use a barcode scanner, click anywhere on the page and then scan the patient's wristband ID. If the barcode matches, you can continue.
Administer the medication
Note: At the upper right corner of the MAR, you can click Due, PRN, or All to toggle the view. Medication tasks appear on the Due tab one hour before their scheduled time. If the medication is not administered, the task remains on the Due tab for 23 hours after the due time.

- Click the name of the medication to administer. The input form opens with the most current dosage time, and administer selected.

- Pain (appears for pain medications only) — Select the patient's pain scale.
- Products — Select the product to administer and enter the quantity.
You can click the plus icon to add a product, and click the X icon  to delete a product.
 - For orders in mg or mL, the ordered amount is populated automatically on the first scan.
- For discrete units such as pills and capsules, scan the barcode for each unit ordered. For example, to fill an order for two tablets, scan the barcode twice.
- Administered — The field is populated automatically with the current date and time.
Note: An alert appears if you enter the wrong dose or administer the dose at the wrong time. You can select the override options if needed and enter a reason for the change in the text field. - Post-DST — Only check this box if you are administering the medication between 1:00 a.m.-1:59 a.m. on the Sunday in November that Daylight Savings Time (DST) ends.
- Note — Enter any notes concerning this medication administration.
- Make sure that only the medications you want to sign are selected and that the bars for those medications have turned green. If the High alert medication message appears, select the Requires validation from another nurse option.

- Click Sign.
If you use barcode scanning, scan the patient's wristband to sign the medication administration.
For high alert medications, the medication remains on the Due tab with a *Validation Required warning. A second nurse must then confirm that they checked the preparation and administration to verify that the medication was prepared correctly.
Scanning the medication barcode populates the Products field, including the quantity.
To add a shift note for a patient in the Hospital Infusion Clinic
Note: You must have a nursing role to add a shift note for a patient. Shift notes are labeled according to your provider type.
- In the patient's chart, click the arrow in the green workflow menu (at the upper right) and select Add Shift Note. (The options available in the green workflow menu depend on your user role.)
- Note/Assessment — You can click the plus icon to select an assessment template to document the patient assessment.
You can also enter a free-text shift note in the field provided to document the patient's status during the shift.
Tip: To save the note as a shift note template, click the star icon, enter a name for the new note, and click Save.
- To include the most recent vitals in the note summary, check Include vitals in summary.
- Click Next.
- Review the note Summary.
- Click Sign Note.
Note: The timestamp appears just below the Sign Note button.
You can click the timestamp to update the date and time, provided that the date you enter is within 30 days of the current date. When you update a timestamp, the note is marked "Late entry."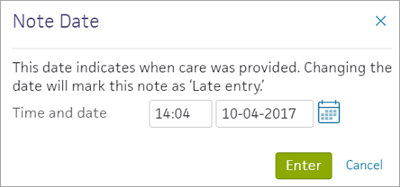
You can delete a note before you sign, but you cannot delete unsigned notes. 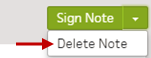
To close the hospital stay
User permissions: To close the stay, you must have the Inpatient Clinicals: Edit Chart permission and the Inpatient Clinicals: Administer Chart permission.
After you click Close Stay, athenaOne removes the patient from the Patient List. Discharged patients do not remain on the Patient List unless the stay was not closed when the patient was discharged.
- In the patient chart, enter the date and time into the fields to the left of the Close Stay button.
- Ensure that all orders are completed or discontinued.
If the button appears with a red vertical bar, you must close all the open shift notes and discontinue all open orders before closing the stay.
To discontinue orders
- In the patient chart, click the arrow in the green workflow menu (at the upper right) and select Go to Orders. (The options available in the green workflow menu depend on your user role.)
- Pause your cursor over the order and click the "X" on the right to discontinue the medication.
- Click the order to expand the details.
- Select the Referring Provider, and Reason for Discontinuation.
- Check the box next to the order, and click Enter Orders.
- Click Done.
- Ensure that all notes have been signed.
- Click Close Stay to close the stay for the patient.
Auto-close feature
To meet CMS requirements that hospitals complete a patient's documentation within a reasonable amount of time after discharging a patient, and to reduce manual data entry, athenaOne uses the auto-close feature, which automatically closes stays 45 days after the patient's discharge. athenahealth recommends 45 days, but you can request a different number of days when you enable the feature.
To enable the auto-close feature for your department, please contact your Customer Success Manager. After the auto-close feature is enabled, athenaOne closes any stay that has been open for the selected number of days. The auto-close feature does not apply retroactively.
If a stay includes open notes, closing the stay does not sign them. You must sign open notes manually before closing the stay. If you create a claim for a stay with open notes, a warning message appears to close the open notes or proceed. You cannot sign open notes after a stay is closed.
Note: You can still close the stay manually, either before or after you create the claim, with this feature enabled.