Add/Update Insurance Card Image
This page allows you to add a card image to an insurance policy for a patient. You can scan the patient's insurance card (or use patient-submitted card images) from the Quickview or Check-in page. You can also use athenaCapture to take a picture of the insurance card with a smartphone or tablet.
On the Quickview page, under the Insurances heading, under the Policy Info column, click Add card image or Update/Delete card image
On the Quickview page, under the Insurances heading, click add new. In the pop-up window Add insurance by uploading card image?, click Upload Image.
On the Quickview page, under the Insurances heading, click Add with card image. In the pop-up window Add insurance card image page, click Upload Image.
This page is accessible if your practice has the card scanning feature enabled for your practice.
For complete information about athenaCapture, including how to download the app, see athenaCapture.
Note: athenaCapture works with digital insurance cards on patients' mobile devices, as well as with paper insurance cards.
- Display the patient Quickview:
 In the text box at the top right of the Main Menu, enter the first three letters of the patient's last name, followed by a comma, followed by the first three letters of the patient's first name. Click the search icon. On the Find a Patient page, click Quickview for the patient you need.
 - Under the Insurances heading, click Add card image next to the Insurance Card Image field.
Note: If the patient has more than one insurance policy, make sure to click the Add card image link for the correct policy.
The Add Insurance Card Image page appears with an athenaCapture barcode on the right side of the page. - On your mobile device, open the athenaCapture app.
- In the app, tap Start and point the mobile device camera at the barcode on the Add Insurance Card Image page.
- In the app, tap Take Photo. Use the camera button on your mobile device to take a picture of the front of the insurance card.
- Review your photo.
- If you do not want to keep the photo, tap Retake and take another picture.
- To keep the photo, tap Use Photo.
- To take a photo of the back of the insurance card, tap + Add Images and use the camera button on your mobile device to take a picture of the back of the card.
Note: athenahealth recommends that you take a photo of both the front and back of an insurance card. - Edit photos as needed:
 — Tap to crop the photo.
- Add Caption... — Click into this field and enter a caption for the photo.
 — Tap to delete photos you do not want to upload.

- To upload your photos, tap Upload.
athenaOne uploads the photos. - In the app, tap OK to complete the process.
- To view the card images you uploaded, click Update/Delete Insurance Card for the insurance policy on the Quickview or Check-in page.
To scan cards, the Burroughs check and ID card scanner device must have approximately 2 inches of room behind it. The device comes with an extender that ensures the required spacing.
- Display the Add Insurance
Card Image page:
On the Quickview or Check-in page, under the Insurances heading, click Add
card image next to the Insurance Card Image field.
Note: If the patient has more than one insurance policy, make sure to click the Add card image link for the correct policy. - If you already scanned and saved the insurance card image, click Browse and then locate and select the card image file. (You can also drag and drop the image file onto the Add Insurance Card Image page.)
- If you have not yet scanned the insurance card, follow these instructions.
- Click the Scan button.
Note: Wait for the blue light on the device to change from blinking to solid before you feed the card through the scanner. - Insert the card into the device's left slot. The front of the card must face outward.
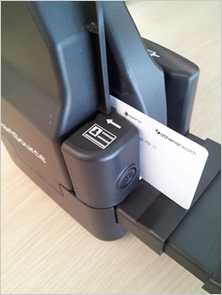
The card moves through the device. - When the card stops moving, remove the card from the Burroughs device.
The scanned image is displayed on the Add Insurance Card Image page. - Validate the image on the Add Insurance Card Image page against the insurance card.
- Click the Save button.
The Quickview or Check-in page reappears.
- Display the Add Insurance Card Image page:
On the Quickview or Check-in page, under the Insurances heading, click Add
card image next to the Insurance Card Image field.
Note: If the patient has more than one insurance policy, make sure to click the Add card image link for the correct policy. - If you already scanned and saved the insurance card image, click Browse and then locate and select the card image file. (You can also drag and drop the image file onto the Add Insurance Card Image page.)
- If you have not yet scanned the insurance card, follow the instructions for the scanner you're using.
Note: For the Ambir or Inuvio scanner, feed the card through the scanner. After the card is completely scanned, click Show Preview. - If the image
does not appear after you scan the card (or click Show Preview), a warning message may appear: "The card image specified in Settings, c:\card-AB.jpg could not
be opened, this is an invalid path." If this warning
message appears:
- Wait a few seconds while the image is saved.
- If you are using the Ambir or Inuvio scanner, click the Show Preview button again.
- If your file name still does not appear, contact the CSC from athenaOne > Support > Success Community > Contact Client Support Center to configure this setting.
Note: To correct issues related to a misaligned, illegible, or otherwise imperfect image, re-scan the card. You cannot modify the image in athenaOne after it is scanned.
- Verify that
the insurance card image is for the correct patient, is positioned correctly, and is legible,
and then click the Save button.
The Quickview or Check-in page reappears.
On the Quickview and Check-in pages, the Add card image link changes to Update/Delete card image.
- On the
Policy Details page, click Add & Upload Image.
The Add Insurance Card Image page appears. - If you already scanned and saved the insurance card image, click Browse and then locate and select the card image file. (You can also drag and drop the image file onto the Add Insurance Card Image page.)
- If you have not yet scanned the insurance card, follow the instructions for the scanner you're using.
- For the Ambir or Inuvio scanner, feed the card through the scanner. After the card is completely scanned, click Show Preview.
- For the Burroughs scanner, click the Scan button. After the blue light on the device changes from blinking to solid, feed the card through the scanner. The image appears automatically on the screen.
- If the image
does not appear after you scan the card (or click Show Preview), a warning message may appear: "The card image specified in Settings, c:\card-AB.jpg could not
be opened, this is an invalid path." If this warning message
appears:
- Wait a few seconds while the image is saved.
- If you are using the Ambir or Inuvio scanner, click the Show Preview button again.
- If your file name still does not appear, contact the CSC from athenaOne > Support > Success Community > Contact Client Support Center to configure this setting.
Note: To correct issues related to a misaligned, illegible, or otherwise imperfect image, re-scan the card. You cannot modify the image in athenaOne after it is scanned.
- Verify that
the insurance card image is for the correct patient, is positioned correctly, and is legible,
and then click the Save button.
The Quickview or Check-in page reappears.
On the Quickview and Check-in pages, the Add card image link changes to Update/Delete card image.
- Display the patient's Quickview page:
 In the text box at the top right of the Main Menu, enter the first three letters of the patient's last name, followed by a comma, followed by the first three letters of the patient's first name. Click the search icon. On the Find a Patient page, click Quickview for the patient you need.
 -
Scroll down to the Insurances area and click add new.
Note: For insurance categories (Primary, Secondary, etc.) that have no existing insurance packages, select from the options:
- Add with card image — You can use patient-submitted card images or upload an image.
- If patient-submitted insurance card images are available, the Use card images from patient to add new insurance window appears. You can use the images or choose to upload new images.
- If no patient-submitted insurance card images are available, the Add Insurance Card Image page appears and you can upload images.
- Add without card image — You can use the Policy Lookup page to manually search for an insurance policy.

- Add with card image — You can use patient-submitted card images or upload an image.
-
If your organization has Enhanced Patient Self Check-In with Insurance Card Capture enabled, and the patient submitted their insurance card images, the Use card images to add new insurance? pop-up window appears.
Otherwise the Add insurance by uploading card image? pop-up window appears.
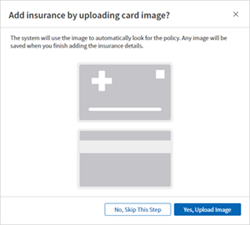
Note: You can also access the card images from the Eligibility and Phone List or the Check-in page.
-
Use the images provided by the patient or upload your own images.
-
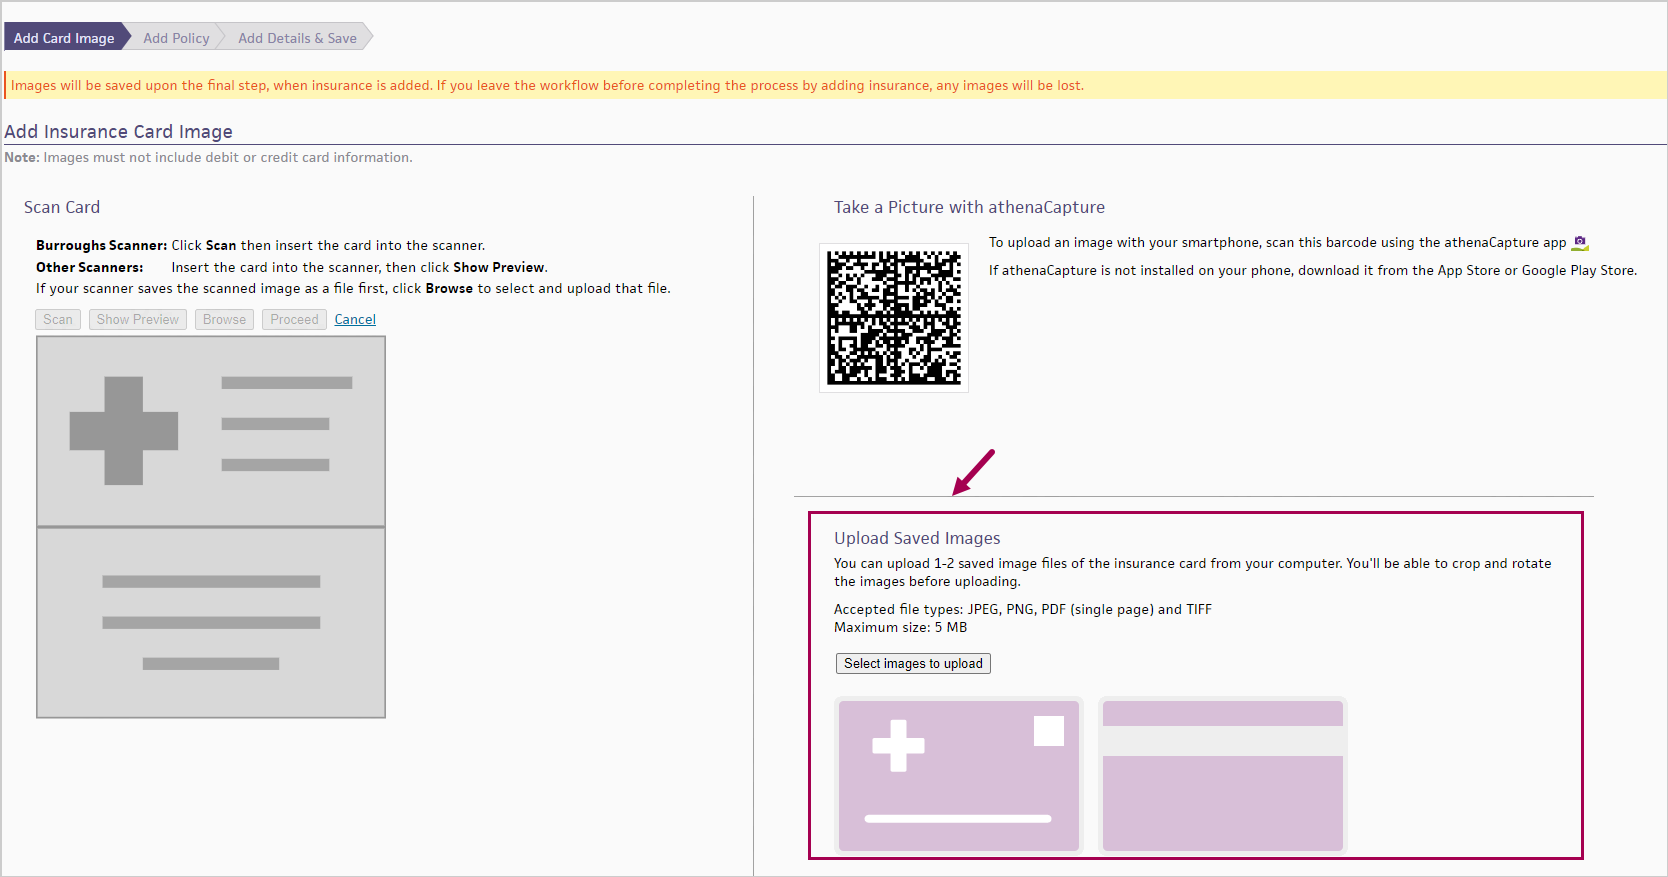
The Add Insurance Card Image page appears.
- Follow the instructions to Scan Card or Take a Picture with athenaCapture.
-
In the Upload Saved Images section, click Select images to upload.
Tip: Click the image to see an expanded view.
-
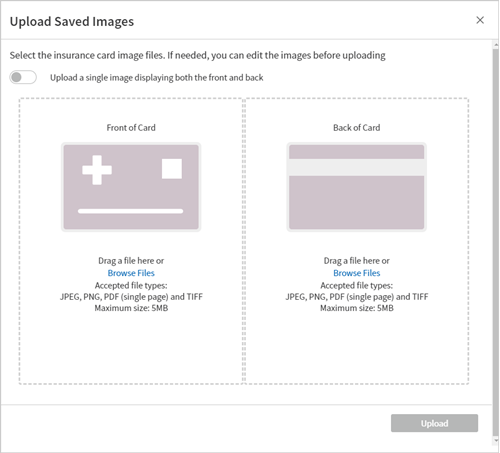
The Upload Saved Images window appears.
PDF technology powered by PDFTron SDK copyright © PDFTron™ Systems Inc., 2001-2020, and distributed by athenahealth, Inc. under license. All rights reserved.
- Select the card image file from your computer.
- You can upload 1-2 saved image files.
- Accepted file types: JPEG, PNG, PDF (single page) and TIFF
- Maximum size: 5 MB
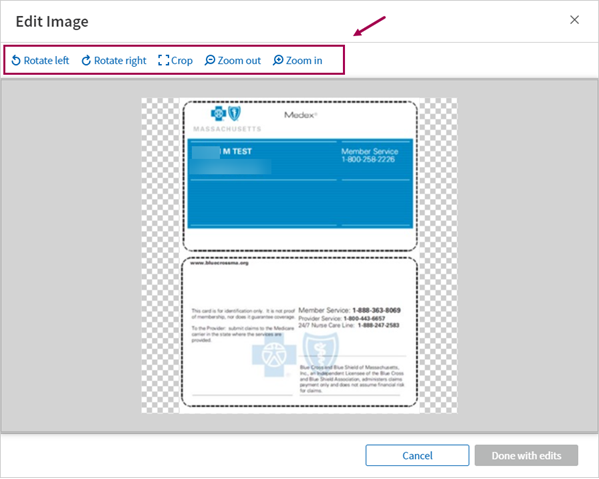
If needed, click the edit icon
 to edit the image before uploading. Use the options at the top to rotate, crop, zoom out, or zoom in as needed. Then click Done with edits and Upload.
Note: For now, the additional image file types and image editing are only available for Front Desk insurance card image uploads and for users adding a new insurance. In a future release, these enhancements will be also available for patient-submitted insurance card images and for users adding images to existing insurance policies. - Images will be saved upon the final step, when insurance is added. If you leave the workflow before completing the process by adding insurance, any images will be lost. (This alert appears at the top of page as a reminder.)
A progress indicator also appears at the top of the page to help you track where you are in the workflow.
- Click Proceed. athenaOne processes the card image and searches for matching insurance policies.
-
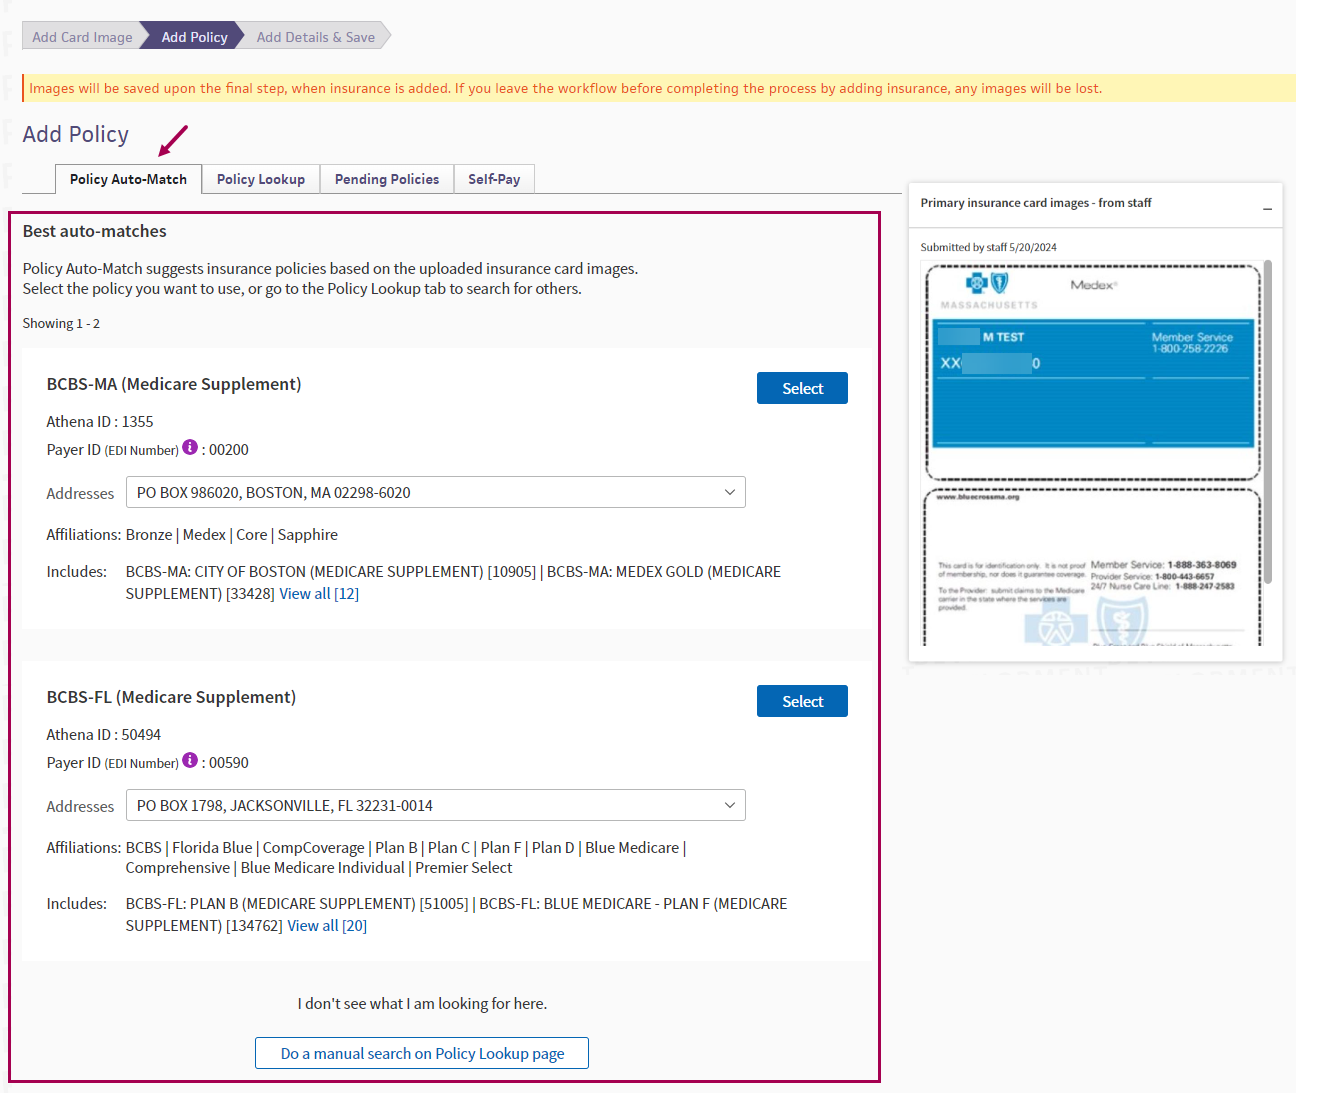
The Add Policy page appears.
-
If there's a best match, athenaOne automatically selects the best match insurance policy for you to review.
Make changes if needed, fill in required fields, then click Add Policy.
If you decide not to use the automatically selected policy, click Change Insurance Selection. The Policy Auto-Match page appears.
-
The Policy Auto-Match tab shows up to three suggested policies for selection, based on data from the insurance card images.
- Suggested policies will only include standard policies, not case policies.
- Suggested policies will only include policies that have an eligibility class that matches from the eligibility check.
-
The Payer ID (EDI Number) appears with insurance package details on the Add Policy page, for standard policies and case policies. The Payer ID is used for electronic claim submission. Some insurance cards include Payer ID, so this may help you identify the correct insurance package for a patient more easily.
Note: Payer ID is not included in a search filter because the Payer ID in athenaOne may not always match what's on the patient's insurance card. This can happen when third-party companies (for example, a clearinghouse) are involved in submitting claims to payers.
-
You'll see the same insurance policy information you would see if you were using Policy Lookup, including the ability to view the drop-down list of additional addresses, should you need to change from the default address.
-
The Insurance card images pop-up window remains on the side so you can reference the card details as needed. This same window will appear on subsequent athenaOne screens so you have continued access to the card image and the information on it as you add the insurance policy.
Tip: Click the image to see an expanded view.
-
Review the suggested policies and determine the best match. Click Select next to the policy you want to use.
- The Add Policy Details page appears.
- Member ID will be prefilled based on Optical Character Recognition (OCR) from the card images.
- Review and fill in required fields, then click Add Policy.
-
athenaOne saves the policy information and the card images to the patient's registration.
- When you return to the patient's Quickview page, the new policy appears in the Insurances section.
- Insurance name and Member ID will be prefilled based on Optical Character Recognition (OCR) from the card images.
If no auto-match policies were suggested, or if you decide not to select any of the suggested policies, you can always use the Policy Lookup page to manually search for an insurance policy.
If the Quickview for a patient does not include an insurance card image, but the image is saved in a clinical document for this patient, you see this message in the Insurances area of the Quickview: "An insurance card image is stored in the patient's chart." You can copy that image to the Quickview.
Note: Only clinical documents with the class "Admin - Insurance Card" cause this message to appear in the Quickview.
You must have the Clinicals or Clinicals Admin permission to add an insurance card image from a patient clinical document to the Quickview.
- Under the Insurances heading of the Quickview, click Add card image next to the message about an insurance card image stored in the patient chart.
The clinical document opens. - Review the document to locate the insurance card image.
- If the document does not contain an insurance card image, select the page and click Reclassify selected document as "Admin".
The clinical document will no longer appear in the Quickview as a document that contains an insurance card image. - If you find an insurance card image in the clinical document, select the page with the insurance card image and click Next.
Note: athenaOne does not import multiple page images. - Drag the cursor over the image to select it, and then click Crop.
- Review the cropped card image.
Note: To select and crop the image again, click Reset crop. - To save the image, click Submit. To return to the Quickview, click Cancel.
- Display the Update Insurance Card Image page: On the Quickview or Check-in page, under the Insurances heading, click Update/Delete card image next to the Insurance Card Image field.
- Click Update Image at the bottom of the page.
A warning appears: "Are you sure you want to update this image?" - Click OK
to update
the image.
The card image is removed from the Update Insurance Card Image page. - If you already scanned and saved the new insurance card image, click Browse and then locate and select the card image file. (You can also drag and drop the image file onto the Update Insurance Card Image page.)
- If you have not yet scanned the new insurance card, follow the instructions for the scanner you're using.
- For the Ambir or Inuvio scanner, feed the card through the scanner. After the card is completely scanned, click Show Preview.
- For the Burroughs scanner, click the Scan button. After the blue light on the device changes from blinking to solid, feed the card through the scanner. The image appears automatically on the screen.
- If the image
does not appear after you scan the card (or click Show Preview), a warning message may appear: "The card image specified in Settings, c:\card-AB.jpg could not
be opened, this is an invalid path." If this warning message
appears:
- Wait a few seconds while the image is saved.
- If you are using the Ambir or Inuvio scanner, click the Show Preview button again.
- If your file name still does not appear, contact the CSC from athenaOne > Support > Success Community > Contact Client Support Center to configure this setting.
Note: To correct issues related to a misaligned, illegible, or otherwise imperfect image, re-scan the card. You cannot modify the image in athenaOne after it is scanned.
- Verify that
the insurance card image is for the correct patient, is positioned correctly, and is legible,
and then click the Save button.
The Quickview or Check-in page reappears.
- Display the Update Insurance
Card Image page: On the Quickview or Check-in page, under the Insurances heading, click Update/Delete
card image next to the Insurance Card Image field.
The Update Insurance Card Image page appears, with the image displayed. - Click Delete Image.
A warning message appears: "Are you sure you want to delete this image?" - Click OK
to delete the image. The Quickview or Check-in page appears.
The deleted image is still visible via the policy audit trail, but it no longer appears linked to the Policy Details page.
- On the patient Quickview page, click the Update this policy link (in the Insurances section). The Update Policy Details page appears, with the active card image displayed at the bottom of the page.
- The Policy History section displays audit information tracking when an image was saved or deleted. Click the view link for deleted images to view the old card image in a new window.
- On the patient Quickview page, click the link to View cancelled insurances.
A view/delete card image link appears for policies that have an image stored.
Note: You cannot add an image to a deactivated insurance policy. - If a cancelled insurance had a card image, click the Reassign card image link to view the image and to view any current active policies.
- At the bottom of the page, click the Select link next to the policy that you want to move the card image to.
athenaEnterprise organizations can add Scanned Insurance Card Image to the list of shared CPI fields. To add this option to the Common Patient Index, please contact the CSC from athenaOne > Support > Success Community > Contact Client Support Center.
For patients who are minors, it is important to scan the parent's card when you are requesting a new insurance package. athenahealth can access that image when we verify the information and add the new insurance package to the database.
If you scan an image to your system and then use the Browse button to copy that image to the Add/Update Insurance Card Image, Prescription Card Image, or Add/Update Driver's License page, the scanned image must meet the following requirements.
Note: If you use the Burroughs ID card scanner to scan an image, the device uploads the image itself, so these rules do not apply.
- Images must be scanned with the image resolution no greater than 180 dpi. A lower dpi value produces smaller card images when viewed in athenaOne, and images are at a lower resolution. We have determined that a 150 dpi resolution with 15% JPG quality produces a clear image that fits the various athenaOne pages without scrolling; image size depends on your specific screen size area. (Testing was done using a 1024 by 768 pixel display setting.)
- Files should be named "card" and have an extension of "jpg" for file type JPEG (for example, card.jpg).
- The maximum file size for a card image is 300 kB.
