 User Guide — athenaCapture
athenaCollector + athenaClinicals
athenaOne for Hospitals & Health Systems
The athenaCapture app provides a simple, secure way to upload image documentation into athenaOne using iOS (iPhone and iPad) and Android (smartphone and tablet) devices.
![]() Look for the camera icon in the patient banner to upload a patient photo.
Look for the camera icon in the patient banner to upload a patient photo.
By default, the athenaCapture app is available to all practice users. If you do not want all users to use athenaCapture, contact the CSC from athenaOne > Support > Success Community > Contact Client Support Center and request that the athenaCapture feature be turned off for your practice.
After athenaCapture is turned off, you can allow specific users at your practice to use the athenaCapture app by granting those users the Capture App Workflow role.
For the best possible experience using athenaCapture, we recommend that you use an iPhone with iOS 10.0 or newer, or an Android phone with OS 8.0 or newer. Download the athenaCapture app from the Apple App Store (iPhone or iPad) or from Google Play (Android smartphone or tablet).
Note: To obtain the app for an Android device from Google Play, you must have a Gmail address or a Google Apps account.
The athenaCapture app provides a simple, secure way to upload image documentation into athenaOne using iOS (iPhone and iPad) and Android (smartphone and tablet) devices. You can use athenaCapture for:
- Insurance card and driver's license image capture
- Embedded image documentation capture during a patient encounter
- Patient photo capture
Important: To protect patient privacy, images pass directly from the athenaCapture app to athenaOne and are never stored unsecured in a device, such as a camera roll or a memory card inserted into a camera.
athenaCapture uses the following security features.
- TLS — All communication between the athenaCapture app and athenaOne is secured by Transport Layer Security (TLS). TLS is a cryptographic protocol that provides communication security over a computer network.
- Barcode-driven authentication — You do not need to enter athenaOne credentials into athenaCapture. The barcode contains a one-time-use key that is random and unique. This key allows athenaOne to recognize the incoming Web service transaction.
- Session timeouts — The athenaCapture app enforces a maximum session time, after which you are required to restart the session.
Note: To avoid connection failures, the athenaCapture app should be on the same network as the athenaOne desktop.
- Display the patient Quickview or the patient chart:
 In the text box at the top right of the Main Menu, enter the first three letters of the patient's last name, followed by a comma, followed by the first three letters of the patient's first name. Click the search icon.
The Find a Patient page appears. - Click Quickview or Chart for the patient record you need.
- In the patient banner at the top of the page, click the camera icon
 .
.
A window opens with instructions and a barcode that you need to scan with your device. - On your mobile device, open the athenaCapture app.
- In the app, tap Start and point the mobile device camera at the barcode in athenaOne to scan it.
- In the app, tap Take Patient Photo. Use the camera button on your mobile device to take a picture of the patient photo.
- Review your photo.
- If you do not want to keep the photo, tap Retake and take another picture.
- To keep the photo, tap Use Photo.
- Edit the photo as needed:
 — Tap to crop the photo.
- Add Caption... — Click into this field and enter a caption for the photo.
 — Tap to delete photos you do not want to upload.
- To upload the photo, tap Upload.
athenaOne uploads the photo. - In the app, tap OK to complete the process.
- To edit or delete the photo you uploaded, click the Update/Delete patient photo link below the Patient photo field on the Quickview or Check-in page.
The Update Patient Image page appears. - Use athenaCapture to take a new photo, or upload an image that is saved on your computer.
- Display the patient chart: Click the athenaOne logo in a department that uses athenaOne for Hospitals & Health Systems to display the Patient List, and then click the patient's name in the Patient List.
- In the patient banner at the top of the page, click the camera icon
 .
.
A window opens with instructions and a barcode that you need to scan with your device. - On your mobile device, open the athenaCapture app.
- In the app, tap Start and point the mobile device camera at the barcode in athenaOne to scan it.
- In the app, tap Take Photo. Use the camera button on your mobile device to take a picture of the patient photo.
- Review your photo.
- If you do not want to keep the photo, tap Retake and take another picture.
- To keep the photo, click Use Photo.
- Edit the photo as needed:
 — Tap to crop the photo.
- Add Caption... — Click into this field and enter a caption for the photo.
 — Tap to delete photos you do not want to upload.
- To upload the photo, tap Upload.
athenaOne uploads the photo. - In the app, tap OK to complete the process.
- To edit or delete the photo you uploaded, click the Update/Delete patient photo link below the Patient photo field on the Quickview page.
You can upload an image of a patient's driver's license on the Quickview page and on the Check-in page.
- Display the patient Quickview:
 In the text box at the top right of the Main Menu, enter the first three letters of the patient's last name, followed by a comma, followed by the first three letters of the patient's first name. Click the search icon. On the Find a Patient page, click Quickview for the patient you need.
 - Under the Registration Information heading, next to the Driver's license image field, click Add card image.
The Add Driver's License page appears with an athenaCapture barcode on the right side of the page. - On your mobile device, open the athenaCapture app.
- In the app, tap Start and point the mobile device camera at the barcode on the Add Driver's License page.
- In the app, tap Take Photo. Use the camera button on your mobile device to take a picture of the driver's license.
- Review your photo.
- If you do not want to keep the photo, tap Retake and take another picture.
- To keep the photo, click Use Photo.
- Edit the photo as needed:
 — Tap to crop the photo.
- Add Caption... — Click into this field and enter a caption for the photo.
 — Tap to delete photos you do not want to upload.
- To upload the photo, tap Upload.
athenaOne uploads the photo. - In the app, tap OK to complete the process.
- To view the license image you uploaded, click the Update/Delete card image link next to the Driver's license image field on the Quickview or Check-in page.
You can upload an image of a patient's insurance card on the Quickview page and on the Check-in page.
Note: athenaCapture works with digital insurance cards on patients' mobile devices, as well as with paper insurance cards.
- Display the patient Quickview:
 In the text box at the top right of the Main Menu, enter the first three letters of the patient's last name, followed by a comma, followed by the first three letters of the patient's first name. Click the search icon. On the Find a Patient page, click Quickview for the patient you need.
 - Under the Insurances heading, click Add card image next to the Insurance Card Image field.
Note: If the patient has more than one insurance policy, make sure to click the Add card image link for the correct policy.
The Add Insurance Card Image page appears with an athenaCapture barcode on the right side of the page. - On your mobile device, open the athenaCapture app.
- In the app, tap Start and point the mobile device camera at the barcode on the Add Insurance Card Image page.
- In the app, tap Take Photo. Use the camera button on your mobile device to take a picture of the front of the insurance card.
- Review your photo.
- If you do not want to keep the photo, tap Retake and take another picture.
- To keep the photo, tap Use Photo.
- To take a photo of the back of the insurance card, tap + Add Images and use the camera button on your mobile device to take a picture of the back of the card.
Note: athenahealth recommends that you take a photo of both the front and back of an insurance card. - Edit photos as needed:
 — Tap to crop the photo.
- Add Caption... — Click into this field and enter a caption for the photo.
 — Tap to delete photos you do not want to upload.
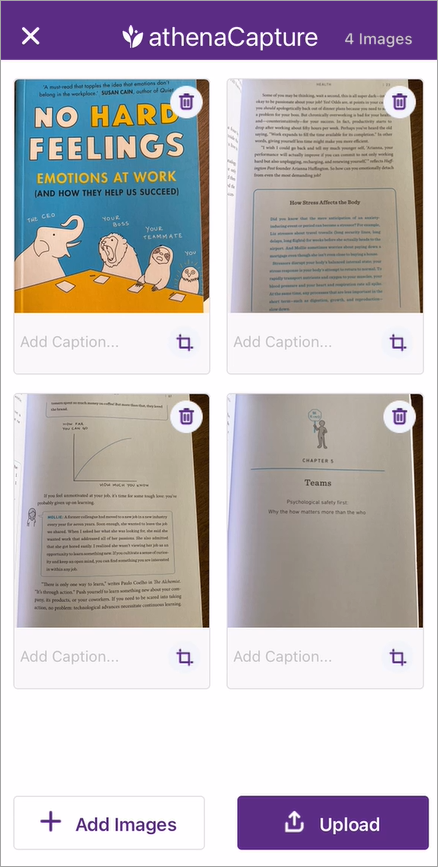
- To upload your photos, tap Upload.
athenaOne uploads the photos. - In the app, tap OK to complete the process.
- To view the card images you uploaded, click Update/Delete Insurance Card for the insurance policy on the Quickview or Check-in page.
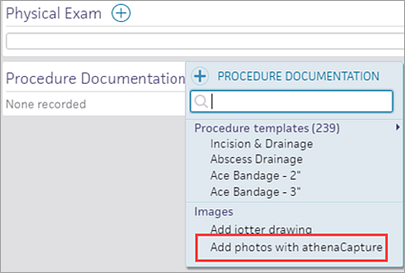
- In the Physical Exam section of the encounter, click the plus icon
 next to the Physical Exam or Procedure Documentation heading.
-
Under Images, click Add photos with athenaCapture.
A window appears showing a secure barcode that enables a connection between the current encounter and the photos that you take with your mobile device.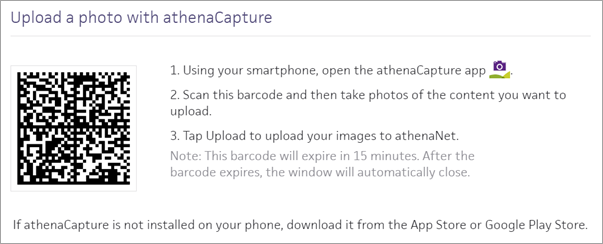
Note: If you haven't yet downloaded the athenaCapture app, you can do so from the App Store or the Google Play Store. - On your mobile device, open the athenaCapture app.
- In the app, tap Start and point the mobile device camera at the barcode in athenaOne.
- In the app, tap Take Photo. Use the camera button on your mobile device to take the picture.
- Review your photo.
- If you do not want to keep the photo, tap Retake and take another picture.
- To keep the photo, tap Use Photo.
- To take additional photos, tap + Add Images and use the camera button on your mobile device to take the picture.
- Edit photos as needed:
 — Tap to crop the photo.
- Add Caption... — Click into this field and enter a caption for the photo.
 — Tap to delete photos you do not want to upload.
- To upload your photos, tap Upload.
Note: The number of images to be uploaded is noted at the top right.
athenaOne uploads the photos. - In the app, tap OK to complete the process.
In athenaOne, the Exam section is refreshed automatically to display a link to the new clinical document with thumbnails of the images you just uploaded. The document is tied to the current encounter and marked CLOSED. - Click the clinical document preview to open the document view window.
Note: The Visits and Cases chart tab indicates that you added images. You can view the images in the Full Encounter Summary.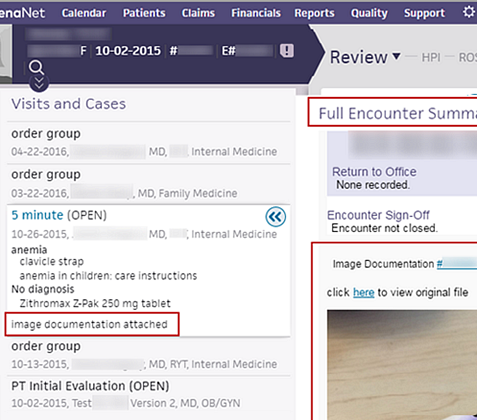
- You can annotate the images you uploaded using athenaCapture. For instructions, see Annotation for Documents.
- In the patient chart, click the Menu icon
 and select Add document.
The Add Document window appears. - Select Upload photo from smartphone.
A secure barcode appears with instructions.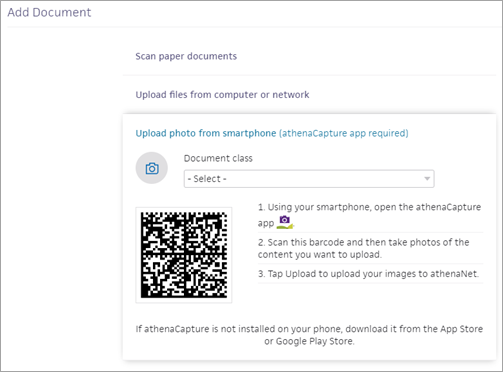
- Document class — Select a document classification.
Note: If you do not select an option from the Document class menu, the class defaults to "unknown." See Document Classifications for more information about document types and document processing. - On your mobile device, open the athenaCapture app.
- In the app, tap Start and point the mobile device camera at the barcode in athenaOne.
- In the app, tap Take Photo. Use the camera button on your mobile device to take the picture.
- Review your photo.
- If you do not want to keep the photo, tap Retake and take another picture.
- To keep the photo, tap Use Photo.
- To take additional photos, tap + Add Images and use the camera button on your mobile device to take the picture.
- Edit photos as needed:
 — Tap to crop the photo.
- Add Caption... — Click into this field and enter a caption for the photo.
 — Tap to delete photos you do not want to upload.
- To upload your photos, tap Upload.
Note: The number of images to be uploaded is noted at the top right.
athenaOne uploads the photos. -
In the app, tap OK to complete the process.
In athenaOne, the new clinical document opens in document view.
Note: The document status is DATAENTRY; you may need to perform additional actions. - If you uploaded multiple images, they are attached separately to the single clinical document.
Note: The Visits and Cases chart tab indicates that you added images. You can view the full images in the Full Encounter Summary. - You can annotate the images you uploaded using athenaCapture. For instructions, see Annotation for Documents.
- Display the patient chart: Click the athenaOne logo in a department that uses athenaOne for Hospitals & Health Systems to display the Patient List, and then click the patient's name in the Patient List.
- In the patient chart, click the Menu icon
 and select Add document.
The Add Document window appears. - Select Upload photo from smartphone.
A secure barcode appears with instructions.
- On your mobile device, open the athenaCapture app.
- In the app, tap Start and point the mobile device camera at the barcode in athenaOne.
- In the app, tap Take Photo. Use the camera button on your mobile device to take the picture.
- Review your photo.
- If you do not want to keep the photo, tap Retake and take another picture.
- To keep the photo, tap Use Photo.
- To take additional photos, tap + Add Images and use the camera button on your mobile device to take the picture.
- Edit photos as needed:
 — Tap to crop the photo.
- Add Caption... — Click into this field and enter a caption for the photo.
 — Tap to delete photos you do not want to upload.
- To upload your photos, tap Upload.
Note: The number of images to be uploaded is noted at the top right.
athenaOne uploads the photos. -
In the app, tap OK to complete the process.
In athenaOne, the document view opens and displays the new clinical document. - Tie To Stay — Select the patient stay from the menu (or accept the current stay).
- Document Class — Select a document class from the menu.
Depending on the document class you selected, you see additional fields. - If the Document Class is set to Imaging/Diagnostic Result or Lab Result, complete these fields as needed:
- Tie to Order — You can select an order to tie this image to.
- Clinical Order Type (appears if you did not tie the image to an order) — Enter the first few letters of the order type and select it from the matching list.
- Status — Select the status of the result.
- Observation Date and Time — Enter a time and click the calendar icon
 to select a date.
- If the Document Class is set to Admin, Clinical Document, or Hospital Note, complete these fields as needed:
- Provider (for the Hospital Note class) — You can search for and select a provider to associate with the document.
- Document Label — Search for and select the document label (for more information see Document Labeling).
- Date of Service (for the Hospital Note class) — Enter dates or click the calendar icon
 to select a date.
 - Date and Time (for the Admin class) — Enter the document's date and time.
- Observation Date and Time (for the Clinical Document class) — Enter a time and click the calendar icon
 to select a date.
- Click Save.
If you uploaded multiple images, they are attached separately to the single clinical document. - You can annotate the images you uploaded using athenaCapture. For instructions, see Annotation for Documents.