 User Guide — The 5-Stage Patient Encounter
The 5-stage patient encounter is the athenaOne workflow for checking in patients, documenting the patient encounter (for athenaClinicals), and creating the resulting claim (for athenaCollector).
This workflow provides your practice with several important capabilities:
- Visibility into patient status, location, and stage of encounter throughout the workflow
- Efficient hand-offs between front desk staff, clinical staff, and providers
- Behind-the-scenes measurement of data
- Common workflow and consistent athenaOne user interface across the five patient workflow stages:
- Check-in
- Intake (athenaClinicals)
- Exam (athenaClinicals)
- Sign-off (athenaClinicals)
- Checkout
Note: If your practice uses athenaClinicals without the athenaCollector service, some functions are not available, and some fields, columns, buttons, and links may not appear.
The provider can begin the encounter workflow from the Clinician home page.
When you log in to athenaOne, the Clinician home page appears, with the Clinical Inbox on the left, the schedule in the center, and news and announcements on the right.
Tip: You can click the plus icon ![]() to add tasks assigned to other users to your Clinical Inbox.
to add tasks assigned to other users to your Clinical Inbox.
For providers — how to access an encounter
- In the Clinical Inbox, click the Encounters row to display the list of encounters assigned to you (and to any users you added to your Clinical Inbox). Next, click a patient name in the list of encounters.
Note: A green bar appears next to the names of patients who are checked in.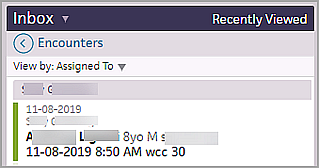
- In the Clinician home page schedule, click a patient name with the Intake stage completed (indicated by a green bar and shading).

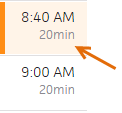
- In the Clinician home page schedule, click a patient name that has been checked in for the appointment (indicated by an orange bar and shading).
- If you complete both the Intake and Exam stages of an encounter, click the arrow next to Done with Intake and select one of these options (the patient status changes to "with provider"):
- Done with Intake, go to Exam

- Ignore alerts, go to Exam

In the schedule at the center of the screen, click the patient name to display the patient's chart.
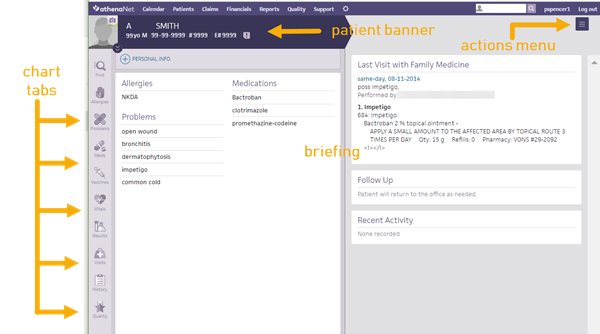
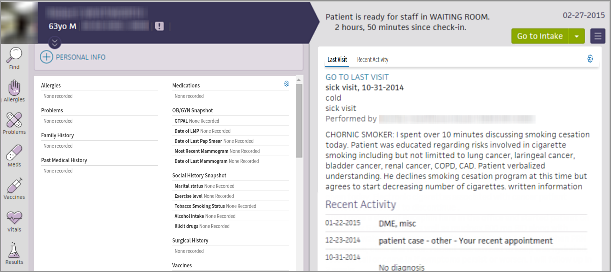
The briefing shows the story of the patient at a glance, highlighting the most critical information at the point of care. It provides lists of chart alerts, allergies, problems, and medications (sorted alphabetically) on the left, and a summary of the patient's last visit and recent activity on the right. The right side of the page displays a summary of today's visit, recent activity, and what happened the last time the patient visited the practice.
Chart tabs at the far left provide quick access to the patient's chart.
In the Intake stage, the Intake checklist appears on the left side of the screen, making it easy for MAs to enter data during intake. The top-to-bottom workflow guides you through completion, with flexibility throughout.
For details, see Intake Stage for athenaClinicals
The Exam stage is designed to accelerate the standard exam, with quick access to the chart sections and a Diagnoses & Orders (D&O) cart. The exam uses a left-to-right layout in three parts:
- Chart tabs (left) — Easy access to the patient's full health information.
- Work area (center) — Your area to document the current step in the exam, supported by documentation accelerators.
- D&O cart (tab at the right) — Your area to queue up diagnoses and orders as they come up during any step in the exam. This is a convenient way to build the Assessment / Plan organically, including transparency into what your staff has queued.
The Exam navigation bar provides easy navigation though the steps of the exam:

For details, see Exam Stage for athenaClinicals.
The billing workflow begins in the Sign-off stage of the encounter. In Sign-off, providers can access the Billing tab and enter charges for the visit.
The Billing tab is available both before and after the encounter is closed. athenahealth recommends that providers complete the billing information during the Sign-off stage of the encounter, after the clinical documentation is complete.
For details, see Sign-off Stage for athenaClinicals.
You can perform these actions in most areas of the encounter:
- At any time, you can return to your home page by clicking the athenaOne logo
 in the upper left corner of the screen.
 -
At the top of the appointment schedule pane, click the left arrow
 or right arrow
  to display appointments for the previous week or for the week ahead. You can also click the calendar icon
  to select another date.
 - Click the Find tab
 in the patient chart to search for documents associated with a patient.
 - Click the plus icon
 to add an item.
 - Click the X icon
 to remove an item.
 - You can enter a period (".") followed by the shortcut name to search for previously saved content.
- Drag and drop items, such as vitals, into a flowsheet.
- Click a row in the Clinical Inbox to display details in the center pane.
- If data is available, you can hover over a row in the Clinical Inbox and click the view flowsheet icon
 to view flowsheets in table or graph format.
 - Click the action icon
 to select an action.
 - If another user made changes to the patient chart or encounter information since you started making changes, a message at the bottom of the page displays the username of the person who made the changes and the time that the changes were saved. Click REFRESH Chart to obtain the latest updates.

When you log in to athenaOne, the Clinician home page appears, with the Clinical Inbox on the left, the schedule in the center, and news and announcements on the right.
Tip: You can click the plus icon ![]() to add tasks assigned to other users to your Clinical Inbox.
to add tasks assigned to other users to your Clinical Inbox.
For providers — how to access an encounter
- In the Clinical Inbox, click the Encounters row to display the list of encounters assigned to you (and to any users you added to your Clinical Inbox). Next, click a patient name in the list of encounters.
Note: A green bar appears next to the names of patients who are checked in.
- In the Clinician home page schedule, click a patient name with the Intake stage completed (indicated by a green bar and shading).

- In the Clinician home page schedule, click a patient name that has been checked in for the appointment (indicated by an orange bar and shading).

- If you complete both the Intake and Exam stages of an encounter, click the arrow next to Done with Intake and select one of these options (the patient status changes to "with provider"):
- Done with Intake, go to Exam

- Ignore alerts, go to Exam

Review patient demographics
- Click the patient's name in the schedule or in the Clinical Inbox list of encounters.
- Click the view more icon
 in the patient banner to expand and review patient demographic information.
Review patient documents
- Click the Find tab
 in the patient chart to search for documents associated with the patient.
Note: From the Intake stage, you can click the Search icon in the patient banner to search for documents associated with the patient.
Review chart alerts
- If the chart alert icon
 is yellow, click the icon to view chart alerts.
Review briefing information
- In the left-hand pane, review the read-only views of the Allergies, Problems, and Medications sections.
Note: You can add more sections to the left-hand pane of the briefing by clicking the settings icon in the top right corner. See also: To configure the patient summary on the patient briefing.
 - In the right-hand pane, review Last Visit or Recent Activity information.
Review relevant chart sections
- Click the chart tabs at the left to access the sections of the patient chart to review pertinent details. Click an item to edit it.
Tip: You can sort problems in the default view or drag problems to customize the sort order. - After you click a section of the chart to review it, "Reviewed" appears at the bottom of the section. (athenaOne marks a section as "Reviewed" only if you scroll to view the entire section.)
The "Reviewed" note also appears in the Full Encounter Summary.
Note: If a section in the chart is incorrectly marked as reviewed during the encounter workflow, you can navigate to the section and click the "Reviewed" text to change it to "Not Reviewed." Marking a section as not reviewed also removes the statement from that section in the Full Encounter Summary or removes the entire section (if blank). - When you finish reviewing the briefing, click Go to Intake to start the Intake stage of the encounter.
Note: If another user made changes to the patient chart or encounter information since you started making changes, a message at the bottom of the page displays the username of the person who made the changes and the time that the changes were saved. Click REFRESH Chart to obtain the latest updates.
Note: If another user made changes to the patient chart or encounter information since you started making changes, a message at the bottom of the page displays the username of the person who made the changes and the time that the changes were saved. Click REFRESH Chart to obtain the latest updates.
- Click each chart tab on the left side of the screen to expand the section. Click an item to edit it.
- To close a section, click the chart tab again.
After you click a section of the chart to review it, "Reviewed" appears at the bottom of the section. (athenaOne marks a section as "Reviewed" only if you scroll to view the entire section.)
The "Reviewed" note also appears in the Full Encounter Summary.
Note: If a section in the chart is incorrectly marked as reviewed during the encounter workflow, you can open the section and click the "Reviewed" text to change it to "Not Reviewed." Marking a section as not reviewed also removes the "Reviewed" notation from that section in the Full Encounter Summary or removes the entire section (if it is blank). - In the Problems section, you can toggle between ACTIVE and HISTORICAL problems, and click the flowsheet icon
 to view the flowsheet and related diagnosis notes.
Tip: In the Problems section, you can sort problems in the default view or drag problems to customize the sort order. - Click the Medications tab to review alerts or familiarize yourself with the patient's current medication list.
- Click the Results tab to review any labs you need to discuss with the patient when you begin the Exam stage.
- Click the result status to expand the details.
You can also click the flowsheet icon to view more lab details. Click the left arrow icon
  to collapse the detailed view.
 - Click IMAGING RESULTS.
- Results are listed with four parts: test name, date, text, and image or attachment indicator.
- The following fields appears: Interpretation, Internal Notes, Results text.
- "Image available" appears when a linked image is available.
- "Attachment available" appears when the result has an attachment that is not categorized, such as a fax image, integrated device image, or uploaded file.
- Click the view more icon
 to view the result details.
- You can review vaccines, vitals, past visits and cases, a patient's history, or quality measures.
- Visits — You can access open and closed encounters in the Visits section of the chart.
- History — You can add surgical history questions and manage past medical history questions.
- Quality — Quality measures that need attention are indicated by the orange vertical bar. The relevant fields are highlighted to remind you to complete the actions required to fulfill the measures.
Note: The alerts disappear when you take the necessary actions, indicating you have satisfied the measure.
- In the schedule on the clinician home page, click a future appointment.
- Click Go to Intake Prep or Go to Exam Prep.
- Document as you would in an encounter.
Note: You cannot sign orders, enter vitals and measurements, or close the encounter. See Actions unavailable in encounter prep mode for more information. - In the Prep Note section (found in the Reason for Visit section), enter any notes or reminders to yourself and other clinical staff.
- Click Done with Intake Prep or Done with Prep.
- Modify the documentation as needed during the encounter.
When the encounter begins, the data converts to active encounter documentation and can be modified as needed during the encounter. - After an encounter has been prepared, you will see the appointment marked PREPPED in the schedule.

Hover your cursor over PREPPED to see who last prepared documentation and when.
Important: If the appointment is moved or cancelled without being rescheduled, the prepped documentation is deleted. If the appointment is rescheduled, the prepped documentation moves to the rescheduled appointment.
Note: If another user made changes to the patient chart or encounter information since you started making changes, a message at the bottom of the page displays the username of the person who made the changes and the time that the changes were saved. Click REFRESH Chart to obtain the latest updates.
- To begin the Intake stage, click Go to Intake in the upper right corner of the screen.
The Intake checklist appears in the left panel, starting with Reason for Visit.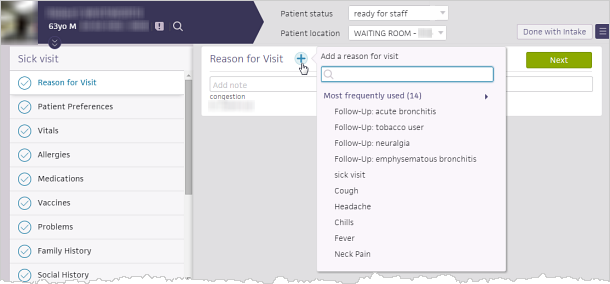
Tip: You can update the patient location and patient status at the top of the screen during the Intake stage of the encounter and at any step during the Exam stage. - Record the reason for the visit. You can select one or more reasons from the list, or click the plus icon
 to create a new reason. The Follow-Up reasons category includes all items in the patient's Problems list. The All reasons category is sorted by most frequently used.
Note: If you select a reason for visit or follow-up reason that has an associated encounter plan, that encounter plan is triggered for the encounter. - Click outside the Add Reason selector to close it.
The selected reasons appear in the Reason for Visit section.
Note: If you have the Clinicals: Requires Chief Complaint/Encounter Reason user role or permission, you must select a reason for a patient's visit during the Intake or Exam stage. If you attempt to open another page or advance to the next stage of the patient encounter before you select a reason for the visit, athenaOne automatically opens the Add Reason selector. - To add more information about why the patient is here today, click the Add note icon
 .
.
Note: If the patient sent a question to the provider during self check-in, the question appears in the Patient question field in the Reason for Visit section.
- Click the Next button.
The next section appears in the center panel. As you complete a section, the checkmark icon darkens in the checklist, and the word Reviewed appears at the bottom of the section. (athenaOne marks a section as "Reviewed" only if you scroll to view the entire section.)
Note: At the bottom of most checklist items you can click the Add note icon to document a patient's health status and history.
Clinical quality measures that need attention are indicated by the orange vertical bar. The relevant fields are highlighted to remind you to complete the actions required to fulfill the measures. The alerts disappear when you take the necessary actions, indicating that you have satisfied the measure.
Tip: You don't need to display the checklist items in order and click the Next button after each item. As long as you click in each item, in any order, and scroll to view the entire section, the checkmark icon darkens in the checklist, and Reviewed appears at the bottom of the section. - Vitals — Height values recorded in the past year are autopopulated in the Vitals section for patients over 18 years old. For patients under 18, height values recorded in the past 3 months are autopopulated.
Tip: You can click Growth Chart to view the growth chart. Click outside the growth chart to close it. - Medications — Click the add to D&O icon
 to add a previously ordered medication to the Diagnoses & Orders cart for today's visit.
 - Problems — Add and update problems and individual problem notes, view active and historical problems, move active problems to the historical list, or reactivate historical problems.
Complete screening questionnaires (optional)
If your practice uses screening questionnaires, click the Screening item in the checklist. You can use screening questionnaires to assess risk for or severity of certain disorders or conditions, such as autism and depression. These questionnaires result in a score, and they often include guidelines and proposed treatment actions that you can use to determine next steps for the patient.
- Check the box next to the screening questionnaire that you want to administer.
The questionnaire appears.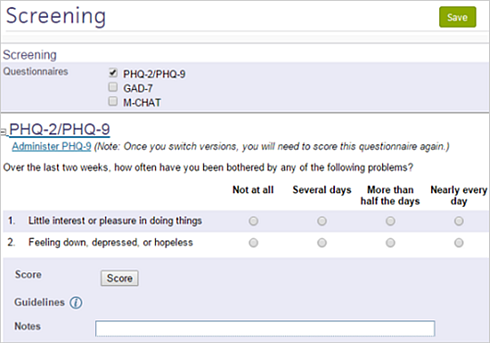
- Enter the responses into the form.
- Click Score.
The score and any associated guidelines appear below. - Click the Save button.
Complete the Intake stage
- When you complete the checklist, click Done with Intake.
Your Clinician home page appears, and athenaOne generates an Intake Summary section for the encounter, which appears when you begin the Exam stage of the encounter.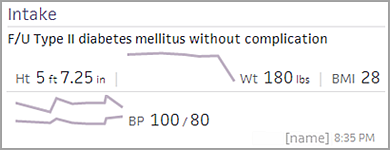
Note: If you have not completed all the requirements in the checklist and you click Done with Intake, the first section with remaining tasks appears. To dismiss these tasks, select Ignore these alerts and continue in the menu next to the button.
When Intake is complete, the encounter status changes to Ready for Provider. Clinical staff and providers can click the Encounters row in the Clinical Inbox to access the encounter.
Tip: You can update the patient location and patient status at the top of the screen during the Intake stage of the encounter and at any step during the Exam stage.
- To add a new problem to the list:
- Click the plus icon
 , start typing the problem name, and then select it from the matching list.
 - Record the Onset date and Status, and enter any notes.
- Click Add.
- To add a problem directly to the Assessment & Plan section, click the add to D&O icon
 .
. - Click the Medications chart tab to review and order medications.
Note: You can indicate that a patient's medication list was not reviewed along with the reason why. Click Reviewed at the bottom of the tab and then select a reason from the menu. For more information, see To record the reason that the medications list was not reviewed. - You can click each chart tab to review items in each section.
Use the icons to stop medications and delete items , view flowsheets
  , and add orders to the D&O cart
  .
.
- Click the Next button to proceed to the HPI step.
The History of Present Illness section appears in the center pane, and the Exam stage navigation bar changes to highlight HPI.
HPI is also on the Intake checklist, so this section may have been updated during the Intake stage.
Note: If the provider looks at the section after the clinical staff look at it, athenaOne attributes the review of the section to the provider.
- Add a note in the note field if necessary.
If the note needs to be hidden from patients and family members or caretakers who have access to their health information, click to mark the note confidential. See User Guide — Lock Patient Data for more information.
 - Click the plus icon
 to search for saved findings or previous encounter templates. A list of your commonly used templates and saved findings for this type of encounter and patient history appears.
Note: The rendering provider's name appears in the list of previous templates. - Click an item in a template to expand the section.
- Select a finding. The status of a finding is indicated by color:
- Normal — Gray-green
- Neutral — Light blue
- Abnormal — Pink

- In the upper right corner, click Normal to set the status to normal, or click Clear to reset a status.

Tip: You can click the All Normal or Clear links at the paragraph or sentence level to reset all items to normal status or clear all items in the exam templates. - To add finding-level notes for normal, neutral, and abnormal findings, click Add note below each finding.
Abnormal findings appear in bold in the summary view. - Reported by — You can select an option from the menu to indicate who reported the findings described. For patients under age 10, this option defaults to Parent. For patients age 10 and over, this option defaults to Patient.
- To add a new finding, click the "save favorite" icon
 , enter a name for the new finding, and click Save.
You can save new findings in the HPI, ROS, and PE sections.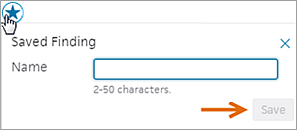
Tip: You can use the Encounter Plans page to add saved findings and text macros to an encounter plan.
- Click the Next button, or click ROS on the Exam navigation bar to proceed to the ROS step.
The Review of Systems section appears in the center pane, and the Exam stage navigation bar changes to highlight ROS.
ROS is also on the Intake checklist, so this section may have been updated during the Intake stage.
Note: If the provider looks at the section after the clinical staff look at it, athenaOne attributes the review of the section to the provider.
- Add a note in the note field if necessary.
If the note needs to be hidden from patients and family members or caretakers who have access to their health information, click to mark the note confidential. See User Guide — Lock Patient Data for more information.
 - Click the plus icon
 to search for saved findings or previous encounter templates. A list of your commonly used templates and saved findings for this type of encounter and patient history appears.
Note: The rendering provider's name appears in the list of previous templates. - Click an item in a template to expand the section.
- Select a finding. The status of a finding is indicated by color:
- Normal — Gray-green
- Neutral — Light blue
- Abnormal — Pink

- In the upper right corner, click Normal to set the status to normal, or click Clear to reset a status.

Tip: You can click the All Normal or Clear links at the paragraph or sentence level to reset all items to normal status or clear all items in the exam templates. - To add finding-level notes for normal, neutral, and abnormal findings, click Add note below each finding.
Abnormal findings appear in bold in the summary view. - Reported by — You can select an option from the menu to indicate who reported the findings described. For patients under age 10, this option defaults to Parent. For patients age 10 and over, this option defaults to Patient.
- To add a new finding, click the "save favorite" icon
 , enter a name for the new finding, and click Save.
You can save new findings in the HPI, ROS, and PE sections.
Tip: You can use the Encounter Plans page to add saved findings and text macros to an encounter plan.
- Click the Next button, or click PE to proceed to the PE step.
The Physical Exam section appears in the center pane, and the Exam stage navigation bar changes to highlight PE.
- Add a note in the note field if necessary.
If the note needs to be hidden from patients and family members or caretakers who have access to their health information, click to mark the note confidential. See User Guide — Lock Patient Data for more information.
 - To add procedure documentation, click the plus icon
 next to "Procedure Documentation."
A list of procedure templates and any previous templates for this patient appear, with your commonly used templates at the top. The rendering provider's name appears in the list of previous templates.
Note: If you have the Multispecialty Practice feature enabled, the list of available templates is filtered by age, gender, and specialty. - Select a procedure template and complete it. Procedure templates appear in the full encounter summary and on the Visits and Cases section in the patient chart.
Note: If the procedure template has been mapped to a procedure code, the Billing tab is pre-populated with the procedure and codes.
- Click the Next button or click A/P to proceed to the Assessment & Plan step.
The Assessment & Plan section appears in the center pane, and the Exam stage navigation bar changes to highlight A/P.
Note: Items that need attention are highlighted with an orange bar.
- Add diagnoses and orders. Your most frequently used selections appear at the top of the list.
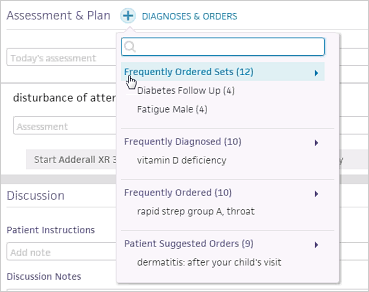
Diagnoses and orders that you select are added to the D&O cart.
Note: When you add a diagnosis that relates to an existing problem, the problem is marked active. You can also click the send to icon to add diagnoses directly to the Problems section of the chart (the problem is marked active).
Note: With the Encounter Diagnosis Required feature, your practice can require that providers add an ICD-10 diagnosis before they can close a patient encounter or send an encounter for review. For more details, see the Features and workflow section in Sign-off Stage for athenaClinicals. - You can assign a procedure to a clinical provider or to a point-of-care test to be performed at an in-house lab.
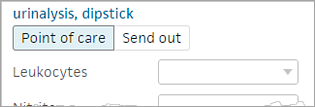
A template automatically appears to immediately add results and interpretations.
Note: If the in-house facility needs additional information to perform the point-of-care lab or imaging test, athenaOne displays ask-on-order-entry (AOE) questions. Answer the AOE questions before you sign and save the order. (To see additional AOE questions, click view more at the bottom of the expanded view of the order.) - Click
 to remove an item.
Tip: You can drag and drop a section to reorder the Assessment & Plan.
A vertical orange bar next to an item indicates that the item requires attention: .
. - If an alert appears in a medication order — for example, an allergy conflict — a message asks you to confirm that you want to sign the order.
Note: This message appears for conflicts and whenever you sign orders.
- When the Sign Orders button is green, click the button to sign all the orders and complete the Assessment & Plan step.
This action also completes the Exam stage of the encounter.
- After you complete the A/P step of the Exam stage of the encounter, click the Next button to proceed to the Sign-off stage.
The Sign-off Summary appears in the center pane, and the Exam stage navigation bar changes to highlight Sign-off.
The Encounter Information and Summary sections appear at the top of the page. - To view letters and Patient Care Summaries, hover the cursor over an item in the Letters section (below the Summary) to highlight it, and click VIEW (at the far right).
Complete the billing information
- Click the Billing tab on the right side of the screen to display the Billing tab.
- Enter charges.
- If service type add-ons are configured, you can select add-ons and enter or review any relevant information in the Clinical Add-Ons section.
At charge entry, when you click Save & Enter Charges to create a claim, the selected service type add-ons also appear in the claim. - Click Save & Mark Reviewed to save your changes.
The Billing Tab Review Complete box at the bottom of the page is automatically checked off. - Click Sign & Close (or Close). Your home page appears.
Note: To reassign the encounter to a supervising provider for sign-off, click the down arrow next to Sign & Close and select Send for Review.
- If your billing staff needs to work on additional billing, they can access the Checkout Claim: Billing tab of the encounter in their Non-Clinical Inbox in the Missing Slips row.
To move the encounter to REVIEW status and assign it to a provider
- In the Summary section, highlight and click the summary.
- Select the Move to review option.
- Click the assigned-to provider name to display the search tool, and search for the provider you need.
- Click outside the box to save the selected provider.
Complete the Sign-off step
-
Performed by — athenaOne automatically sets the Performed by field to the encounter's rendering provider at check-in. You can change the selection to the provider who actually performed the encounter. The Performed by provider must be set to a person provider before you can close the encounter.
- When you complete the exam, click the Close button to save and close the encounter. The encounter is now ready for checkout. If the Close button is gray, click it to open the Performed by selector to select a person provider.
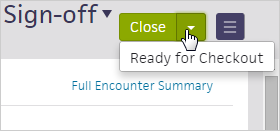
Alternatively, you can select Ready for Checkout from the Close button menu to notify front-desk staff that the patient is ready for checkout, but keep the encounter open for additional documentation.