 User Guide — Patient Self Check-In
This user guide refers to our legacy patient self check-in solution. For enhanced patient self check-in (released in Fall 2022), refer to this user guide. Expect communication from athenahealth regarding deprecation of this workflow.
Patients can complete check-in for appointments at home before arriving at the office or in the office after they arrive. Patients do not need to be registered for the Patient Portal to complete self check-in, but they are encouraged to register when they complete the self check-in process. Patients whose preferred language is Spanish can display the self check-in information in Spanish.
Important: In-office self check-in does not work if you use single sign-on.
Patients can check themselves in for their appointments at your practice as follows:
- At home, before they arrive at your office (pre-appointment self check-in). Patients complete self check-in using their personal computer or smartphone.
- After they arrive at your office (in-office self check-in). Patients complete self check-in using a computer that you supply or using their own smartphones.
Patients see the same information when they check in from home or in your office, using their home computer, smartphone, or an in-office device.
When patients check in from home or in your office, they can complete the following tasks:
- Confirm their demographic information.
- Add preferred pharmacies.
- Pay copays and outstanding charges.
- Sign consent forms electronically.
- Complete health history forms.
- Sign up for the Patient Portal (if they are not yet registered for the Patient Portal).
Note: If a patient creates a Patient Portal account, the patient can choose to sign up for electronic statements (e-statements) after creating the account. - Complete screening questionnaires.
Note: Screening questionnaires are available only during in-office self check-in.
For more information about implementing screening questionnaires for in-office self check-in, see Setting up screening questionnaires for the self check-in workflow.
With the patient self check-in feature, your practice can:
- Reduce work and minimize the amount of data that the front office must enter manually during check-in.
- Reduce the amount of time your staff spends updating patient information when patients arrive for their appointment.
- Reduce check-in lines and patient wait time in the office by having patients complete online check-in before their appointments.
- Increase Patient Portal adoption and engage patients in their own care.
For your patients to use self check-in, your practice must use these services and features:
- athenaCommunicator with the Patient Portal enabled
- Credit Card Plus (for patients to make payments during self check-in)
- ReminderCall email or text messages (for pre-appointment self check-in)
- Upcoming appointments enabled on the Portal Settings page (for pre-appointment self check-in)
Note: In-office patient self check-in is off by default. To enable this feature, contact the CSC from athenaOne > Support > Success Community > Contact Client Support Center. In-office patient self check-in does not work if you use single sign-on.
If your practice uses an athenahealth Marketplace partner solution for patient self check-in:
- You can use the third-party application and the athenaOne in-office patient self check-in feature. You decide which patients use which self check-in method.
- You cannot use the athenaOne pre-appointment self check-in feature (the feature is disabled).
Note: If your practice decides to implement an athenahealth Marketplace partner solution in the future, please contact the CSC to disable the pre-appointment self check-in feature.
Patients can complete check-in for appointments on a computer or mobile device before they arrive at the office with or without a Patient Portal account.
To use the Patient Portal, patients must use a computer or mobile device with one of these supported browsers:
- Google Chrome
- Microsoft Edge (for Windows 7, Windows 8/8.1, Windows 10, and Windows 11)
- Mozilla Firefox
- Safari (for Apple devices only)
Patients who attempt to use an unsupported browser (such as Internet Explorer) to access the Patient Portal receive a message with links to download a supported browser. If patients ask you about these messages, please encourage them to upgrade to a supported browser using the links displayed in the alerts.
Note: To use the Log in to Portal as Patient option on the Quickview, practice staff must also use a supported browser (not Internet Explorer).
Patients can check themselves in at your office using any of these devices:
- Desktop, laptop, or tablet computer set up for this purpose
- Patient's personal smartphone
If your practice uses an in-office computer for patient self check-in, the computer must use the most recent version of any of these browsers:
- Chrome (recommended)
- Microsoft Edge
- Safari
Note: For optimal performance, athenahealth recommends using an iPad running the latest version of Chrome to complete in-office self check-in.
If your practice uses a desktop, laptop, or tablet computer for in-office patient self check-in, follow these instructions.
- Open a Web browser, such as Chrome or Safari, on the computer and enter the URL for your Patient Portal:
- If your practice does not use the Communicator Brands feature, enter "https://CONTEXTID.portal.athenahealth.com/?section=selfcheckin", where CONTEXTID = your practice ID.
- If your practice uses the Communicator Brands feature, enter
"https://CONTEXTID-BRANDID.portal.athenahealth.com/?section=selfcheckin", where CONTEXTID = your practice ID and BRANDID = your brand ID.
Note: To find your brand ID, display the Communicator Brands page: On the Main Menu, click Settings >Communicator. In the left menu,under Practice Links — Communicator, click Brands.
- Bookmark this URL and make it the home page of the browser on the device.
- Make sure that you turn the device on, open the browser window, and log in using your athenaOne credentials every morning.
To adjust settings for the self check-in workflow (for example, to enable upcoming appointments on the Portal Settings page), please open a case with the CSC from athenaOne > Support > Success Community > Contact Client Support Center.
Before patients can check themselves in, you need to set up privacy forms and health history forms for use during self check-in. For in-office self check-in, you can also set up screening questionnaires to be filled out before the patient's appointment.
Note: If your practice chose not to use the pre-appointment self check-in feature enabled in Release 16.10, you can use the Online Check-in Filters page to configure settings for appointment types, providers, and departments, as well as how many days before the appointment online check-in is available on the Patient Portal.
For patients to access and electronically sign consent forms during self check-in, your practice must configure the forms as follows:
- Map the forms to an appointment type.
- Configure the forms to appear during self check-in and accept electronic signature.
You can configure forms for signature during self check-in and on the Patient Portal on these pages:
You can upload forms and documents on the Clinical Paper Forms page and the Forms and Documents page, where you can configure them for electronic signature on the Patient Portal.
- Display the Clinical Paper Forms page: On the Main Menu, click Settings
 > Clinicals. In the left menu,under Practice Links — Forms and Letters, click Clinical
Paper Forms.
For non-clinical forms, display the Forms and Documents page: On the Main Menu, click Settings >Billing. In the left menu, under Practice Links — Billing Slips and Forms, click Forms
and Documents.
- Click update next to an existing form.
- View on Patient Portal — Select this option. Additional fields appear.
Note: Only .html, .pdf, and .png documents can be viewed on the Patient Portal. - Patient Portal display name — Enter the name of the form as it should appear on the Patient Portal. This name should be easily understandable by patients.
- Assign appointment types to form — Select the appointment types to map to this form.
The appointment types that you select move to the Selected list on the right. - Enable digital signature — Select this option to enable patients to sign the form electronically on the Patient Portal.
The Signature applies to field appears.
Note: To display a form to the patient during in-office self check-in, you must select the Enable digital signature option (you may not need to select this option if your organization uses only pre-appointment self check-in). - Signature applies to — You can select the type of consent that the patient is giving with their electronic signature. Leave this field blank for forms or consents that the menu options do not apply to (for example, a surgery consent form).
- Click Save.
Patients can sign this form electronically on the Patient Portal. When patients submit these forms electronically to your practice via the Patient Portal, the forms automatically update the corresponding privacy form checkboxes in the Privacy section of the patient's Quickview page.
Your patients can update their health history information as part of the self check-in workflow. If multiple patient health history forms are available in athenaOne for a single appointment type, the questions are merged into one form for the patient.
Note: Patients can access the health history form only through the self check-in procedure. After patients complete self check-in, they cannot access the health history form again until they check in for their next appointment.
For complete instructions on setting up the health history form for patient self check-in, see To configure patient health forms.
When the patient arrives at the office, reconcile the patient's completed health history information within the encounter using the reconciliation workflow (see Data Reconciliation), or print the form from the Check-in page to manually reconcile the information.
To enable patients to complete screening questionnaires during in-office self check-in, your practice must:
- Make sure that the in-office self check-in feature is enabled. If this feature is not enabled, contact the CSC from athenaOne > Support > Success Community > Contact Client Support Center.
- Enable at least one screening questionnaire. For information about configuring screening questionnaires, see Screening Questionnaires.
- Map screening questionnaires to appointment types on the Self Check-In Questionnaires page.
Note: Any age, gender, and specialty filters that you set up for screening questionnaires on the Screening Questionnaires page apply to in-office self check-in. For example, if the M-CHAT questionnaire has an age filter of 18-36 months and you map the questionnaire to the Well Visit 30 appointment type, the screening questionnaire appears during self check-in only if the child is between 18 and 36 months old.
Note: In-office self check-in is off by default. To enable this feature, practices must submit a case to the CSC from athenaOne > Support > Success Community > Contact Client Support Center. If you want to enable patient self check-in only for an in-office computer or only using patients' smartphones, include this information in your case (both computer and smartphone self check-in are enabled by default).
You can start the patient self check-in process when the patient arrives at your office as follows:
- Send the check-in code in a text message to the patient's smartphone.
- Hand the patient a tablet (iPad) with the check-in code or ask the patient to use a computer set up in your front office.
For information about supported devices, see Requirements for the patient self check-in feature.
To generate a check-in code or text message
Any staff member who has access to the Appointment page can initiate the in-office self check-in workflow for patients. You can generate a check-in code or text message for the patient up to six hours prior to the patient's appointment.
![]() For a demonstration, see this video: In-Office Self Check-in - Staff Workflow.
For a demonstration, see this video: In-Office Self Check-in - Staff Workflow.
- Display the Appointment page: On the Non-Clinician home page, click a patient name in the schedule.
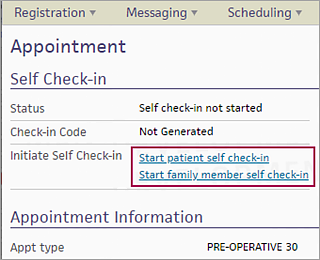
- Click Start patient self check-in or Start family member self check-in.
Note: If you click the wrong link, you can change your selection in the next step. - Ask the patient how they'd like to check in and click their preferred method: Smartphone or Office Device. (Your practice may have chosen to offer only one of these options.)

Note: If you selected the wrong option when you initiated patient self check-in, you can click Switch to Patient Check-in or Switch to Family Member Check-in now.
Patient checks in using a smartphone
- If you select Smartphone as the check-in method, you are asked to enter or confirm the mobile phone number for the patient or family member. (If you change the phone number in this window, the patient record is updated with this phone number.)
- Click Send Link and Generate Code.
athenaOne sends the patient a text message with a link to begin the in-office self check-in process (see In-office self check-in instructions for patients).
Patient checks in using an office computer
- If you select Office Device as the check-in method, athenaOne generates a code to enter on the office device or on the patient's smartphone to begin the in-office self check-in process.

- Depending on your practice setup, provide the check-in code to the patient as follows.
- If you use tablet computers for patients to check in, you can enter the code on the tablet and hand it to the patient.
- If you set up a computer away from your desk for patients to use, you can send a text message with the check-in code to the patient or you can write the code down for the patient.
- If you sent the check-in link to the patient's smartphone, you can send a text message with the check-in code to the patient or you can write the code down for the patient.
Monitor the patient's check-in progress
- After the patient begins the self check-in process, you can monitor the patient's progress on the Check-in page.
Important: Do not click Done with Check-in on the Check-in page until the patient completes self check-in. If you click Done with Check-in before the patient completes self check-in, all the information that the patient entered is lost.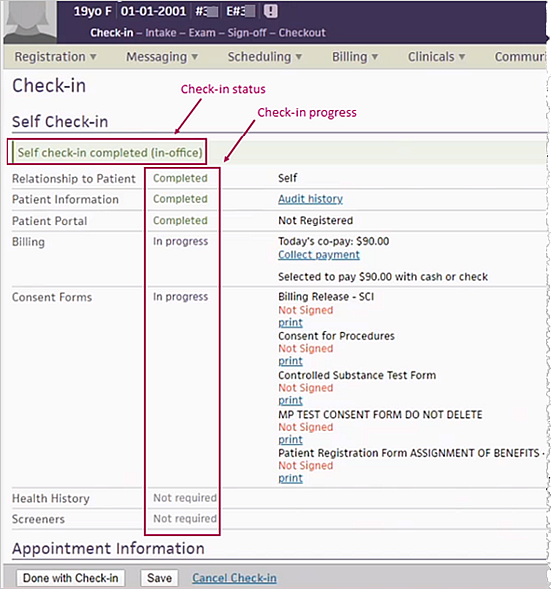
- If a patient did not sign a form or if the patient still owes a copay or other payment, you can print the form for signature or collect money from the Check-in page.
![]() For a demonstration, see this video: In-Office Self Check-in - Patient Workflow.
For a demonstration, see this video: In-Office Self Check-in - Patient Workflow.
The instructions here show all possible questions that you can see, but you may well see only some of these items.
- If you already have a Patient Portal account, you are not prompted to create an account.
- If you do not owe a copay or have an outstanding balance, you are not prompted to make a payment.
- If your consent forms are up to date, you are not prompted to sign these forms.
- If no screening questionnaire is attached to the appointment, you are not prompted to answer screening questions.
To check in for your appointment in the office:
- If you are checking in using your smartphone, display the text message sent by the office and tap the link to start the self check-in process.
- Enter the check-in code that office staff handed you on a piece of paper or sent you in a text message, and then click Continue Check-In.
- Confirm or update your contact and personal information.
Note: Click Español in the upper right corner of the page to complete self check-in in Spanish. - To add a pharmacy to your patient record:
- Scroll to the bottom of the page and click Add Pharmacy or Add another Pharmacy.
Note: You can store up to five pharmacies in your patient record, but only one can be designated as your primary pharmacy. - In the Select a Pharmacy window, search for and select the pharmacy.
Note: You can delete an existing pharmacy by clicking the x icon to the right of the pharmacy.
- Scroll to the bottom of the page and click Add Pharmacy or Add another Pharmacy.
- Click Continue.
If you do not have a Patient Portal account, you are prompted to create one. If you have an outstanding account balance, a copay, or both, you are prompted to make a payment now.
Register for the Patient Portal (not required)
- If you do not want to create a Patient Portal account now, click I'll do this later.
- To create a Patient Portal account:
- Verify your email in the Email address field.
- Enter the same password in the Password and Confirm password fields.
- Check the box to indicate that you read the Terms and Conditions and the Privacy Policy.
- Click Set Password.
A thank you message appears. - Click Continue.
A message asks you about signing up for electronic statements (e-statements). If you do not want to receive e-statements, click No thanks. - To receive e-statements, click Sign up, select the Receive e-Statements option, and then click Save.
Pay your copay or outstanding balance
- To pay your balance at a later time, click Pay at the Front Desk.
- To pay your copay and outstanding balances:
- Select the charges to pay and click Pay Now.
Note: For outstanding balances, you can enter an amount smaller than the charge in the Payment box. - Select a saved credit card (if available) or select the option to pay with a different credit card.
If you selected Pay with a different card, a payment window appears. - Enter your credit card information, check the I'm not a robot box, and click Review Payment.
- Verify your credit card information and then click Submit Payment.
A message confirms that your payment was received. - Click Continue.
- Select the charges to pay and click Pay Now.
Sign consent forms
- If the practice has any consent forms for you to sign, you are prompted to sign the forms.
- Review each form on the page and either sign it or click Sign at the front desk.
To sign a form, enter your full name in the signature box at the bottom of the window and click Sign. - After you review all the forms, click Continue.
Update your health history
- Review each section (Medications, Allergies, and so on) of your health history information.
- For each section, click Update to add, edit, or remove items, or click No Changes.
- When you finish reviewing the health history, click Complete.
- If you did not change any information in one or more sections, you can mark these sections as having "no changes" by clicking Yes at the prompt.
Complete screening questionnaires
- Answer the questions in the screening questionnaires.
Note: You can skip a question if you are unsure of how to answer it. - Click Continue to display the next screening questionnaire, or click Back to return to the previous screening questionnaire.
Note: You can see how many screening questionnaires there are and which one you're viewing near the top of the page.
- To clear answers for the current questionnaire, click Clear answers near the bottom of the page.

- Click Submit after you complete the questionnaire.
Complete self check-in
- After you check in for the appointment, the final window displays any tasks you still need to complete before your appointment, for example, paying your copay or signing a consent form.
- If you completed check-in on a tablet, hand the tablet back to the front desk staff member.
Patients can complete check-in for appointments on a computer or mobile device before they arrive at the office, with or without a Patient Portal account. Patients can complete self check-in by clicking a link in a ReminderCall email or text message or by logging on to the Patient Portal.
From a ReminderCall email message, you can confirm your upcoming appointment and check in for the appointment.
Log on to the Patient Portal from the ReminderCall email
-
In the appointment reminder email, click Yes, I'll be there.
A new window indicates that your appointment is confirmed and prompts you to check in for the appointment online. - Confirm your email address, enter your Patient Portal password, and click Check In.
The Patient Information step appears.
Note: If you can't remember your password, click Forgot your password?
Confirm or update demographic information and (optional) add pharmacies
- Confirm or update your contact and personal information.
- To add a pharmacy to your patient record:
- Scroll to the bottom of the page and click Add Pharmacy.
In the Select a Pharmacy window, search for and select the pharmacy. - Click Save.
Note: You can store up to five pharmacies in your patient record, but only one can be designated as your primary pharmacy. - Click Continue.
If you have an outstanding account balance, a copay, or both, the Billing step appears.
Pay your copay or outstanding balance
- Select the charges to pay.
Note: For outstanding balances, you can enter an amount smaller than the charge in the Payment box. - Select your payment method.
If you select Pay at the front desk or I have questions about my balance, you can pay your balance at the time of your appointment. - Click Continue.
- If you selected Pay with a credit card, a payment window appears.
- Enter your credit card information, check the I'm not a robot box, and click Review Payment.
- Verify your credit card information and then click Submit Payment.
A message confirms that your payment was received. - Click Continue.
If the practice has any consent forms for you to sign, the Consent and Privacy step appears.
Sign consent forms
- Review each form on the page and either sign it or click Sign at the front desk to continue to the next step.
To sign a form, enter your full name in the signature box at the bottom of the window and click Sign. - After you review all the forms, click Continue.
The Health History Form step appears.
Complete the health history form
- Review each section (Medications, Allergies, and so on) of your health history form.
- For each section, click Update to add, edit, or remove items, or click No Changes.
- When you finish reviewing the health history, click Complete.
A message thanks you for completing online check-in.
Send a secure message to the provider (optional)
- After you check in for the appointment, the final window displays a prompt to enter a question for your provider. (For more information, see Questions for providers created during pre-appointment self check-in.)
- Click Send a secure message.
A message box opens. - Enter your question (up to 500 characters) and then click Send.
Practice staff will not see the question until the time of your visit.
- Click Send a secure message.
From a ReminderCall email message, you can confirm your upcoming appointment, check in for the appointment, and register for the Patient Portal.
Confirm the appointment from the ReminderCall email
-
In the appointment reminder email, click Yes, I'll be there.
A new window indicates that your appointment is confirmed and prompts you to check in for the appointment online. - To check in online, click Check In.
The Verify Identity step appears.
Verify your identity
- Select how you would like to receive your temporary passcode: Call or Text.
- Click Send Code.
- When you receive the
temporary passcode, enter it in the box, and then click Continue.
A window prompts you to indicate whether you are the patient or the patient's family member. - If you're checking in as the patient, click I'm [patient name].
- If you're a family member checking in on the patient's behalf, click I'm [patient name's] Family Member.
The Your Information window appears. - Select your relationship to the patient from the menu and enter your contact information.
- Click Continue.
The Patient Information step appears.
Confirm or update demographic information and (optional) add pharmacies
- Confirm or update your (or the patient's) contact and personal information.
- Would you like to receive text alerts? — This prompt appears only if you have not yet agreed to accept text message notifications from the practice. Select Yes to receive text messages from the practice.
- To add a pharmacy to the patient record:
- Scroll to the bottom of the page and click Add Pharmacy.
In the Select a Pharmacy window, search for and select the pharmacy. - Click Save.
Note: You can store up to five pharmacies in your patient record, but only one can be designated as your primary pharmacy. - Click Continue.
The Patient Portal registration step appears. You can still check in for the appointment even if you choose not to create a Patient Portal account.
Register for the Patient Portal (not required)
- If you do not want to create a Patient Portal account now, click the No Thanks button.
- To create a Patient Portal account:
- Verify your email in the Email address field.
- Enter the same password in the Password and Confirm password fields.
- Click Register Now.
A thank you message appears. - Click Continue.
A message asks you about signing up for electronic statements (e-statements). If you do not want to receive e-statements, click No thanks. - To receive e-statements, click Sign up, select the Receive e-Statements option, and then click Save.
If you have an outstanding account balance, a copay, or both, the Billing step appears.
Pay your copay or outstanding balance
- Select the charges to pay.
Note: For outstanding balances, you can enter an amount smaller than the charge in the Payment box. - Select your payment method.
If you select Pay at the front desk or I have questions about my balance, you can pay your balance at the time of your appointment. - Click Continue.
- If you selected Pay with a credit card, a payment window appears.
- Enter your credit card information, check the I'm not a robot box, and click Review Payment.
- Verify your credit card information and then click Submit Payment.
A message confirms that your payment was received. - Click Continue.
If the practice has any consent forms for you to sign, the Consent and Privacy step appears.
Sign consent forms
- Review each form on the page and either sign it or click Sign at the front desk to continue to the next step.
To sign a form, enter your full name in the signature box at the bottom of the window and click Sign. - After you review all the forms, click Continue.
The Health History Form step appears.
Complete the health history form
- Review each section (Medications, Allergies, and so on) of your health history form.
- For each section, click Update to add, edit, or remove items, or click No Changes.
- When you finish reviewing the health history, click Continue.
A message thanks you for completing online check-in. - After you check in for the appointment, the final window displays a prompt to enter a question for your provider. (For more information, see Questions for providers created during pre-appointment self check-in.)
- Click Send a secure message.
A message box opens. - Enter your question (up to 500 characters) and then click Send.
Practice staff will not see the question until the time of your visit.
- Click Send a secure message.
- If you registered for the Patient Portal, you can click the Go to Patient Portal button to display the Patient Portal home page.
Patients can log on to the Patient Portal and check in for their appointments within 7 days of the appointment date.
Note: The number of days is set to 7 by default; however, you can open a case with the CSC to adjust this setting to 2-10 days.
Log on to the Patient Portal and find the appointment
- Log on to the Patient Portal.
Your upcoming appointment appears on your home page and on the Appointments page. - Click Manage appointment.
The Patient Information step appears.
Confirm or update demographic information and (optional) add pharmacies
- Confirm or update your contact and personal information.
- Would you like to receive text alerts? — This prompt appears only if you have not yet agreed to accept text message notifications from the practice. Select Yes to receive text messages from the practice.
- To add a pharmacy to your patient record:
- Scroll to the bottom of the page and click Add Pharmacy.
In the Select a Pharmacy window, search for and select the pharmacy. - Click Save.
Note: You can store up to five pharmacies in your patient record, but only one can be designated as your primary pharmacy. - Click Continue.
If you have an outstanding account balance, a copay, or both, the Billing step appears.
Pay your copay or outstanding balance
- Select the charges to pay.
Note: For outstanding balances, you can enter an amount smaller than the charge in the Payment box. - Select your payment method.
If you select Pay at the front desk or I have questions about my balance, you can pay your balance at the time of your appointment. - Click Continue.
- If you selected Pay with a credit card, a payment window appears.
- Enter your credit card information, check the I'm not a robot box, and click Review Payment.
- Verify your credit card information and then click Submit Payment.
A message confirms that your payment was received. - Click Continue.
If the practice has any consent forms for you to sign, the Consent and Privacy step appears.
Sign consent forms
- Review each form in the list and either sign it or click Sign at the front desk to continue to the next step.
To sign a form, enter your full name in the signature box at the bottom of the window and click Sign. - After you review all the forms, click Continue.
The Health History Form step appears.
Complete the health history form
- Review each section (Medications, Allergies, and so on) of your health history form.
- For each section, click Update to add, edit, or remove items, or click No Changes.
- When you finish reviewing the health history, click Complete.
A message thanks you for completing online check-in.
Send a secure message to the provider (optional)
- After you check in for the appointment, the final window displays a prompt to enter a question for your provider. (For more information, see Questions for providers created during pre-appointment self check-in.)
- Click Send a secure message.
A message box opens. - Enter your question (up to 500 characters) and then click Send.
Practice staff will not see the question until the time of your visit.
- Click Send a secure message.
You can check in online using a mobile device compatible with iOS and Safari (iPhones, iPads, etc.) or using an Android device. You do not need to be registered for your practice's Patient Portal for self check-in.
From a ReminderCall text message, you can confirm your upcoming appointment, check in for the appointment, and register for the Patient Portal.
Confirm the appointment from the ReminderCall text message
-
Reply 1 to confirm your appointment.
ReminderCall sends a confirmation message, and if you have a Patient Portal account, at least two unique phone numbers, or an email on file, prompts you to check in for the appointment online. - To check in online, tap the link in the text message.
The Verify Identity step appears.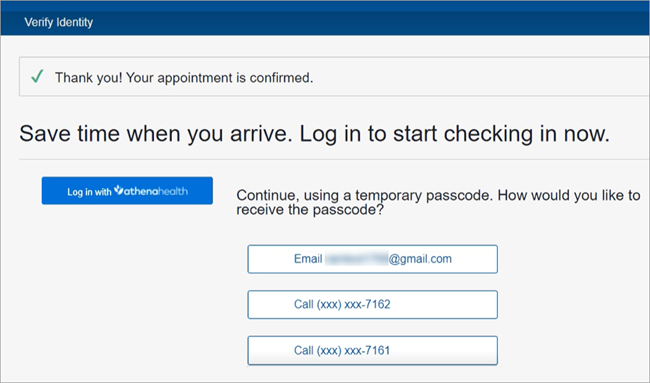
Note: The options available to start check-in depend on the following:- Log in with athenahealth — Available if you have a Patient Portal account.
- Email — Available if your email address is on record.
- Call — Available if you have at least two unique phone numbers on record.
Verify your identity
- Tap Log in with athenahealth, or select where you would like to receive a temporary passcode.
- If you chose to receive a temporary passcode:
- When you receive the
temporary passcode, enter it in the box, and then tap Continue.
A window prompts you to indicate whether you are the patient or the patient's family member. - If you're checking in as the patient, tap I'm [patient name].
- If you're a family member checking in on the patient's behalf, tap I'm [patient name's] Family Member.
The Your Information step appears.- Select your relationship to the patient from the menu and enter your contact information.
- Tap Continue.
- When you receive the
temporary passcode, enter it in the box, and then tap Continue.
The Patient Information step appears.
Confirm or update demographic information
- Confirm or update your (or the patient's) contact and personal information.
- Tap Continue.
The Patient Portal registration step appears. You can still check in for the appointment even if you choose not to create a Patient Portal account.
Register for the Patient Portal (not required)
- If you do not want to create a Patient Portal account now, tap No Thanks.
- To create a Patient Portal account:
- Verify your email in the Email address field.
- Enter the same password in the Password and Confirm password fields.
- Select I have read and agree to the Terms and Conditions and Privacy Policy (after reading the documents).
- Tap Sign Up Now.
A thank you message appears. - Tap Continue.
A message asks you about signing up for electronic statements (e-statements). If you do not want to receive e-statements, tap No thanks. - To receive e-statements, tap Sign up, select the Receive e-Statements option, and then tap Save.
If you have an outstanding account balance, a copay, or both, the Billing step appears.
Pay your copay or outstanding balance
- Select the charges to pay.
Note: For outstanding balances, you can enter an amount smaller than the charge in the Payment box. - Tap Continue.
- Select your payment method (credit card only).
You can select any credit card displayed on this page, or you can select Pay with a different card. - If you have no credit card on file with the practice, or if you selected Pay with a different card, a payment window appears. Enter your credit card information and check the I'm not a robot box.
- Tap Review Payment.
- Verify your payment information and tap Submit Payment.
A message confirms that your payment was received. - Tap Continue
If the practice has any consent forms for you to sign, the Consent and Privacy step appears.
Sign consent forms
- Tap a form.
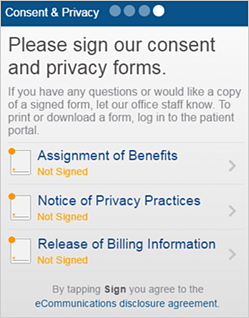
- Some forms (.html and .png) appear immediately.
- For other forms (.pdf), tap download. The form opens in your mobile device's default reader.
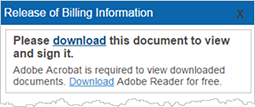
Note: You can tap Download to download Adobe Reader for free. - To sign the form, enter your full name in the signature box and tap Sign.

If you prefer to sign the form when you arrive at the practice, tap Sign at the front desk. - Review each form on your mobile device and either sign it or tap Sign at the front desk to continue to the next step.
- After you review all the forms, tap Continue.
The Health History Form step appears.
Complete the health history form
- Review each section (Medications, Allergies, and so on) of your health history form.
- For each section, tap Update to add, edit, or remove items, or tap No Changes.
- If you tap No Changes in every health history section, this message appears:
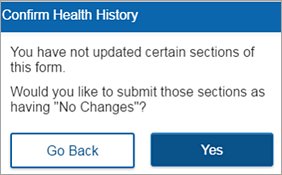
- To make changes, tap Go Back. Otherwise, tap Yes.
- When you finish reviewing the health history, tap Complete.
A message thanks you for completing online check-in. - After you check in for the appointment, the final window displays a prompt to enter a question for your provider. (For more information, see Questions for providers created during pre-appointment self check-in.)
- Tap Send a secure message.
A message box opens. - Enter your question (up to 500 characters) and then tap Send.
Practice staff will not see the question until the time of your visit.
- Tap Send a secure message.
- If you registered for the Patient Portal, you can tap Go to Patient Portal to display the Patient Portal home page.
From a ReminderCall email message, you can confirm your upcoming appointment and check in for the appointment.
Log on to the Patient Portal from the ReminderCall email
-
In the appointment reminder email, tap Confirm Appointment.
A new window indicates that your appointment is confirmed and prompts you to log on to the Patient Portal to check in for the appointment online. - Confirm your email address, enter your Patient Portal password, and tap Check In.
Note: If you can't remember your password, tap Forgot your password?
The Patient Information step appears.
Confirm or update demographic information
- Confirm or update your contact and personal information.
- To add a pharmacy to your patient record:
- Scroll down and tap Add Pharmacy.
In the Select a Pharmacy window, search for and select the pharmacy. - Tap Save.
Note: You can store up to five pharmacies in your patient record, but only one can be designated as your primary pharmacy. - Tap Continue.
If you have an outstanding account balance, a copay, or both, the Billing step appears.
Pay your copay or outstanding balance
- Select the charges to pay.
Note: For outstanding balances, you can enter an amount smaller than the charge in the Payment box. You can also select pay at your appointment. - Tap Continue.
- Select your payment method (credit card only).
You can select any credit card displayed on this page, or you can select Pay with a different card. - If you have no credit card on file with the practice, or if you selected Pay with a different card, a payment window appears. Enter your credit card information and check the I'm not a robot box.
- Tap Review Payment.
- Verify your payment information and tap Submit Payment.
A message confirms that your payment was received. - Tap Continue.
If the practice has any consent forms for you to sign, the Consent and Privacy step appears.
Sign consent forms
- Tap a form.

- Some forms (.html and .png) appear immediately.
- For other forms (.pdf), tap download. The form opens in your mobile device's default reader.

Note: You can tap Download to download Adobe Reader for free. - To sign the form, enter your full name in the signature box and tap Sign.

If you prefer to sign the form when you arrive at the practice, tap Sign at the front desk. - Review each form on your mobile device and either sign it or tap Sign at the front desk to continue to the next step.
- After you review all the forms, tap Continue.
The Health History Form step appears.
Complete the health history form
- Review each section (Medications, Allergies, and so on) of your health history form.
- For each section, tap Update to add, edit, or remove items, or click No Changes.
- If you tap No Changes in every health history section, this message appears:

- To make changes, tap Go Back. Otherwise, tap Yes.
- When you finish reviewing the health history, tap Complete.
A message thanks you for completing online check-in. - After you check in for the appointment, the final window displays a prompt to enter a question for your provider. (For more information, see Questions for providers created during pre-appointment self check-in.)
- Tap Send a secure message.
A message box opens. - Enter your question (up to 500 characters) and then tap Send.
Practice staff will not see the question until the time of your visit.
- Tap Send a secure message.
From a ReminderCall email message, you can confirm your upcoming appointment, check in for the appointment, and register for the Patient Portal.
Confirm the appointment from the ReminderCall email
-
In the appointment reminder email, tap Confirm Appointment.
A new window indicates that your appointment is confirmed and prompts you to check in for the appointment online.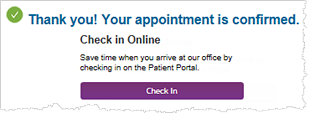
- To check in online, tap Check In.
The Verify Identity step appears.
Verify your identity
- Select how you would like to receive your temporary passcode: Call or Text.
- Tap Send Code.
- When you receive the
temporary passcode, enter it in the box, and then tap Continue.
A window prompts you to indicate whether you are the patient or the patient's family member. - If you're checking in as the patient, tap I'm [patient name].
- If you're a family member checking in on the patient's behalf, tap I'm [patient name's] Family Member.
The Your Information step appears. - Select your relationship to the patient from the menu and enter your contact information.
- Tap Continue.
The Patient Information step appears.
Confirm or update demographic information
- Confirm or update your (or the patient's) contact and personal information.
- To receive text message notifications from the practice, select the Yes, you may send me text alerts option. (This option appears only if you have not yet agreed to accept text message notifications from the practice.)
- Tap Continue.
The Patient Portal registration step appears. You can still check in for the appointment even if you choose not to create a Patient Portal account.
Register for the Patient Portal (not required)
- If you do not want to create a Patient Portal account now, tap No Thanks.
- To create a Patient Portal account:
- Verify your email in the Email address field.
- Enter the same password in the Password and Confirm password fields.
- Select I have read and agree to the Terms and Conditions and Privacy Policy (after reading the documents).
- Tap Sign Up Now.
A thank you message appears. - Tap Continue.
A message asks you about signing up for electronic statements (e-statements). If you do not want to receive e-statements, tap No thanks. - To receive e-statements, tap Sign up, select the Receive e-Statements option, and then tap Save.
If you have an outstanding account balance, a copay, or both, the Billing step appears.
Pay your copay or outstanding balance
- Select the charges to pay.
Note: For outstanding balances, you can enter an amount smaller than the charge in the Payment box. - Tap Continue.
- Select your payment method (credit card only).
You can select any credit card displayed on this page, or you can select Pay with a different card. - If you have no credit card on file with the practice, or if you selected Pay with a different card, a payment window appears. Enter your credit card information and check the I'm not a robot box.
- Tap Review Payment.
- Verify your payment information and tap Submit Payment.
A message confirms that your payment was received. - Tap Continue
If the practice has any consent forms for you to sign, the Consent and Privacy step appears.
Sign consent forms
- Tap a form.

- Some forms (.html and .png) appear immediately.
- For other forms (.pdf), tap download. The form opens in your mobile device's default reader.

Note: You can tap Download to download Adobe Reader for free. - To sign the form, enter your full name in the signature box and tap Sign.

If you prefer to sign the form when you arrive at the practice, tap Sign at the front desk. - Review each form on your mobile device and either sign it or tap Sign at the front desk to continue to the next step.
- After you review all the forms, tap Continue.
The Health History Form step appears.
Complete the health history form
- Review each section (Medications, Allergies, and so on) of your health history form.
- For each section, tap Update to add, edit, or remove items, or tap No Changes.
- If you tap No Changes in every health history section, this message appears:

- To make changes, tap Go Back. Otherwise, tap Yes.
- When you finish reviewing the health history, tap Complete.
A message thanks you for completing online check-in. - After you check in for the appointment, the final window displays a prompt to enter a question for your provider. (For more information, see Questions for providers created during pre-appointment self check-in.)
- Tap Send a secure message.
A message box opens. - Enter your question (up to 500 characters) and then tap Send.
Practice staff will not see the question until the time of your visit.
- Tap Send a secure message.
- If you registered for the Patient Portal, you can tap Go to Patient Portal to display the Patient Portal home page.
Patients can log on to the Patient Portal and check in for their appointments within 7 days of the appointment date.
Note: The number of days is set to 7 by default; however, you can open a case with the CSC to adjust this setting to 2-10 days.
Log on to the Patient Portal and find the appointment
- Log on to the Patient Portal on your mobile device.
- Tap Appointments.
- Tap Upcoming Appointments.
Check-in Available appears next to any appointment that is available for online check-in.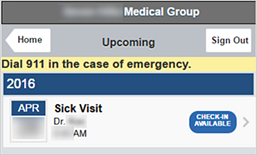
- Tap Check-in Available.
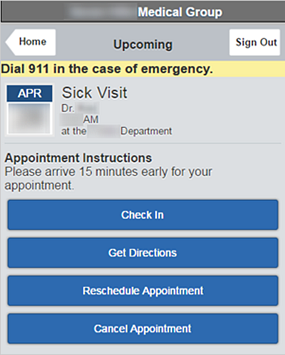
- Review the appointment information and tap Check In.
The Patient Information step appears.
Confirm or update demographic information
- Confirm or update your contact and personal information.
- To add a pharmacy to your patient record:
- Scroll down and tap Add Pharmacy.
In the Select a Pharmacy window, search for and select the pharmacy. - Tap Save.
Note: You can store up to five pharmacies in your patient record, but only one can be designated as your primary pharmacy. - Tap Continue.
If you have an outstanding account balance, a copay, or both, the Billing step appears.
Pay your copay or outstanding balance
- Select the charges to pay.
Note: For outstanding balances, you can enter an amount smaller than the charge in the Payment box. You can also select pay at your appointment. - Tap Continue.
- Select your payment method (credit card only).
You can select any credit card displayed on this page, or you can select Pay with a different card. - If you have no credit card on file with the practice, or if you selected Pay with a different card, a payment window appears. Enter your credit card information and check the I'm not a robot box.
- Tap Review Payment.
- Verify your payment information and tap Submit Payment.
A message confirms that your payment was received. - Tap Continue.
If the practice has any consent forms for you to sign, the Consent and Privacy step appears.
Sign consent forms
- Tap a form.

- Some forms (.html and .png) appear immediately.
- For other forms (.pdf), tap download. The form opens in your mobile device's default reader.

Note: You can tap Download to download Adobe Reader for free. - To sign the form, enter your full name in the signature box and tap Sign.

If you prefer to sign the form when you arrive at the practice, tap Sign at the front desk. - Review each form on your mobile device and either sign it or tap Sign at the front desk to continue to the next step.
- After you review all the forms, tap Continue.
The Health History Form step appears.
Complete the health history form
- Review each section (Medications, Allergies, and so on) of your health history form.
- For each section, tap Update to add, edit, or remove items, or click No Changes.
- If you tap No Changes in every health history section, this message appears:

- To make changes, tap Go Back. Otherwise, tap Yes.
- When you finish reviewing the health history, tap Complete.
A message thanks you for completing online check-in. - After you check in for the appointment, the final window displays a prompt to enter a question for your provider. (For more information, see Questions for providers created during pre-appointment self check-in.)
- Tap Send a secure message.
A message box opens. - Enter your question (up to 500 characters) and then tap Send.
Practice staff will not see the question until the time of your visit.
- Tap Send a secure message.
For both in-office and pre-appointment self check-in, you can track the patient's progress in athenaOne. For patients who complete self check-in from home, you can also see whether the patient sent a question to the provider.
When patients confirm the appointment details from home (pre-appointment self check-in), they can enter a question for the provider. Patient questions created during pre-appointment self check-in are categorized as patient cases and are closed automatically. When the patient comes in to the office for the appointment, the Self Check-in section at the top of the Check-in page displays "Secure message sent." You can see the patient question in the Patient reason field in the Appointment Information section of the Check-in page.
Note: The question also appears in the chart and in the Intake and Exam stages of the encounter (Reason for Visit section).
You can also find patient questions created during pre-appointment self check-in on the Document Search page (On the Patient Actions Bar, click Communicator, and then click Portal Message History). The description for these documents is "Patient Case - Clinical Question - Question from self check-in." Click the document name in the list to display the question.
Before the patient arrives for an appointment, your staff can see whether the patient started or completed online check-in on the Eligibility and Phone page.
- Display the Eligibility and Phone page: On the Main Menu, click Calendar. Under APPOINTMENTS, click Eligibility and Phone List.
- Locate the patient appointment in the list.
The Appointment Confirmation Result column displays information about self check-in, for example, "Self check-in not started" or "Self check-in completed." (You can see the patient's progress through the self check-in process in the Self Check-in section at the top of the Check-in page.)
Note: If your organization chose not to use the updated self check-in feature, the Appointment Confirmation Result column on the Eligibility and Phone page also displays the status of the patient's online check-in steps: Demographics, Health History Forms, Completed forms, and Incomplete forms.
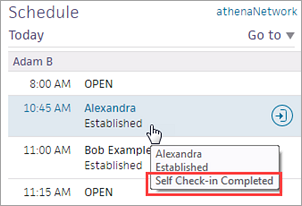
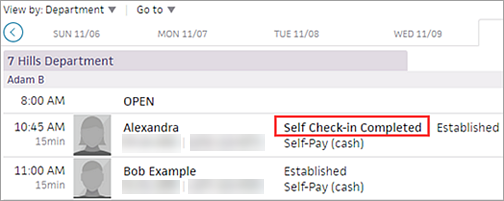
When a patient completes self check-in before an appointment but has not yet checked in with the front desk, the athenaOne home page displays the status "Self Check-in Completed." As soon as the patient arrives for the appointment and checks in with the front desk, the status changes to "Arrived."
Note: For the "Self Check-in Completed" status to appear on the athenaOne home page, upcoming appointments must be enabled on the Portal Settings page.
In the Schedule panel on the right side of the home page, hover your cursor over the patient's name. If the patient completed self check-in prior to the appointment, you see the "Self Check-in Completed" status.
If the patient completed self check-in prior to the appointment, you see the "Self Check-in Completed" status in the Schedule panel in the center of the home page.
At the top of the Check-in page, the Self Check-in section displays the patient's progress through the self check-in process. The middle column indicates whether the patient completed that step of the self check-in process, or if that step was not required.
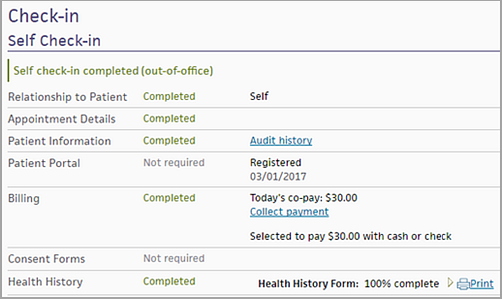
- Appointment Details row — If the patient sent a question to the provider during self check-in, "Secure message sent" appears in this row.
Note: The patient's question appears in the Patient reason field in the Appointment Information section of the Check-in page with other secure messages. The question also appears in the chart and in the Intake and Exam stages of the encounter (Reason for Visit section). - Patient Information row — If the patient updated any demographic information during self check-in, athenaOne automatically updates the patient's Quickview. To see what information the patient changed, click Audit history in the Patient Information row.
- Patient Portal row — If the patient already had a Patient Portal account or registered for one during self check-in, "Registered" appears in this row.
- Billing row — If the patient has an outstanding balance or a copay for this appointment, the Billing row shows the amount that the patient paid (if any) during self check-in. If the patient has an outstanding balance, the Collect payment link appears. You can also click Receipt to give the patient a receipt for the payment made during self check-in.
Note: You can see the copay associated with this appointment type on the Update Policy Details page. - Consent Forms row — This row shows which consent forms the patient signed during self check-in. You can use the print link to give the patient a copy of any forms that the patient signed electronically during self check-in (this copy shows the patient's electronic signature). You can also click print to print any unsigned forms for the patient to sign now.
Note: To review consent forms that the patient completed during self check-in, display the patient's Privacy Information page: On the Check-in page, click Manage Privacy (under the Privacy heading). - Health History row — This row shows whether the patient completed the health history form during self check-in and the percentage of each section that was completed. You can click
 Print to give the patient a copy of the form or to help you reconcile updated health history information (see Data Reconciliation).
Note: If the patient skipped the Health History step during self check-in, the health history forms appear at the bottom of the Check-in page under the Forms heading (Portal Health History Forms).