 User Guide — athenaOne Basics
athenaOne for Hospitals & Health Systems
athenaOne is a Web-based, nonlinear application. This means that athenaOne does not force you to step through a long series of fixed screens to perform a function. Instead, you can navigate through the application at will. You, and not the application, are in the driver's seat.
Your athenaOne home page appears when you first log in to athenaOne. To return to your home page from anywhere in athenaOne, click the athenaOne logo at the upper left of your screen. You can click your username in the upper right corner of the screen to select your default home page. Your options depend on your user role and your practice configuration: clinician or non-clinician.
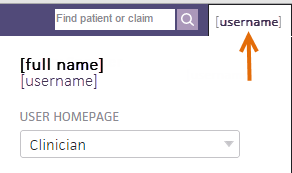
- Non-clinician home page — This option has three panels. The items from the Workflow Dashboard, followed by your Clinical Inbox tasks, are listed in the left panel Inbox. These are the outstanding tasks and documents that need your attention. The center panel shows your weekly calendar. The right panel provides announcements and links to training and resources.
- Clinician home page — This option has three panels. The queues from your Clinical Inbox are listed in the left panel Inbox. These are the outstanding tasks and documents that need your attention. The center panel shows your weekly calendar. The right panel provides announcements and links to training and resources.
- Classic home page — This option shows only the athenaNetwork home page, with navigation tabs labeled news & messages, workflow dashboard, clinical inbox, performance reviews, and live benchmarks. This option is available only if your practice has athenaCollector, but not athenaClinicals.
The athenaOne application has four basic components:
- Main Menu — The top-most horizontal bar, used for basic navigation, is always visible.
- Workspace — The largest section of your screen is used for data entry, reporting, and most patient-specific tasks.
- Task Bar — The left-hand, vertical side bar opens to display worklists and sub-menus.
- Patient Actions Bar — This horizontal bar appears under the Main Menu when you display the Quickview, Patient Registration, Privacy Information, Claim Edit, and other patient-specific pages. The links available in the Patient Actions Bar depend on your user permissions and practice configuration.
The Main Menu, which is the top-level navigation, follows standard medical practice workflows from left to right. Within each menu option, similar items are grouped logically into categories to make them easier to find:
The Calendar menu provides access to pages and resources related to the schedule and practice communications.
The Patients menu provides access to documents, chart management, and care coordination across your patient population.
The Claims menu provides access to claims and self-pay worklists and resources related to claims.
The Financials menu provides access to pages related to money that is flowing in and out of your practice.
The Reports menu provides access to pages such as the Report Library, Report Builder, and Report Inbox, in addition to other useful predefined reports.
The Quality menu provides access to items that give the practice insight into the quality of care either through quality management reporting or pay for performance metrics.
The Support menu provides access to all help-related items. This menu includes a link to the Success Community, along with other self-service help pages.
The administration and practice configuration pages are found under the Settings menu: click the Settings icon ![]() in the Main Menu to display all the menu options. In the leftmost column you'll find user-specific settings. To the right you'll find practice-wide settings.
in the Main Menu to display all the menu options. In the leftmost column you'll find user-specific settings. To the right you'll find practice-wide settings.

Required text-box fields appear yellow. Your practice can customize which fields appear yellow.

Optional text-box fields appear white.
Usernames that belong to your practice remain in regular font, but athenahealth usernames are italicized. Non-client usernames include athenahealth staff and contracted vendor staff.
The Patient Actions Bar is a navigation feature located near the top of the Quickview and other patient-specific pages. It provides quick access to most patient-specific pages and actions in athenaOne.


The patient banner, which appears at the top of most patient-specific pages, includes a patient photo, patient surname in uppercase, and basic demographic information.
Note: If your practice does not use athenaClinicals, you cannot upload a patient photo from the Quickview.
Click your username in the upper right corner of the Main Menu, to the right of the search tool. The name of your practice (and the practice ID number) appears under the PRACTICE heading.

Your department of login appears in the Department menu, in the bottom right corner of your screen. To switch your department of login, click the Department menu arrow and select a new department.

You can also click your username in the upper right corner of the Main Menu. The name of the current department appears under the DEPARTMENT heading.
(If authorized, you can click Switch Practice to switch the practice or select a new department.)
You can see the athenaOne version information on the leftmost tab of the Web browser when you hover over the athenaOne browser tab.
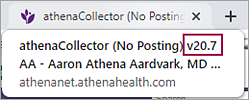
For more detailed information and information about the current version of the ONC certification (required for some quality programs), see athenaOne Version.
You can see your athenaCollector service level at the very top of your screen, on the leftmost tab of the Web browser. You can also pause your cursor over the tab to view your practice name and practice ID number.

The medical group pay-to address is displayed at the bottom of the Quickview.

In addition to the pay-to address, this line displays your username and the date and time that the patient record was accessed.
To manage pay-to addresses for your practice and to view their affiliated medical groups, see the Pay-To Address Admin page.
- Navigate to an athenaOne page that you want to bookmark.
-
Open the Bookmarks menu. On the Main Menu, click the Bookmarks icon
 in the upper right corner of the page.
 -
Click Add Current Page to add a bookmark for the current page you're viewing in athenaOne.
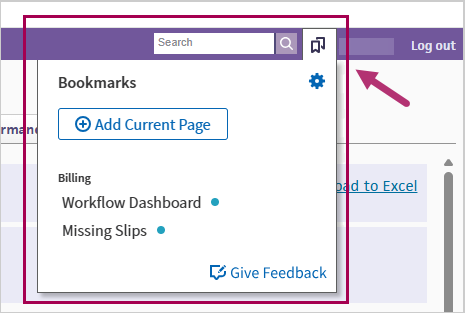
Notes:
- If the Add Current Page button is disabled, hover over the information icon. The button will be disabled if you already have a bookmark for the page.
- Some athenaOne pages currently do not support bookmarking.
-
You cannot bookmark pages that embed another application within the page, often requiring an additional SSO log-in. For example:
-
Care Management
-
Outreach Management
-
Patient Population
These pages are not supported in the Bookmarks menu. Please access these pages from the athenaOne menu.
-
- Click Give Feedback at the bottom of the Bookmarks menu to notify athenahealth so we can review the page configuration.
- Or, contact the CSC: On the Main Menu, click Support > Success Community > Contact Client Support Center.
-
Bookmark Label — Use the default page name (if there is one) or enter a name that will be useful for your future reference. The label must have fewer than 35 characters.
Note: A blue dot indicates a newly added bookmark. The blue dot will disappear after the page is refreshed.
-
Click the check icon to save the bookmark label. The bookmark appears in your Bookmarks list.
You can bookmark... You cannot bookmark... pages you have access to pages you don't have access to up to 40 pages more than 40 pages athenaOne pages with filters
Note:
- Some athenaOne pages are configured to save your selected filter values. If you open one of those pages using a bookmark, the page will load with your previously selected filter values.
- For athenaOne pages that are not configured to save filter values, you'll need to select the filter values each time you open the bookmarked page. Please use Give Feedback for any page that isn't working as you would like, so we can consider it for a future enhancement.
the “Run” page for a specific report in Report Library, for quick direct access to run your frequently used reports a specific tab in the Report Library, such as the Financial tab
- From an athenaOne page, open the Bookmarks menu:
On the Main Menu, click the Bookmarks icon in the upper right corner of the page.
 -
Select one of your bookmarked pages. The page appears.
Note: In this initial release, bookmarks are not saved across your athenahealth contexts. We received this enhancement request from many of you and will be adding that in a future release!
-
Open the Manage Bookmarks window::
-
On the Main Menu, click the Bookmarks icon
 in the upper right corner of the page.
 -
Click the settings icon
 in the Bookmarks pane.
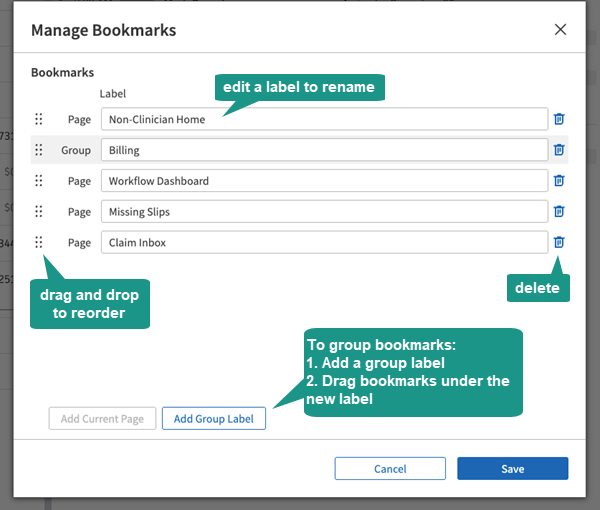
 The Manage Bookmarks window appears with a list of your current bookmarks.
Example of an athenaOne user's saved bookmarks:
-
-
Use the following to manage your bookmarks:
Manage Bookmarks Action Icon Description Delete 
Click the Delete icon next to the bookmark you want to delete.
Rename N/A Label — Edit the label next to the bookmark you want to rename. Reorder 
Click the reorder icon to drag and drop a bookmark to its new position. Group N/A - Click Add Group Label. A new Group label appears.
- Label — Edit the label for your new Group.
- Click the reorder icon to drag and drop bookmarks under your new Group label.
-
Click Save.
- Add bookmarks (saved hyperlinks) using the Bookmarks icon
 in the Main Menu.
 - Bookmark up to 40 pages in athenaOne.
- Manage bookmarks (view, delete, rename, reorder, group related bookmarks into categories with group labels).
- See To bookmark athenaOne pages for quick access for detailed steps..
Note: Bookmarks are specific to each athenaOne user and each context.
Do not use your browser's back button or right-click to select "Back" in order to access the previous page. There is a risk that some data may be submitted to the system twice or that two different patient charts could be displayed.
Use the links or buttons provided on your current page. Many pages provide a Return to workflow or Continue button that transfers you to the next logical page in your current workflow.
Keyboard shortcuts are available on many pages. The shortcuts in the table below work throughout athenaOne. See the Post Payment page for additional keyboard shortcuts that work only on that page.
| Key | Action |
|---|---|
| Tab or Enter |
Cycle to the next field on a page. |
| Shift Tab |
Cycle to the previous field on a page. |
| Space |
If the cursor is on a button, the SPACE bar clicks the button. |
| F1 | Displays context-sensitive help about that page (on a Mac, hold the Fn key and press F1). If you are using athenaOne in the Chrome browser, select Ctrl+F1. |
| F2 |
F2 toggles the Task Bar open and closed. If the Task Bar does not reopen when you press F2, click on white space in the Workspace, or click the purple area of the Main Menu, and then press F2. |
You can use the following keystrokes in athenaOne:
- Ctrl+A — Select (highlight) all
- Ctrl+F — Find (search for text)
- Ctrl+P — Print
- Ctrl+Z — Undo last text action
Please enter text into athenaOne fields manually. Using the copy and paste method can copy hidden HTML code, and create issues within athenaOne.
Return to the current patient's Quickview (athenaCollector) or chart (athenaClinicals) — Click the magnifying glass icon for the patient ID displayed in the Find patient tool  .
.
Date fields — In any date field, you can use these shortcuts:
- Enter "t" in any date field to enter today's date.
- Type "t+1" in any date field to enter tomorrow's date.
- Type "t-1" in any date field to enter yesterday's date.
- Type "t±n" in any date field to enter the date "n" days before or after today's date.
- Calendar icon — Click the calendar icon
 to display a date selector.
Note: Make sure that your computer's date and time clock settings are accurate. The "t" feature retrieves the date from your own PC's calendar.
Time field — In any time field, you can:
- Type "now" to enter the current time
To provide a consistent printing experience across all supported browsers — Chrome, Microsoft Edge, and Safari — athenaOne converts a page's HTML to a PDF file before printing. The browser then displays the converted PDF file in a print preview window. You can print the page from the print preview or save the PDF file to your computer.
Note: If you try to print very long documents, the print job may fail and you will see an error message.
Only athenaOne pages with Print links or Print buttons are printer-friendly. Although it is possible to print other athenaOne pages using the "right-click > Print" method, the printed results may not be formatted correctly on the printed page.
- To request that a Print link appear on a specific page, please submit an idea on the Success Community for review and feedback from our development teams.
- To report a problem or to provide feedback about athenaOne printing, please contact the CSC from athenaOne > Support > Success Community > Contact Client Support Center.
The PDF file displayed when you click the Print link or Print button includes the following:
- Headers and footers printed on every page
- Automatically set print margins
- Consistent printed documents across all browsers
- UTF-8 character encoding
- Selectable fonts (the default printing font is Arial)
Print job status icon
If you're using Chrome or Safari as your web browser, you see a print icon that shows you the status of your print job. You can continue to work in athenaOne while the PDF document is generated.

Hover over the icon for more information about the status of the print job, or drag and drop the print icon to the right of your browser window to prevent it from blocking information on the screen.
Icon statuses

|
The PDF is being generated for preview. |

|
The print job was successful. |

|
An error occurred and the print job failed. Note: If the print job fails, an error message appears. You can click Dismiss to clear the print job and try again, or you can click Help to see more information about printing pages in athenaOne. |
If you are unable to save and download PDF files in the Chrome browser after you click the Print button, follow these steps.
- In the Google Chrome browser, click the more options icon
 on the top right corner of the page and select Settings.
 - Scroll to the bottom of the page and click Advanced.
Additional settings appear. - Click Site Settings to display the site settings options.
- Near the bottom of the list, click PDF documents.
The Download PDF files instead of automatically opening them in Chrome option should be disabled.
- If the Download PDF files instead of automatically opening them in Chrome option is on, turn it off.
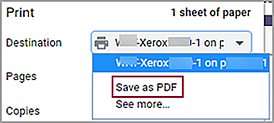
- To save or download a file from athenaOne as a PDF file, click the Print button in athenaOne and then select the Save as PDF option from the Destination menu.
- Display the patient Quickview: In the patient chart, click the Menu icon
 and select Quickview.
 - On the Patient Actions Bar, click Clinicals, and then click Print Forms.
- Check the box next to the documents that you want to print.
- Click Print [#] selected.
Note: athenaOne prepares the PDF document; the print status icon shows you the progress of the print job. For more information about the print job statuses for success, failure, and errors, see Printing athenaOne Pages.