 User Guide — Patient Information Center
The Patient Information Center is a slimmed-down version of the athenaCommunicator online Patient Portal or the Patient Portal component enabled. athenahealth provides the Patient Information Center for practices with athenaClinicals that do not use the athenaCommunicator service.
The Web-based Patient Portal gives patients secure and convenient access to their health information. Patients can use the Patient Portal to view, download, and transmit their health information, send secure messages to their provider, as well as update their demographic information.
You can register patients and their family members for the Patient Information Center while the patient is in the office from the Quickview, Check-in, and Checkout pages. Practice users (including clinical providers) can register a patient or family member as follows:
- From a practice computer.
- From a kiosk (a desktop, laptop, or tablet computer set up for this task).
- By sending an invitation email to the patient's registered email address in athenaOne.
In-office registration for the Patient Information Center enables patients to experience the Patient Information Center for the first time while they're in your office. Practice users can register patients for the Patient Information Center at any stage of the patient encounter. A dedicated practice user can also help patients register for the Patient Information Center before check-in.
Important: Register your patients (or their family members) in the office to increase the likelihood that you will meet quality program measures.
You can use the Quick Registration functionality to allow patients and their family members to sign up for the Patient Information Center from athenaOne.
Important: If a patient's family member is creating a Patient Information Center account (for example, the parent of a young child), do not enter the family member's email address in the Patient email field on the Quickview, Check-in, or Checkout page (use the Patient email field only for the patient's email address). If the patient does not have an email address, select the No Email option.
To start the Quick Registration process:
- On the Quickview, Check-in, or Checkout page, confirm or enter the email address, home phone number, and mobile phone number for the patient.
Note: If you enter an email address or phone number for the first time, click Save before you proceed. - Scroll down to the Contact Details & People with Portal Access section and click Add portal account.
The Portal account is for... prompt appears. - Click The patient or Not the patient to indicate whether the Patient Portal account owner is the patient or another person (a family member or caregiver, for example).
Note: If your practice does not use family access, the Not the patient button does not appear.
The Register Patient or Register Family Member page appears. - If you are registering a family member for the Patient Information Center, confirm the email address, home phone number, mobile phone number, and additional demographic information. Also, make sure to specify the relationship of the family member to the patient and the access level: full access or billing-only access.
- Click Register with This Computer.
A message appears about your responsibility for verifying the patient's or family member's identity. - Click Continue.
- You are logged out of athenaOne, and the Create new password page appears.
- Allow the patient or family member to use the device that the practice user was using.
- The patient or family member confirms the email address and types in a Patient Portal password on the Create new password page. This password must be 8-20 characters long and must have at least one uppercase letter, one lowercase letter, and one number or symbol.
- The patient or family member checks the box to accept the Terms and Conditions and the Privacy Policy and then clicks Create account.
The Patient Information Center home page appears. - When the patient or family member signs out of the Patient Information Center, the athenaOne login page appears.
- The practice user logs back in to athenaOne and is returned to the Check-in workflow.
You can set up a computer (desktop, laptop, or tablet) in your office to allow patients and family members to register for the Patient Portal or Patient Information Center while the patient is at the practice. From the Quickview or Check-in page, practice staff generate temporary passwords, which they give to the patient or family member; the patient enters this password on the login page set up on the kiosk computer to register for the Patient Portal or Patient Information Center. (These temporary passwords are case sensitive.)
Note: Generate temporary passwords while the patient is in the office, not over the phone.
To enhance the security of the kiosk workflow, athenahealth provides you with a unique URL, which enables an automatic timeout of a Patient Portal or Patient Information Center login after 3 minutes. Also, a large Signout button is displayed on the kiosk screen so that your patients and their family members can easily sign out after they register for the Patient Portal or Patient Information Center and explore it.
To use the kiosk registration feature, you must set up a kiosk (desktop, laptop, or tablet computer) in your office and then call the CSC to enable this feature. After the CSC enables the feature for you:
- Open a Web browser, such as Chrome or Safari, on the kiosk device, and enter one of the following URLs:
- If your practice does not use the Communicator Brands feature, enter "https://CONTEXTID.portal.athenahealth.com/?section=kiosk", where CONTEXTID = your practice ID.
- If your practice uses the Communicator Brands feature, enter
"https://CONTEXTID-BRANDID.portal.athenahealth.com/?section=kiosk", where CONTEXTID = your practice ID and BRANDID = your brand ID.
Note: To find your brand ID, display the Communicator Brands page: On the Main Menu, click Settings >Communicator. In the left menu,under Practice Links — Communicator, click Brands.
- Bookmark this URL, and make it the home page of the browser on the device.
- Make sure that you turn the device on and open the browser every morning.
Important: When you start the kiosk registration process, advise patients that they must complete their registration and create a new password within 2 hours or the password will expire.
- On your computer (not the kiosk device) display the Quickview or Check-in page for the patient.
- On the Quickview or Check-in page, scroll down to the Contact Details & People with Portal Access section and click
 Add Contact Person and Grant Portal Access.
The Add contact window opens. - Click The Patient or Not the Patient to indicate whether the Patient Portal or PIC account owner is the patient or another person (a family member or caregiver, for example). If the patient already has a Patient Portal account, these options do not appear; the new contact that you are creating is assumed to be "not the patient."
Note: If your practice does not use family access, the Not the Patient option does not appear. - You can click Pre-fill fields using the chart contact details to fill in fields — such as address and phone number fields — that exist already in the patient chart. This option is especially useful for parents and guardians of minor children.
- After you enter all required contact information, click Save and Go To Portal Registration.
The Choose Portal Registration Method window opens. - Click Register With Kiosk.
athenaOne generates a temporary password on your computer screen. - Write down this password and give it to the patient or family member (this password is case sensitive).
Note: The temporary password that you generate for kiosk registration is valid for 2 hours.
- Go to the kiosk that's set up for Patient Portal or Patient Information Center registration.
- On the landing page, tap
 .
. - Enter your email address and the temporary password given to you by the practice staff and then tap Log In.
- On the Security update page, tap Continue.
The Choose your security option page appears.
Note: For detailed instructions about creating your account, see To create a new Patient Portal account from a notification email. The steps are summarized here. - Select your security option and then verify access to your patient record.
- Create a permanent Patient Portal or Patient Information Center password.
- Enter the temporary password in the Current password field.
- Enter your permanent password in the New password fields.
This password must be 8-20 characters long and must have at least one uppercase letter, one lowercase letter, and one number or symbol. - On the All set page, tap Continue.
The Patient Portal or Patient Information Center home page appears. You are now registered.
During a patient encounter, you can send an email invitation for the Patient Portal or Patient Information Center on the Intake and Exam tabs.
- In the banner at the top of the Intake and Exam page, click Manage Portal Account.
The Register Patient or Register Family Member page appears. - Confirm or enter the email address, home phone number, and mobile phone number for the patient.
- Click Send Email Invitation.
The patient will receive an email containing the Patient Portal or Patient Information Center registration link at the email address given during registration.
You can send an email invitation for the Patient Portal or Patient Information Center at any time from the Quickview page.
- On the Quickview or Check-in page, scroll down to the Contact Details & People with Portal Access section and click
 Add Contact Person and Grant Portal Access.
The Add contact window opens. - Click The Patient or Not the Patient to indicate whether the Patient Portal or PIC account owner is the patient or another person (a family member or caregiver, for example). If the patient already has a Patient Portal account, these options do not appear; the new contact that you are creating is assumed to be "not the patient."
Note: If your practice does not use family access, the Not the Patient option does not appear. - You can click Pre-fill fields using the chart contact details to fill in fields — such as address and phone number fields — that exist already in the patient chart. This option is especially useful for parents and guardians of minor children.
- After you enter all required contact information, click Save and Go To Portal Registration.
The Choose Portal Registration Method window opens. - Click Send Email Invitation.
The patient or family member will receive an email containing the Patient Portal or Patient Information Center registration link at the email address given during registration.
If a patient or other user forgets her Patient Information Center password, you can send an email with a password reset link.
- Display the patient's Quickview.
- Scroll down to the Contact Details & People with Portal Access section.
- Locate the name of the patient or the name of a Patient Portal user who is not the patient.
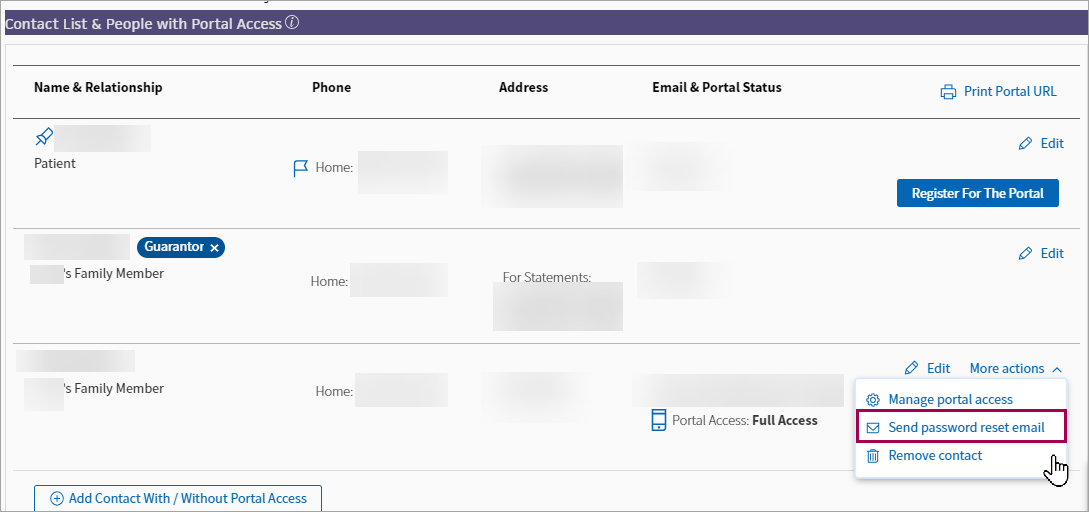
- Click More actions and then click Send password reset email.
A confirmation message appears, stating that the email was sent to the displayed email address.
- Display the patient's Quickview.
- In the Patient Actions Bar, click Scheduling > Automated Messaging History.
- Show only — Select Portal Activity.
- The page displays the patient's activity, including when the patient:
- Logged in to the Patient Information Center.
- Downloaded health data. Includes a linked document ID, so that you can see what information the patient downloaded.
- Transmitted health data. Includes a linked document ID, so that you can see what information the patient transmitted.
You can display a read-only view of the Patient Information Center.
Note: You must have the Clinicals user permission to log in to the PIC as a patient.
- On the Patient Actions Bar, click Clinicals, and then click Log in to the PIC as Patient.
An alert message appears. - Click OK.
A read-only view of the Patient Information Center appears, showing the selected patient's clinical data as the patient would see it when logged in to the Patient Information Center.
To assist a patient with the Patient Information Center, you may need to know if the patient is new to your practice and has not yet registered. You may need to provide the patient with the URL for your Patient Information Center.
The following instructions help you walk patients through some of the tasks that they can perform on the Patient Information Center.
When patients submit their tobacco history on the Patient Portal or Patient Information Center, an alert appears next to the History tab in the patient chart. Use the data reconciliation process to integrate your patients' self-reported tobacco use with their chart.
- Log on to the Patient Portal or Patient Information Center.
- Click My health on the left side of the page.
- On the My Health page, click the Health Summary tab.
- Click Tobacco Use.
- Do you or have you ever smoked tobacco? — Select an option from the menu, for example, Former smoker.
- How much tobacco do you smoke? — Select an option from the menu, for example, 1 pack per week.
- How many years have you smoked tobacco? — If you are or were a smoker, enter the number of years you've smoked.
- Click Submit.
A confirmation message appears. - After you read the message, click OK.
Patients can download and transmit their health records from the Patient Portal or the Patient Information Center in the form of a continuity of care document (CCD). A patient can send the health record using Direct Messaging, a secure, encrypted method for transmitting health information, or using regular email, which is not encrypted.
Note: To use Direct Messaging, the patient may need to phone the receiving provider to find out that provider's Direct email address (these addresses contain "@direct" in the address).
- Log on to the the Patient Portal or Patient Information Center.
- Click My health on the left side of the page.
-
On the My Health page, click the Health Records tab. The Health Records page appears.
Choose a time frame
- Specify the dates of service for the health information that you want to download or send.
- Custom date range — Specify the From date and the To date to retrieve health information from the dates of service in that time range.
- Single date — Specify the date for the information, for example, the date of your last physical exam.
- All time — Retrieve your entire health record.
Choose how you'd like to get your data
- By default, the Download tab is selected. To download your health record, click the Download button.
A .zip file containing your health record is downloaded to your computer. - To send your health record using email:
- Click the Email tab.
The tab displays a warning about sending sensitive information via unencrypted email.
Important: Make certain that the email address is correct! After you send the email, you cannot cancel or recover it. - Email — Enter the provider's email address in the field.
- Confirm email — Enter the provider's email address again in this field.
- Click the Send button.
The email recipient receives a one-time-use link to the health record. - To send your health record using Direct Messaging:
- Click the Direct Exchange tab.
- Direct Exchange Address — Enter the provider's Direct address in the field.
Note: If you do not know the provider's Direct address, contact the provider (these addresses contain "@direct" in the address). - Click the Send button.
If the receiving provider uses athenaClinicals, athenaOne classifies the health record as a clinical document (ClinicalDocument_CCDA) and routes it to the Clinical Inbox.
This self-registration procedure applies to patients who fall into these categories:
- The patient record exists in athenaOne but the patient has not set up a Patient Portal account.
- The patient does not exist in athenaOne.
For patients to register online, ensure you have online Patient Portal registration enabled on the Patient Portal Settings page.
For patients to register at your practice (and create a Patient Portal or Patient Information Center account) from the Patient Portal, the Portal New Patient Creation Allowed feature must be enabled for your practice.
Important: To comply with the Children's Online Privacy Protection Act (COPPA), patients under the age of 13 cannot create self-registered Patient Portal accounts, and you cannot register or invite new Patient Portal users under the age of 13.
The patient accesses the Patient Portal sign up workflow from your practice-branded Patient Portal login page.
They click Sign up today to begin the registration process.
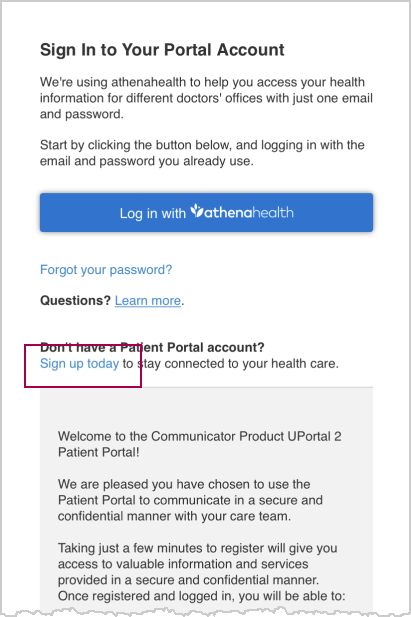
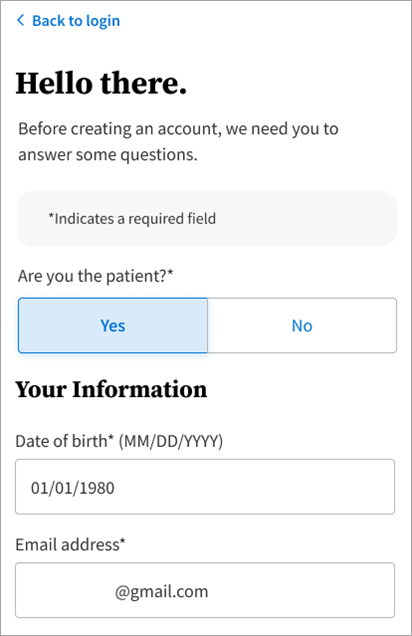
The patient indicates that they are signing up for themselves ("Are you the patient?"), as well as their date of birth and email address.
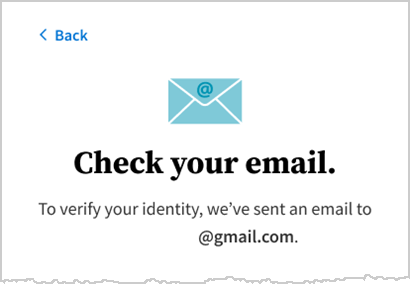
A verification email is sent to the patient's email address.
From this email, the patient clicks Create My Account.
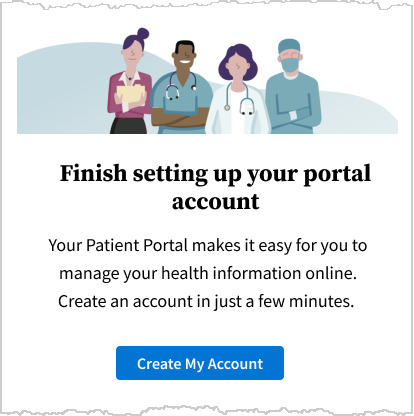
For these users, demographic information is not required. After they receive their verification email and click Create My Account, they are taken to the create your new password page.
The patient creates a password for their Patient Portal account.
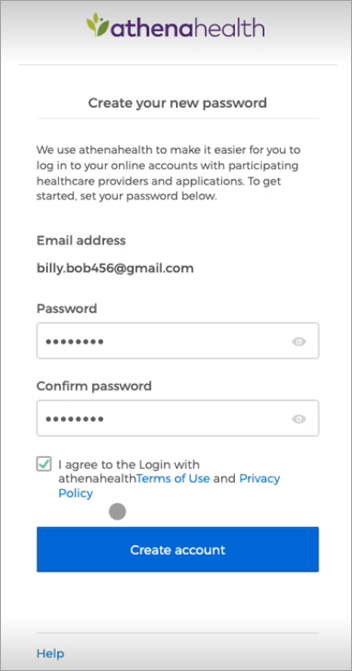
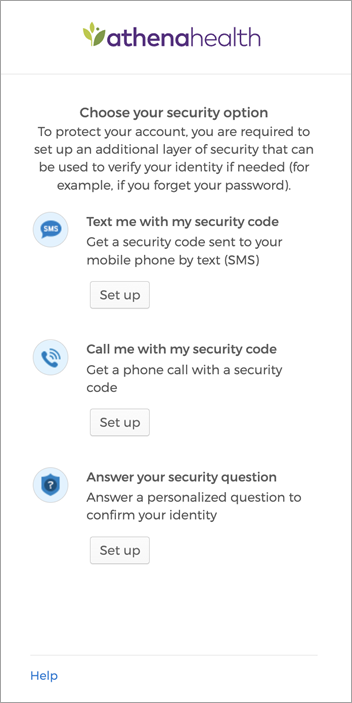
Then, they choose a security option:
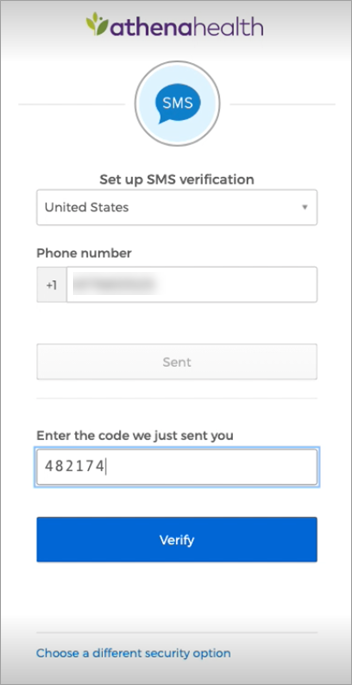
The example below shows the mobile phone security setup option. The patient receives a code via SMS and enters it on this page.
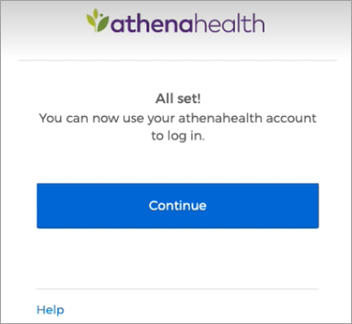
The registration process is complete. When the patient clicks Continue, they are taken to the Patient Portal.
The patient accesses the Patient Portal sign up workflow from your website. They click Sign up today to begin the registration process.
Important: You must enable the "Allow new patient registration" setting on the Portal Settings page to allow new patients to successfully register online.

The patient indicates that they are signing up for themselves ("Are you the patient?"), as well as their date of birth and email address.

A verification email is sent to the patient's email address.

From this email, the patient clicks Create My Account.

They enter the demographic information shown below:

Note: Gender identity is an optional field.
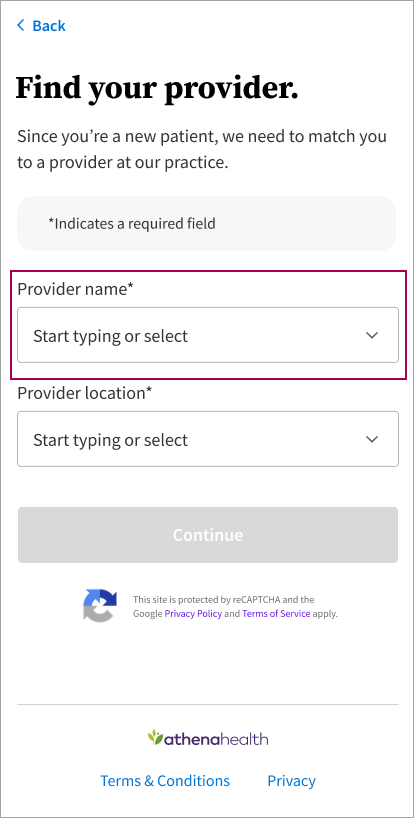
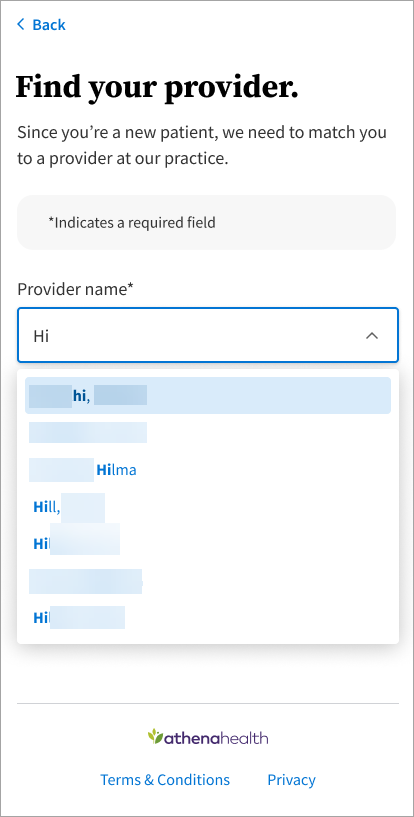
Next, the patient chooses a provider name. They can start typing in this field, which provides options via a drop-down menu:
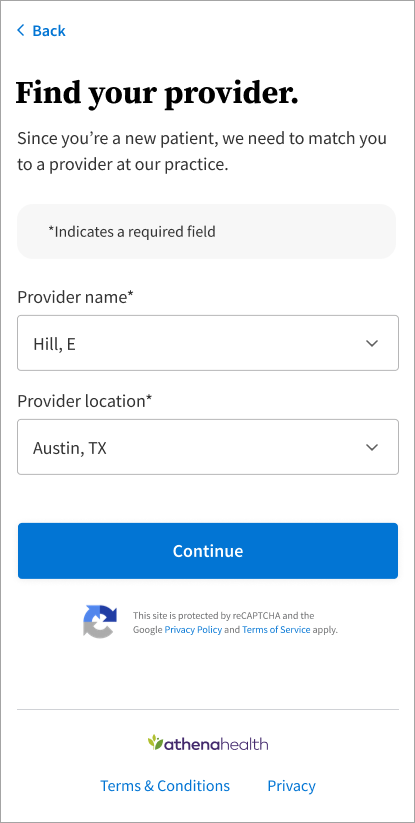
After selecting a provider name and location, the patient can continue the registration process.
The patient creates a password for their Patient Portal account.

Then, they choose a security option.

The example below shows the mobile phone security setup option. The patient receives a code via SMS and enters it on this page.

The registration process is complete. When the patient clicks Continue, they are taken to the Patient Portal.

If your practice does not allow new patient registration online, they will see the followings screens:
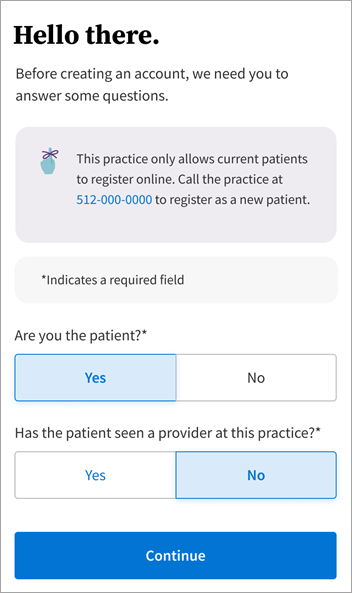
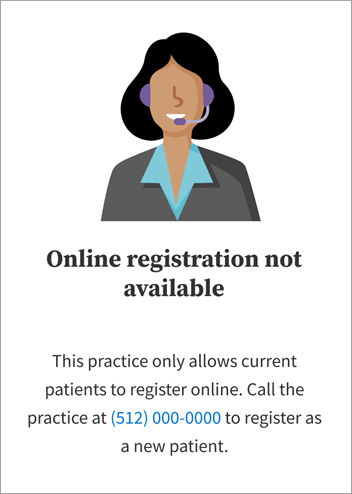
If a patient has an existing patient record and, during self registration, uses an email address or date of birth that differs from their current information on file, a new patient record is created for them. The new record is created because athenaOne is unable to match the patient's information with their existing patient record.
In this scenario, we advise using the Manage Prospective Patients page to review and merge the new record with the existing patient record in athenaOne as appropriate.
To access the Manage Prospective Patients page in athenaOne, from the Main Menu, click Patients. Under Patient Registration, click Manage Prospective Patients.
For practices with brands that have the "Allow new patient registration" setting enabled on the Portal Settings page, athenahealth automatically enables the "Prospective Patient Management Admin" setting to ensure the Manage Prospective Patients page is available to practice users.
If your practice is testing this online self-registration workflow, you may receive this error message when clicking Create my account from the identity validation email:
"No record found. This practice only allows current patients to register online. If you're already an existing patient, call the practice."
In the online self-registration workflow, the most likely reasons the system does not recognize an existing patient in athenaOne are as follows:
-
Wrong DOB entered
-
Wrong email address entered
-
Patient does not have an email address on their Quickview
-
Patient was created in athenaOne less than 30 minutes before initiating the portal registration workflow
-
Patient's DOB or email address were updated less than 30 minutes before initiating the portal registration workflow
There is a 30-minute latency period in the patient search function used in the online self-registration workflow, so if the patient was created, or the DOB or email were updated, just before testing, the system hasn't had enough time to refresh the changes. Please wait at least 30 minutes after making those changes before testing the online self-registration workflow.
A family member who is not a patient at your practice can create a Patient Portal (or Patient Information Center) account on behalf of a family member who is a patient at your practice. For example, a father can create a Patient Portal account for his minor child, so that he can access her health information.
Note: If your practice does not allow non-patients to create Patient Portal accounts, this feature is not available to your patients.
If the age of majority for your practice's Patient Portal is 18 years old, a family member can register to access their 19-year-old child's Patient Portal account, but the family member will have billing-only access (instead of the full access they would have if the child was 15 years old).
Instructions for patient's family member
- On the Patient Portal home page, click Sign up today.
- Who will use this account? — Click the Patient's family member option.
Enter information about the patient
- First name — Enter the patient's first name.
- Last name — Enter the patient's last name.
- Date of birth — Select the patient's date of birth.
- Gender — Select the patient's gender.
- Email — Enter the patient's email address.
- Phone — Enter the patient's phone number.
- Is this a mobile phone? — Select Yes or No.
- I'm not a robot — Check the box, enter the CAPTCHA information, and click Verify.
- Click Continue.
Verify your identity
- The Patient Portal will send a temporary passcode to the patient (not to you).
Note: By sending the temporary passcode to the patient, we inform the patient of your request to obtain access to his or her Patient Portal account. By giving you the temporary passcode, the patient consents to your receiving access. - Select how this passcode should be sent: email, call, or text message (these options depend on the patient contact information that is on file with the practice).
- Enter the email address or phone number and then click Send Code.
- Enter the temporary passcode that the patient received by email, phone call, or text, and then click Continue.
Enter your demographic information
- Relationship to patient — Select your relationship to the patient.
- First name — Enter your first name.
- Last name — Enter your last name.
- Email — Enter your email address.
- Date of birth — Select your date of birth.
- Phone — Enter your phone number.
- Is this a mobile phone number? — Select Yes or No.
- Click Continue.
Set your password
- Password — Enter a password that meets the criteria on the right. This password must be 8-20 characters long and must have at least one uppercase letter, one lowercase letter, and one number or symbol.
- Confirm password — Enter your password again.
- Remember this computer to save time resetting your password — If you're using your own computer or a computer that you trust, you can select this option to make it faster to reset your password if you ever need to. If you're using a public or shared computer, do not select this option.
- Click Terms and Conditions and Privacy Policy to read both documents, and then check the box to accept the Terms and Conditions and the Privacy Policy.
- Click Continue.
You are now logged in to your own Patient Portal account, with third-party access to your family member's account.
Patients who have a Patient Portal or Patient Information Center can provide access to family members.
- Log on to your Patient Portal or Patient Information Center account.
- Click the arrow next to your name at the top of the Patient Portal and select Family access settings from the menu.
Note: Patients who do not have access to other patients' Patient Portal accounts do not see the Family access settings option.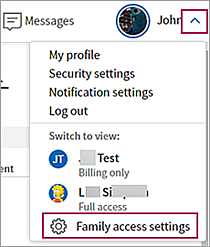
The My profile page appears with the Family Access tab displayed.
- Click Invite Family Member.
- Enter the information about your family member.
- First name — Enter the family member's first name.
- Last name — Enter the family member's last name.
- Relationship to you — Select the family member's relationship to you from the menu.
- Email — Enter the family member's email address.
- Access level — Select Full or Billing only.
A user with billing-only access can see only billing information, not health information, on the Patient Portal or Patient Information Center. - Date of birth — Select the family member's date of birth.
- Phone — Enter the family member's phone number.
- Is this a mobile phone — Select Yes or No.
- Click Invite.
Your family member receives an email invitation to access your Patient Portal or Patient Information Center.
A family member who is a patient at your practice can request access to the Patient Portal (or Patient Information Center) account of another family member who is also a patient.
Note: If your practice does not allow non-patients to create Patient Portal accounts, this feature is not available to your patients.
If the age of majority for your practice's Patient Portal is 18 years old, a family member can access their 18-year-old child's Patient Portal account, but the family member will have billing-only access (instead of the full access they would have if the child was 15 years old).
Note: After a child reaches the age of majority, that child can grant full access to a family member.
Instructions for the patient
- Log on to your Patient Portal account.
- Click the arrow next to your name at the top of the Patient Portal and select Family access settings from the menu.
Note: Patients who do not have access to other patients' Patient Portal accounts do not see the Family access settings option.
The My profile page appears with the Family Access tab displayed.
- Click Add Patient.
- Enter the information about your family member who is also a patient at the practice.
- First name — Enter the patient's first name.
- Last name — Enter the patient's last name.
- Email — Enter the patient's email address. If the patient does not have an email address, select the No Email option.
- Date of birth — Select the patient's date of birth.
- Phone — Enter the patient's phone number.
- Your relationship to patient — Select your relationship to the patient.
- Click Continue.
The Patient Portal sends a temporary passcode to the patient (not to you).
Note: By sending the temporary passcode to the patient, we inform the patient of your request to obtain access to his or her Patient Portal account. By giving you the temporary passcode, the patient consents to your receiving access. - Select how this passcode should be sent: email, call, or text message (these options depend on the patient contact information that is on file with the practice).
- Click Send Code.
- Enter the temporary passcode that the patient received by email, phone call, or text, and then click Continue.
You can now access your family member's information using your own Patient Portal account. The Family Access tab of the My profile page shows this access.
The features on the Patient Information Center include:
- My Health page
- Patients can view, download, and transmit their health record, which includes:
- Patient name
- Demographic information (preferred language, sex, race, ethnicity, date of birth)
- Provider's name and office contact information
- Current and past problem list
- Procedures
- Current medication list and medication history
- Current medication allergy list and medication allergy history
- Height, weight, blood pressure, BMI
- Smoking status
- Care plan fields, including goals and instructions
- Known care team members, including the primary care provider (PCP) of record
Note: The electronic Patient Care Summaries appear on the My Health page.
The Patient Information Center URL is: https://YOURPRACTICEID.portal.athenahealth.com/
(Your practice ID is located in the title bar of your athenaOne window.)
If your practice uses provider groups, add a dash and digit after your practice ID to distinguish the different provider groups:
https://YOURPRACTICEID-1.portal.athenahealth.com/
https://YOURPRACTICEID-2.portal.athenahealth.com/
The Patient Information Center supports the following browsers:
- Microsoft Edge 13.0 and later
- Google Chrome 30.0 and later
- Mozilla Firefox 40 and later
- Apple Safari 11 and later
Patients can sign in to the Patient Information Center using an unsupported browser, but the Patient Information Center displays an alert and prompts the patient to upgrade to a supported browser.
If patients ask for information about these messages, please encourage them to upgrade to a supported browser using the update your browser link displayed in the alerts.
The MIPS and Promoting Interoperability (PI) quality programs require that patients are provided online access to their health information in a timely manner. When you click Done with Check-in, the Patient Portal invitation menu automatically prompts you to register the patient if the patient:
- Has not registered for the Patient Portal.
- Has not previously been given access to the Patient Portal.
If athenaOne prompts you to register a patient for the Patient Portal when you click Done with Check-in, you can either:
- Register the patient for the Patient Portal or Patient Information Center using one of the buttons on the Register Patient or Register Family Member page.
- Indicate that the patient declined to register by clicking the Indicate portal declined reason link in the Contact Details & People with Portal Access section. After you click Indicate portal declined reason, you must select a reason from the list. Reasons include "Does not have an email" and "Does not want a portal account."
The decline reason and date are displayed in the Contact Details & People with Portal Access section for 6 months, and athenaOne does not display the Patient Portal invitation menu for that patient when you click Done with Check-in. After 6 months, athenaOne displays the Patient Portal invitation menu again when you click Done with Check-in for this patient.
Note: To report on this data using the Report Builder, select the Patient Demographics report type and then select the Patient Portal Decline Date and Patient Portal Decline Reason display columns.
If a patient declines to register for the Patient Portal, you can satisfy the portal access measure as follows:
- Click Print Portal URL to print registration instructions from athenaOne and give them to the patient.
or
- Click Provided Registration Instructions to indicate that you gave the patient other instructions outside athenaOne (for example, a brochure that includes registration instructions).
When you use either of these options, athenaOne records your action, which counts towards satisfying the patient access measure for the provider.
The Messages section in the Patient Information Center includes these pages:
- Inbox
- Compose Message
- Sent Messages
- Archived Messages
If providers at your practice are participating in the MIPS or Promoting Interoperability (PI) program, athenahealth enables the secure messaging feature.
With the secure messaging feature, your patients can use the Patient Information Center to send secure messages to their provider, and your practice can respond to patient messages.
To encourage patients to use the secure messaging feature on the Patient Portal and Patient Information Center, messaging prompts appear on the home page and throughout the My Health section.
When patients view their medical information on the My Health tabs of the Patient Portal or Patient Information Center, athenaOne prompts patients to send a message.
Secure messaging is required for MIPS Promoting Interoperability due to the Patient Electronic Access measure specification and certification requirements.
To enable prompts that ask patients whether they have questions after viewing data on the Patient Portal or Patient Information Center, patient messaging must be enabled. If you need additional help meeting the secure messaging measure, athenahealth can enable this feature for you.
Patients whose preferred language is Spanish can display the information on the Patient Information Center in Spanish.
- Laptop computer — Click ¿Prefieres el español? at the top of any page.

- Mobile device — Tap Esp in the upper right corner of the screen on your mobile device.
If a patient chooses Spanish for the Patient Information Center, the language defaults to Spanish the next time the patient visits the Patient Information Center.
To translate the Patient Information Center back to English, a patient can click Prefer English? at the top of any page on a laptop, or tap Eng in the upper right corner of the screen on a mobile device.
Information that is translated into Spanish
All static text on each page of the Patient Information Center is translated into Spanish, including the tabs on the My health (Mi salud) page.

The patient profile options and the tabs on the My profile page are also translated into Spanish.

The options at the bottom of each Patient Information Center page are also translated into Spanish.

When a patient clicks the FAQ (Preguntas Frecuentes) options, the text displayed is in Spanish.
Note: The Terms and Conditions, Privacy Practice, and Website Privacy text is not translated.
Information that is not translated into Spanish
The following information on the Patient Information Center is not translated into Spanish:
- Content of secure messages
- Patient-specific clinical data, such as medications, allergies, vaccines, and Patient Care Summaries
- Practice-specific data, for example, the practice name, provider names, and department names and addresses
- Practice-specific content, for example, custom text that your organization added to the Sign In or Home page of the Patient Information Center
Note: You can translate the custom text and request that the CSC update your Patient Information Center to include the Spanish text. Both the English and Spanish text will appear on the Patient Information Center.
athenaOne automatically sends invitation emails to register for the Patient Information Center:
- When a new patient registers with an email address
- Each time the patient checks in for an appointment, if the patient has not yet set up a password
Patients log in to the Patient Information Center using an email address and password. The email address must match the email address in the Quickview and cannot be shared with any other patient.
When you or a patient change the patient email address, athenaOne sends a notification email to inform the patient of the change and to remind the patient to use the updated email address to log in to the Patient Information Center.
Patients can create and reset their own Patient Information Center passwords and security questions on the Patient Information Center. Your patients can log in to the Patient Information Center using the same credentials on a mobile device.
If the Electronic Patient Care Summary Delivery feature is enabled for your practice, the Patient care summary and patient letter delivery preference field appears on the Quickview, Check-in, and Checkout pages and on the full Patient Registration page.
You can register patients for the Patient Portal or Patient Information Center on the Quickview, Check-in, or Checkout page. You can register patients in the office or send them an invitation email. If you cannot register a patient at this time, you can click Print Portal URL. When the pop-up window appears, click Print and give the printout to the patient.
Patients can access their electronic Patient Care Summary after a visit using the Patient Information Center website.
The Patient Information Center URL is:
https://YOURPRACTICEID.portal.athenahealth.com/
(Your practice ID is located in the title bar of your athenaOne window.)
If your practice uses provider groups, add a dash and digit after your practice ID to distinguish the different provider groups:
https://YOURPRACTICEID-1.portal.athenahealth.com/
https://YOURPRACTICEID-2.portal.athenahealth.com/
In the Letters section of a patient encounter, select the Close and Email Patient option for Patient Care Summary letters to make the Patient Care Summary available for the patient on the Patient Information Center site.