 User Guide — COVID-19 (2019 Novel Coronavirus) Features in athenaOne
athenaCollector + athenaClinicals + athenaCommunicator
athenaOne for Hospitals & Health Systems
This page describes all athenaOne features and workflows related to COVID-19 (2019 novel coronavirus).
Note: This page is organized so that the most recently added features appear at the top of the page.
A reference policy is an insurance package that does not have sequencing (primary, secondary, or tertiary). You can create and use reference policies for unique scenarios in place of a patient's usual insurance policies. For example, if the patient has Medicare Advantage as the primary insurance, but a service rendered requires your organization to bill traditional Medicare, you can add the traditional Medicare package as a reference policy so that your organization can appropriately bill for the services without changing the patient's primary or secondary insurance.
During Scheduling, Edit Appointment, and Check-in — if a patient has an active case policy or reference policy, you'll see a Policy Alert message reminding you to select the appropriate insurance for the appointment.
Note: You can use a reference policy to bill for the COVID-19 vaccination.
To add a reference policy, click Add reference policy to the right of the Insurances heading on the Quickview. You can create as many reference policies for a patient as you need.
After you select the insurance package on the Add Policy page, the Add Reference Policy Details page appears; you configure the reference policy just as you do for a primary or secondary insurance policy (see Add/Update Policy Details).
Note: On the Add Policy page, you must choose a Standard policy (not a Case policy).
After a reference policy is added to the Quickview, users complete charge entry as usual. If needed, they can manually select the reference policy in the Primary payer or Secondary payer field on the Charge Entry page.
In some cases, the athenaOne rules engine automatically updates the insurance to the reference package before claim submission. The rules engine may also split the claim when some charges must be billed to the patient's primary payer and other charges must be billed to the reference insurance policy.
Note: You will see the reference policy billed on the Claim Edit page when these scenarios occur.
A reference insurance package may appear automatically in the Quickview under these circumstances:
- Certain charges need to be billed to more than one primary insurance package. For example, if you enter an office visit that includes a Medicare DME charge, we split the claim so that the office visit is billed to Medicare Part B and the DME charge is billed to Medicare DME. Because only one insurance can be "primary," we store the appropriate Medicare DME insurance as a reference package so that we can access the information for the DME claim.
- The insurance entered for a patient is less accurate than required for submission — for example, if a patient has BCBS-MA coverage and visits a practice in Florida, where the practice selects BCBS-FL. athenahealth rules review the patient's eligibility and member ID to more accurately reflect the patient insurance, and we add a reference package to the patient's Quickview instead of replacing the primary insurance.
If a patient received a vaccination for COVID-19 outside your practice, you can record the vaccine as a historical vaccine on the Vaccines tab of the patient chart. For two-dose vaccines, record separate entries for each dose.
Note: Do not use this procedure if the vaccine is administered at your practice.
- In the patient chart, click the Vaccines chart tab on the left side of the page.
- Click the plus icon
 , and begin typing "covid" in the search bar.
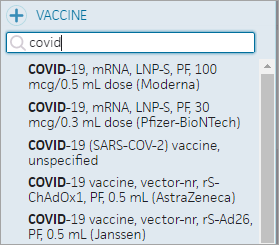
Select the correct vaccine, if you know it
- If you know which vaccine the patient received, select the vaccine from the menu. Here are some of the available COVID-19 vaccine options:
- Moderna — COVID-19, mRNA, LNP-S, PF, 100 mcg/0.5 mL dose (Moderna)
- Pfizer (12 yrs and up) — COVID-19, mRNA, LNP-S, PF, 30 mcg/0.3 mL dose (Pfizer-BioNTech)
- Pfizer (12 yrs and up) — COVID-19, mRNA, LNP-S, PF, 30 mcg/0.3 mL dose, tris-sucrose (Pfizer-BioNTech)
- Pfizer (5 to 11 yrs) — COVID-19, mRNA, LNP-S, PF, 10 mcg/0.2 mL dose, tris-sucrose (Pfizer-BioNTech)
- Pfizer (2 to 4 yrs) — COVID-19, mRNA, LNP-S, PF, 3 mcg/0.2 mL dose, tris-sucrose (Pfizer-BioNTech)
- Janssen (J&J) — COVID-19 vaccine, vector-nr, rS-Ad26, PF, 0.5 mL (Janssen)
- If you do not know which vaccine the patient received, select COVID-19 (SARS-COV-2) vaccine, unspecified from the menu.
Note: If the unknown COVID-19 vaccine was administered outside the U.S., you can select Non-US Vaccine COVID-19, Product Unknown from the menu.
Complete as much information about the vaccine as you can
- Administer date — If you can enter only an approximate date, follow your practice's convention. For example, some practices use 1/1/year to indicate an approximate date.
Note: For vaccines that require two doses, such as the Moderna and Pfizer vaccines, make sure that the Administer date for the second vaccine is after the Administer date for the first vaccine. - Administered by — Enter the location where the patient received the vaccine, that is, the pharmacy name, mass vaccination site, or other practice (for example, CVS or Walgreens).
- Amount/units — You can enter the quantity of the vaccine and then select the unit of measure from the menu (the amount and units are specified in the vaccine name).
- NDC — If you know the NDC information, click the plus icon to search for and select the vaccine's NDC.
- Route — Select the route (how the vaccine was administered), for example, Intramuscular.
- Site — Select the site where the vaccine was administered, for example, Arm, Left Upper or Arm, Right Upper.
- Lot # — If you have this information, enter the lot number of the vaccine.
- Manufacturer — If you selected the Moderna, Pfizer, Janssen, or AstraZeneca vaccine from the list of vaccines, select the appropriate manufacturer from the menu.
Note: If the manufacturer is not listed and you see only the Other (not listed) option in the Manufacturer menu, select Other (not listed). - If you have the following information, enter it in these fields:
- Exp. — Enter the vaccine expiration date.
- VIS Given — Enter the date that VIS information was given to the patient.
- Date on VIS — Enter the date from the vaccine information statement.
- Click Add, or click Add Another to add an additional vaccine to the chart (for example, the second dose of the Pfizer or Moderna vaccine).
Tip: If you accidentally click the Add Another button, you can click outside the form to close the form.
Document adverse reactions to the COVID-19 vaccine
To document any adverse reactions to the COVID-19 vaccine, follow these instructions.
- In the patient chart, click the Allergies chart tab at the left side of the page.
- Click the plus icon , and type "covid" in the search bar.
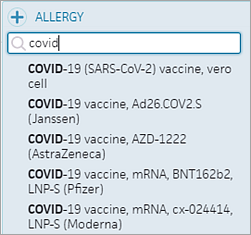
- Select the COVID-19 vaccine that the patient received.
Input fields appear. - Reaction — Select a reaction from the menu.
- Severity — Select the severity of the reaction.
- Onset date — Enter the date of onset.
-
Reaction — Click to add additional reactions, if needed.
-
 — Click to add a free-text note.
 - Click Add.
From the Campaign Builder page, you can run population health campaigns for COVID-19 vaccination appointments. Select Population Health as the Campaign Type and then select one of these campaigns from the menu:
- COVID-19 Vaccination (General Population): 1st Dose
- COVID-19 Vaccination (General Population): 2nd Dose
- COVID-19 Vaccination (High-Risk): 1st Dose
- COVID-19 Vaccination (High-Risk): 2nd Dose
To make these vaccination campaigns available, make sure that the following appointment type reasons are enabled on the Patient Appointment Reasons Settings page. Patients select one of these reasons when they schedule a COVID-19 vaccination appointment on the Patient Portal.
- COVID-19 Vaccine
- COVID-19 Vaccine Initial
- COVID-19 Vaccine Subsequent
To support the reporting of COVID-19 vaccinations to state immunization registries, athenahealth is making modifications to the interfaces that connect athenaOne to some state immunization registries.
Note: Registries require the reporting of doses administered within their jurisdictions only. For information about the reporting of COVID-19 vaccinations to each state immunization registry, see State Immunization Registries on the Success Community.
To meet specific requirements for COVID-19 vaccine administration by the New York State Immunization Information System (NYSIIS), athenaOne interfaces to NYSIIS contain revised HL7 message content.
- Additional COVID-19 vaccine information recorded and sent to NYSIIS.
- Two additional OBX segments sent from athenaOne to NYSIIS.
- First OBX segment indicates that the vaccine pertains to the COVID-19 Public Health Emergency.
- Second OBX segment pertains to the patient's Priority Group for vaccine distribution.
If you practice in New York state, you see the custom field COVID Priority Group NYSIIS (under Additional Information) on the Quickview, Check-in, and Patient Registration pages. To ensure accurate system behavior, do not change the custom field name or its associated drop-down options.
Note: If you practice in New York state and do not see the COVID Priority Group NYSIIS field, contact your CSM.
For more information, see Immunization Registry Interfaces.
To meet specific requirements for COVID-19 vaccine administration by the Ohio Impact Statewide Immunization Information System (ImpactSIIS), athenaOne interfaces to ImpactSIIS contain revised HL7 message content.
- Additional COVID-19 vaccine information recorded and sent to ImpactSIIS
- Additional RXA segment sent from athenaOne to ImpactSIIS
If you practice in Ohio, you see the custom field COVID Priority Group IMPACTSIIS (under Additional Information) on the Quickview, Check-in, and Patient Registration pages. To ensure accurate system behavior, do not change the custom field name or its associated drop-down options.
Note: If you practice in the state of Ohio and do not see the COVID Priority Group IMPACTSIIS field, contact your CSM.
For more information, see Immunization Registry Interfaces.
The Patient Appointment Reasons Settings page includes appointment type reasons for patients to select when they schedule an athenaTelehealth or COVID-19 appointment on the Patient Portal. The reasons specific to COVID-19 are as follows:
- COVID-19 Related
- COVID-19 Related - Telehealth
- COVID-19 Testing
- COVID-19 Vaccine
- COVID-19 Vaccine Initial
- COVID-19 Vaccine J&J
- COVID-19 Vaccine Moderna Initial
- COVID-19 Vaccine Moderna Subsequent
- COVID-19 Vaccine Pfizer Initial
- COVID-19 Vaccine Pfizer Subsequent
- COVID-19 Vaccine Subsequent
The athenaTelehealth appointment type reasons are indicated by the suffix "Telehealth." For example, the Reason menu on the Patient Appointment Reasons Settings page includes these reasons:
- Behavioral Health
- Behavioral Health - Telehealth
- Consult/Referral
- Consult/Referral - Telehealth
- Follow-Up
- Follow-Up - Telehealth
- New Patient
- New Patient - Telehealth
- Problem
- Problem - Telehealth
- Sick Visit
- Sick Visit - Telehealth
The corresponding Description field for the athenaTelehealth appointment type reasons specifies that the patient is scheduling a telehealth appointment. For example, if you select the Behavioral Health - Telehealth option from the Reason menu, the default description reads as follows:
"I would like to have a Telehealth appointment with my provider for Behavioral Health"
The COVID-19 Population Insights reporting package identifies practices with highest rate of confirmed COVID-19 patients and at-risk patient populations (patients at risk for more severe illness), helps your organization understand the patient population's COVID-19 related exposure and risk, and provides patient lists to support patient care during the pandemic.
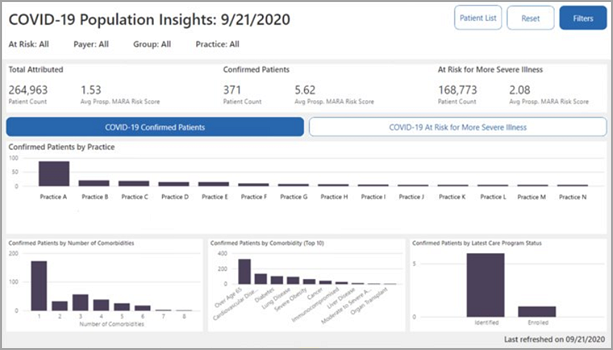
To identify the population of patients at a higher risk for a severe case of COVID-19, athenahealth uses MARA clinical classifications and SNOMED codes mapped to the following conditions and other risk factors (based on the May 2020 CDC guidelines):
- Asthma
- Chronic kidney disease being treated with dialysis
- Chronic lung disease
- Diabetes
- Immunocompromised
- Liver disease of people aged 65 years and older
- Serious heart conditions
- Severe obesity
| Code Set | Code | Description |
| SNOMED | 840533007 | Severe acute respiratory syndrome coronavirus 2 (organism) |
| SNOMED | 840539006 | Disease caused by severe acute respiratory syndrome coronavirus 2 (disorder) |
| ICD-10 | U07.1 | COVID-19 |
See Resource Overview: Population Health Reporting Package on the Success Community for more information, including strategy guides and data reference guides.
Note: You can also see COVID-19 patient population information in the Health Outcome Selection section of the Social Determinants of Health reporting package. This shows you the percentage of patients in a practice that are infected with COVID-19, which lets you see how your organization's SDoH Factor Rating compares to the % of your patient panel with COVID-19.
To help your organization more easily meet CARES Act Provider Relief Fund grant requirements, use the new COVID-19 service type add-on to indicate that a claim is for services related to COVID-19 care.
Note: The COVID-19 service type add-on appears on the Charge Entry and Claim Edit pages for claims created with or without an appointment.
The COVID-19 service type add-on includes these fields:
- Was the patient suspected of having, diagnosed with, or tested for COVID-19 at the time of the encounter?
Select Yes or No to indicate whether the claim is for services related to COVID‑19 care. If you select No, you cannot select answers in the remaining fields. - Does this claim include services related to COVID‑19 testing?
Select Yes or No. - Is the provider or medical group out-of-network with the patient's insurance?
Select Yes or No. You can use the answer to this question in conjunction with the COVID‑19 related patient balance hold to help you meet the CARES Act Provider Relief Fund grant requirements. The selection you make in this field does not affect which claims are held by the COVID-19 related patient balance rule.
Note: For information about the COVID-19 related patient balance rule, see COVID-19 Management: Patient Balance Hold Rules Request on the Success Community.
The athenahealth rules engine uses the information in these fields to determine which COVID-19 related rules should fire on the claim, particularly when the patient is COVID-19 presumptive positive. You may notice a change in hold volume for claims related to COVID-19 care in the future as rules adapt to changing payer requirements and as athenahealth gains more information about COVID-19 federal grant requirements.
To ensure that you are correctly billing for services related to COVID-19, you can use the following display columns and filters in the Report Builder.
Note: These columns and filters map to the questions included in the COVID-19 service type add-on.
- COVID-19 Out of Network — The COVID-19 Out of Network display column and filter display information entered using the Is the provider or medical group out-of-network with the patient's insurance? field of the COVID-19 service type add-on.
- COVID-19 Suspected — The COVID-19 Suspected display column and filter display information from the Was the patient suspected of having, diagnosed with, or tested for COVID-19 at the time of the encounter? field of the COVID-19 service type add-on.
- COVID-19 Testing — The COVID-19 Testing display column and filter display information from the Does this claim include services related to COVID-19 testing? field of the COVID-19 service type add-on.
The COVID-19 display columns and filters are available in the Claim category of these report types in the Report Builder: Appointment, Claim, FCC Activity, Transaction Activity, and Transaction Aging.
You can use the Claim report type in Report Builder to report on the place of service code that athenaOne used to bill to insurance or will use to bill insurance. This gives you insight into how the claim is billed, particularly if the rules engine changes the place of service code during claim submission.
Primary bill place of service and Secondary bill place of service are available as display columns and filters:
- Primary bill place of service — Displays the place of service code athenaOne used to bill or will use to bill the primary insurance
- Secondary bill place of service — Displays the place of service code athenaOne used to bill or will use to bill the secondary insurance
There are four professionally recorded instructional phone messages that you can send with ReminderCall that inform patients about alternative virtual visit options. All these messages are available in both English and Spanish. After you map the message to an appointment type on the Instructional Messages Mappings page, you can select the messages to send on the Instructional Messages page.
Patients who use the Patient Portal can also find these instructions in the Upcoming Appointment Details section of the Patient Portal.
Note: These messages are available for ReminderCall phone calls only.
| General telehealth option with instructions (sans COVID-19) |
We are now offering online appointments as an option for patients, allowing you to attend your appointment without the need to come into our office. Your visit is currently scheduled as an online appointment. To join, you will need access to a smartphone, tablet, or computer with a stable Internet connection. Please join 10-15 minutes prior to your session. Have your updated insurance and payment information available.
If you have an urgent need for an in-person visit call us directly to reschedule you for an in-office appointment or determine next steps for your care. |
| General telehealth option with instructions | Due to COVID-19 and for the safety of our patients and staff, we are now offering online appointments as an option for patients, allowing you to attend your appointment without the need to come into our office. Your visit is currently scheduled as an online appointment. To join, you will need access to a smartphone, tablet, or computer with a stable Internet connection. Please join 10-15 minutes prior to your session. Have your updated insurance and payment information available. If you have an urgent need for an in-person visit or are experiencing possible COVID-19 symptoms including a cough, fever, or difficulty breathing, call us directly to reschedule you for an in-office appointment or determine next steps for your care. |
| Telehealth encouraged with in-office instructions |
We're now offering online appointments allowing you to see a practitioner without the need to come into our office. We encourage you to consider this option for the safety of our patients and staff. To complete an online appointment, you will need access to a smartphone, tablet, or computer with an Internet connection. If you are scheduled for an in-office visit and wish to reschedule using our online option, please call us directly.
If you need to come into our office, please wear a mask and have caregivers stay in your vehicle for the duration of your visit. If you are experiencing possible COVID-19 symptoms including a cough, fever, or difficulty breathing, contact us immediately and we will determine next steps. |
| Telehealth only with reschedule | Due to COVID-19 and for the safety of our patients and staff, we are holding all appointments as online appointments until further notice. To reschedule your in-office visit as an online appointment, please contact our office directly. Our staff will be happy to coordinate your new appointment and discuss payment and further instructions. If you are currently experiencing possible COVID-19 symptoms including a cough, fever, or difficulty breathing, please contact us immediately and we will determine next steps for your care. |
Requirements for use
Before you can use this feature, you must have ReminderCall enabled. Instructional messages can be mapped to multiple appointment types, but a single appointment type can have only one instructional message mapped to it.
- ReminderCall uses the default practice-wide instructional message unless you set up individual exceptions by department or by provider.
- If there are no instructional message exceptions at the provider level, ReminderCall uses the instructional message mappings configured for the department that includes the provider.
- If a provider is included in more than one department and has no custom instructional message mappings, ReminderCall uses the mappings configured for each department that includes this provider.
User access and permissions
To view the Instructional Message Mapping page (read-only access), you must have the Patient Messaging: ReminderCall permission. To edit the page, you must have one of these permissions:
- Communicator Admin
- Communicator Admin: Instructional Message Mapping
- Display the Instructional Message Mapping page:
On the Main Menu, click the Settings icon . Under ADMIN, click Communicator. In the Task Bar, under PRACTICE LINKS — Greetings and Instructional Messages, click Instructional Message Mapping.
Practices with athenaCollector but not athenaCommunicator access the Instructional Message Mapping page, from Settings, Schedule > Communicator > Instructional Message Mapping. - Filter by — Select Provider or Department. In the Filter by provider or department list, check the box beside each provider or department whose instructions for appointments you want to change.
- Click Filter.
- Click Edit to make changes one by one.
- Under Custom Instructional Messages by Appointment Type, select Use custom settings or Create custom settings, depending on whether custom messages have already been set up for the provider or department.
- From the Map new instructional message drop-down list, select one of these new messages:
- 1. General telehealth optional with instructions sans COVID-19
- 2. General telehealth optional with instructions
- 3. Telehealth encouraged with in-office instructions
- 4. Telehealth only with reschedule
- In the Filter list, select the appointments types that you want to use this new message.
- Click Save.
You can use the Patient Population page to identify patient populations at higher risk for COVID-19 (COVID-19 AT RISK FOR MORE SEVERE ILLNESS) and populations with confirmed cases of COVID-19 (COVID-19 CONFIRMED CASES).
COVID-19 AT RISK FOR MORE SEVERE ILLNESS
This population identifies patients, based on the CDC guidelines, at higher risk for severe illness from COVID-19.
athenahealth uses MARA clinical classifications and SNOMED codes mapped to the following conditions and other risk factors based on CDC guidelines to identify this population:
- Asthma
- Chronic kidney disease being treated with dialysis
- Chronic lung disease
- Diabetes
- Immunocompromised
- Liver disease
- People aged 65 years and older
- Serious heart conditions
- Severe obesity
COVID-19 CONFIRMED CASES
| Code Set | Code | Description |
| SNOMED | 840533007 | Severe acute respiratory syndrome coronavirus 2 |
| SNOMED | 840539006 | Disease caused by severe acute respiratory syndrome coronavirus 2 (disorder) |
| ICD-10 | U07.1 | COVID-19 |
- Display the Patient Population page: On the Main Menu, click Patients and select Patient Population. The Population tab is selected by default.
To filter by PCP, Payer, Quality Test, or Medicare Data Provider
- Click the Add Filter icon
 at the top of the page.
 - Select an option, and then click Apply.
To filter by the filter sets
- Scroll to a filter set of interest, for example, Care Management.
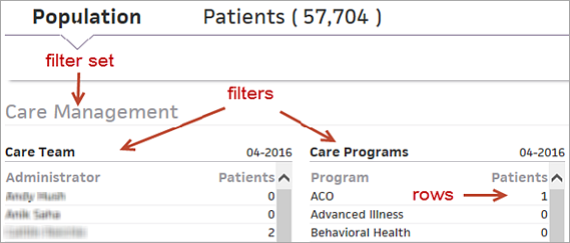
- Click a row of the filter of interest. For example, for the Care Programs filter in the Care Management filter set, click the ACO row to filter by patients with ACO.
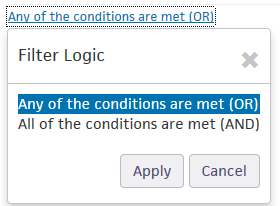
- You can select additional filter rows, select (AND) or any (OR) of these filters. The default is OR. You can click Any of the conditions are met (OR) to display the filter logic options.
Select All of the conditions are met (AND) to filter for all selected filter rows. - Click Apply.
- Apply additional filters as desired.
The page is recalculated to show all metrics related to the filtered set of patients.
If your organization uses care plan templates, you can use the templated information available in the COVID-19 Comprehensive care plan to help you monitor and educate your patients about COVID-19, based on the latest CDC guidance. To access the patient care plan, you must have the Clinicals: Edit Chart role or permission.
You can filter for the Telehealth Distant Site Visit appointment type class to report on COVID-19 claim activity specific to telemedicine services your organization rendered. You can gain deeper insight into shifts in patient care and shifts in the services your organization rendered and billed during the COVID-19 pandemic.
You can use the Appointment Type Class filter and display column in the following reports:
- Activity Wizard report (Advanced View) — Available as a filter
- A/R Aging Wizard report (Advanced View) — Available as a filter
- Transaction Aging report type in Report Builder — Available as a display column and filter
You can add Telehealth Distant Site Visit as the appointment type so that you can differentiate in-office visits from telehealth visits when you schedule appointments.
- Display the Appointment
Types page: On the Main Menu, click Settings >Schedule. In the left menu,under Practice Links — Scheduling, click Appointment
Types.
- Click Add new to create a new appointment type.
The Add Appointment Types section appears.
Note: Click edit next to an existing appointment type to display the Edit Appointment Types section. - Appointment type class — Select Telehealth Distant Site Visit.
- Add or edit information fields as necessary.
- Click Save, or click Save and add another to continue adding new appointment types.
You can run the COVID-19 High Risk Patients report in the Report Library to return data on patients who are at higher risk of more severe illness if they contract COVID-19. This data is aggregated from your practice's claim data, SNOMED codes, athenaOne data, and the latest CDC guidelines.
For more information, see CDC guidelines for Groups at Higher Risk for Severe Illness.
User access and permissions
You must have the "Report: Custom Reports Activate" permission to activate the report. You must have access to the Other tab of the Report Library to run the report.
- On the Main Menu, click Settings >Implementation. In the left menu, under Practice Links — Reports, click Activate
Reports.
- Check the box next to COVID-19 High Risk Patients Report.
- Click Save.
- Display the Report Library: On the Main Menu, click Reports. Under General, click Report Library.
- Click the Other tab.
- Click run next to COVID-19 High Risk Patients Report.
- From date - To date — Enter the start and end dates for the report, or select a date range from the menu.
- Date Range Filter Type — Select Last Appointment or Next Appointment.
- Provider Group — Select All or Selected.
- Usual Provider — Select All or Selected.
- Report Format — Select the format for your report results.
- HTML table — Display the report results on your screen.
- Text (tab-delimited) — Export the report results to a .csv file in tab-delimited format.
- Text (comma-delimited) — Export the report results to a .csv file in comma-delimited format.
- Report Options — Select report options.
- Suppress Column Headings — Select this option to remove column headings from the report results.
- Suppress Report Name — Select this option to remove the report name from the report results.
- Show Filter Criteria — Select this option to include your selected filter criteria in the report results.
- Run Offline (will appear in your Report Inbox tomorrow morning) — Select this option for very long reports. Reports that are run offline appear in your Report Inbox the morning after the request.
- Click Run Report.
You can use the Clinicals and Clinicals — Document Actions report types to run comprehensive reports for orders and results that your organization has received. This lets you closely monitor and follow up on COVID-19 test results that aren't tied to orders.
Note: You must have access to the Clinical report types in the Report Builder to use these features.
Clinicals report type
The Lab Result Document ID filter and display column shows the lab result document ID number. When you set the Lab Result Document ID filter, enter the range of the result document IDs.
The Tied to Order Y/N display column Indicates whether the lab result is tied to an order.
Clinicals — Document Actions report type
This report type now includes data for documents without orders in the Order Type Group display column.
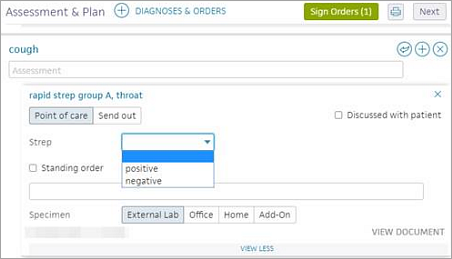
The following global office order types are available for COVID-19 point-of-care tests:
- Global office order types, each with a single positive/negative result type:
- Rapid SARS CoV 2 IgG + IgM Ab, QL IA, serum or plasma
- Rapid SARS CoV 2 Ag, QL IA, respiratory specimen
- COVID-19 RNA, QL, rRT-PCR, respiratory specimen
- Global office order type with one positive/negative result type for SARS CoV 2 IgG and one positive/negative result type for SARS CoV 2 IgM:
- SARS CoV 2 IgG + IgM Ab, QL IA, serum or plasma or blood
Note: Since one of the tests for COVID-19 is a whole blood test, the order type includes the phrase "or blood."
You must add the COVID-19 test orders to your practice before you can use them.
- Display the
Office Order Types page: On the Main Menu, click Settings > Clinicals. In the left menu,under Practice Links — Order Configuration, click Office Order Types.
- Click Add new.
The input fields appear. - Order type — Search for the test or lab that is performed in house. Enter the first few characters of the order type, and then select it from the matching list.
- Department — Click Select all or, if this office order type is department-specific, select the departments that will use this office order type.
- Default to point-of-care test — Select Yes to set N/A (Point-of-care test) as the default option in the Diagnosis and Order Details form when you order this test. This option allows you to enter the results of the in-house test in the Results section.
- Result type — Select the result type: Analyte Table, Dropdown/Freetext List, or Dropdown/Freetext Grid.
If you select the Analyte Table option
- Select one or more Show options to display those fields in the results by default.
- Show status
- Show abnormal flag
- Show reference range
- Show units
- Show notes
- Results — Fill in the fields. (Click the plus icon to add additional rows to the table.)
- Analyte
- Reference range
- Units
Note: When you specify values for the Reference range and Units fields, athenaOne automatically selects the corresponding Show options so that these fields appear by default.
If you select the Dropdown/Freetext List option
- Name — Enter or select the name of the result type.
- Type — Select the type of result:
- Pos/Neg — Provides a drop-down menu in the results screen so that you can indicate a positive or negative result.
- Normal/Abnormal — Provides a drop-down menu in the results screen so that you can indicate a normal or abnormal result.
- Free Text — Assumes that the result is entered in the Result Notes field as free text. No other specific result field is shown.
- Custom Dropdown
— In the Options field, enter the name of the first menu option. Click the plus icon to add additional options to the list.
Note: With custom lists, it may be useful to include a free-text field in the template for any information not documented as part of the normal result parameters.
Click the plus icon ![]() to add additional items to the list.
to add additional items to the list.
If you select the Dropdown/Freetext Grid option
- Number of Columns — Specify the number of columns in the grid and select the Header Column? option, if appropriate.
- Number of Rows — Specify the number of rows in the grid and select the Header Row? option, if appropriate.
- Split Grid? — Select this option to display each column and row entry separately (not in a grid).
- If you selected the Header Column? option or Header Row? option, enter the header values in the yellow free-text fields.
- For each field in the grid, select the result type to display (Pos/Neg, Normal/Abnormal, Free Text, or Dropdown).
Complete the office order type
- Interpretation template — You can select a test interpretation template if your practice has created these templates on the Test Interpretation Templates page.
- Click Preview to see the configured office order type before you save it.
- Click Save. The new office order type appears in the list below.
After you add the COVID-19 global office orders to your practice, you can create a COVID-19 order as you would for any other point-of-care test.
- In the Exam stage of the patient encounter, click A/P in the navigation bar.
- You can enter an assessment in the assessment note field. When you begin to enter text, the star icon
 appears at the right. You can click the star icon to save your text as a macro for future use.
Note: Macros created in this field cannot exceed 4000 characters.
If the note needs to be hidden from patients and family members or caretakers who have access to their health information, click to mark the note confidential. See User Guide — Lock Patient Data for more information.
 - Click the plus icon next to Diagnoses & Orders.
Diagnoses and orders you select are added to the D&O cart. - Search for and select the point-of-care test.
- Click the new point-of-care test order to open the form and expand the details.
- If the in-house facility needs additional information to perform the test, ask-on-order entry (AOE) questions appear. Enter responses to the AOE questions. If view more appears at the bottom of the expanded view of the order, click View More to answer additional AOE questions. (See also: AOE Question Management)
Important: If you later reopen the point-of-care test order, modify the answer to an AOE question, and then reapprove the order, a new order will be created. - Enter the results of the test in the point-of-care test template, or sign the order to create a Clinical task. (You can also enter test results on the Results tab of the patient chart.)
Note: If the point-of-care test template is marked as "Discussed with patient," the order is automatically closed and the result is tied to the order when it is signed.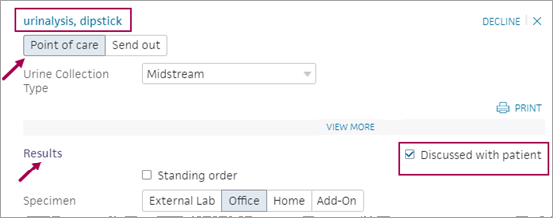
You can select COVID-19 as the reason for not collecting a copay from your patient at the time of service (TOS). You can see this option in the TOS Collection section of the Check-in stage.
This feature allows you to better track uncollected copays related to COVID-19 in front desk reports, such as the Time of Service Collections Report.
You can use the athenaOne app to initiate a FaceTime call with patients. This feature is intended to be a temporary solution to meet the increased demand for telehealth options during the COVID-19 crisis.
In response to the COVID-19 crisis, we're adding the ability to initiate a FaceTime video call with a patient from the patient chart. You can offer this option in place of an in-person encounter to help minimize the risk of exposure to COVID-19.
While this functionality isn't a full-scale telehealth offering, it can help providers quickly facilitate face-to-face interactions with patients during the COVID-19 crisis. If you prefer a full telehealth solution, please explore our available Marketplace offerings.
This feature is intended to be a temporary solution to meet the increased demand for telehealth options during the COVID-19 crisis. It complies with the relaxed HIPAA Rules that the HHS Office for Civil Rights (OCR) announced on March 17, 2020.
Requirements
You must have both the athenaOne app and athenaClinicals, and your mobile device must use iOS 12 or newer.
Some larger organizations require additional setup. Please contact your IT resource for more information. IT resources can contact your organization's Customer Success Manager (CSM) to enable the athenaOne app for your practice.
Only providers, such as physicians (MD, DO) and advanced practitioners (NP, PA), can use the athenaOne app.
To use the athenaOne app, you must:
- Be configured as a provider in athenaOne
- Have Chart Edit permissions
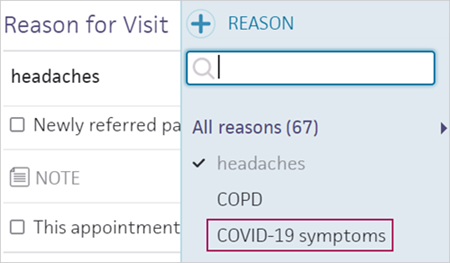
- On the Main Menu, click Settings > Clinicals. In the left menu,under Practice Links — History/Intake, click Reasons for Visit.
- Click Add new. The Input fields appear.
- Click the Plus icon to add a reason for visit.
- Select COVID-19 symptoms.
- After you select COVID-19 symptoms as the reason for visit, you can take the following actions in the Exam stage of the encounter:
- HPI section — Select the COVID-19 Symptoms template to begin documenting symptoms.
- PE section — Select the COVID-19 Exam template.
Note: This template is based on the existing athenahealth Upper Respiratory PE template.
You can document information related to COVID-19 as part of the patient's social history. In the Social History section of the Intake checklist and on the History tab of the patient chart, click the Public Health and Travel category to view global social history questions that include questions related to COVID-19.
In addition, you can:
-
Use the Social History Global Templates page to opt in and out of specific global social history questions related to COVID-19.
-
Use the Configure Social History page to add custom social history questions related to COVID-19 to the Local Templates category in the Social History section.
-
Use the Patient Portal Health Forms page to add global and local (custom) social history questions related to COVID-19 to patient self check-in.
-
Use the Custom Fields page to create custom fields for capturing any data related to COVID-19 during appointment check-in or patient registration.
You can run the COVID-19 Orders report or the COVID-19 Orders Cross-Practice report in the Report Library to return data on COVID-19 testing orders created since January 1, 2020.
Orders appear in the report regardless of whether there is an associated result. athenahealth updates the report continuously to ensure it returns data for all potential COVID-19 orders in the absence of structured LOINC and SNOMED codes.
User access and permissions
- To run the report — You must have access to the Clinicals tab of the Report Library.
- To activate the report — You must have the "Report: Custom Reports Activate" permission.
-
To run the cross-practice version of the COVID-19 Orders report — You must also have the ATHENACBO: Cross Practice Reporting permission.
- On the Main Menu, click Settings >Implementation. In the left menu, under Practice Links — Reports, click Activate
Reports.
- Check the box next to COVID-19 Orders Report or COVID-19 Orders Cross-Practice Report.
- Click Save.
If you have access to multiple practices, you can enable and run the cross-practice version of the COVID-19 Orders report. The report results include the same columns
- Display the Report Library: On the Main Menu, click Reports. Under General, click Report Library.
- Click the Clinicals tab.
- Click run next to COVID-19 Orders Report or COVID-19 Orders Report Cross-Practice in the Standard Reports section of the tab.
-
Specify the start and end dates, or select a date range from the menu, for at least one of the three date range fields. Any date range filter that is left blank will Show All.
- Created Date Range — Creation dates for the orders or order results, depending on the option you select using the Show me... field.
- If you select All Orders with or without Results or Orders with Results only, the Created Date Range field specifies the creation dates for orders.
- If you select All Results with or without Orders, the Created Date Range field specifies the creation dates for order results
-
Observation Date Range
- Specimen Collection Date Range
- Created Date Range — Creation dates for the orders or order results, depending on the option you select using the Show me... field.
- Show me... — Select the order and result data that you want to include in the report.
- All Orders with or without Results — Include data for all COVID-19 test orders.
- Orders with Results only — Include data only for COVID-19 test orders that have results.
- All Results with or without Orders — Include data for all COVID-19 test results.
- Department — To report on COVID-19 orders for specific departments only, click Selected and then select the departments to include in the report.
- If the Show me... field is set to All Results with or without Orders, the report displays the results associated with the selected departments.
- If the Show me... field is set to All Orders with or without Results or Orders with Results only, the report displays the orders associated with the selected departments.
- Provider Group — To report on COVID-19 orders for specific provider groups only, click Selected and then select the provider groups to include in the report.
- If the Show me... field is set to All Results with or without Orders, the report displays the results associated with the selected provider groups.
- If the Show me... field is set to All Orders with or without Results or Orders with Results only, the report displays the orders associated with the selected provider groups.
- Medical Group — To report on COVID-19 orders for specific medical groups only, click Selected and then select the medical groups to include in the report.
- If the Show me... field is set to All Results with or without Orders, the report displays the results associated with the selected medical groups.
- If the Show me... field is set to All Orders with or without Results or Orders with Results only, the report displays the orders associated with the selected medical groups.
- Document Status — To report on COVID-19 orders or order results in specific document statuses only (for example, result documents in CLOSED or SUBMITTED status), click Selected and then select the statuses of the documents to include in the report. The document statuses you select apply to the orders themselves or to order results, depending on the option you select using the Show me... field.
- If you select All Orders with or without Results or Orders with Results only, the Document Status field specifies the status of the order documents.
- If you select All Results with or without Orders, the Document Status field specifies the status of the result documents.
- Report Format — Select the format for your report results.
- HTML table — Display the report results on your screen.
- Text (tab-delimited) — Export the report results to a .csv file in tab-delimited format.
- Text (comma-delimited) — Export the report results to a .csv file in comma-delimited format.
- Report Options — Select report options.
- Suppress Column Headings — Select this option to remove column headings from the report results.
- Suppress Report Name — Select this option to remove the report name from the report results.
- Show Filter Criteria — Select this option to include your selected filter criteria in the report results.
- Run Offline (will appear in your Report Inbox tomorrow morning) — Select this option for very long reports. Reports that are run offline appear in your Report Inbox the morning after the request.
- Click Run Report.